Installation And Operation Instructions - Home :: TPS Thermal Controls
Installation And Operation Instructions - Home :: TPS Thermal Controls
Installation And Operation Instructions - Home :: TPS Thermal Controls

Create successful ePaper yourself
Turn your PDF publications into a flip-book with our unique Google optimized e-Paper software.
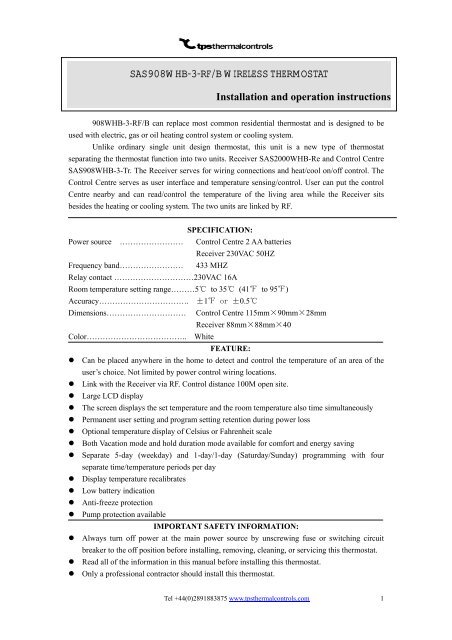
• All wiring must conform to local and national building and electrical codes and ordinances.• This thermostat has a removable fuse to protect the system from damage. If system is notoperating properly, check wiring and replace fuse if necessary.• Use this thermostat only as described in this manual.RF ADDRESS CODE SETTINGIf there is another user nearby, e.g. in the next house, your receiver may be fault triggered bytheir transmitter. You may select a different RF address code to prevent this. Receivers can onlyrespond to RF coding with the same address code setting as its own address code. If you want tochange the RF address to avoid miss-triggered by other user, you should adjust address code ofboth Receiver and the Control Centre.1. To adjust address code of Receiver, simply push up one or more of the 8 dip switch levers.2. To adjust address code of Control Centre, open the housing of the Control Center. See installthe Control Centre. According to the modified address code of Receiver, adjust the addresscode of Control Centre to the same address of Receiver by pushing up the 8 dip switch levers.Caution:1. Address code of Control Centre must be the same as address code of Receiver.2. Disconnect AC power and remove batteries prior to adjusting address code.Address code of Control CentreAddress code of ReceiverFigure 1 Figure 2MOUNTING THE RECEIVERMounting the Receiver onto the optional wall box (See Figure 3)1. Remove the front cover of the Receiver 5. Connect the wires-See wiring diagram2. Mark the holes position for the wall box 6. Push on the wires in the wall box.3. Drill two holes and insert the plastic 7. Securely fasten the Receiver to the wallanchors carefully into the holes until they box with the two screws.are flush with the wall.8. Replace the front cover and installation is4. Push the wires into the wall box and completedfasten the wall box onto the wall.Tel +44(0)2891883875 www.tpsthermalcontrols.com 2
In Wall BoxReceiver BaseScrewFront CoverFigure 3WIRING DIAGRAMNLCOM NCNONLLHeat OnHeat Off123451 2 34 5For Volt Free ApplicationThe unit still requires a 230V feedFor 230VAC ApplicationFigure 4INSTALL THE CONTROL CENTREScrew for mounting thermostat to wallBaseControl panelFixing screwFigure 51. Remove 2 screws from the bottom ofthermostat. (See Figure 5) Gently pull thecontrol panel straight off the base. Forcing orprying on the thermostat will cause damageto the unit.2. Push power base into wall.3. Using two mounting screws mount the powerbase to the wall. Place a level against bottomof base, adjust until level, and then tightenscrews. (Leveling is for appearance only andwill not affect thermostat operation.)4. Replace control panel on the power baseand fix power base and control panel byremoved two screws in item 1.Tel +44(0)2891883875 www.tpsthermalcontrols.com 3
SWITCH AND LED DESCRIPTION OF RECEIVERFigure 8RXD ON POWERLED LED LEDONOFFLED INDICATIORSPOWER SWITCHPOWER SWITCH: When there is no demand toturn on the heating/cooling device, it is recommendedto turn the power switch to the off position.LED INDICATOR:1. Red LED turns on as long as there is power to theunit2. Green LED turns on as long as theheating/cooling device is energized.3. Yellow LED flashes as long as there are anysignals received from the Control Centre.CHECK THERMOSTAT OPERATIONThe unit will be controlled via air sensor in the Control Centre and the Control Centre will determineto activate/deactivate heating system by comparing set temperature with room temperature. Press ▲ toadjust Control Centre setting above room temperature 1℃ in fast heating mode or 3℃ in slow heatingmode, See configuration menu item 5. The Control Centre will emit signals to the Receiver asking to turnon the heating/cooling device. Yellow LED on the Receiver flashes means Receiver has received thesignals. Green LED turns on means heating/cooling device are energized. Press ▼ to adjust ControlCentre setting below room temperature. The Control Centre will emit signals to the Receiver asking toturn off the heating/cooling device. Yellow LED on the Receiver flashes means Receiver has received thesignals. Green LED turns off means heating/cooling device are deactivated.OPERATION1. Configuration MenuThe configuration menu allows you to set certain thermostat operating characteristics to your systemor personal requirements. Shortly press button 1 to make sure the thermostat is in anti-freeze mode.Hold button 3 for 3 seconds to enter the configuration menu. The display will show the first item in theconfiguration menu. Press button 3 to shift to the next menu item. Use ▲、▼to select. To exit themenu , press button 1 revert to the anti-freeze mode . Press button 4 revert to the program operation.If no buttons are pressed within 20 second the thermostat will exit the menu. To revert to factory defaultsetting , push ▲、▼ button in a same time for 3 seconds. Display will show “DEF” blinking 3 times andreturn to Menu item 1 indicates all the configuration setting has reverted to factory default setting.Step Press buttons Displayed(factory default) Press▲、▼to select Descriptions1 3 01 (0) -3 --- +3 Select temperature display adjustment higher orlower2 3 02 (35℃) 18℃(64℉)—35℃(95℉) Select maximum setting temperature for heating3 3 03 (5℃) 5℃(41℉)—20℃(68℉) Select minimum setting temperature limitation4 3 04 (℃) ℃/℉ Select temperature display to℃ or ℉5 3 05 (FA) FA/SL Select fast heating or slow heating6 3 06 (PP) PP/OO Select pump protection PPCancel pump protection OO7 Press button 4 revert to the program operationTel +44(0)2891883875 www.tpsthermalcontrols.com 5
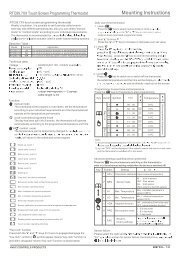
1) Select temperature recalibrates Adjustment 3 LO to 3 HI –You can adjust the room temperature display up to 3 higher or lower. Your thermostat was accuratelycalibrated at the factory but you have the option to change the display temperature to match your previousthermostat. The current or adjusted room temperature will be displayed on the right side of the display.2) Select maximum temperature set pointThis feature provides a maximum set point temperature f. The default setting is 35℃ (95℉), It canbe changed between 18℃ (64℉) to 35℃ (95℉)3) Select minimum temperature set point.This feature provides a minimum set point temperature. The default setting is 5℃ (41℉), It can bechanged between 5℃ (41℉) to 20℃ (68℉)4) Select ℉ or ℃ readout.Changes the display readout to Centigrade or Fahrenheit as required5) Select fast heating or slow heatingSelect FA to start heating immediately when the set point is 1℃ above the room temperature. SelectSL to start heating only when the set point is 3 ℃ above the room temperature.6) Select pump protection modeFor hot water installations, it is recommended to activate the pump at least 15 second every 24 hoursin order to avoid any seizing. Select PP will activate pump protection mode. Select OO will cancel thefunction. When thermostat is activating the pump, ○15 in the display will blink.2. Manual <strong>Operation</strong>1) On/Anti-freezing modeYou can press power button 1 to activate the anti-freezing mode. The unit only displays Clock time,Weekday and Room temperature. The default set temperature for anti-freezing mode is 5℃. Duringanti-freezing mode, if room temperature is below 5℃, the unit will activate the heating system till roomtemperature reaches 9℃. For hot water installations, if PP had been selected (See Configuration menuitem 6), the unit will activate the pump at least 15 seconds every 24 hours in order to avoid any seizing.Press power button 1 again will terminate the anti-freezing mode and return to normal operation mode.2) Program operation and Hold temperature operationMomentarily press 4 shift between program operation and hold temperature operation. Progrunning shows when thermostat is in program operation. Thermostat controls the heating system bypresetting program. See Planning your program section. Hold shows when thermostat is in holdtemperature operation. The thermostat will hold the room temperature at the selected setting3) Temperature overrideDuring program operation, Press ▲、▼ until the temperature you want is displayed. The thermostat willoverride the current programming and keep the room temperature at the selected temperature until the nextprogram period begins. Then the thermostat will automatically revert to the program.4) Vacation Temperature holdContinue pressing button 3 over 3 seconds until display will show Vacation indicates you have nowentered into vacation hold, Use time key 2to select the number of the days (from 1 to 99 days) duringyour vacation.,you can use ▲、▼to adjust the temperature during your holiday. Push button 4 to revertto program operation.。5) Reset operationIf the display is abnormal, press the Reset button by using a fine probe such as a straightened paper6
clip to gently push the Rest button. This will reset the thermostat.3. Set current day and time1) Press 2 button. The display will show the hour flashing.2) Press and hold either ▲、▼ until you reach the correct hour and AM/PM designation.(AM begins atnight, PM begins at noon)3) Press 2 button once again. The display will only show minutes flashing4) Press and hold either ▲、▼ until you reach the correct minutes5) Press 2 button once again. The display will show the day of the week flashing.6) Press ▲、▼ until you reach the correct day of the weekPress button 4 once. The display will show the correct day of the week and the time. If no keysare pressed within 20 seconds, the thermostat will revert to program operation.4. Planning your programLook at the factory preprogrammed times and temperatures shown in the sample schedule. If thisprogram will suit your needs, simply press the 4 button to begin running the factory preset program.If you want to change the preprogrammed time and temperature, follow these steps.Determine the times period and temperature for your program. You must program four periods foreach day. You can choose heating temperature and start time independently. (for example, you may select5:00 AM and 70℉ as the weekday 1 st period heating start time and temperature and also choose 7:00 AMand 76℉ and the weekday 1 st period cooling start time and temperature)Use the table to plan your program time periods and the temperatures you want during each period. Fill inthe complete table to have a record of your programHeating Schedule Plan (Factory default program setting)Period Weekdays (5 day) Saturday SundayStart time Temperature Start time Temperature Start time TemperatureHeat6:00 AM 21°℃ 6:00 AM 21°℃ 6:00 AM 21°℃8:00 AM 16.5℃ 8:00 AM 16.5℃ 8:00 AM 16.5℃5:00 PM 21°℃ 5:00 PM 21°℃ 5:00 PM 21°℃10:00 PM 16.5℃ 10:00 PM 16.5℃ 10:00 PM 16.5℃Enter Heating Program1). Press 3 once. PRGM SETTING will display. “MO TU WE TH FR” (indicating weekdayprogram) will appear in the display. Also be displayed are the currently programmed start times for the1st heating period and the currently programmed temperature (flashing), icon indicates 1 stprogram period (Get up) setting。2). Press 2 to set the programmed time or programmed temperature ,Press 2 once (theprogrammed temperature will flash) ,Press ▲、▼ to change the displayed temperature to yourselected temperature for the 1st heating program period.7
3). Press 2 once (the programmed time will flash). Press ▲、▼ until your selected time appears.The time will change in 15-minute increments. When your selected time is displayed, press TIMEagain to return to the change temperature mode.。4). Press 3 once, icon 2 nd program period(Go out)display, he currently programmedstart time and set point temperature for the 2nd heating program period will appear5). Repeat steps 3 and 4 to select the start time and heating temperature for the 2nd heating programperiod.6). Repeat steps 3 through 5 for the 3rd and 4th heating program periods7). Press 3 once. “SA” (indicating Saturday program) will appear in the display, along with thestart time for the 1st heating period and the currently programmed temperature.8). Repeat steps 3 through 7 to complete Saturday heating programming.9). Press 3 once to change to SU (Sunday) heating programming and repeat steps 3 through 7 tocomplete Sunday programming.10). When you have completed entering your heating program, press 4.REVERT TO FACTORY DEFAULT PROGRAM SETTINGPress 3 button enter into program setting. Press ▲、▼ at the same time for 3 seconds. Display willshow DEF blinking for 3 times and back to program setting. Press the 4 button to begin running thefactory preset program. If no keys are pressed within 20 sec, the thermostat will revert to programoperation.CHECK YOUR PROGRAMMINGFollow these steps to check your thermostat programming one final time before beginning thermostatoperation.1. Press button 3 to view the 1st weekday heating period time and temperature. Each time you pressbutton 3, the next heating period time and temperature will be displayed in sequence for weekday,then Saturday and Sunday program periods (you may change any time or temperature during thisprocedure).Press button 4 to begin program operation.CUSTOMER ASSISTANCEAfter reading this guide, if you have any question about the operation of your thermostat, please contactyour supplier8