Create successful ePaper yourself
Turn your PDF publications into a flip-book with our unique Google optimized e-Paper software.
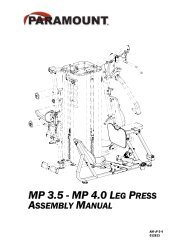
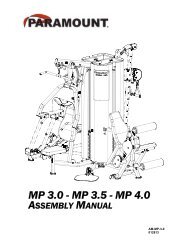
MACHINE DISASSEMBLY<br />
If you need to disassemble your machine for any reason (i.e. maneuver the machine through small<br />
doorway during installation), the diagram on the following page will show you the frame clamping<br />
locations.<br />
You will need the following tools:<br />
•Ratchet (1/2” drive, minimum)<br />
•1-7/16” Socket (1/2” drive, minimum)<br />
•6” Extension (1/2” drive, minimum)<br />
•1-1/16” Wrench (or socket)<br />
•7/16” Wrench (for shroud removal)<br />
•3/8” Hex Bit for 1/2” Drive Ratchet<br />
•5/16” Hex Bit or allen wrench (balance bar removal)<br />
DISASSEMBLY STEPS:<br />
1. Remove the Rear Shroud.<br />
2. If the weight stacks are installed, remove them from the machine. Also, remove the guide<br />
rods.<br />
3. Remove both cables.<br />
4. Disassemble the Balance Bar from the Front Shroud by removing (2) bolts.<br />
5. Remove the nuts and washers retaining the front shroud (5 top & 5 bottom).<br />
6. Disassemble the top frame first by removing the (2) 1”-8 lock nuts from inside the front pivot<br />
column tube. Then remove the 1/2”-13 socket head screws and lock washers (2) as shown.<br />
Lift the top frame off of the pivot columns.<br />
7. Remove the front shroud.<br />
8. Remove the (4) 3/4”-10 lock nuts from the base frame. Lift to separate the Pivot Columns<br />
and Support Columns from the machine.<br />
9. To reassemble the machine, follow these steps in reverse order. Loosely assemble ALL frame<br />
components and the front shroud before fully tightening any hardware. MAKE SURE that the<br />
frame hardware is FULLY tightened using a 1/2” drive ratchet. Re-assemble the remainder of<br />
the components.<br />
16