

Intelliflo VF Installation / Owners Manual - Pool Center
Intelliflo VF Installation / Owners Manual - Pool Center
Intelliflo VF Installation / Owners Manual - Pool Center

Create successful ePaper yourself
Turn your PDF publications into a flip-book with our unique Google optimized e-Paper software.
32<br />
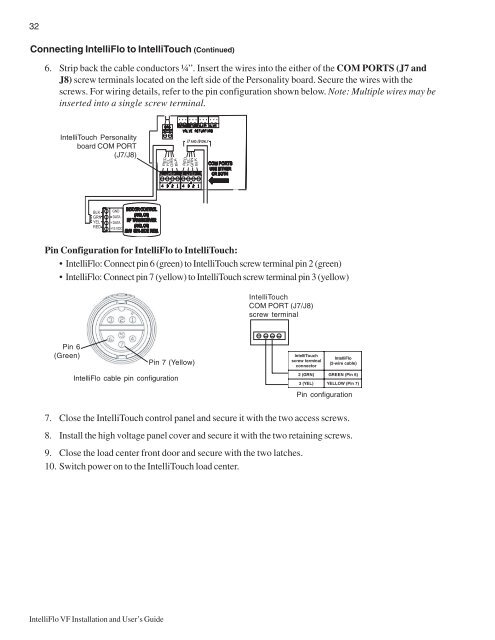
Connecting IntelliFlo to IntelliTouch (Continued)<br />
6. Strip back the cable conductors ¼”. Insert the wires into the either of the COM PORTS (J7 and<br />
J8) screw terminals located on the left side of the Personality board. Secure the wires with the<br />
screws. For wiring details, refer to the pin configuration shown below. Note: Multiple wires may be<br />
inserted into a single screw terminal.<br />
IntelliTouch Personality<br />
board COM PORT<br />
(J7/J8)<br />
BLK<br />
GRN<br />
YEL<br />
RED<br />
Pin Configuration for IntelliFlo to IntelliTouch:<br />
• IntelliFlo: Connect pin 6 (green) to IntelliTouch screw terminal pin 2 (green)<br />
• IntelliFlo: Connect pin 7 (yellow) to IntelliTouch screw terminal pin 3 (yellow)<br />
IntelliTouch<br />
COM PORT (J7/J8)<br />
screw terminal<br />
Pin 6<br />
(Green)<br />
Pin 7 (Yellow)<br />
IntelliFlo cable pin configuration<br />
IntelliTouch<br />
screw terminal<br />
connector<br />
IntelliFlo<br />
(2-wire cable)<br />
2 (GRN) GREEN (Pin 6)<br />
3 (YEL) YELLOW (Pin 7)<br />
Pin configuration<br />
7. Close the IntelliTouch control panel and secure it with the two access screws.<br />
8. Install the high voltage panel cover and secure it with the two retaining screws.<br />
9. Close the load center front door and secure with the two latches.<br />
10. Switch power on to the IntelliTouch load center.<br />
IntelliFlo <strong>VF</strong> <strong>Installation</strong> and User’s Guide


