
Create successful ePaper yourself
Turn your PDF publications into a flip-book with our unique Google optimized e-Paper software.
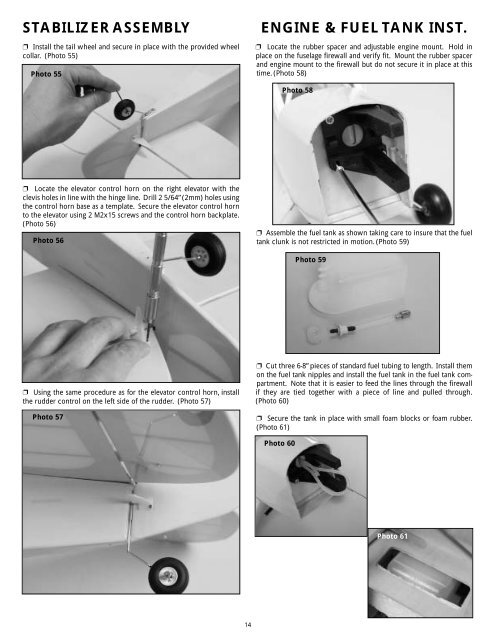
STABILIZER ASSEMBLY<br />
❐ Install the tail wheel and secure in place with the provided wheel<br />
collar. (Photo 55)<br />
Photo 55<br />
ENGINE & FUEL TANK INST.<br />
❐ Locate the rubber spacer and adjustable engine mount. Hold in<br />
place on the fuselage firewall and verify fit. Mount the rubber spacer<br />
and engine mount to the firewall but do not secure it in place at this<br />
time. (Photo 58)<br />
Photo 58<br />
❐ Locate the elevator control horn on the right elevator with the<br />
clevis holes in line with the hinge line. Drill 2 5/64”(2mm) holes using<br />
the control horn base as a template. Secure the elevator control horn<br />
to the elevator using 2 M2x15 screws and the control horn backplate.<br />
(Photo 56)<br />
Photo 56<br />
❐ Assemble the fuel tank as shown taking care to insure that the fuel<br />
tank clunk is not restricted in motion. (Photo 59)<br />
Photo 59<br />
❐ Using the same procedure as for the elevator control horn, install<br />
the rudder control on the left side of the rudder. (Photo 57)<br />
Photo 57<br />
❐ Cut three 6-8”pieces of standard fuel tubing to length. Install them<br />
on the fuel tank nipples and install the fuel tank in the fuel tank compartment.<br />
Note that it is easier to feed the lines through the firewall<br />
if they are tied together with a piece of line and pulled through.<br />
(Photo 60)<br />
❐ Secure the tank in place with small foam blocks or foam rubber.<br />
(Photo 61)<br />
Photo 60<br />
Photo 61<br />
14