You also want an ePaper? Increase the reach of your titles
YUMPU automatically turns print PDFs into web optimized ePapers that Google loves.
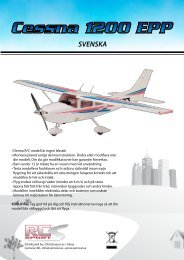
WING ASSEMBLY<br />
❐ Apply 30-45 Minute Epoxy to the left wing panel spar box as well<br />
as the entire root rib. Carefully join the two wing panels together.<br />
Wipe off any excess epoxy. Block up each wing tip 5/8” and allow to<br />
cure. It may be necessary to use masking tape to hold the wing panels<br />
in position until cured. Photo 24)<br />
Photo 24<br />
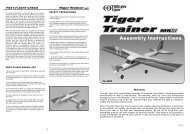
❐ Place the wing on the fuselage. Carefully align the wing ensuring<br />
that it is centered on the fuselage. Using a 19/64” (7.4mm) drill bit,<br />
drill through the wing into the wing hold down plate in the fuselage<br />
using the previously drilled holes as a reference. (Photo 27)<br />
Photo 27<br />
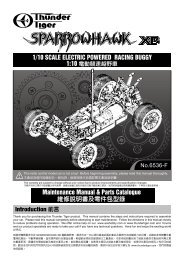
❐ Use the hardwood wing bolt plate as a template. Draw a reference<br />
line on the top of the wing at the trailing edge. Using a hobby knife<br />
carefully cut the covering and remove from the wing. Use caution not<br />
to cut into the wing skin. (Photo 25)<br />
Photo 25<br />
❐ Remove the wing from the fuselage. Install the blind nuts in the<br />
bottom of the wing hold down mounting plate. Install the wing hold<br />
screws in the blind nuts and pull up tightly ensuring that the blind<br />
nuts are secured in place. (Photo 28)<br />
Photo 28<br />
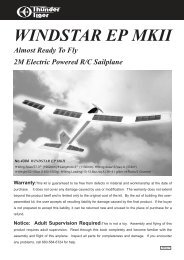
❐ Using 5-10 Minute Epoxy, glue the hardwood wing bolt plate into<br />
place. Locate and mark a reference point 5/8”in from each side and 1-<br />
3/8” up from the trailing edge of the wing. Using a 9/32” (7mm) drill,<br />
drill a hole through the wing at each reference mark.(Photo 26)<br />
Photo 26<br />
❐ Remove the wing bolts and trial mount the wing to the fuselage.<br />
Adjust as necessary to ensure proper alignment. (Photo 29)<br />
Photo 29<br />
❐ Remove the wing and cover the center joint with the trim covering<br />
provided.<br />
9