
Create successful ePaper yourself
Turn your PDF publications into a flip-book with our unique Google optimized e-Paper software.
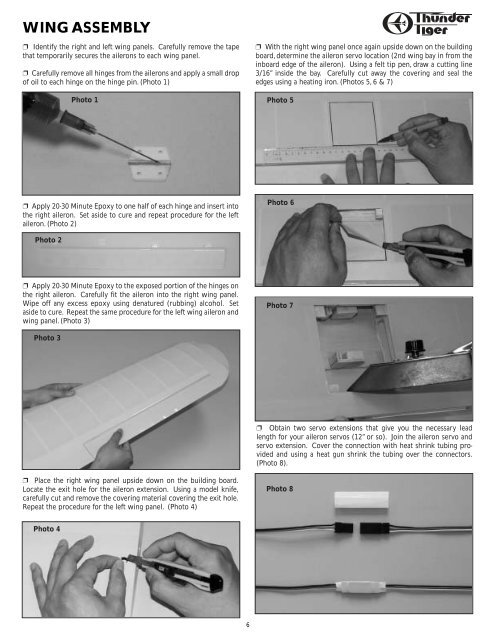
WING ASSEMBLY<br />
❐ Identify the right and left wing panels. Carefully remove the tape<br />
that temporarily secures the ailerons to each wing panel.<br />
❐ Carefully remove all hinges from the ailerons and apply a small drop<br />
of oil to each hinge on the hinge pin. (Photo 1)<br />
Photo 1<br />
❐ With the right wing panel once again upside down on the building<br />
board, determine the aileron servo location (2nd wing bay in from the<br />
inboard edge of the aileron). Using a felt tip pen, draw a cutting line<br />
3/16” inside the bay. Carefully cut away the covering and seal the<br />
edges using a heating iron. (Photos 5, 6 & 7)<br />
Photo 5<br />
❐ Apply 20-30 Minute Epoxy to one half of each hinge and insert into<br />
the right aileron. Set aside to cure and repeat procedure for the left<br />
aileron. (Photo 2)<br />
Photo 6<br />
Photo 2<br />
❐ Apply 20-30 Minute Epoxy to the exposed portion of the hinges on<br />
the right aileron. Carefully fit the aileron into the right wing panel.<br />
Wipe off any excess epoxy using denatured (rubbing) alcohol. Set<br />
aside to cure. Repeat the same procedure for the left wing aileron and<br />
wing panel. (Photo 3)<br />
Photo 7<br />
Photo 3<br />
❐ Obtain two servo extensions that give you the necessary lead<br />
length for your aileron servos (12” or so). Join the aileron servo and<br />
servo extension. Cover the connection with heat shrink tubing provided<br />
and using a heat gun shrink the tubing over the connectors.<br />
(Photo 8).<br />
❐ Place the right wing panel upside down on the building board.<br />
Locate the exit hole for the aileron extension. Using a model knife,<br />
carefully cut and remove the covering material covering the exit hole.<br />
Repeat the procedure for the left wing panel. (Photo 4)<br />
Photo 8<br />
Photo 4<br />
6