eLibrary® Presentation Multimedia Guide - ProQuest
eLibrary® Presentation Multimedia Guide - ProQuest
eLibrary® Presentation Multimedia Guide - ProQuest

Create successful ePaper yourself
Turn your PDF publications into a flip-book with our unique Google optimized e-Paper software.
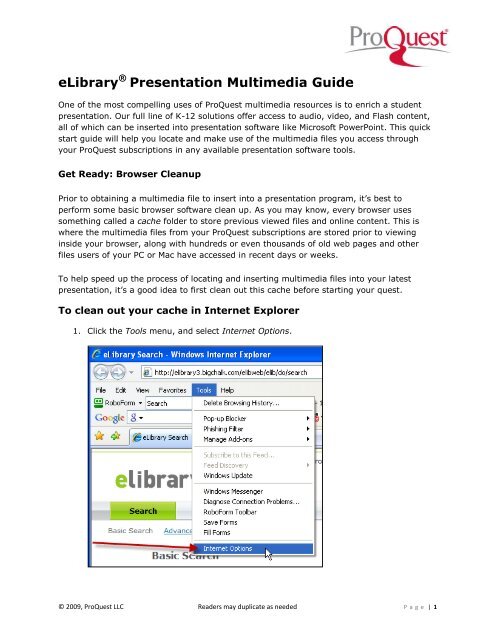
eLibrary ® <strong>Presentation</strong> <strong>Multimedia</strong> <strong>Guide</strong><br />
One of the most compelling uses of <strong>ProQuest</strong> multimedia resources is to enrich a student<br />
presentation. Our full line of K-12 solutions offer access to audio, video, and Flash content,<br />
all of which can be inserted into presentation software like Microsoft PowerPoint. This quick<br />
start guide will help you locate and make use of the multimedia files you access through<br />
your <strong>ProQuest</strong> subscriptions in any available presentation software tools.<br />
Get Ready: Browser Cleanup<br />
Prior to obtaining a multimedia file to insert into a presentation program, it’s best to<br />
perform some basic browser software clean up. As you may know, every browser uses<br />
something called a cache folder to store previous viewed files and online content. This is<br />
where the multimedia files from your <strong>ProQuest</strong> subscriptions are stored prior to viewing<br />
inside your browser, along with hundreds or even thousands of old web pages and other<br />
files users of your PC or Mac have accessed in recent days or weeks.<br />
To help speed up the process of locating and inserting multimedia files into your latest<br />
presentation, it’s a good idea to first clean out this cache before starting your quest.<br />
To clean out your cache in Internet Explorer<br />
1. Click the Tools menu, and select Internet Options.<br />
© 2009, <strong>ProQuest</strong> LLC Readers may duplicate as needed P a g e | 1
2. Under Browsing history click Delete...<br />
3. Click the Delete files… button to the right of Temporary Internet Files.<br />
4. Click Yes to begin the process, and wait for the cache to be deleted.<br />
5. Your web browser cache is now empty. Click Close twice to return to your browser.<br />
Get Set: Locate <strong>Multimedia</strong> Content<br />
Your <strong>ProQuest</strong> subscriptions make it easy to locate audio, video, and animated Flash<br />
content using a variety of search methods.<br />
In eLibrary, one method is to enter your search query, then make sure that only<br />
audio/video is checked as the content type. Additionally, you may click the audio/video icon<br />
on the main search page to find content by publisher, including:<br />
© 2009, <strong>ProQuest</strong> LLC Readers may duplicate as needed P a g e | 2
3D Animation – QuickTime or Flash (Flash after 4.04)<br />
A.D.A.M. Animation Library – QuickTime<br />
Archive Films - .WAV file (audio)<br />
Eye on Nature – QuickTime<br />
Fox Hannity & Colmes (video) – streaming (Windows Media)<br />
Fox News Sunday (video) – streaming (Windows Media)<br />
Fox Special Report With Brit Hume (video) – streaming (Windows Media)<br />
Great Events of the 20th Century (video) – streaming (Windows Media)<br />
The Hutchinson Dictionary of Arts (audio) - .WAV file (audio)<br />
The Hutchinson Dictionary of Music (audio) - .WAV file (audio)<br />
KRT Interactive Hot Topics - Flash or Interactive html<br />
Lifestory Audio - .WAV file (audio)<br />
LifeStory Publications Videos – QuickTime<br />
Live Event (video) – streaming (Windows Media)<br />
MPI Video – QuickTime<br />
MPI Video (silent) – QuickTime<br />
The O'Reilly Factor (video) – streaming (Windows Media)<br />
Your World with Neil Cavuto (video) – streaming (Windows Media)<br />
Keep in mind that <strong>ProQuest</strong> streaming multimedia files cannot be reused in student<br />
projects. (The file is stored within our servers and cannot be transferred to your local<br />
computer for use in this manner.)<br />
Go: Locating & Integrating <strong>Multimedia</strong> Content<br />
Once you’ve found a multimedia file you wish to insert into your presentation software, view<br />
it in your browser once. Once you’ve listened to or viewed the file, you can find it in your<br />
cache and integrate it into your project.<br />
Here’s how to locate your multimedia file and prepare it for integration into your<br />
presentation using Internet Explorer:<br />
1. Conduct a search and locate a multimedia file you’d like to harvest and re-use in<br />
your presentation. View the video or file inside your browser. This will pull the file<br />
from our servers to your local browser cache.<br />
2. Click the Tools menu, then select Internet Options.<br />
© 2009, <strong>ProQuest</strong> LLC Readers may duplicate as needed P a g e | 3
3. Under Browsing history, click Settings.<br />
4. Click the View Files… button to continue.<br />
5. To make it easy to locate your multimedia file, resort the file view to we see the files<br />
grouped by Type.<br />
© 2009, <strong>ProQuest</strong> LLC Readers may duplicate as needed P a g e | 4
6. Open the View menu, then under Arrange Icons by select Type.<br />
7. Open the View menu again, and select Details.<br />
© 2009, <strong>ProQuest</strong> LLC Readers may duplicate as needed P a g e | 5
8. Scroll down until you see the words QuickTime Movie, MP3, or Shockwave Flash<br />
Object in the Type column next to your file.<br />
9. Under the Name column, right-click on the icon to the left of your multimedia file,<br />
and select Copy. (Mac users can click and drag the file to their desktop.)<br />
10. Close all the current windows and return to your desktop.<br />
11. Right-click anywhere on an empty area of your desktop and select Paste.<br />
12. The multimedia file is now stored on your computer desktop for easy location. You<br />
may wish to rename the file if you’re going to harvest more than one file and store it<br />
on your desktop. (Windows users, right-click on the file and select Rename. Be sure<br />
to keep the file extension -- .mov, etc. -- in place when doing this.)<br />
© 2009, <strong>ProQuest</strong> LLC Readers may duplicate as needed P a g e | 6
To integrate your multimedia files into Microsoft PowerPoint TM<br />
(most compatible method with previous versions):<br />
1. Display the slide you want the movie on in PowerPoint, and on the Slide Show menu,<br />
point to Action Buttons, then select the Movie action button. (Note that to insert a<br />
sound clip, you would click the small icon to the left of the Movie button which looks<br />
like a speaker.)<br />
2. Draw a button on the slide.<br />
© 2009, <strong>ProQuest</strong> LLC Readers may duplicate as needed P a g e | 7
3. The Action Settings dialog box appears; click Run program and then click Browse.<br />
4. In the Browse dialog box, change Files of type to All Files. Click your multimedia file<br />
then select OK.<br />
© 2009, <strong>ProQuest</strong> LLC Readers may duplicate as needed P a g e | 8
5. Click OK in the Action Settings dialog box.<br />
6. During your presentation, when you get to the slide with the movie object on it, click<br />
the movie object to launch the application that plays the movie. If the application<br />
doesn't automatically play the movie, you will have to click a command within the<br />
application to launch the movie.<br />
© 2009, <strong>ProQuest</strong> LLC Readers may duplicate as needed P a g e | 9
7. The movie will start playing in a separate window during your presentation.<br />
Get the most out of your eLibrary subscription with our email newsletter (archives),<br />
videos, free monthly Web training, library marketing kit, additional presentation files, and<br />
other resources. All of our K-12 resources are just a click away at proquestk12.com.<br />
© 2009, <strong>ProQuest</strong> LLC Readers may duplicate as needed P a g e | 10