Rigging and Installation Manual - Evapco
Rigging and Installation Manual - Evapco
Rigging and Installation Manual - Evapco

You also want an ePaper? Increase the reach of your titles
YUMPU automatically turns print PDFs into web optimized ePapers that Google loves.
Bulletin 123E<br />
<strong>Rigging</strong> <strong>and</strong><br />
<strong>Installation</strong> <strong>Manual</strong><br />
LPT SERIES FORCED DRAFT COOLING TOWERS.<br />
LRWB SERIES FORCED DRAFT CLOSED CIRCUIT COOLERS<br />
LRC FORCED DRAFT EVAPORATIVE CONDENSERS<br />
EVAPCO North America<br />
EVAPCO Products are Manufactured Wordwide<br />
EVAPCO, Inc. — World Headquarters & Research/Development Center<br />
EVAPCO, Inc. • P.O. Box 1300 • Westminster, MD 21158 USA<br />
PHONE: 410-756-2600 • FAX: 410-756-6450 • E-MAIL: marketing@evapco.com<br />
EVAPCO Europe<br />
EVAPCO Asia/Pacific<br />
EVAPCO, Inc.<br />
World Headquarters<br />
P.O. Box 1300<br />
Westminster, MD 21158 USA<br />
Phone: 410-756-2600<br />
Fax: 410-756-6450<br />
E-mail: marketing@evapco.com<br />
EVAPCO East<br />
5151 Allendale Lane<br />
Taneytown, MD 21787 USA<br />
Phone: 410-756-2600<br />
Fax: 410-756-6450<br />
E-mail: marketing@evapco.com<br />
EVAPCO Midwest<br />
1723 York Road<br />
Greenup, IL 62428 USA<br />
Phone: 217-923-3431<br />
Fax: 217-923-3300<br />
E-mail: evapcomw@evapcomw.com<br />
EVAPCO West<br />
1900 West Almond Avenue<br />
Madera, CA 93637 USA<br />
Phone: 559-673-2207<br />
Fax: 559-673-2378<br />
E-mail: contact@evapcowest.com<br />
EVAPCO Iowa<br />
925 Quality Drive<br />
Lake View, IA 51450 USA<br />
Phone: 712-657-3223<br />
Fax: 712-657-3226<br />
EVAPCO Iowa<br />
Sales & Engineering<br />
215 1st Street, NE<br />
P.O. Box 88<br />
Medford, MN 55049 USA<br />
Phone: 507-446-8005<br />
Fax: 507-446-8239<br />
E-mail: evapcomn@evapcomn.com<br />
EVAPCO Northwest<br />
P.O. Box 1727<br />
Lake Oswego, Oregon 97035 USA<br />
Phone: 503-639-2137<br />
Fax: 503-639-1800<br />
EVAPCO Newton<br />
701 East Jourdan Street<br />
Newton, IL 62448 USA<br />
Phone: 618-783-3433<br />
Fax: 618-783-3499<br />
E-mail: evapcomw@evapcomw.com<br />
EVAPCO-BLCT Dry Cooling, Inc.<br />
981 US Highway 22 West<br />
Bridgewater, New Jersey 08807 USA<br />
Phone: 1-908-379-2665<br />
E-mail: info@evapco-blct.com<br />
Refrigeration Valves &<br />
Systems Corporation<br />
A wholly owned subsidiary of EVAPCO, Inc.<br />
1520 Crosswind Dr.<br />
Bryan, TX 77808 USA<br />
Phone: 979-778-0095<br />
Fax: 979-778-0030<br />
E-mail: rvs@rvscorp.com<br />
EvapTech, Inc.<br />
A wholly owned subsidiary of EVAPCO, Inc.<br />
8331 Nieman Road<br />
Lenexa, KS 66214 USA<br />
Phone: 913-322-5165<br />
Fax: 913-322-5166<br />
E-mail: marketing@evaptech.com<br />
Tower Components, Inc.<br />
A wholly owned subsidiary of EVAPCO, Inc.<br />
5960 US HWY 64E<br />
Ramseur, NC 27316<br />
Phone: 336-824-2102<br />
Fax: 336-824-2190<br />
E-mail: mail@towercomponentsinc.com<br />
EVAPCO Europe BVBA<br />
European Headquarters<br />
Industrieterrein Oost 4010<br />
3700 Tongeren, Belgium<br />
Phone: (32) 12-395029<br />
Fax: (32) 12-238527<br />
E-mail: evapco.europe@evapco.be<br />
EVAPCO Europe, S.r.l.<br />
Via Ciro Menotti 10<br />
I-20017 Passirana di Rho<br />
Milan, Italy<br />
Phone: (39) 02-939-9041<br />
Fax: (39) 02-935-00840<br />
E-mail: evapcoeurope@evapco.it<br />
EVAPCO Europe, S.r.l.<br />
Via Dosso 2<br />
23020 Piateda Sondrio, Italy<br />
EVAPCO Europe, GmbH<br />
Meerbuscher Straße 64-78<br />
Haus 5<br />
40670 Meerbusch, Germany<br />
Phone: (49) 2159-69560<br />
Fax: (49) 2159-695611<br />
E-mail: info@evapco.de<br />
Flex coil a/s<br />
A wholly owned subsidiary of EVAPCO, Inc.<br />
Knøsgårdvej 115<br />
DK-9440 Aabybro Denmark<br />
Phone: (45) 9824 4999<br />
Fax: (45) 9824 4990<br />
E-mail: info@flexcoil.dk<br />
EVAPCO S.A. (Pty.) Ltd.<br />
A licensed manufacturer of EVAPCO, Inc.<br />
18 Quality Road<br />
Is<strong>and</strong>o 1600<br />
Republic of South Africa<br />
Phone: (27) 11-392-6630<br />
Fax: (27) 11-392-6615<br />
E-mail: evapco@evapco.co.za<br />
Evap Egypt Engineering Industries Co.<br />
A licensed manufacturer of EVAPCO, Inc.<br />
5 El Nasr Road<br />
Nasr City, Cairo, Egypt<br />
Phone: 2 02 24022866 /2 02 24044997<br />
Fax: 2 02 24044667/2 02 24044668<br />
E-mail: Primacool@link.net / Shady@primacool.net<br />
EVAPCO Asia/Pacific Headquarters<br />
1159 Luoning Rd. Baoshan Industrial Zone<br />
Shanghai, P. R. China, Postal Code: 200949<br />
Phone: (86) 21-6687-7786<br />
Fax: (86) 21-6687-7008<br />
E-mail: marketing@evapcochina.com<br />
EVAPCO (Shanghai) Refrigeration<br />
Equipment Co., Ltd.<br />
1159 Louning Rd., Baoshan Industrial Zone<br />
Shanghai, P.R. China, Postal Code: 200949<br />
Phone: (86) 21-6687-7786<br />
Fax: (86) 21-6687-7008<br />
E-mail: marketing@evapcochina.com<br />
Beijing EVAPCO Refrigeration<br />
Equipment Co., Ltd.<br />
Yan Qi Industrial Development District<br />
Huai Rou County<br />
Beijing, P.R. China, Postal Code: 101407<br />
Phone: (86) 10 6166-7238<br />
Fax: (86) 10 6166-7395<br />
E-mail: evapcobj@evapcochina.com<br />
EVAPCO Australia (Pty.) Ltd.<br />
34-42 Melbourne Road<br />
P.O. Box 436<br />
Riverstone, N.S.W. Australia 2765<br />
Phone: (61) 2 9627-3322<br />
Fax: (61) 2 9627-1715<br />
E-mail: sales@evapco.com.au<br />
EVAPCO Composites Sdn. Bhd<br />
No. 70 (Lot 1289) Jalan Industri 2/3<br />
Rawang Integrated Industrial Park<br />
Rawang, Selangor, 48000 Malaysia<br />
Phone: 60 3 6092-2209<br />
Fax: 60 3 6092-2210<br />
EvapTech Asia Pacific Sdn. Bhd<br />
A wholly owned subsidiary of EvapTech, Inc.<br />
IOI Business Park, 2/F Unit 20<br />
Persiaran Puchong Jaya Selatan<br />
B<strong>and</strong>ar Puchong Jaya,<br />
47170 Puchong, Selangor, Malaysia<br />
Phone: (60-3) 8070-7255<br />
Fax: (60-3) 8070-5731<br />
E-mail: marketing-ap@evaptech.com<br />
Visit EVAPCO’s Website at: http://www.evapco.com<br />
EVAPCO...SPECIALISTS IN HEAT TRANSFER PRODUCTS AND SERVICES.
Low Profile Forced Draft Towers, Coolers <strong>and</strong> Condensers<br />
Method of Shipment<br />
Forced draft units are shipped fully assembled. Miscellaneous items, such as sealer, self-tapping screws <strong>and</strong> any other required<br />
materials, are packaged <strong>and</strong> placed inside the pan for shipment.<br />
NOTE: All hoods <strong>and</strong> attenuation packages are factory inspected prior to shipment to verify proper fit for rigging. Please take extra<br />
care to h<strong>and</strong>le <strong>and</strong> rig unit section per the instructions of this manual to avoid possible distortion <strong>and</strong> poor casing alignment. It is<br />
advisable to check each section upon receipt <strong>and</strong> during each lift to ensure that the factory alignment has not been altered. Should<br />
the field inspection indicate the section alignment (“square”) has been altered, please contact the factory or your local EVAPCO<br />
representative for additional instructions to obtain proper section fit.<br />
Storage<br />
Do not place tarps or other coverings over the top of the units if the units are to be stored before installation. Excessive heat can<br />
build up if the units are covered causing possible damage to the PVC eliminators. For extended storage beyond six months rotate<br />
the fan <strong>and</strong> fan motor shaft(s) monthly. Also, the fan shaft bearings should be purged <strong>and</strong> regreased prior to start-up.<br />
General<br />
For extended lifts, or where hazards may exist, it is recommended that safety slings <strong>and</strong> spreaders be employed for safety. Refer to<br />
the extended lift information in this bulletin.<br />
International Building Code Provisions<br />
The International Building Code (IBC) is a comprehensive set of regulations addressing the structural design <strong>and</strong> installation<br />
requirements for building systems– including HVAC <strong>and</strong> industrial refrigeration equipment. As of June 2008, all 50 states plus<br />
Washington D.C. have adopted the International Building Code. The code provisions require that evaporative cooling equipment<br />
<strong>and</strong> all other components permanently installed on a structure must meet the same seismic design criteria as the building. The<br />
LPT Series Cooling Towers, LR Series Coolers <strong>and</strong> Condensers are IBC 2009 compliant up to 1g with st<strong>and</strong>ard construction <strong>and</strong><br />
up to 5.12g with additional structural modifications.<br />
All items attached to the EVAPCO LPT Cooling Tower, <strong>Evapco</strong> LR Closed Circuit Cooler or LR Evaporative Condenser must be<br />
independently reviewed <strong>and</strong> isolated to meet applicable wind <strong>and</strong> seismic loads. This includes piping, ductwork, conduit, <strong>and</strong><br />
electrical connections. These items must be flexibly attached to the <strong>Evapco</strong> unit so as not to transmit additional loads to the<br />
equipment as a result of seismic or wind forces.<br />
Structural Steel Support<br />
Two structural “I” beams running the length of the unit are required for supporting the unit. These beams should be located<br />
underneath the outer flanges of the unit as shown in Figure 1. See Table 1 for Steel Support Dimensions. Table 1 lists units<br />
according to the nominal plan area of their heat transfer section. Overall dimensions will be different.<br />
Mounting holes, 3/4” in diameter, are located in the bottom flange for bolting to the structural steel. Refer to the recommended<br />
structural steel support drawing <strong>and</strong> certified print for exact bolt hole location. Bolt the bottom section to the steel support before<br />
rigging any hoods or attenuation.<br />
Beams should be sized in accordance with accepted structural practices. Maximum deflection of the beam under the unit should be<br />
1/360 of the unit length, not to exceed 1/2”. Deflection may be calculated by using 55% of the operating weight as a uniform load on<br />
each beam (see certified print for operating weight).<br />
2
Low Profile Forced Draft Towers, Coolers <strong>and</strong> Condensers<br />
The supporting “I” beams should be level to within 1/8” in 6’ before setting the unit. Do not level the unit by shimming between the<br />
bottom flange <strong>and</strong> the beams as this will not provide proper longitudinal support.<br />
NOTE: Consult IBC 2009 for required steel support layout <strong>and</strong> structural design.<br />
Table 1 – Steel Support Dimensions<br />
A1<br />
A2<br />
Plan View<br />
LPT<br />
SOUND<br />
ATTENUATION<br />
Figure 1 – Structural Steel Support<br />
B1<br />
End Elevation<br />
Coil A1 A2 B1<br />
Casing (Unit Only) (Unit with<br />
Footprint<br />
Intake Attn.)<br />
3' x 6' 10' 1-7/8" 13' 9-5/8" 3' 4-1/2"<br />
5' x 6' 12' 2-7/8" 15' 10-5/8" 5' 5/8"<br />
5' x 9' 15' 2-1/4" 18' 10" 5' 5/8"<br />
5' x 12' 18' 2-5/8" 21' 10-3/8" 5' 5/8"<br />
8' x 9' 15' 2-1/4" 18' 10" 7' 10"<br />
8' x 12' 18' 2-5/8" 21' 10-3/8" 7' 10"<br />
<strong>Rigging</strong> the Main Unit<br />
Lifting devices are located on the sides of the unit near the bottom as shown in Figure 2a. It is recommended that units be lifted<br />
using a boom oriented along the length of the unit with the cables straddling the unit at the lift points (Figure 2a). An alternative<br />
method is to lift the unit with a single hook, lashing the cables to the lift points on the unit directly (Figure 2b). Spreader bars are<br />
necessary in both cases to prevent damage to the sides of the unit.<br />
When a boom is used, the distance “A” between the lift points on the boom should be set equal to the distance between the lift points<br />
on the unit <strong>and</strong> the crane hook must be located a minimum distance “H1” above the top of the unit as shown in Figure 2a. When no<br />
boom is used, the crane hook must be a minimum distance “H2” above the lifting points on the unit as shown in Figure 2b.<br />
SPREADER BAR<br />
H 1<br />
SPREADER<br />
BAR<br />
SPREADER BAR<br />
H 2<br />
SPREADER BAR<br />
A<br />
Figure 2a – Recommended <strong>Rigging</strong> - LP/LR Main Unit<br />
Figure 2b – Alternate <strong>Rigging</strong> - LP/LR Main Unit<br />
3
Low Profile Forced Draft Towers, Coolers <strong>and</strong> Condensers<br />
Table 2 shows minimum “H” dimensions <strong>and</strong> gives “A” dimensions for the different unit sizes.<br />
Table 2 – - Dimensional Guidelines for Lift Cables.<br />
Dimensions Refer to Drawings in Figure 2a <strong>and</strong> 2b.<br />
A<br />
Coil/Casing A Coolers H 1 H 2<br />
Footprint Towers Condensers<br />
3’ x 6’ 86” 86” 3’ 10’<br />
5’ x 6’ 102” 102” 5’ 12’<br />
5’ x 9’ 137” 137” 5’ 13’<br />
5’ x 12’ 174” 174” 5’ 14’<br />
8’ x 9’ 138” 133” 7’ 17’<br />
8’ x 12’ 174” 169” 7’ 20’<br />
Extended Lifts<br />
The recommended method for extended lifts is to use slings under the unit (Figures 3a <strong>and</strong> 3b). Safety slings, spreaders <strong>and</strong> skids<br />
should be removed before final positioning of the unit.<br />
NOTE: Always use safety slings for extended lifts or where any safety hazard exists.<br />
SPREADER<br />
BAR<br />
SPREADER<br />
BAR<br />
SPREADER<br />
BARS<br />
Figure 3a – Recommended Safety Sling <strong>Rigging</strong><br />
Figure 3b – Alternative Safety Sling <strong>Rigging</strong><br />
Applying Sealer Tape<br />
If the unit was shipped with optional discharge attenuation or discharge hoods sealer tape must be applied prior installation of the<br />
section. Once the unit has been set on the supporting steel <strong>and</strong> bolted in place, wipe the top flanges to remove any dirt or<br />
moisture. Place sealer tape over the mounting hole centerline on the side flanges. Apply two strips of sealer tape, one partially<br />
overlapping the other, on the end flanges.<br />
4
Low Profile Forced Draft Towers, Coolers <strong>and</strong> Condensers<br />
The sealer tape should overlap on the corners as shown in Figure 4. Do not splice the sealer tape along the end flanges <strong>and</strong><br />
preferably not on the side flanges if it can be avoided. Always remove the paper backing from the sealer tape.<br />
2 OVERLAPPING<br />
LAYERS OF SEALER<br />
ON THE ENDS<br />
1 LAYER OF SEALER<br />
CENTERED OVER THE<br />
MOUNTING HOLES<br />
END<br />
SIDE<br />
Figure 4 – Proper Sealer Tape Application<br />
Hood or attenuation only<br />
<strong>Rigging</strong> <strong>and</strong> Assembling Discharge <strong>and</strong> Intake Accessories<br />
Intake sound attenuators <strong>and</strong> discharge hoods/discharge attenuators are not assembled to the main unit when shipped <strong>and</strong> must<br />
be separately rigged <strong>and</strong> assembled in the field. Four accessories fall into this group - discharge hood (may be straight or<br />
tapered), discharge attenuation, fan-end sound attenuator <strong>and</strong> fan side attenuators. These are shown mounted in Figure 5 <strong>and</strong><br />
construction details are referenced to Figures 6, 8 <strong>and</strong> 10 respectively.<br />
FIG. 10<br />
FIG. 8<br />
FIG. 6<br />
Figure 5 – Discharge <strong>and</strong> Intake Accessory <strong>Rigging</strong><br />
5
Low Profile Forced Draft Towers, Coolers <strong>and</strong> Condensers<br />
<strong>Rigging</strong> Discharge Hoods <strong>and</strong> Discharge Attenuators<br />
Discharge Hoods may be either straight or tapered. Discharge Attenuators will be straight-sided. Both must be rigged with a<br />
separate lift after the main unit has been secured to the structural supports. The rigging for both types of accessories is shown in<br />
Figures 6a <strong>and</strong> 6b. The lifting cables must be long enough to allow the crane hook to be a minimum dimension “H” above the top<br />
of the assembly. These “H” values are given in Table 3.<br />
H<br />
H<br />
Figure 6a – <strong>Rigging</strong> Straight Discharge Hood or<br />
Discharge Attenuation<br />
Figure 6b – <strong>Rigging</strong> Tapered Discharge Hood<br />
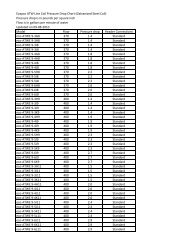
Table 3 – “H” Dimensions for Discharge Hoods<br />
Nominal Plan Area of<br />
Heat Transfer Section<br />
H<br />
3’ x 6’ 8’<br />
5’ x 6’ 8’<br />
5’ x 9’ 10’<br />
5’ x 12’ 15’<br />
8’ x 9’ 10’<br />
8’ x 12’ 15’<br />
6
Low Profile Forced Draft Towers, Coolers <strong>and</strong> Condensers<br />
Galvanized <strong>and</strong> stainless steel units use 5/16” nuts <strong>and</strong> bolts to secure the hood or attenuation to the casing. Construction<br />
details referenced in Figure 4 are shown in Figure 7 below.<br />
Figure 7 – Discharge Hood or Attenuation Assembly Details<br />
<strong>Rigging</strong> Fan End Sound Attenuation<br />
Fan end sound attenuators must be rigged with a separate lift after the main unit has been secured to the structural supports. The<br />
rigging for the fan-end sound attenuator assembly is shown in Figure 8. The lifting cables must be long enough to allow the crane<br />
hook to be a minimum dimension “H” above the top of the assembly. These “H” values are given in Table 4.<br />
H<br />
Figure 8 – <strong>Rigging</strong> Fan-End Sound Attenuator Assembly<br />
7
Low Profile Forced Draft Towers, Coolers <strong>and</strong> Condensers<br />
Table 4 – “H” Dimensions for Fan-End Sound Attenuator Assembly<br />
Nominal Plan Area of<br />
Heat Transfer Section<br />
H<br />
3’ x 6’ 4’<br />
5’ x 6’ 5’<br />
5’ x 9’ 5’<br />
5’ x 12’ 5’<br />
8’ x 9’ 8’<br />
8’ x 12’ 8’<br />
On galvanized units, the fan-end sound attenuator housing is secured on the sides <strong>and</strong> top with 5/16” self-tapping bolts. On<br />
stainless steel units, the fan-end sound attenuator housing is secured on the sides using 1/4” threaded machine bolts that are set<br />
into rivnuts located in the side panel of the main unit <strong>and</strong> on the top using 5/16” stainless steel nuts <strong>and</strong> bolts. Construction details<br />
referenced in Figure 5 are shown in Figure 9. At the time the fan-side attenuator is fitted to the main unit, be sure that the fan belt<br />
adjustment extension tube at the base of the fan-end sound attenuator assembly is properly mated with the hex head fitting at the<br />
main unit.<br />
Figure 9 – Fan-End Sound Attenuator Assembly Details<br />
8
Low Profile Forced Draft Towers, Coolers <strong>and</strong> Condensers<br />
<strong>Rigging</strong> Fan-Side Attenuators<br />
On galvanized units, the fan-side sound attenuators are secured to the main unit using 5/16” self-tapping bolts. On stainless steel<br />
units, it is secured using 1/4” threaded machine bolts which are set into rivnuts located in the side panel of the unit. Assembly is<br />
shown in Figure 10 <strong>and</strong> construction details referenced in Figure 5 are shown in Figure 11 below.<br />
Figure 10 – <strong>Rigging</strong> Fan-Side Sound Attenuator Assembly<br />
Figure 11 – Fan-Side Sound Attenuator Assembly Details<br />
9
Low Profile Forced Draft Towers, Coolers <strong>and</strong> Condensers<br />
Final Assembly <strong>and</strong> Start-up Details<br />
Shipping Materials - Remove any wood chocks, spare parts, or miscellaneous items that have been placed inside the unit for<br />
shipping purposes. Clean all debris from the basin.<br />
Pump Discharge Line - Connect the riser pipe from the pump discharge on the pan-fan section to the riser pipe on the coil section<br />
using the flexible connection <strong>and</strong> hose clamps provided.<br />
Bleed-off Line - A bleed-off line <strong>and</strong> valve are installed on the unit when shipped with a pump. On units shipped without a pump<br />
(remote sump applications) make sure a bleed-off line <strong>and</strong> valve are properly sized <strong>and</strong> installed on the discharge side of the pump<br />
<strong>and</strong> connected to a convenient drain. In either case, the bleed-off valve should be fully open.<br />
Strainer - Check the strainer in the basin to ensure that it is in its proper location over the pump suction as shown in Figures 12a<br />
<strong>and</strong> 12b.<br />
STRAINER<br />
STRAINER<br />
SUCTION PIPE<br />
SUCTION PIPE<br />
Figure 12a – Strainer Location on 3’ <strong>and</strong> 5’ Wide Units.<br />
Figure 12b – Strainer Location on 8’ Wide Units.<br />
Screens - Protective air inlet screens are provided across the front of the fan section of all models. Screens are not provided on<br />
the bottom of the fan section since most of the units are mounted on steel beams, either on the roof or at ground level. If units are<br />
installed in an elevated position, bottom screens are recommended for safety protection <strong>and</strong> should be provided by the installing<br />
contractor.<br />
Float Valve Adjustment - The float valve is pre-set at the factory, however adjustment should be checked after rigging. The float<br />
valve should be adjusted so that the center of the float is 1” below the center of the overflow connections when the valve is in the<br />
fully closed position. Raise or lower the float by using the wing nuts on the vertical threaded rod. Do not adjust the horizontal rod.<br />
During normal operation, the water level will drop 3” to 4” below the overflow in condensers <strong>and</strong> coolers; <strong>and</strong> to approximately 5” to<br />
6” below the overflow in cooling towers. See Table 5 for normal operating level for the LR <strong>and</strong> LP style units.<br />
Table 5 – Minimum Operating Level<br />
Nominal Plan Area of<br />
Heat Transfer Section<br />
Minimum<br />
Level (inches)<br />
3’ x 6’ 8"<br />
5’ x 6’ 8"<br />
5’ x 9’ 8"<br />
5’ x 12’ 8"<br />
8’ x 9’ 8"<br />
8’ x 12’ 8"<br />
10
Low Profile Forced Draft Towers, Coolers <strong>and</strong> Condensers<br />
Fan Rotation - Bump start <strong>and</strong> check the fans for proper rotation. Directional arrows are placed on the outside of centrifugal fan<br />
housings or on the inside of axial fan cylinders.<br />
Pump Rotation - Bump start <strong>and</strong> check the pump for proper rotation. Directional arrows are found on the pump impeller housing.<br />
Freeze Protection<br />
The simplest <strong>and</strong> most effective way of keeping the recirculated water from freezing is to use a remote sump. With a remote sump,<br />
when the recirculating water pump is shut off all recirculating water drains back to the sump.<br />
If a remote sump is not being used, pan heaters are available. However, the basin heater will not prevent the external water lines,<br />
pump or pump piping from freezing. For installations where water will be left in the basin during freezing conditions, the make-up<br />
water supply, overflow <strong>and</strong> drain lines, as well as the pump <strong>and</strong> pump piping up to the overflow level must be heat traced <strong>and</strong><br />
insulated to protect them from damage. Any other connections or accessories at or below the water level must also be heat traced<br />
<strong>and</strong> insulated.<br />
The pan heaters are designed to prevent pan water from freezing when the unit is idle (no fan). If the unit will be operated<br />
dry (no water over coil) but will not be completely drained, please consult EVAPCO marketing to upsize the heaters.<br />
Maintenance<br />
Once the installation is complete <strong>and</strong> the unit is turned on, it is important that it be properly maintained. Maintenance is not difficult<br />
or time-consuming but must be done regularly to assure full performance of the unit. Refer to the operation <strong>and</strong> maintenance<br />
instructions supplied with the unit for proper maintenance procedures.<br />
Water Treatment<br />
Proper water treatment is an essential part of the maintenance required for evaporative cooling equipment. Galvanized equipment<br />
should be passivated prior to equipment startup to avoid the formation of white rust. For more information on passivation <strong>and</strong> white<br />
rust, please download a copy of EVAPCO’s Engineering Bulletin 36 at www.evapco.com. The spray water <strong>and</strong> the fluid inside the<br />
heat transfer coil should both be maintained with a water treatment program to ensure efficient system operation while maximizing<br />
the equipments service life. For more information on recommended water chemistry for EVAPCO equipment, see the Operation<br />
<strong>and</strong> Maintenance Instructions for this equipment.<br />
<strong>Rigging</strong> Hardware Parts List<br />
Table 6 lists those parts which are shipped together with the unit(s) for field assembly <strong>and</strong>/or spare parts. These parts will be found<br />
in a cardboard box wrapped in plastic <strong>and</strong> secured in the basin of the unit.<br />
Table 6 – LP Tower <strong>and</strong> LR Cooler <strong>and</strong> Condenser Attenuation <strong>and</strong> Discharge Hood <strong>Rigging</strong> Box Parts List<br />
(galvanized <strong>and</strong> stainless steel construction)<br />
Nominal Plan<br />
Area of Heat Extra Bolt Hex Nut Flat Washer Lock Washer Sealer<br />
Transfer Section Nozzles 5/16” x 1” 5/16” 5/16” 5/16” Tape<br />
3x6 1 14 14 28 14 2<br />
5x6 1 14 14 28 14 2<br />
5x9 1 22 22 44 22 3<br />
5x12 1 24 24 48 24 3<br />
8x9 2 22 22 44 22 3<br />
8x12 2 24 24 48 24 3<br />
11
Low Profile Forced Draft Towers, Coolers <strong>and</strong> Condensers<br />
Accessory Location Checklist<br />
Accessories can ship in a variety of locations depending on the type of accessory, the size of the unit <strong>and</strong> the accessories<br />
purchased with the unit. See Table 7 for a guide to accessory location.<br />
Table 7 – Unit Accessory Shipping Location<br />
Unit Accessories<br />
Aluminum Ladder<br />
Discharge Attenuation<br />
Discharge Hood with Dampers<br />
Electric Basin Heater<br />
Electric Basin Heater Control Panel<br />
Electric Basin Heater Low Water Cutout<br />
Electric Basin Heater Thermostat<br />
Electronic Water Level Control Probes<br />
Electronic Water Level Control<br />
Factory Mounted Crossover Piping<br />
Fan Screens (If not mounted)<br />
Hot Water or Steam Coil<br />
Inlet Attenuation<br />
Remote Sump Trash Screen<br />
<strong>Rigging</strong> Hardware<br />
Safety Cage<br />
Sealer Tape<br />
Sump Sweeper Piping with <strong>and</strong> without<br />
High Flow Eductors<br />
Vibration Switch<br />
Water Silencers<br />
Shipping Location<br />
Shipped Separately on Truck Bed<br />
Shipping Location is Unit Dependent<br />
- If Space is Available: Loosely Mounted on Unit<br />
- If No Space is Available: Shipped Separately on Truck Bed<br />
Shipping Location is Unit Dependent<br />
- If Space is Available: Loosely Mounted on Unit<br />
- If No Space is Available: Shipped Separately on Truck Bed<br />
Shipping Location is Unit Dependent<br />
- End Mounted Heater: Installed in Unit Basin<br />
- Side Mounted Heater: Strapped Inside Unit Basin<br />
Shipping Location is Dependent on Control Panel Size <strong>and</strong> Unit Width<br />
- If Space is Available: Mounted on Unit Basin<br />
- If No Space is Available: Boxed, Wrapped <strong>and</strong> Wire Tied Inside Unit Basin<br />
Shipped in <strong>Rigging</strong> Box Strapped Inside Unit Basin<br />
Shipping Location is Unit Dependent<br />
- End Mounted Thermostat: Mounted on Unit Basin<br />
- Side Mounted Thermostat: Shipped in <strong>Rigging</strong> Box<br />
Mounted in PVC st<strong>and</strong>pipe<br />
PVC St<strong>and</strong>pipe Strapped Inside Unit Basin<br />
Welded to Coil Connections<br />
Shipping Location is Unit <strong>and</strong> Accessory Dependent<br />
- If Space is Available: Strapped Inside Unit Basin<br />
- If No Space is Available: Crated <strong>and</strong> Shipped Separately on Truck Bed<br />
Installed in Unit Basin<br />
Shipping Location is Unit Dependent<br />
- If Space is Available: Loosely Mounted on Unit<br />
- If No Space is Available: Shipped Separately on Truck Bed<br />
Installed In Unit Basin<br />
Shipped in <strong>Rigging</strong> Box Strapped Inside Unit Basin<br />
Attached to the Ladder<br />
Shipped in <strong>Rigging</strong> Box Strapped Inside Unit Basin<br />
Installed in Unit Basin<br />
Mounted in Fan Section<br />
Installed in Unit Basin<br />
EVAPCO, Inc. • P.O. Box 1300 • Westminster, MD 21158 USA<br />
PHONE: 410-756-2600 • FAX: 410-756-6450 • E-MAIL: marketing@evapco.com<br />
Printed on recycled paper<br />
using soy-based ink<br />
©2013 EVAPCO, Inc.