Saab 400133252 instructions in English - SaabDocs.com
Saab 400133252 instructions in English - SaabDocs.com
Saab 400133252 instructions in English - SaabDocs.com

Create successful ePaper yourself
Turn your PDF publications into a flip-book with our unique Google optimized e-Paper software.
SCdefault<br />
900 Installation <strong><strong>in</strong>structions</strong><br />
SITdefault<br />
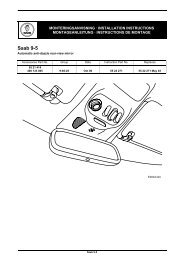
<strong>Saab</strong> 9-5 4D M02-<br />
Rear bumper<br />
MONTERINGSANVISNING · INSTALLATION INSTRUCTIONS<br />
MONTAGEANLEITUNG · INSTRUCTIONS DE MONTAGE<br />
Accessories Part No. Group Date Instruction Part No. Replaces<br />
400 133 252 9:84-28 Aug 03 55 81 863 55 81 863 May 03<br />
E980A438<br />
<strong>Saab</strong> 9-5 4D M02-
2 55 81 863<br />
3<br />
2<br />
5<br />
4 1<br />
6<br />
E980A439<br />
1 Bumper shell (ordered separately)<br />
2 Cellular block, bumper member<br />
3 Cellular block, upper<br />
4 Cellular block, L<br />
5 Cellular block, R<br />
6 Grille decor strip<br />
<strong>Saab</strong> 9-5 4D M02-
55 81 863 3<br />
2<br />
3<br />
1<br />
3<br />
1<br />
E980A440<br />
The bumper shell has been treated with grey primer<br />
<strong>in</strong> preparation for pa<strong>in</strong>t<strong>in</strong>g.<br />
Pa<strong>in</strong>t the bumper shell <strong>in</strong> the colour of the body, see<br />
“Directions for pa<strong>in</strong>t<strong>in</strong>g preprimed PP/EPDM plastic”<br />
<strong>in</strong> these <strong>in</strong>stallation <strong><strong>in</strong>structions</strong>.<br />
1 Unscrew the screws <strong>in</strong> the wheel hous<strong>in</strong>g, 2 on<br />
each side.<br />
2 Open the trunk (boot) lid.<br />
3 Remove the scuff plate.<br />
<strong>Saab</strong> 9-5 4D M02-
4 55 81 863<br />
6<br />
4<br />
7<br />
6<br />
8<br />
5<br />
E980A441<br />
4 Fold away the luggage <strong>com</strong>partment carpet and<br />
remove the seals.<br />
Cars with towbar:<br />
– Undo the corner sections of the bumper strip<br />
and remove the centre section.<br />
– Remove the bolts and nuts that hold the<br />
re<strong>in</strong>forcements to the body.<br />
– Remove the towbar mount<strong>in</strong>gs to the floor of<br />
the car.<br />
– Remove the towbar's electrical connector<br />
from the towbar.<br />
5 Remove the nuts that hold the bumper. The<br />
lower bolts only have nuts it the car is equipped<br />
with towbar.<br />
6 Pull out the bumper from the wheel hous<strong>in</strong>g<br />
edges and the rear fender (w<strong>in</strong>g). Lift the bumper<br />
out backwards.<br />
SPA: Unplug the connectors.<br />
Important<br />
Work carefully dur<strong>in</strong>g removal so that pa<strong>in</strong>t damage<br />
is avoided.<br />
7 Remove the upper cellular block.<br />
8 Remove the bumper rail.<br />
9 SPA: Remove the cellular block from the<br />
bumper shell, the wir<strong>in</strong>g harness and the holder<br />
for the connector.<br />
<strong>Saab</strong> 9-5 4D M02-
55 81 863 5<br />
10<br />
12<br />
11<br />
E980A443<br />
10 Cars with towbar: Us<strong>in</strong>g a universal knife with<br />
hook shaped blade, cut out the marked area for<br />
the towbar <strong>in</strong> the bumper grille decor strip (a jig<br />
saw can also be used).<br />
Important<br />
Cut or saw as exact as possible. The appearance<br />
is very important. Adjust with a file if necessary.<br />
11 Fit the grille decor strip <strong>in</strong> the bumper.<br />
SPA: Fit the wir<strong>in</strong>g harness.<br />
12 Press the cellular block <strong>in</strong>to the bumper shell<br />
mount<strong>in</strong>g wedges.<br />
<strong>Saab</strong> 9-5 4D M02-
6 55 81 863<br />
15<br />
17<br />
14<br />
13<br />
17<br />
18<br />
18<br />
E980A444<br />
13 Fit the bumper rail.<br />
Note<br />
The rail must be guided <strong>in</strong>to place us<strong>in</strong>g the guide<br />
p<strong>in</strong> <strong>in</strong> the protective shell.<br />
14 Fit the cellular block on the sides of the bumper<br />
shell.<br />
15 Fit the upper cellular block.<br />
16 SPA: Fit the holder for the connector.<br />
17 Position the bumper.<br />
SPA: Connect the connectors.<br />
18 Press the bumper over the edge of the wheel<br />
hous<strong>in</strong>g and rear fender (w<strong>in</strong>g), make sure that<br />
the clips locate correctly, and fit the nuts.<br />
<strong>Saab</strong> 9-5 4D M02-
55 81 863 7<br />
22<br />
21<br />
19<br />
19<br />
20<br />
E980A445<br />
19 Centre the bumper aga<strong>in</strong>st the trunk (boot)<br />
open<strong>in</strong>g and tighten the screws <strong>in</strong> the edge of<br />
the wheel hous<strong>in</strong>g. Check the fit and adjust if<br />
necessary.<br />
20 Fit the nuts that hold the bumper.<br />
Tighten<strong>in</strong>g torque 40 Nm (30 lbf ft)<br />
Cars with towbar:<br />
– Fit the towbar's electrical connector to the<br />
towbar.<br />
– Fit the towbar mount<strong>in</strong>gs to the floor of the<br />
car.<br />
Tighten<strong>in</strong>g torque 40 Nm (30 lbf ft)<br />
– Fit the bolts and nuts that hold the re<strong>in</strong>forcements<br />
to the body.<br />
Tighten<strong>in</strong>g torque 40 Nm (30 lbf ft)<br />
– Fit the centre section of the bumper shell<br />
decor strip and fit the corner sections.<br />
21 Fit the seals and fold down the luggage <strong>com</strong>partment<br />
carpet.<br />
22 Fit the scuff plate.<br />
23 Close the trunk (boot) lid.<br />
<strong>Saab</strong> 9-5 4D M02-
8 55 81 863<br />
Directions for pa<strong>in</strong>t<strong>in</strong>g preprimed PP/<br />
EPDM plastic<br />
• Place the sill covers <strong>in</strong> such a way as they will not<br />
be distorted while pa<strong>in</strong>t<strong>in</strong>g.<br />
• The temperature must not exceed +40 °C<br />
(104 °F).<br />
• The sill covers are primed on delivery.<br />
• Use clean gloves when handl<strong>in</strong>g the sill covers.<br />
Dry<strong>in</strong>g time<br />
70 m<strong>in</strong>utes at 40 °C (104 °F).<br />
Preparations<br />
• Rub down the primed surfaces thoroughly. Use<br />
3M 1200 or 800 abrasive paper.<br />
<strong>Saab</strong> 9-5 4D M02-