Saab 12798348 instructions in English - SaabDocs.com
Saab 12798348 instructions in English - SaabDocs.com
Saab 12798348 instructions in English - SaabDocs.com

Create successful ePaper yourself
Turn your PDF publications into a flip-book with our unique Google optimized e-Paper software.
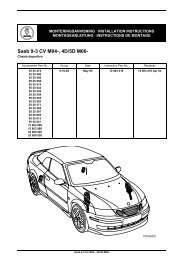
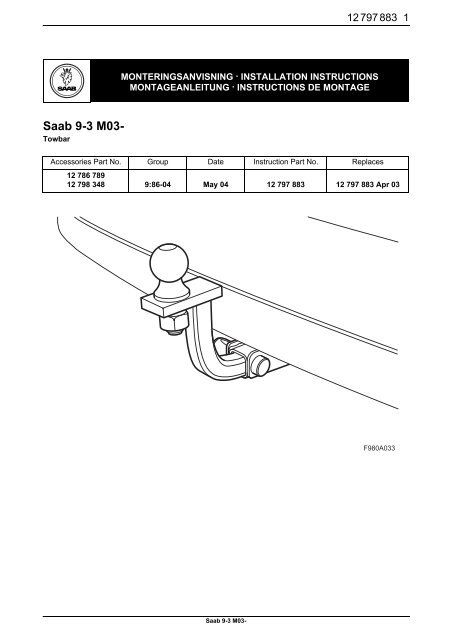
12 797 883 1<br />
SCdefault<br />
4900 Monter<strong>in</strong>gsanvisn<strong>in</strong>g<br />
SITdefault<br />
<strong>Saab</strong> 9-3 M03-<br />
Towbar<br />
MONTERINGSANVISNING · INSTALLATION INSTRUCTIONS<br />
MONTAGEANLEITUNG · INSTRUCTIONS DE MONTAGE<br />
Accessories Part No. Group Date Instruction Part No. Replaces<br />
12 786 789<br />
12 798 348 9:86-04 May 04 12 797 883 12 797 883 Apr 03<br />
F980A033<br />
<strong>Saab</strong> 9-3 M03-
2 12 797 883<br />
7<br />
10<br />
8<br />
9<br />
6<br />
7<br />
4<br />
15<br />
1<br />
3<br />
5<br />
13<br />
12 2 16<br />
14<br />
11<br />
14<br />
17<br />
F980A034<br />
1 Body bracket<br />
2 Ball mount<strong>in</strong>g<br />
3 Lock<strong>in</strong>g p<strong>in</strong><br />
4 Bolt (x4)<br />
5 Screw (x2)<br />
6 Nut (x4)<br />
7 Re<strong>in</strong>forcement plate (x2)<br />
8 Ball cap<br />
9 Storage bag<br />
10 Key (x2)<br />
11 Wir<strong>in</strong>g harness with diode box<br />
12 Cable tie (x4)<br />
13 Electronic module<br />
14 Cover<br />
15 Ball<br />
16 Spr<strong>in</strong>g washer<br />
17 Nut<br />
Note<br />
Always check national legislation and regulations<br />
regard<strong>in</strong>g mount<strong>in</strong>g a tow<strong>in</strong>g bracket. Ensure that<br />
all requirements are <strong>com</strong>plied with.<br />
The tow<strong>in</strong>g bracket was designed and tested <strong>in</strong><br />
accordance with standard V-5 Class 2.<br />
Maximum permitted trailer weight:<br />
Trailer with brake: 3500 lbs (1587 kg)<br />
Trailer without brake: 1000 lbs (455 kg)<br />
Max. permissible ball pressure: 165 lbs (75 kg)<br />
Important<br />
The wir<strong>in</strong>g harness must be connected follow<strong>in</strong>g<br />
the description <strong>in</strong> these <strong>in</strong>,stallation <strong><strong>in</strong>structions</strong>.<br />
This is a requirement. If the wir<strong>in</strong>g harness is connected<br />
<strong>in</strong> any other way, it could negatively affect<br />
the car's electrical system.<br />
<strong>Saab</strong> 9-3 M03-
12 797 883 3<br />
6<br />
5<br />
7<br />
7<br />
7<br />
4<br />
5<br />
2<br />
1 Raise the car.<br />
2 Remove the two nuts hold<strong>in</strong>g the rear bumper<br />
air shield aga<strong>in</strong>st the body and the two bolts<br />
hold<strong>in</strong>g the bumper shell aga<strong>in</strong>st the wheel<br />
hous<strong>in</strong>gs.<br />
3 Lower the car and open the boot lid.<br />
CV: Remove the carpet on the luggage <strong>com</strong>partment<br />
floor.<br />
4 Remove the luggage <strong>com</strong>partment scuff plate.<br />
5 4D: Remove the hatch <strong>in</strong> the luggage <strong>com</strong>partment<br />
left-hand side trim and lower the hatch on<br />
the right-hand side.<br />
6 Remove the side scuff plate on the left-hand<br />
side.<br />
7 Remove the clips for the left-hand side trim and<br />
fold the trim aside.<br />
CV: Unhook the strap on the rear side of the side<br />
trim and remove the connector from the luggage<br />
<strong>com</strong>partment light<strong>in</strong>g. Remove the side trim.<br />
2<br />
F980A022<br />
<strong>Saab</strong> 9-3 M03-
4 12 797 883<br />
CV<br />
8<br />
8<br />
4D<br />
8<br />
8<br />
8<br />
8<br />
8<br />
10<br />
11<br />
12<br />
F980A259<br />
8 Remove the rear lamp clusters.<br />
9 SPA: Unplug the connector.<br />
10 Remove the bumper shell bolts that are located<br />
below the rear lamp clusters.<br />
11 Remove the bumper bolts at the wheel hous<strong>in</strong>gs.<br />
12 Remove the bumper shell by pull<strong>in</strong>g the sides<br />
outwards and then pull<strong>in</strong>g the bumper shell rearwards.<br />
<strong>Saab</strong> 9-3 M03-
12 797 883 5<br />
15 13,15<br />
15<br />
15<br />
13,15<br />
15<br />
13<br />
14,15<br />
14,15<br />
F980A035<br />
13 Mount the tow<strong>in</strong>g bracket us<strong>in</strong>g bolts and nuts<br />
together with the re<strong>in</strong>forcements <strong>in</strong> the four<br />
bumper member holes and raise the car.<br />
14 Fasten the tow<strong>in</strong>g bracket <strong>in</strong> the floor under the<br />
spare wheel well.<br />
15 Tighten the bumper member mount<strong>in</strong>gs aga<strong>in</strong>st<br />
the body as well as the screws, bolts and nuts<br />
hold<strong>in</strong>g the tow<strong>in</strong>g bracket aga<strong>in</strong>st the bumper<br />
member and floor.<br />
Tighten<strong>in</strong>g torque, bumper member aga<strong>in</strong>st<br />
body 50 Nm (37 lbf ft)<br />
Tighten<strong>in</strong>g torque, tow<strong>in</strong>g bracket aga<strong>in</strong>st<br />
bumper member 50 Nm (37 lbf ft)<br />
Tighten<strong>in</strong>g torque, tow<strong>in</strong>g bracket aga<strong>in</strong>st<br />
floor 50 Nm (37 lbf ft)<br />
<strong>Saab</strong> 9-3 M03-
6 12 797 883<br />
16A<br />
19<br />
16B<br />
20<br />
19<br />
F980A036<br />
16 Use a universal knife with a hooked blade to cut<br />
a hole for the towbar <strong>in</strong> the bumper shell (a jig<br />
saw can also be used).<br />
WARNING<br />
Exercise caution when us<strong>in</strong>g a saw or knife as this<br />
may cause <strong>in</strong>jury.<br />
24 Fit the two nuts hold<strong>in</strong>g the rear bumper air<br />
shield aga<strong>in</strong>st the body and the two bolts hold<strong>in</strong>g<br />
the bumper shell aga<strong>in</strong>st the wheel hous<strong>in</strong>gs.<br />
4D: Cont<strong>in</strong>ue with step 25.<br />
CV: Cont<strong>in</strong>ue with step 36.<br />
The cut-out should be made with<strong>in</strong> the re<strong>in</strong>forc<strong>in</strong>g<br />
grooves.<br />
Cars without bumper skirt (A): There is only<br />
one mark<strong>in</strong>g.<br />
Cars with bumper skirt (B): There are three<br />
mark<strong>in</strong>gs. Use the mark<strong>in</strong>g <strong>in</strong>dicated <strong>in</strong> the illustration.<br />
17 Lower the car.<br />
18 SPA: Insert and plug <strong>in</strong> the connector.<br />
19 Fit the two tabs of the bumper shell under the<br />
holes and the outer corners between the wheel<br />
arch l<strong>in</strong>er and the holder at the wheel hous<strong>in</strong>gs.<br />
Press the bumper shell <strong>in</strong>to place.<br />
20 Fit the bumper shell bolts that are located below<br />
the rear lamp clusters.<br />
21 Fit the bumper bolts at the wheel hous<strong>in</strong>gs.<br />
22 Fit and connect the rear lamp clusters. Check<br />
the fit aga<strong>in</strong>st the boot lid mould<strong>in</strong>g.<br />
23 Raise the car.<br />
<strong>Saab</strong> 9-3 M03-
12 797 883 7<br />
27<br />
26<br />
33<br />
26 26<br />
26<br />
F980A037<br />
4D<br />
25 Lower the car and run the wir<strong>in</strong>g harness along<br />
the other wir<strong>in</strong>g harnesses towards the left-hand<br />
side of the car and to the rear electrical distribution<br />
box.<br />
26 Plug the wir<strong>in</strong>g harness connector <strong>in</strong>to the rear<br />
electrical distribution box and secure the wir<strong>in</strong>g<br />
harness with 4 cable ties.<br />
27 Fit the kit's electronic module <strong>in</strong> the rear electrical<br />
distribution box.<br />
28 Fit the left-hand side trim.<br />
29 Fit the side scuff plate on the left-hand side.<br />
30 Fit the scuff plate.<br />
31 Fit the hatches <strong>in</strong> the side trims of the luggage<br />
<strong>com</strong>partment.<br />
32 Fit the ball mount<strong>in</strong>g, see “User <strong><strong>in</strong>structions</strong>”.<br />
33 Fit the ball to the mount<strong>in</strong>g.<br />
Tighten<strong>in</strong>g torque 180 Nm (133 lbf ft)<br />
34 Check the fit of the bumper. Adjust as necessary.<br />
35 Carefully remove the page regard<strong>in</strong>g fitt<strong>in</strong>g and<br />
remov<strong>in</strong>g the ball unit and give it to the customer<br />
together with the <strong>in</strong>stallation <strong><strong>in</strong>structions</strong>.<br />
<strong>Saab</strong> 9-3 M03-
8 12 797 883<br />
37<br />
37<br />
38<br />
44<br />
37<br />
37<br />
F980A265<br />
CV<br />
36 Lower the car and run the wir<strong>in</strong>g harness along<br />
the other wir<strong>in</strong>g harnesses towards the left-hand<br />
side of the car and to the rear electrical distribution<br />
box.<br />
37 Plug the wir<strong>in</strong>g harness connector <strong>in</strong>to the rear<br />
electrical distribution box and secure the wir<strong>in</strong>g<br />
harness with 4 cable ties.<br />
38 Fit the kit's electronic module <strong>in</strong> the rear electrical<br />
distribution box.<br />
39 Fit the left-hand side trim. Connect the luggage<br />
<strong>com</strong>partment light<strong>in</strong>g and hook the strap on.<br />
40 Fit the side scuff plate on the left-hand side.<br />
41 Fit the scuff plate.<br />
42 Fit the carpet on the luggage <strong>com</strong>partment floor.<br />
43 Fit the ball mount<strong>in</strong>g, see “User <strong><strong>in</strong>structions</strong>”.<br />
44 Fit the ball to the mount<strong>in</strong>g.<br />
Tighten<strong>in</strong>g torque 180 Nm (133 lbf ft)<br />
45 Check the fit of the bumper. Adjust as necessary.<br />
46 Carefully remove the page regard<strong>in</strong>g fitt<strong>in</strong>g and<br />
remov<strong>in</strong>g the ball unit and give it to the customer<br />
together with the <strong>in</strong>stallation <strong><strong>in</strong>structions</strong>.<br />
<strong>Saab</strong> 9-3 M03-
12 797 883 9<br />
Wir<strong>in</strong>g diagram<br />
701<br />
+30<br />
+30<br />
10<br />
26<br />
I-BUS<br />
25<br />
18 11 9<br />
7<br />
8<br />
2 3 1 5<br />
10<br />
12 6<br />
4<br />
13<br />
26<br />
23<br />
24<br />
BK 4.0<br />
2<br />
R-B<br />
19<br />
22<br />
21<br />
20 16 15<br />
17 14<br />
731<br />
G31-5<br />
3<br />
7<br />
11<br />
10<br />
13<br />
258<br />
G3<br />
BK 2.5<br />
GY 1.0<br />
C1-6<br />
OG 1.0<br />
C1-4<br />
PK 1.0<br />
C1-5<br />
GN/BU1 .0<br />
C31<br />
C1-9<br />
DIODE BOX<br />
C31-1 WH 1.0<br />
C1-3<br />
BN 1.0<br />
C1-2<br />
YE 1.0<br />
C1-1<br />
GN 1.0<br />
1 2 3 4<br />
SAE J 1239<br />
13 27/30R<br />
27/30L<br />
FL12US<br />
021217<br />
<strong>Saab</strong> 9-3 M03-
10 12 797 883<br />
List of <strong>com</strong>ponents<br />
No.<br />
Name<br />
position<br />
Components<br />
13 Lamp, park<strong>in</strong>g light,<br />
trailer<br />
27/30 Lamp, direction <strong>in</strong>dicators/brake lights,<br />
trailer<br />
258 Connector, towbar wir<strong>in</strong>g harness,<br />
<strong>in</strong> the luggage <strong>com</strong>partment electrical<br />
distribution unit<br />
701 Luggage <strong>com</strong>partment electrical distribution<br />
unit,<br />
on the wall beh<strong>in</strong>d the left rear wheel<br />
hous<strong>in</strong>g<br />
731 Trailer control module,<br />
<strong>in</strong> the luggage <strong>com</strong>partment electrical<br />
distribution unit<br />
G3<br />
Ground<strong>in</strong>g po<strong>in</strong>ts<br />
In the luggage <strong>com</strong>partment below the<br />
left light cluster<br />
<strong>Saab</strong> 9-3 M03-
12 797 883 11<br />
3 4<br />
4<br />
2<br />
F980A038<br />
User <strong><strong>in</strong>structions</strong><br />
(keep <strong>in</strong> the car's Owners Manual)<br />
WARNING<br />
To ensure that the towbar is coupled correctly<br />
and safely:<br />
• The coupl<strong>in</strong>g mechanism must always be kept<br />
well lubricated. Contact your nearest <strong>Saab</strong><br />
dealer regard<strong>in</strong>g a suitable grease.<br />
• Always fitted the protective cover when the<br />
towball unit is not attached.<br />
• It must always be possible to detach and<br />
attach the towball unit without it jamm<strong>in</strong>g.<br />
To attach the towball unit<br />
1 Remove the cover.<br />
2 Fit the ball unit.<br />
3 Insert the key <strong>in</strong> the p<strong>in</strong>'s lock, turn it clockwise<br />
and remove the p<strong>in</strong>'s lock.<br />
4 Insert the p<strong>in</strong> <strong>in</strong>to the tow<strong>in</strong>g bracket hole and fit<br />
the lock to the p<strong>in</strong>. Turn the key anticlockwise to<br />
lock the p<strong>in</strong> and then remove the key. Turn the<br />
lock sleeve to hide and protect the lock.<br />
<strong>Saab</strong> 9-3 M03-
12 12 797 883<br />
1<br />
3<br />
1<br />
4<br />
F980A136<br />
To detach the towball unit<br />
1 Turn the sleeve to access the lock. Insert the<br />
key, turn it clockwise and remove the p<strong>in</strong>'s lock.<br />
2 Pull out the p<strong>in</strong>.<br />
3 Fit the lock on the p<strong>in</strong>, turn the key anticlockwise<br />
and remove it.<br />
4 Remove the ball unit.<br />
5 Fit the cover.<br />
When the towbar is not <strong>in</strong> use, the wir<strong>in</strong>g harness<br />
must be stored <strong>in</strong> the follow<strong>in</strong>g location:<br />
4D: Beh<strong>in</strong>d the hatch <strong>in</strong> the left-hand side trim.<br />
CV: Beside the spare wheel <strong>in</strong> the spare wheel well.<br />
<strong>Saab</strong> 9-3 M03-