Saab 400107322 instructions in English - SaabDocs.com
Saab 400107322 instructions in English - SaabDocs.com
Saab 400107322 instructions in English - SaabDocs.com

You also want an ePaper? Increase the reach of your titles
YUMPU automatically turns print PDFs into web optimized ePapers that Google loves.
4785267 1<br />
SCdefault<br />
900 Monter<strong>in</strong>gsanvisn<strong>in</strong>g<br />
SITdefault<br />
<strong>Saab</strong> 9-5<br />
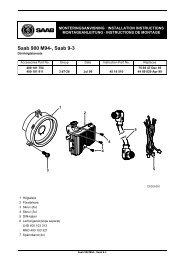
Installation kit, extra lights<br />
MONTERINGSANVISNING · INSTALLATION INSTRUCTIONS<br />
MONTAGEANLEITUNG · INSTALLATIONS DE MONTAGE<br />
Accessories Part No. Group Date Instruction Part No. Replaces<br />
400 107 322 3:51-30 Apr 99 47 85 267 47 85 267 May 97<br />
1<br />
6<br />
9<br />
10<br />
3<br />
8<br />
7 2 5 4<br />
E351A001<br />
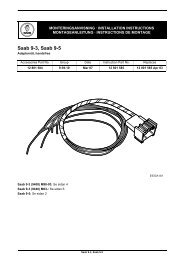
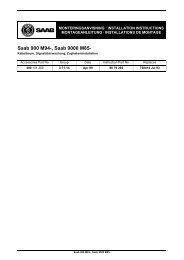
1 Wir<strong>in</strong>g harness<br />
2 Switch<br />
3 Relay<br />
4 Fuse<br />
5 Distribution block (2)<br />
6 Cable tie (10)<br />
7 Connector<br />
8 Bracket, left-hand<br />
9 Bracket, right-hand<br />
10 Screw (x4)<br />
<strong>Saab</strong> 9-5
2 4785267<br />
4<br />
5<br />
6<br />
7<br />
2<br />
1<br />
8<br />
E351A002<br />
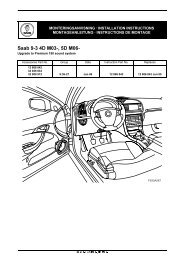
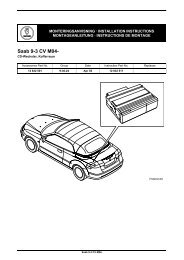
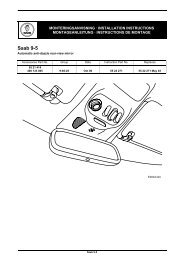
1 Disconnect the negative battery cable.<br />
2 Undo and lift up the ma<strong>in</strong> fuse box <strong>in</strong> the eng<strong>in</strong>e<br />
bay.<br />
3 Remove the seal/cable tie on the ma<strong>in</strong> fuse box,<br />
open the lid and then lift out the relay board.<br />
4 Fit the wir<strong>in</strong>g harness relay holder <strong>in</strong> position 4.<br />
Check that it snaps <strong>in</strong>to place.<br />
5 Connect the wir<strong>in</strong>g's red leads with contact p<strong>in</strong>s<br />
to fuse 12.<br />
6 Connect the green lead by means of a<br />
distribution block to the white lead from p<strong>in</strong> 8 of<br />
the filament monitor (relay position 13).<br />
7 Run the wir<strong>in</strong>g harness through the ma<strong>in</strong> fuse<br />
box. Connect the wir<strong>in</strong>g's black lead (r<strong>in</strong>g<br />
term<strong>in</strong>al) to the outer ground<strong>in</strong>g po<strong>in</strong>t on the lefthand<br />
structural member <strong>in</strong> front of the battery.<br />
8 Connect the red lead (r<strong>in</strong>g term<strong>in</strong>al) to the ma<strong>in</strong><br />
maxi fuse board's battery <strong>in</strong>put term<strong>in</strong>al.<br />
9 Fit the relay board back <strong>in</strong> the ma<strong>in</strong> fuse box and<br />
fit the fuse box back <strong>in</strong> place.<br />
10 Fit the relay <strong>in</strong> position 4 <strong>in</strong> the ma<strong>in</strong> fuse box.<br />
11 Fit the fuse <strong>in</strong> position 12 on the ma<strong>in</strong> relay<br />
board <strong>in</strong> the eng<strong>in</strong>e bay and fit the lid back <strong>in</strong><br />
place.<br />
<strong>Saab</strong> 9-5
4785267 3<br />
13<br />
12,20<br />
14<br />
15<br />
E351A003<br />
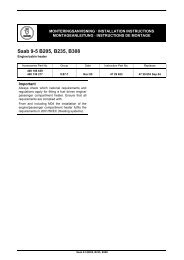
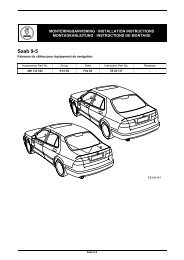
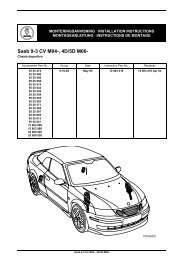
12 Remove the front grille.<br />
13 Remove the horn brackets and the front <strong>in</strong>take<br />
manifold mount<strong>in</strong>g.<br />
14 Fit the brackets for the extra lights onto the<br />
bumper member together with the horn brackets<br />
us<strong>in</strong>g the screws <strong>in</strong>cluded <strong>in</strong> the kit.<br />
Refit the <strong>in</strong>take manifold.<br />
15 Make sure that the washer fluid hose is not<br />
trapped between the brackets but runs <strong>in</strong> its<br />
groove<br />
16 Remove the left-hand headlamp and left-hand<br />
direction <strong>in</strong>dicator. Lay the wir<strong>in</strong>g harness along<br />
the exist<strong>in</strong>g wir<strong>in</strong>g harness up to the brackets.<br />
17 Mount the lamps on the brackets.<br />
18 Connect the yellow and black leads to their<br />
respective lamps.<br />
19 Secure the harness from the ma<strong>in</strong> fuse box to<br />
the bracket with cable ties.<br />
Refit the left-hand headlamp and direction<br />
<strong>in</strong>dicator.<br />
20 Refit the front grille<br />
<strong>Saab</strong> 9-5
4 4785267<br />
26<br />
22 23<br />
27<br />
21<br />
E351A004<br />
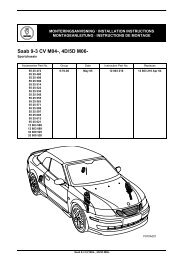
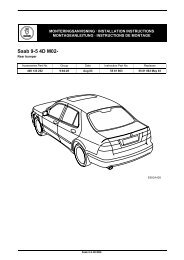
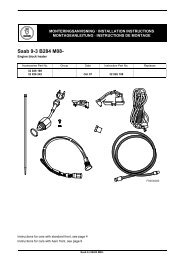
21 Remove the acoustic <strong>in</strong>sulation panel above the<br />
pedal assembly.<br />
22 Remove the lights switch unit.<br />
23 Remove the upper cover on the switch assembly<br />
between the steer<strong>in</strong>g wheel and door.<br />
24 Run the wir<strong>in</strong>g through the bulkhead partition<br />
grommet and <strong>in</strong>to the cab<strong>in</strong>.<br />
25 Run the leads up to the dashboard and connect<br />
them to the <strong>in</strong>stallation kit’s connector as follows:<br />
28 Secure any surplus wir<strong>in</strong>g by means of cable<br />
ties. Check that the cables are clear of any mov<strong>in</strong>g<br />
parts.<br />
29 Refit the lights switch unit and acoustic <strong>in</strong>sulation<br />
panel.<br />
30 Reconnect the negative battery cable.<br />
31 Switch on the ignition and test the extra lights<br />
and <strong>in</strong>strument light<strong>in</strong>g, mak<strong>in</strong>g sure that they<br />
are <strong>in</strong> proper work<strong>in</strong>g order.<br />
32 Check that the lights are wired <strong>in</strong> conformity with<br />
the country's legal requirements. Check and<br />
adjust the alignment of the extra lights.<br />
P<strong>in</strong> Colour<br />
1 BN<br />
2 BK<br />
3 -<br />
4 -<br />
5 GN<br />
6 -<br />
7 -<br />
8 BL<br />
26 Connect the brown lead by means of a distribution<br />
block to the blue/white lead on p<strong>in</strong> 5 of the<br />
lights switch connector.<br />
27 Connect the wir<strong>in</strong>g's connector to the extra<br />
lights switch and mount the switch <strong>in</strong> the dashboard.<br />
<strong>Saab</strong> 9-5
4785267 5<br />
Wir<strong>in</strong>g diagram<br />
B+<br />
16<br />
5<br />
56a<br />
56b<br />
228b<br />
MAXI<br />
A<br />
GY/RD<br />
1<br />
5<br />
7<br />
BU<br />
YE<br />
RD<br />
2<br />
BK<br />
4<br />
1<br />
86<br />
30<br />
B<br />
BK<br />
85<br />
5<br />
87<br />
2<br />
RD/BK<br />
RD/BK<br />
1 1<br />
2<br />
2<br />
BK<br />
BK<br />
DL03A98<br />
990420<br />
10 12FL 228b 342a 628 FL FR<br />
Lights<br />
switch<br />
Left-hand<br />
ma<strong>in</strong> beam<br />
Relay, front<br />
filament<br />
monitor<br />
Ma<strong>in</strong> fuse<br />
board <strong>in</strong> the<br />
eng<strong>in</strong>e bay<br />
DICE<br />
Left-hand<br />
extra light<br />
Right-hand<br />
extra light<br />
<strong>Saab</strong> 9-5