PM-Menu-76 Doors - Security Help Desk
PM-Menu-76 Doors - Security Help Desk
PM-Menu-76 Doors - Security Help Desk
You also want an ePaper? Increase the reach of your titles
YUMPU automatically turns print PDFs into web optimized ePapers that Google loves.
MODEL 3000 / ACCESS 4000 Programmer’s Manual - <strong>Doors</strong>. Rev 4.50 [MENU 7-6] p 1<br />
Door Programming<br />
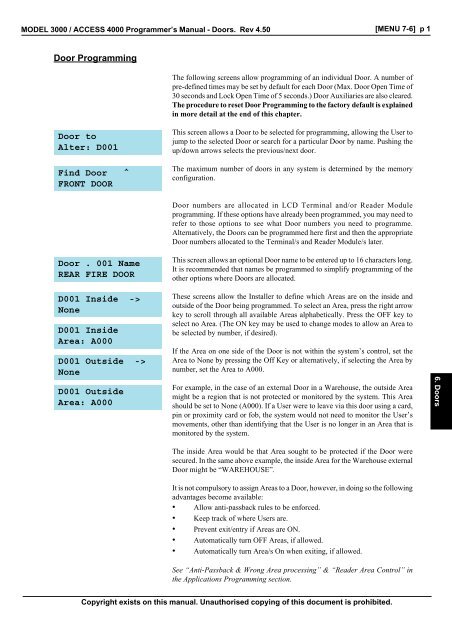
The following screens allow programming of an individual Door. A number of<br />
pre-defined times may be set by default for each Door (Max. Door Open Time of<br />
30 seconds and Lock Open Time of 5 seconds.) Door Auxiliaries are also cleared.<br />
The procedure to reset Door Programming to the factory default is explained<br />
in more detail at the end of this chapter.<br />
Door to<br />
Alter: D001<br />
Find Door<br />
FRONT DOOR<br />
^<br />
This screen allows a Door to be selected for programming, allowing the User to<br />
jump to the selected Door or search for a particular Door by name. Pushing the<br />
up/down arrows selects the previous/next door.<br />
The maximum number of doors in any system is determined by the memory<br />
configuration.<br />
Door numbers are allocated in LCD Terminal and/or Reader Module<br />
programming. If these options have already been programmed, you may need to<br />
refer to those options to see what Door numbers you need to programme.<br />
Alternatively, the <strong>Doors</strong> can be programmed here first and then the appropriate<br />
Door numbers allocated to the Terminal/s and Reader Module/s later.<br />
Door . 001 Name<br />
REAR FIRE DOOR<br />
This screen allows an optional Door name to be entered up to 16 characters long.<br />
It is recommended that names be programmed to simplify programming of the<br />
other options where <strong>Doors</strong> are allocated.<br />
D001 Inside -><br />
None<br />
D001 Inside<br />
Area: A000<br />
D001 Outside -><br />
None<br />
D001 Outside<br />
Area: A000<br />
These screens allow the Installer to define which Areas are on the inside and<br />
outside of the Door being programmed. To select an Area, press the right arrow<br />
key to scroll through all available Areas alphabetically. Press the OFF key to<br />
select no Area. (The ON key may be used to change modes to allow an Area to<br />
be selected by number, if desired).<br />
If the Area on one side of the Door is not within the system’s control, set the<br />
Area to None by pressing the Off Key or alternatively, if selecting the Area by<br />
number, set the Area to A000.<br />
For example, in the case of an external Door in a Warehouse, the outside Area<br />
might be a region that is not protected or monitored by the system. This Area<br />
should be set to None (A000). If a User were to leave via this door using a card,<br />
pin or proximity card or fob, the system would not need to monitor the User’s<br />
movements, other than identifying that the User is no longer in an Area that is<br />
monitored by the system.<br />
6. <strong>Doors</strong><br />
The inside Area would be that Area sought to be protected if the Door were<br />
secured. In the same above example, the inside Area for the Warehouse external<br />
Door might be “WAREHOUSE”.<br />
It is not compulsory to assign Areas to a Door, however, in doing so the following<br />
advantages become available:<br />
• Allow anti-passback rules to be enforced.<br />
• Keep track of where Users are.<br />
• Prevent exit/entry if Areas are ON.<br />
• Automatically turn OFF Areas, if allowed.<br />
• Automatically turn Area/s On when exiting, if allowed.<br />
See “Anti-Passback & Wrong Area processing” & “Reader Area Control” in<br />
the Applications Programming section.<br />
Copyright exists on this manual. Unauthorised copying of this document is prohibited.
[MENU 7-6] p 2<br />
MODEL 3000 / ACCESS 4000 Programmer’s Manual - <strong>Doors</strong>. Rev 4.50<br />
D001 Acc.Group-><br />
CARD USER<br />
This screen allows the User to assign an Access Group to this Door. The Access<br />
Group programming will determine how access works at this Door.<br />
D001 Access<br />
Group: AG002<br />
D001 Lock<br />
Aux: R01:X01<br />
This screen allows an Auxiliary output to be specified that will operate the Door<br />
lock associated with this Door. If a Control Module Auxiliary is chosen to operate<br />
a Door Lock, the Auxiliary timer units must be set to seconds. For all other Module<br />
types the Auxiliary timer is completely independent from the lock open time. (See<br />
next screen).<br />
Lock Auxiliaries<br />
It is recommended that the following Auxiliaries be used as Lock Auxiliaries:<br />
Single Door & 2 Door Access Modules:<br />
1st Door<br />
Rxx:X01<br />
2nd Door<br />
Rxx:X04<br />
LCD Terminal<br />
Txx:X01<br />
Intelligent 4 Door Access Module: (Lock Auxiliaries shown must be used)<br />
1st Door<br />
Ixx:X01<br />
2nd Door<br />
Ixx:X02<br />
3rd Door<br />
Ixx:X03<br />
4th Door<br />
Ixx:X04<br />
D001 Lock Open<br />
Time: 005 S/0.1S<br />
This screen determines the time for which this Door will be un-locked during a<br />
normal access event. This value is programmable from 0 to 255 Seconds.<br />
IMPORTANT NOTES:<br />
1) A value of “000” causes the Door to un-lock indefinitely. The Door must<br />
then be re-locked by another operation. (e.g. MENU.9.2, TimeZone, etc.)<br />
2) The Lock Open Timer is independent of the “Auxiliary Timer” for the Lock<br />
Auxiliary. Normally, the “Lock Open Time” is the only timer that needs to be<br />
programmed for the Lock Auxiliary. However, if any other operation is to be used<br />
to momentarily unlock the Door, the Auxiliary Timer [MENU 5,5] for the Lock<br />
Auxiliary should also be programmed. (Unless the actual operation already includes<br />
a timer).<br />
Fast Lock Open Time option.<br />
(Only available in Intelligent 4 Door Access Module firmware V1.08 or later.)<br />
The “Lock Open Time” defined in Door programming is normally specified in<br />
Seconds. e.g. A Lock Open Time of “5”, will activate the Lock Auxiliary for 5<br />
Seconds. In some installations, the Lock Open Time needs to be shorter than 1<br />
second. e.g. When providing a short pulse output to trigger a special access<br />
device such as a turnstile system.<br />
An option is available to allow an Intelligent 4 Door Access Module to process<br />
the “Lock Open Time” as 100 milli-Second increments instead of 1 Second<br />
increments.<br />
Copyright exists on this manual. Unauthorised copying of this document is prohibited.
MODEL 3000 / ACCESS 4000 Programmer’s Manual - <strong>Doors</strong>. Rev 4.50 [MENU 7-6] p 3<br />
e.g.<br />
-Lock Open Time of “5”, will activate the Lock Aux. for 500 mS. ( 5 x 100mS)<br />
-Lock Open Time of “50”, will activate the Lock Aux. for 5 Sec. ( 50 x 100mS)<br />
This is done by setting Switch 8 on DIPswitch 2 to the ON position.<br />
When set, the Lock Open Time will then be processed as 100 milli-Second<br />
increments for all 4 <strong>Doors</strong> on that particular Module.<br />
See the Intelligent 4 Door Access Module installation manual for location of<br />
DIPswitch.<br />
Only Modules with the DIPswitch set to ON will process the Lock Open Time in<br />
this way. Any other Modules with the DIPswitch left in the OFF position, will<br />
process the Lock Open Time in the normal manner as 1 second increments.<br />
D001 Max. Open<br />
Time: 030 sec<br />
This screen determines the maximum time this Door may be left open before creating<br />
a “Door Open Too Long” (Door Held Open) alarm. The “Door Open Too Long”<br />
alarm is a System Input generated from the LCD Terminal or Reader Module<br />
associated with the Door. This time is programmable from 1 to 255 seconds.<br />
Note: In earlier 2 Door Reader Modules (Part no: 993012) configured for “2” Door<br />
mode, the “Maximum Door Open Time” set for the 1st Door on the Module was<br />
utilized as the Max. Door Open Time for both <strong>Doors</strong>.<br />
All current Access Modules allow the Max. Door Open time to be defined and<br />
operate separately for each Door.<br />
i.e. 995012-2 Door Access Modules and Intelligent 4 Door Access Modules.<br />
D001 E.......<br />
Opts -> nnnnnnnn<br />
This screen allows the Installer to programme various Door options.<br />
E<br />
Extra Area Counting<br />
This option allows the User count in the User’s “Extra Area” to be incremented/<br />
decremented when the User is granted access through this door.<br />
If the reader is on the “Outside”, the User count is incremented in the User’s Extra<br />
Area.<br />
6. <strong>Doors</strong><br />
If the reader is on the “Inside”, the User count is decremented in the User’s Extra<br />
Area.<br />
No “count” or “Arm on count = 0” will occur on the Door Areas when this option<br />
is enabled.<br />
. Spare<br />
Spare for future use. This option must be set to “n”.<br />
Copyright exists on this manual. Unauthorised copying of this document is prohibited.
[MENU 7-6] p 4<br />
MODEL 3000 / ACCESS 4000 Programmer’s Manual - <strong>Doors</strong>. Rev 4.50<br />
Door Interlocking<br />
ACCESS 4000 ONLY<br />
The Access 4000 model supports convenient Door Interlocking without the need<br />
to programme Calculated Auxiliaries or Function Zones. Every Door can have an<br />
Interlock Group assigned to it. When a Door has an Interlock Group assigned,<br />
access through the Door may be further qualified by the programming of that<br />
Interlock Group. <strong>Doors</strong> can share Interlock Groups if required. The number of<br />
Interlock Groups programmable depends upon the memory configuration.<br />
Special Note:<br />
In order for the 4000 system to correctly sense the state of the door reed switches,<br />
these zones should be placed in an Area which is left on permanently with a benign<br />
Process Group.<br />
D001 Interlock<br />
Group: IL000<br />
Interlock to<br />
program: IL001<br />
This screen allows an optional Interlock Group to be assigned to the Door. If the<br />
group is left at zero, access will not be denied through this Door due to an Interlock<br />
violation, although this door can participate in Interlock decisions for other <strong>Doors</strong>.<br />
If an Interlock Group is specified, it must be programmed to determine the<br />
Interlocking rules.<br />
To programme Interlock Group options, press HELP, “9”.<br />
Door Interlocking Programming<br />
This screen selects which Interlock Group to programme. The number of Interlock<br />
Groups depends on the memory configuration.<br />
See the Applications Programming section for further details.<br />
IL001 T.Zone -><br />
None<br />
IL001 Alt.<br />
Interlock: IL000<br />
IL001 ZT......<br />
Opts-> nnnnnnnn<br />
This screen allows a TimeZone to be applied to this Interlock Group. If a TimeZone<br />
is defined and is valid, this Interlock Group will be active; that is Interlock logic<br />
will be applied. If a TimeZone is invalid then either the Interlock Group will not be<br />
active and no Interlock logic will be applied or, if an alternative group is defined,<br />
that group will be used.<br />
This screen defines an alternative Interlock Group to use if the TimeZone is invalid.<br />
This screen allows certain Interlock Group options to be programmed:<br />
Z<br />
T<br />
Zone Inputs<br />
Tongue Sense<br />
If this option is set to “Y”, an optional Zone Input can be used to qualify Interlock<br />
operation.<br />
If this option is set to “Y”, Tongue Sensing is used in addition to qualify the Interlock<br />
operation.<br />
Note: Do not set to “Y” if Tongue sense inputs not connected. If set to Yes when<br />
not used, & Input/s are not sealed, Interlock logic will not allow <strong>Doors</strong> to un-lock.<br />
. Spare<br />
Spare option for future development. Leave set to “n”.<br />
Copyright exists on this manual. Unauthorised copying of this document is prohibited.
MODEL 3000 / ACCESS 4000 Programmer’s Manual - <strong>Doors</strong>. Rev 4.50 [MENU 7-6] p 5<br />
IL001<br />
DL001<br />
IL001<br />
Area<br />
Door List<br />
Area List<br />
This screen allows an optional list of <strong>Doors</strong> to be selected from the available Door<br />
Lists which will be used in Interlock Decisions. If the list is left at 000, no other<br />
doors will prevent doors with this Interlock Group from working. If a Door List is<br />
defined, all <strong>Doors</strong> in the list must be locked (Door Auxiliary must be off) and all<br />
<strong>Doors</strong> must be closed (Door Zones must be sealed).<br />
All Door Contact (Reed switch) Zone Inputs used in Door Interlock functions must<br />
be assigned to an Area that is always On (24 Hrs) so that the Zone state is always<br />
known by the Control Module.<br />
ie. Rxx:Z01 For 1st Door on a Reader Module<br />
Rxx:Z05 For 2nd Door on a Reader Module<br />
Txx:Z01 For a Door controlled and monitored by an LCD Terminal.<br />
When assigning these Zones to an Area use a Process Group programmed for this<br />
purpose that simply monitors for the (A)larm state but does no other processing.<br />
(ie. No other Comms Auxiliary or Siren options).<br />
This screen allows an optional list of Areas to be selected from the available Area<br />
Lists which will be used in Interlock decisions. If the list is left at 000, the state of<br />
no Areas will prevent <strong>Doors</strong> with this Interlock Group from working. If an Area<br />
List is defined, all Areas in the list must be off to allow access through <strong>Doors</strong> with<br />
this Interlock Group.<br />
IL001 Qualify<br />
Aux: :X<br />
This screen allows an optional Auxiliary to be defined which will be used in Interlock<br />
decisions. If an Auxiliary is defined then the Auxiliary must be On to allow access<br />
through <strong>Doors</strong> with this Interlock Group.<br />
IL001<br />
Zone:<br />
Qualify<br />
C01:Z01<br />
This screen allows an optional Zone to be defined which will be used in Interlock<br />
decisions. If the “Z” option above is set to “Y”, this input must be sealed to allow<br />
access through the <strong>Doors</strong> with this Interlock Group.<br />
When programming of Interlock Group is complete, return to Door<br />
Programming by pressing HELP, “0”.<br />
6. <strong>Doors</strong><br />
Copyright exists on this manual. Unauthorised copying of this document is prohibited.
[MENU 7-6] p 6<br />
MODEL 3000 / ACCESS 4000 Programmer’s Manual - <strong>Doors</strong>. Rev 4.50<br />
Door Defaulting<br />
Two options are available by which to default Door Programming to factory settings. These are explained below:<br />
Door to<br />
alter: D001<br />
Door Default -><br />
Don’t Default<br />
At the first Door Programming screen press HELP, “9”.<br />
This screen is then displayed. Available defaulting options are viewed by pressing<br />
the right Arrow Key. To make a selection, press the OK Key.<br />
Don’t Default<br />
Clear All<br />
Selecting this option will abort the procedure.<br />
Selecting this option will reset all Door configuration times to zero.<br />
Door names, if present, are not altered.<br />
Standard<br />
Selecting this option will reset selected Door configuration times as follows:<br />
Lock Open Time 5 seconds<br />
Max. Open Time<br />
30 seconds<br />
Door names, if present, are not altered.<br />
Push ‘9’ key to<br />
Confirm Default<br />
The confirmation screen is displayed. Press the “9” Key to confirm your selection.<br />
Default<br />
Done<br />
The default procedure is confirmed.<br />
Copyright exists on this manual. Unauthorised copying of this document is prohibited.


