CYB-KLCD CyberSuite LCD Keypad Manual - Securityhelpdesk ...
CYB-KLCD CyberSuite LCD Keypad Manual - Securityhelpdesk ...
CYB-KLCD CyberSuite LCD Keypad Manual - Securityhelpdesk ...

You also want an ePaper? Increase the reach of your titles
YUMPU automatically turns print PDFs into web optimized ePapers that Google loves.
LED <strong>Keypad</strong><br />
User <strong>Manual</strong>
PUBLICATION INFORMATION<br />
7051 R First Publication<br />
EliteSuite LED <strong>Keypad</strong> User <strong>Manual</strong>
CONTENTS<br />
INTRODUCTION ...................................................... 1<br />
OPERATION ............................................................ 2<br />
USER CODES ........................................................... 5<br />
SETUP LOGIN.......................................................... 6<br />
USER SETUP OPTIONS ............................................ 7<br />
PROGRAMMING USER CODES .......................................................7<br />
MODIFYING USER OPTIONS .........................................................9<br />
USER CARD NUMBERS.................................................................13<br />
TROUBLE CONDITIONS......................................... 14<br />
ARMING/DISARMING ........................................... 16<br />
EXIT DELAY ...............................................................................16<br />
DISARMING ...............................................................................16<br />
REGULAR ARMING ......................................................................17<br />
STAY ARMING ............................................................................17<br />
FORCE ARMING ..........................................................................18<br />
BYPASSING ZONES .....................................................................19<br />
ONE KEY ARMING .......................................................................20<br />
SPECIAL FEATURES............................................... 21<br />
ALARM MEMORY .........................................................................21<br />
CHIME ZONES ............................................................................22<br />
DISABLE AUDIBLE OUTPUT ..........................................................22<br />
MESSAGES ................................................................................23<br />
PANIC ALARM.............................................................................23<br />
FIRE ALARM ...............................................................................24<br />
CONFIGURATION .................................................. 25<br />
ZONE DESCRIPTION....................................................................25<br />
FIRE ZONE.................................................................................25<br />
ONE KEY ARMING .......................................................................26<br />
PANIC KEYS ...............................................................................26<br />
TIMERS .....................................................................................27<br />
USERS ......................................................................................27<br />
EliteSuite LED <strong>Keypad</strong> User <strong>Manual</strong>
INTRODUCTION<br />
Your suite has been equipped with the EliteSuite Security<br />
System. The EliteSuite Security System will give you<br />
peace of mind by providing reliable security protection.<br />
The EliteSuite System is an advanced technology security<br />
system specifically designed to enhance the functionality of<br />
condominium and apartment security with flexible local<br />
monitoring and offsite communication.<br />
The elegant and user friendly EliteSuite <strong>Keypad</strong> maintains<br />
complete control of your residence providing easy to<br />
understand information.<br />
All the actions performed in your security system will be<br />
executed and displayed through the EliteSuite keypad.<br />
Therefore, before using your EliteSuite security system,<br />
we highly recommend you read this manual carefully and<br />
have your property manager explain basic system operation<br />
to you.<br />
Please consult the configuration section on page 25 to find<br />
out how your system is configured. Some features may not<br />
be available depending on your system configuration.<br />
EliteSuite LED <strong>Keypad</strong> User <strong>Manual</strong> 1
OPERATION<br />
The following section provides you with information on how<br />
to use the EliteSuite keypad.<br />
When the text [USER CODE] is shown this<br />
indicates that you are required to enter your<br />
user code. The default Master Code to gain<br />
access to your system is<br />
. This<br />
code MUST be changed, see page 5 for how<br />
to program user codes.<br />
Many of the features and options must be<br />
enabled by the installation company or<br />
property manager. If the feature is not<br />
programmed or an option is not enabled the<br />
system will generate a rejection tone. Refer<br />
to the system configuration tables on page<br />
25.<br />
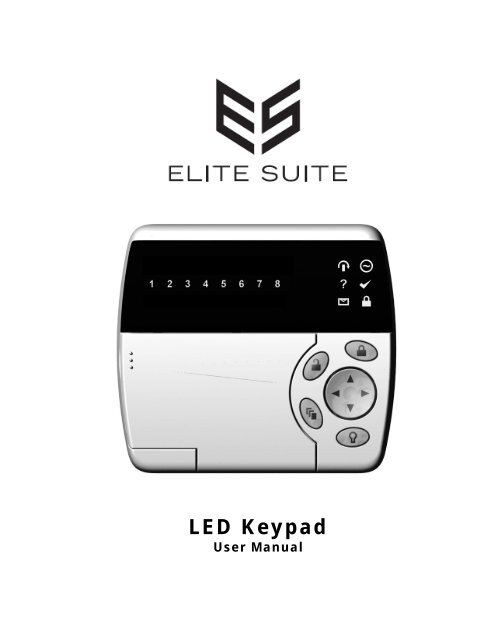
INDICATOR LIGHTS<br />
The EliteSuite LED keypad features three status indicator<br />
lights showing the condition of the EliteSuite Security<br />
System.<br />
Bypass<br />
Install<br />
Message<br />
Power/Trouble<br />
Ready Indicator<br />
Armed/Alarm<br />
Figure 1 - Indicator Lights<br />
EliteSuite LED <strong>Keypad</strong> User <strong>Manual</strong> 2
Power / Trouble Indicator<br />
FLASHING: There is a trouble condition present. Contact<br />
your building manager or security company for assistance.<br />
ON: the system is powered and operating normally.<br />
OFF: Complete power failure. Contact your building<br />
manager or security company for assistance.<br />
Ready Indicator<br />
ON: The system has all zones closed and is ready to be<br />
armed.<br />
OFF: One or more zones in the system are open and the<br />
system cannot be regular armed.<br />
Armed / Alarm Indicator<br />
FLASHING: The system is in alarm and you need to enter<br />
your user code.<br />
ON: The system is armed and you may enter your user<br />
code to disarm.<br />
Message Indicator<br />
FLASHING: Your building manager or concierge has<br />
attempted to contact you. To clear this indicator, please<br />
follow the instructions in the message section of the user<br />
menu information of this booklet.<br />
OFF: You have no pending requests for contact.<br />
Memory Indicator<br />
ON: An alarm has occured. To view which zone(s) triggered<br />
the alarm, please follow the instructions in the memory<br />
section of the user menu information of this booklet. This<br />
indicator will be cleared the next time you arm your system.<br />
OFF: No alarm memory present.<br />
EliteSuite LED <strong>Keypad</strong> User <strong>Manual</strong> 3
VISUAL DISPLAY<br />
The EliteSuite LED keypad features an easy to use 8 zone<br />
display, which in conjuction with the status LED’s allows you<br />
to monitor your system at a glance.<br />
When not using the menu system for programming options<br />
or modifying user accounts, your keypad will display the<br />
status of each programmed zone by lighting the<br />
corresponding number on the display. The 3 status options<br />
shown are:<br />
FLASHING CONTINUALLY: The zone is operating<br />
incorrectly. Contact your building manager or security<br />
company for assistance.<br />
ON: The zone is open.<br />
OFF: The zone is closed.<br />
AUDIBLE TONE<br />
When you press a key on the EliteSuite <strong>LCD</strong> keypad a<br />
short audible tone is generated. Other tones are generated<br />
when certain functions are used, you should be familiar with<br />
the following audible tones.<br />
Confirmation Tone<br />
When an operation (arming/disarming) is successfully<br />
entered on the keypad or when the system switches to a<br />
new status/mode, the keypad generates a series of four<br />
audible tones.<br />
Rejection Tone<br />
When the system times out or when an operation is<br />
incorrectly entered on the keypad, it will generate a<br />
continuous audible tone for three seconds.<br />
EliteSuite LED <strong>Keypad</strong> User <strong>Manual</strong> 4
USER CODES<br />
User Codes are personal identification numbers that allow<br />
you to enter certain programming modes, arm or disarm<br />
your EliteSuite system as well as activate or deactivate<br />
home automation functions. The EliteSuite system<br />
supports up to eight user codes.<br />
MASTER CODE<br />
By default User 01 has the master code for your system.<br />
A master code can perform the arm or disarm functions and<br />
modify and delete any user code, change user options and<br />
modify user card numbers. Other users can be given a<br />
master code by enabling User Option 2 for each new master<br />
user. Take care not to disable the master option for all<br />
users, this will prevent any future management of user<br />
codes until a full reset is performed by your security<br />
company.<br />
DURESS CODE<br />
If you are forced to arm or disarm your system, entering<br />
the user code assigned to User 08 will arm or disarm the<br />
system and immediately transmit a silent message (Duress<br />
Code) to the Property Management System or Security<br />
Company.<br />
EliteSuite LED <strong>Keypad</strong> User <strong>Manual</strong> 5
SETUP LOGIN<br />
Logging Into the Setup Menu<br />
Enter the following keypress sequence to access the setup<br />
menu:<br />
MENU (<br />
) , [USER CODE]<br />
Example: For the default master user to log in to the setup<br />
menu, the sequence is:<br />
, , , ,<br />
The ARMED status LED will begin to flash once you have<br />
successfully logged in, informing you that you are in<br />
programming mode.<br />
Logging Out of the Setup Menu<br />
To leave programming mode, press the CLEAR key<br />
until the ARMED status LED stops flashing, or do not press<br />
any key for 10 seconds and you will be automatically logged<br />
out.<br />
EliteSuite LED <strong>Keypad</strong> User <strong>Manual</strong> 6
USER SETUP OPTIONS<br />
PROGRAMMING USER CODES<br />
Your EliteSuite system uses four digit user codes, where<br />
each digit can be any value from 0 to 9. Avoid programming<br />
simple or obvious user codes, such as part of your<br />
telephone number or address and codes such as 1234, 1111<br />
or 1212.<br />
Entering New User Codes or Changing Existing Codes<br />
Each user’s code can be modified with the following<br />
sequence, in which the new user code must be entered<br />
twice to confirm the new code has been entered as<br />
intended.<br />
To program a new code, or modify an existing code<br />
• Enter SETUP LOGIN mode if you have not done so<br />
already (see page 6 for details)<br />
• Enter the following key press sequence:<br />
, , [USER NUMBER] , , [USER CODE] ,<br />
• The ARMED LED will then flash quickly, prompting<br />
you to confirm the user code by pressing:<br />
[USER CODE] ,<br />
EliteSuite LED <strong>Keypad</strong> User <strong>Manual</strong> 7
• If correct, the confirmation tone will sound and the<br />
ARMED LED will return to a slow flash.<br />
• If incorrect, a rejection tone will sound and the<br />
confirmation process must be repeated.<br />
To delete a user code<br />
• Enter SETUP LOGIN mode if you have not done so<br />
already (see page 6 for details)<br />
• Enter the following key press sequence:<br />
, , [USER NUMBER] , , , , ,<br />
EliteSuite LED <strong>Keypad</strong> User <strong>Manual</strong> 8
MODIFYING USER OPTIONS<br />
The User Option menu contains options for<br />
arming, disarming and door latching for the<br />
optional Card Reader interface. If your<br />
EliteSuite system is not equipped with a<br />
Card Reader interface, changes to these<br />
options will have no effect.<br />
Modifying User Options<br />
• Enter SETUP LOGIN mode if you have not done so<br />
already (see page 6 for details)<br />
• Enter the following key press sequence:<br />
, , [USER NUMBER] ,<br />
• You will now be presented with NUMBER LED’s that<br />
are lit which correspond to the current user options<br />
that are ENABLED. To toggle an option on or off,<br />
press the number corresponding to the option<br />
required from the list on the following pages, and<br />
once all options are correct press to confirm<br />
the selection.<br />
The available options are described below.<br />
• Option 1 – Arm Only Code<br />
Enabled allows the user code to be used<br />
only for arming the EliteSuite system.<br />
EliteSuite LED <strong>Keypad</strong> User <strong>Manual</strong> 9
Disabled allows the user code to arm and<br />
disarm the EliteSuite system.<br />
• Option 2 – Master User<br />
Enabled allows the selected user to access<br />
the User Setup menu and modify codes,<br />
card numbers and options of all other<br />
users.<br />
Disabled prevents access to the User Setup<br />
menu.<br />
• Option 3 – Single Badge Disarming<br />
For Card Reader Interface<br />
Equipped Systems Only<br />
Enabled allows the selected user to disarm<br />
the EliteSuite system by presenting the<br />
card programmed for that user at the Card<br />
Reader.<br />
Disabled will allow only unlocking of the<br />
door where the card is presented, and the<br />
system will remain armed until disarmed by<br />
PIN entry on the keypad or a card being<br />
presented by a Single Badge Disarm<br />
enabled user.<br />
Each user may have only 1 of the following<br />
Triple Badge options enabled at any time.<br />
Enabling one of the triple badge user options<br />
will automatically disable all other Triple<br />
Badge user options for you.<br />
EliteSuite LED <strong>Keypad</strong> User <strong>Manual</strong> 10
• Option 4 – Triple Badge Arming<br />
For Card Reader Interface<br />
Equipped Systems Only<br />
Enabled allows the selected user to regular<br />
arm the EliteSuite system by presenting<br />
the card programmed for that user at the<br />
Card Reader three times in quick<br />
succession.<br />
Disabled prevents triple card presenting<br />
from arming the system.<br />
• Option 5 – Triple Badge Door Latching<br />
For Card Reader Interface<br />
Equipped Systems Only<br />
Enabled allows the selected user to toggle<br />
a door lock open or closed upon presenting<br />
their card 3 times in quick succession.<br />
Disabled prevents triple card presenting<br />
from toggling the door lock.<br />
• Option 6 – Triple Badge Latch 2 Hours<br />
For Card Reader Interface<br />
Equipped Systems Only<br />
Enabled allows the selected user to hold a<br />
door open for 2 hours upon presenting their<br />
card 3 times in quick succession.<br />
Disabled prevents triple card presenting<br />
from latch opening the door.<br />
EliteSuite LED <strong>Keypad</strong> User <strong>Manual</strong> 11
• Option 7 – Triple Badge Latch 4 Hours<br />
For Card Reader Interface<br />
Equipped Systems Only<br />
Enabled allows the selected user to hold a<br />
door open for 4 hours upon presenting their<br />
card 3 times in quick succession.<br />
Disabled prevents triple card presenting<br />
from latching the door open.<br />
• Option 8 – Triple Badge Latch 8 Hours<br />
For Card Reader Interface<br />
Equipped Systems Only<br />
Enabled allows the selected user to hold a<br />
door open for 8 hours upon presenting their<br />
card 3 times in quick succession.<br />
Disabled prevents triple card presenting<br />
from latching the door open.<br />
Any user that has a Triple Badge Latch<br />
Option enabled may present their card three<br />
times while the door is latched open to<br />
cancel the latching and immediately lock the<br />
door.<br />
EliteSuite LED <strong>Keypad</strong> User <strong>Manual</strong> 12
USER CARD NUMBERS<br />
This menu is only for Card Reader interface<br />
enabled <strong>Keypad</strong>s.<br />
The EliteSuite Alarm system is able to be interfaced with a<br />
EliteSuite Card Reader device to provide proximity card<br />
access to your condominium. If the Card Reader interface<br />
has been installed, each user can be assigned a unique card<br />
number that is stored on a proximity device.<br />
Programming or Changing User Card Numbers<br />
• Enter SETUP LOGIN mode if you have not done so<br />
already (see page 6 for details)<br />
• Enter the following key press sequence:<br />
, , [USER NUMBER] ,<br />
The card details can now be automatically programmed by<br />
presenting the card at a reader interface, and pressing<br />
to confirm the new card details.<br />
Deleting a User Card<br />
• Enter SETUP LOGIN mode if you have not done so<br />
already (see page 6 for details)<br />
• Enter the following key press sequence:<br />
, , [USER NUMBER] , , ,<br />
EliteSuite LED <strong>Keypad</strong> User <strong>Manual</strong> 13
TROUBLE CONDITIONS<br />
The EliteSuite Security System continually monitors five<br />
system trouble conditions that can occur on your system.<br />
When a trouble condition occurs the<br />
EliteSuite keypad can be programmed to<br />
generate an audible tone every 120 seconds.<br />
The trouble tone is cancelled when the<br />
trouble condition is viewed or the condition<br />
is returned to normal.<br />
Viewing System Trouble Information<br />
• Enter SETUP LOGIN mode if you have not done so<br />
already (see page 6 for details)<br />
• Enter the following key press sequence:<br />
,<br />
The numbered LED corresponding to the trouble<br />
condition(s) present will be lit, and can be identified by<br />
the numbered item in the TROUBLE LIST beginning on<br />
the next page.<br />
EliteSuite LED <strong>Keypad</strong> User <strong>Manual</strong> 14
TROUBLE LIST<br />
The troubles that can occur in your system are detailed in<br />
the following list.<br />
TROUBLE #8 - Host Comms<br />
Communication with the host system is currently offline.<br />
This is possibly due to maintenance or a system fault.<br />
Contact the property manager or security installation<br />
company if the problem persists.<br />
TROUBLE #7 - Zone Fault<br />
A zone in the system is faulty or the wiring has been<br />
damaged. Contact the property manager or security<br />
installation company to arrange for your system to be<br />
serviced.<br />
TROUBLE #6 - Cover Tamper<br />
The cover of the EliteSuite system is open and may have<br />
been damaged. Contact the property manager or security<br />
installation company to arrange for your system to be<br />
serviced.<br />
TROUBLE #4 - Fire Loop<br />
The fire detection wiring or a fire detector has become<br />
faulty. Contact the property manager or security installation<br />
company to arrange for your system to be serviced.<br />
Fire Zones and Fire Loop trouble detection<br />
MUST be enabled by your property manager<br />
or installation company. Please refer to the<br />
system configuration table on page 26.<br />
EliteSuite LED <strong>Keypad</strong> User <strong>Manual</strong> 15
ARMING/DISARMING<br />
To take full advantage of your EliteSuite System, you<br />
should familiarize yourself with the different arming<br />
methods.<br />
EXIT DELAY<br />
After entering a valid arming sequence the exit delay time<br />
will provide you with enough time to exit the protected area<br />
before the system arms. The keypad will generate a beepbeep<br />
tone repeatedly during the exit delay period. The tone<br />
will increase in frequency to indicate that only ten seconds<br />
remains.<br />
DISARMING<br />
To disarm an armed system or an alarm, enter your user<br />
code. An entry point, like the front door, will be<br />
programmed with an entry delay time. When an entry point<br />
is opened, the keypad will emit a continuous audible tone<br />
until you disarm the system. Your EliteSuite system will<br />
not generate an alarm until this timer elapses. All user<br />
codes can be used to disarm the system.<br />
Deactivating Alarm<br />
To deactivate an alarm enter your [USER CODE]. This<br />
will also disarm the system if it was armed.<br />
Disarming Your System<br />
1. Enter through a designated entry point (Entry Door),<br />
the entry delay time will start and the keypad will emit<br />
a continuous audible tone.<br />
EliteSuite LED <strong>Keypad</strong> User <strong>Manual</strong> 16
2. Enter your [USER CODE].<br />
REGULAR ARMING<br />
Regular arming arms your system.<br />
Arming Your System<br />
1. Check that the system is ready to arm and all zones<br />
are closed (Ready Indicator is Green).<br />
2. Enter your [USER CODE].<br />
3. The exit delay beep will start and you can now leave<br />
your premises.<br />
Quick arming can be used by pressing and holding the arm<br />
key. This option MUST be enabled by your property<br />
manager or installation company. See the configuration<br />
section on page 25.<br />
STAY ARMING<br />
This method allows you to remain in the protected area<br />
while partially arming the system. Stay zones are zones<br />
that are bypassed when the system is stay armed. For<br />
example, when you go to sleep at night, doors and windows<br />
can be armed without arming other zones like motion<br />
detectors.<br />
Stay Arming Your System<br />
1. Check that all zones that are not stay zone(s) are<br />
closed and ready to arm.<br />
2. Press the stay key then enter your [USER<br />
CODE].<br />
3. The exit delay will start.<br />
EliteSuite LED <strong>Keypad</strong> User <strong>Manual</strong> 17
Instant Arming Your System<br />
1. During the EXIT DELAY press and hold the key for<br />
2 seconds. The system will instant arm all zones, any<br />
zone will trigger the alarm immediately.<br />
Fast Stay Arming<br />
1. To fast stay arm your system press and hold the stay<br />
key for two seconds.<br />
Switching From Stay To Regular/Force Armed<br />
1. If you need to leave your premises and want to arm<br />
the system fully you can use the fast exit arming<br />
method. Press and hold the force key or arm<br />
key to switch to exit delay and arm in either force or<br />
regular arming.<br />
FORCE ARMING<br />
Force Arming allows you to rapidly arm the system without<br />
waiting for all zones in the system to close. During force<br />
arming, a forced zone is considered deactivated until it<br />
closes, then the system will arm that zone. Force arming is<br />
commonly used when a motion detector is protecting the<br />
area occupied by a keypad. For example, when arming and<br />
the motion detector is programmed as a force zone, the<br />
system will allow you to arm even if the zone is open.<br />
Force Arming Your System<br />
1. Check that all zones that are not force zone(s) are<br />
closed and ready to arm.<br />
2. Press the force key then enter your [USER CODE].<br />
3. The exit delay will start.<br />
EliteSuite LED <strong>Keypad</strong> User <strong>Manual</strong> 18
To fast force arm your system press and hold the force<br />
key for two seconds. This option MUST be enabled by<br />
your property manager or installation company. Refer to the<br />
system configuration table on page 25.<br />
BYPASSING ZONES<br />
Bypassing zones allows you to program the alarm system to<br />
ignore (deactivate) specified zones the next time the<br />
system is armed. For example, you may wish to bypass<br />
certain zones when workers are renovating part of your<br />
establishment. Once the system is disarmed, the bypass<br />
settings are erased.<br />
Bypassing Zones<br />
To select zone(s) to be bypassed, first enter:<br />
, [USER CODE]<br />
The BYPASS LED will now turn on and you can toggle<br />
bypass mode on any zone by pressing the number<br />
corresponding to the required zone. The zone LED will be lit<br />
for each bypassed zone.<br />
Press the enter key to store the bypass settings and<br />
exit., or press the clear key to exit without making<br />
changes.<br />
Bypass Zone Recall<br />
After disarming the system, the bypass entries are erased.<br />
The Bypass Recall Feature reinstates the previous bypass<br />
entries saved in memory. This eliminates the need to<br />
manually re-program the bypass entries every time you arm<br />
the system if you are always bypassing the same zone(s).<br />
EliteSuite LED <strong>Keypad</strong> User <strong>Manual</strong> 19
1. Press the bypass key then enter your [USER<br />
CODE].<br />
2. Press and hold the bypass key for 2 seconds the<br />
last settings will be loaded. You may change these<br />
settings if required.<br />
3. Press the enter key to store the bypass settings<br />
and exit.<br />
4. Press the clear key to exit without making<br />
changes.<br />
ONE KEY ARMING<br />
One key arming can be used to arm the system in regular,<br />
force, stay and instant arming modes. You can use this<br />
feature to allow specific individuals like service personnel<br />
(i.e. cleaners) to arm without giving them access to any<br />
other alarm system operations.<br />
One key arming MUST be enabled by your<br />
property manager or installation company.<br />
Refer to the system configuration table on<br />
page 26.<br />
EliteSuite LED <strong>Keypad</strong> User <strong>Manual</strong> 20
SPECIAL FEATURES<br />
The EliteSuite System offers many unique features.<br />
ALARM MEMORY<br />
All zones that generate an alarm will be stored in the<br />
memory of the EliteSuite <strong>Keypad</strong>. If an alarm has<br />
occurred on your system, the alarm memory status LED will<br />
be lit until the the next time you arm your system.<br />
Viewing Alarm Memory<br />
1. Press and hold the memory key for 2 seconds or<br />
press memory and enter your [USER CODE].<br />
2. The LED’s corresponding to the zone(s) which<br />
generated the alarm will be lit.<br />
3. To exit press the clear key.<br />
The alarm memory can also be accessed from the main<br />
menu by pressing followed by the enter key.<br />
Clearing Alarm Memory<br />
The alarm memory is cleared automatically next time you<br />
arm your EliteSuite system.<br />
EliteSuite LED <strong>Keypad</strong> User <strong>Manual</strong> 21
CHIME ZONES<br />
A chime enabled zone will generate an audible tone every<br />
time that the zone opens, ideal for a front door.<br />
Chiming Zones<br />
To enter Chime Zone select mode, log in to the Setup menu<br />
and press:<br />
,<br />
you can now toggle chime mode on any zone by pressing<br />
the number corresponding to the required zone. The zone<br />
LED will be lit for each chimed zone.<br />
Press the enter key to store the chime settings and<br />
exit., or press the clear key to exit without making<br />
changes.<br />
DISABLE AUDIBLE OUTPUT<br />
It may be desirable to disable the audible tone on your<br />
keypad. This will prevent the beeper from generating any<br />
notification of alarms, exit delay or entry delay. The keypad<br />
will continue to generate a tone when a key is pressed and<br />
to provide audible confirmation.<br />
Disabling Audible Output<br />
1. Press and hold the clear key.<br />
2. <strong>Keypad</strong> will generate one long audible tone (rejection<br />
tone) to signify that the audible output is disabled.<br />
To enable the audible output repeat the above steps.<br />
EliteSuite LED <strong>Keypad</strong> User <strong>Manual</strong> 22
MESSAGES<br />
The EliteSuite system message handling capabilities to<br />
allow communication with a property manager. A new<br />
message that has been sent to your system is announced<br />
by an audible tone and the MESSAGE LED being lit.<br />
Clearing Messages<br />
To clear the Message LED, log in to the Setup menu and<br />
press:<br />
, ,<br />
To choose another menu option press the menu<br />
to exit press the clear key.<br />
key, or<br />
PANIC ALARM<br />
The EliteSuite system can provide three panic alarms that<br />
can immediately generate an alarm after simultaneously<br />
pressing and holding two specific buttons for three seconds.<br />
Based on your needs, these panic alarms can generate<br />
audible alarms (sirens or bells) or silent alarms and can<br />
communicate specific messages to your monitoring station<br />
or property manager.<br />
Press & hold keys and for the panic alarm.<br />
Press & hold keys and for a medical alarm.<br />
Press & hold keys and for a fire alarm.<br />
All Panic Alarm activations MUST be enabled<br />
by your property manager or installation<br />
company. Please refer to the system<br />
configuration table on page 26.<br />
EliteSuite LED <strong>Keypad</strong> User <strong>Manual</strong> 23
FIRE ALARM<br />
When a fire alarm occurs, the EliteSuite will emit three<br />
audible tones at 2 second intervals until reset by entering a<br />
valid user code. If the zone is a delay fire zone, there is a<br />
delay of thirty seconds before the system contacts the<br />
security company or property manager.<br />
A delayed fire zone will prevent unnecessary reporting of<br />
false alarms allowing you to reset the fire alarm before a<br />
report is sent. If there is no fire condition, contact your<br />
property manager or security company immediately to<br />
avoid an unnecessary response.<br />
A delayed fire zone will automatically cancel if the smoke<br />
detector is reset within 30 seconds. Pressing any key on the<br />
keypad during the first 30 seconds will silence the alarm for<br />
90 seconds.<br />
Fire Alarm functions MUST be enabled by<br />
your property manager or installation<br />
company. Please refer to the system<br />
configuration table on page 25.<br />
EliteSuite LED <strong>Keypad</strong> User <strong>Manual</strong> 24
CONFIGURATION<br />
The EliteSuite system has many options that are enabled<br />
by your installer. The following lists the options and how<br />
your system is configured. Use this location to write your<br />
user names and any information about your system.<br />
ZONE DESCRIPTION<br />
The following lists the zones in your system and how each<br />
zone is configured.<br />
ZONE ZONE NAME FORCE STAY BYPASS<br />
01 ZONE 1 <br />
02 ZONE 2 <br />
03 <br />
04 <br />
FIRE ZONE<br />
The following lists the fire zone configuration for your<br />
system.<br />
Enabled Disabled<br />
Fire Zone <br />
Delayed Fire Zone <br />
Your fire zone is located on zone ____________ and<br />
operates with a delay of _____ seconds.<br />
EliteSuite LED <strong>Keypad</strong> User <strong>Manual</strong> 25
ONE KEY ARMING<br />
The following lists the one key arming method(s) that are<br />
enabled on your system.<br />
Enabled Disabled<br />
Regular Arming <br />
Stay Arming <br />
Force Arming <br />
Instant Arming <br />
PANIC KEYS<br />
The following lists the panic key configurations that are<br />
enabled on your system.<br />
Enabled Disabled<br />
[1] + [3] Panic Alarm <br />
[4] + [6] Medical Alarm <br />
[7] + [9] Fire Alarm <br />
EliteSuite LED <strong>Keypad</strong> User <strong>Manual</strong> 26
TIMERS<br />
Your entry time is programmed to be _030_ seconds. This is<br />
the time that you have before an alarm is generated if you<br />
enter through the zone __ZONE 1__.<br />
Your exit time is programmed to be _030_ seconds. This is<br />
the time that you have to exit before the system arms.<br />
If an alarm occurs the siren/beeper will activate for _005_<br />
minutes unless disarmed.<br />
USERS<br />
The following table should be used to keep a record of the<br />
users programmed in your EliteSuite system. Record the<br />
name of the user only. Do not write the user code. All users<br />
can arm and disarm the system.<br />
USER USER NAME DURESS ARM ONLY<br />
01 MASTER <br />
02 <br />
03 <br />
04 <br />
05 <br />
06 <br />
07 <br />
08 <br />
EliteSuite LED <strong>Keypad</strong> User <strong>Manual</strong> 27
WARRANTY<br />
The Seller warrants its products to be free from defects in<br />
materials and workmanship under normal use for a period<br />
of one year. Except as specifically stated herein, all express<br />
or implied warranties whatsoever, statutory or otherwise,<br />
including without limitation, any implied warranty of<br />
merchantability and fitness for a particular purpose, are<br />
expressly excluded. The Seller does not install or connect<br />
the products and because the products may be used in<br />
conjunction with products not manufactured by Seller,<br />
Seller cannot guarantee the performance of the security<br />
system. Seller's obligation and liability under this warranty<br />
is expressly limited to repairing or replacing, at Seller's<br />
option, any product not meeting the specifications. In no<br />
event shall the Seller be liable to the buyer or any other<br />
person for any loss or damages whether direct or indirect or<br />
consequential or incidental, including without limitation, any<br />
damages for lost profits, stolen goods, or claims by any<br />
other party caused by defective goods or otherwise arising<br />
from the improper, incorrect or otherwise faulty installation<br />
or use of the merchandise sold.<br />
EliteSuite LED <strong>Keypad</strong> User <strong>Manual</strong> 28
Unit C, 6 Ascension Place, Mairangi Bay, P.O. Box 302-340<br />
North Harbour, Auckland, New Zealand.<br />
Phone: +64 (9) 476 7124 • Fax: +64 (9) 476 7128<br />
www.integratedcontroltechnology.com