Cine-tal DAVIO CalMAN Setup Guide - SpectraCal
Cine-tal DAVIO CalMAN Setup Guide - SpectraCal
Cine-tal DAVIO CalMAN Setup Guide - SpectraCal

You also want an ePaper? Increase the reach of your titles
YUMPU automatically turns print PDFs into web optimized ePapers that Google loves.
<strong>Cine</strong>-<strong>tal</strong> <strong>DAVIO</strong><br />
<strong>CalMAN</strong> <strong>Setup</strong> <strong>Guide</strong><br />
<strong>CalMAN</strong> takes advantage of Davio’s 3D LUT processor features, as well as the internal test pattern Profile<br />
Generator, to calibrate up to a 65x65x65 3D cube LUT. This quick start guide assists you in setting up the Davio for<br />
use with the <strong>CalMAN</strong> Color Cube workflow.<br />
Recommended <strong>CalMAN</strong> Workflows:<br />
<strong>CalMAN</strong> V5.1.1 or later<br />
<br />
<br />
SI Basic workflow to optimize panel or projector Picture controls.<br />
Color Cube workflow to create display calibration 3D LUT for Davio.<br />
Required Davio Software:<br />
Davio Control software, version 2.0, or later<br />
<br />
Davio 1040 or 1050 system software package<br />
Davio Control Connection:<br />
Ethernet straight through (standard) cable<br />
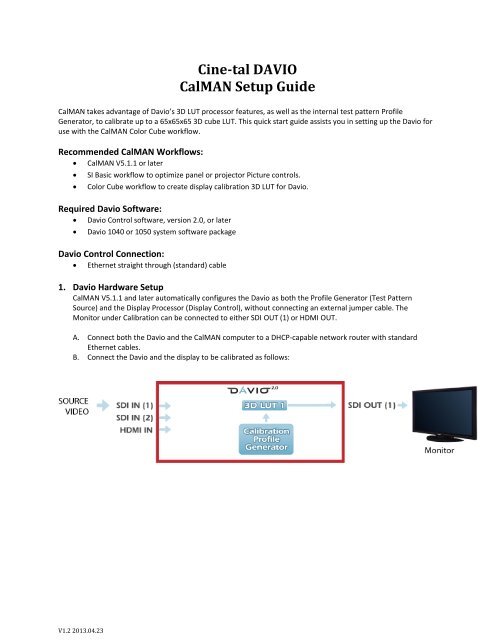
1. Davio Hardware <strong>Setup</strong><br />
<strong>CalMAN</strong> V5.1.1 and later automatically configures the Davio as both the Profile Generator (Test Pattern<br />
Source) and the Display Processor (Display Control), without connecting an external jumper cable. The<br />
Monitor under Calibration can be connected to either SDI OUT (1) or HDMI OUT.<br />
A. Connect both the Davio and the <strong>CalMAN</strong> computer to a DHCP-capable network router with standard<br />
Ethernet cables.<br />
B. Connect the Davio and the display to be calibrated as follows:<br />
V1.2 2013.04.23
2. Davio Initial Software <strong>Setup</strong><br />
To set up a Davio for 3D LUT color calibration:<br />
1. Ins<strong>tal</strong>l the Davio Control application software on your computer.<br />
(See Davio Software Quick Start on ins<strong>tal</strong>ling Davio Control).<br />
2. Start the Davio Control software.<br />
On the Davio Control software <strong>DAVIO</strong>(s) tab:<br />
3. Click the Discover button to find all Davios on the network, and then click Connect.<br />
4. Select either the 1040 or 1050 Davio package.<br />
5. Record the unit’s IP address.<br />
Click on Discover to find<br />
Davios on Network, then<br />
Connect.<br />
Select 1040 or 1050 on<br />
Package Select.<br />
V1.2 2013.04.23
Configure Davio Input Color Space<br />
On the Davio Control Inputs tab:<br />
6. Under Color Space for all Davio inputs, select Full range. (The Davio Inputs and Outputs need to be set<br />
for Full range during 3D LUT calibration, even if you are calibrating for SMPTE range operation, and<br />
must be left in Full range, even for operation in a SMPTE signal path.)<br />
7. Under 1D LUT for all Davio inputs, select “Reset.”<br />
Select Input tab.<br />
Select YCbCr Full - input 1&2<br />
Select DL RGB Full – HDMI<br />
Set all 1D LUTs to “Reset”<br />
Or, from the Davio front panel<br />
a. Right until LCD reads “SDI In 1”<br />
b. Down then right LCD Read “CSC Matrix”<br />
c. +/- until LCD Reads “CSC Matrix YCbCr Full”<br />
d. Right until LCD reads “1D LUT File”<br />
e. +/- until LCD Reads “1D LUT File Reset”<br />
f. (Repeat for SDI Input 2 and HDMI Input)<br />
V1.2 2013.04.23
Configure Davio Output Color Space<br />
On the Davio Control Outputs tab:<br />
8. Under Color Space for all Davio outputs, select Full range. (The Davio Inputs and Outputs need to be set<br />
for Full range during 3D LUT calibration, even if you are calibrating for SMPTE range operation, and<br />
must be left in Full range, even for operation in a SMPTE signal path.)<br />
9. Under 1D LUT for all Davio outputs, select “Reset.”<br />
Select Outputs tab.<br />
Select YCbCr Full - out 1&2<br />
Select DL RGB Full – HDMI<br />
Set all 1D LUTs to “Reset”<br />
Or, from the Davio front panel<br />
a. Right until LCD reads “SDI Out 1”<br />
b. Down then right LCD reads “CSC Matrix”<br />
c. +/- until LCD reads “CSC Matrix YCbCr Full”<br />
d. Right until LCD reads “1D LUT File”<br />
e. +/- until LCD reads “1D LUT File Reset”<br />
f. (Repeat for SDI Output 2 and HDMI Output)<br />
V1.2 2013.04.23
Bypass Davio 3D LUT<br />
On the Davio Control 3D LUTs tab:<br />
10. Under 3D LUT Source, select the Profile Generator.<br />
11. Select the desired 3D LUT slot and set it either to a unity LUT or to Unloaded.<br />
Set 3D LUT Source to Profile Gen.<br />
Set desired 3D LUT Slot to Unity or<br />
Unloaded.<br />
Or, from the Davio front panel<br />
a. Right until LCD reads “3D LUT 1”<br />
b. Down - LCD reads “Select 3D LUT”<br />
c. +/- until LCD reads “Unity LUT filename ”<br />
d. Right until LCD reads “3D LUT 1 Source”<br />
e. +/- until LCD reads “Profile Generator”<br />
V1.2 2013.04.23
Configure Davio Output Source<br />
12. On the Davio Control Outputs tab, for either SDI Out or HDMI Out (whichever is connected to the<br />
monitor) set the Source to 3D LUT 1.<br />
Set the Source for SDI Out or HDMI<br />
Out to 3D LUT<br />
Or, from the Davio front panel<br />
a. Right until LCD reads “SDI Out 1”<br />
b. Down - LCD reads “SDI Out 1 Source”<br />
c. +/- until LCD reads “3D LUT 1”<br />
d. Right until LCD reads “HDMI Out”<br />
e. Down - LCD reads “HDMI Out Source”<br />
f. +/- until LCD reads “3D LUT 1”<br />
V1.2 2013.04.23
Verify Davio <strong>Setup</strong><br />
Verify your Davio signal routing.<br />
On the Davio Control Generator tab:<br />
13. Select different Patch Sizes and Patch Colors on the Generator tab and confirm the changes on the<br />
connected display to be calibrated.<br />
Verify the Profile Generator setup<br />
by changing the Patch Size and<br />
Patch Color.<br />
V1.2 2013.04.23
3. <strong>CalMAN</strong> 3D LUT Display Calibration – Hardware LUT Load<br />
<strong>CalMAN</strong> can calibrate the 3D LUT in the Davio either by automatically loading a LUT directly into the Davio<br />
with a hardware connection or by creating a software 3D LUT file and then using the Davio Control software to<br />
manually load the LUT file into the Davio.<br />
A. To create a software LUT file, skip to the Software LUT File section, below.<br />
B. To use a direct hardware connection to produce an optimized 3D LUT calibration file and automatically<br />
load it into a Davio:<br />
1. In <strong>CalMAN</strong>, load the "Color Cube (3D LUT)" workflow.<br />
2. Proceed through each step of the workflow in the normal fashion, using the following notes for<br />
guidance on the indicated workflow pages.<br />
3. On the LUT Device <strong>Setup</strong> page:<br />
a. Click the Find Processor/Display button, and then select " <strong>Cine</strong>-<strong>tal</strong> - Davio (Ethernet).”<br />
4. On the RGB Adjust page, under the Two Point Levels selection, select “2 Point 30, 100%.” Click Read<br />
Continuous and adjust the display’s RGB Gain controls for RGB balance at 100%. Adjust the display’s<br />
RGB Offset/Bias controls (if provided) for RGB balance at 30%.<br />
5. Skip the Calibrate RGB Balance page (a 1D LUT does not need to be created).<br />
6. On the Calibrate 3D Cube LUT page, click the AutoCal action button in the lower right. On the AutoCal<br />
<strong>Setup</strong> popup dialog (shown below), under Cube 3D LUT Settings, select your desired calibration<br />
precision; Fast, Standard, or Detailed.<br />
If one or more of the display’s primary colors were under saturated on the Check Linearity page, the<br />
Detailed setting is suggested.<br />
Upon completion of the AutoCal 3D hardware LUT calibration process, <strong>CalMAN</strong> automatically loads the<br />
optimized 65x65x65 LUT calibration data into the Davio.<br />
DONE – Davio 3D LUT calibration and setup is complete.<br />
V1.2 2013.04.23
4. <strong>CalMAN</strong> 3D LUT Display Calibration – Software LUT File<br />
To produce an optimized software 3D LUT calibration file, ready to be manually loaded into a Davio:<br />
1. In <strong>CalMAN</strong>, load the "Color Cube (3D LUT)" workflow.<br />
2. Proceed through each step of the workflow in the normal fashion, using the following notes for<br />
guidance on the indicated workflow pages.<br />
3. On the Source Connect workflow page, under Find Source, select “<strong>Cine</strong>-<strong>tal</strong> Davio (Ethernet).” Enter<br />
the Davio IP address in the edit box, and then click Connect.<br />
4. On the LUT Device <strong>Setup</strong> page, under Find Display, select "<strong>SpectraCal</strong> - Cube Generator (3D LUT).”<br />
5. On the RGB Adjust page, under the Two Point Levels selection, select “2 Point 30, 100%.” Click Read<br />
Continuous and adjust the display’s RGB Gain controls for RGB balance at 100%. Adjust the display’s<br />
RGB Offset/Bias controls (if provided) for RGB balance at 30%<br />
6. Skip the Calibrate RGB Balance page (a 1D LUT does not need to be created).<br />
7. On the Calibrate 3D Cube LUT page, click the AutoCal action button in the lower right. On the popup<br />
AutoCal <strong>Setup</strong> dialog (shown below), under File Format, select “CLT – <strong>Cine</strong>Tal Davio” (<strong>CalMAN</strong> creates<br />
a 65x65x65 point 10-bit 3D LUT file).<br />
8. Also on the AutoCal <strong>Setup</strong> dialog, under File Path, click the […] button to select a convenient location<br />
for the LUT file that <strong>CalMAN</strong> will create. Name the .clt file to identify the monitor and the date.<br />
V1.2 2013.04.23
Upon completion of the AutoCal 3D software LUT calibration process, <strong>CalMAN</strong> automatically writes the<br />
optimized LUT calibration data to a Davio .clt format 65x65x65 LUT file in the selected drive location.<br />
5. Davio Final <strong>Setup</strong><br />
When <strong>CalMAN</strong> completes its automatic 3D LUT calibration, the created software LUT file is ready to be loaded<br />
into the Davio. On the Davio Control 3D LUTs tab:<br />
1. Under 3D LUT Source, select your source input.<br />
2. Under Select 3D LUT, select the desired LUT slot.<br />
3. Click the Load LUT to Current Slot button, navigate to the saved LUT file, and load the LUT.<br />
Set 3D LUT Source.<br />
Load 3D Calibration LUT<br />
V1.2 2013.04.23
With your normal video source signal connected to the Davio input and with a Davio output connected to your<br />
monitor, select proper routing of the Davio 3D LUT to the monitor output. On the Davio Control Outputs tab:<br />
1. Under Source, select the desired 3D LUT.<br />
2. Under Color Space, select Full range. (The Davio Inputs and Outputs need to be set for Full range during<br />
3D LUT calibration, even if you are calibrating for SMPTE range operation, and must be left in Full range,<br />
even for operation in a SMPTE signal path.)<br />
3. Under 1D LUT, select “Reset.”<br />
Set Output Source to 3D LUT.<br />
Set Color Space to Full.<br />
Set 1D LUT to “Reset”<br />
DONE – Davio 3D LUT calibration and setup is complete.<br />
V1.2 2013.04.23