VideoForge 4K Video Generator Quick Start Guide - SpectraCal
VideoForge 4K Video Generator Quick Start Guide - SpectraCal
VideoForge 4K Video Generator Quick Start Guide - SpectraCal

You also want an ePaper? Increase the reach of your titles
YUMPU automatically turns print PDFs into web optimized ePapers that Google loves.
<strong><strong>Video</strong>Forge</strong> <strong>4K</strong> <strong>Video</strong> <strong>Generator</strong><br />
<strong>Quick</strong> <strong>Start</strong> <strong>Guide</strong><br />
Thank you for purchasing an AV Foundry <strong><strong>Video</strong>Forge</strong> <strong>4K</strong> <strong>Video</strong> <strong>Generator</strong>, the world’s first<br />
affordable <strong>4K</strong> SDI video test pattern generator.<br />
Included Parts<br />
You should find the following accessories included with your <strong><strong>Video</strong>Forge</strong>:<br />
- Power Supply; 12vdc 5a, all region 100-220vac<br />
- USB micro Wi-Fi wireless adapter (to be supported in subsequent firmware)<br />
- USB micro memory drive<br />
- HDMI to mini HDMI audio/video output cable<br />
- 4 BNC to 4 mini-connector (1.0/2.3) SDI video output cable<br />
Front Panel USB Ports<br />
• Inside the left front access door are two USB ports. The left USB<br />
port contains the supplied USB micro Wi-Fi wireless adapter.<br />
The wireless adapter should be left in the left side USB port. The<br />
wireless adapter is not supported in the original release firmware,<br />
but will be supported as a control interface in subsequent firmware.<br />
• The right USB port inside the front access door contains the supplied USB micro memory<br />
drive. The drive contains some example custom images and a pdf copy of this quick start<br />
guide.<br />
Note: Wi-Fi interface control, RS-23supported in subsequent firmware.<br />
interface control, and front panel menu control will be<br />
3528 Bagley Ave. N. Seattle, WA 98103 USA<br />
Corporate: +1 206 420 7514 | Tech Support: +1 206 457 8949 | www.spectracal.com
Power Up<br />
The power control button for the <strong><strong>Video</strong>Forge</strong> is located in the upper right corner of the front<br />
panel. To power up the unit, momentarily press the power button and release.<br />
On power up, the front panel LCD shows; Booting, Booting .., Booting …,, and then switches to<br />
show the unit’s IP address, if the <strong><strong>Video</strong>Forge</strong> is connected to a network. If the <strong><strong>Video</strong>Forge</strong> is not<br />
connected to a network, or does not get an IP address from a DHCP server, the front panel LCD<br />
will continue to show “Booting ….” Once the connected <strong><strong>Video</strong>Forge</strong> is connected to an active<br />
DHCP network, power cycle the unit to obtain an IP address.<br />
The <strong><strong>Video</strong>Forge</strong> defaults to a 720p60 YCC-10 Rec709 format on initial power up, with the AV<br />
Foundry logo image, with outputs on SDI 3, SDI 4, and HDMI.<br />
Manual Control User Interface<br />
To manually control the <strong><strong>Video</strong>Forge</strong>, including its output signal resolution and test pattern:<br />
1. Connect the <strong><strong>Video</strong>Forge</strong> to a network router with an Ethernet cable, power on the<br />
<strong><strong>Video</strong>Forge</strong>, and note the unit’s IP address on the LCD.<br />
2. Open a web browser (e.g. Internet Explorer, Firefox, etc.).<br />
3. Enter the unit’s IP address into the browser’s address bar and press Enter.<br />
4. Select the desired <strong><strong>Video</strong>Forge</strong> user interface tab and make desired selections.<br />
<strong><strong>Video</strong>Forge</strong> User Interface Tabs:<br />
Output – The Output page gives full control over the <strong><strong>Video</strong>Forge</strong> SDI and HDMI<br />
output formats. This includes format, titling, orientation, color gating, color space,<br />
EDID, etc.<br />
<strong>Video</strong> Cal – The <strong>Video</strong> Cal page provides a convenient shortcut to select test<br />
patterns that are commonly used for video calibration procedures. The desired<br />
pattern can be selected by simply clicking on a Pattern button on the left hand side.<br />
Any pattern parameter options for the selected pattern appear in the panel to the<br />
right of the buttons.<br />
Patterns – The Patterns page provides a list of all the patterns installed on the<br />
<strong><strong>Video</strong>Forge</strong>. Many of the test patterns also provide selection boxes to modify<br />
various parameters of the output pattern.<br />
Admin – The Admin page provides version and serial number information for the<br />
<strong><strong>Video</strong>Forge</strong>. It also allows a user to configure the network settings, update the<br />
firmware, and reset the unit. Pressing the power control button for an extended<br />
period also forces the <strong><strong>Video</strong>Forge</strong> to reset and power down.<br />
3528 Bagley Ave. N. Seattle, WA 98103 USA<br />
Corporate: +1 206 420 7514 | Tech Support: +1 206 457 8949 | www.spectracal.com
<strong><strong>Video</strong>Forge</strong> <strong>4K</strong> Back Panel<br />
<strong>Video</strong> Signal Output Connections<br />
Four SDI output mini-connectors are provided for SDI formats. For single-link link SDI, a single,<br />
mirrored output is provided on both the SDI 3 and SDI 4 connectors. For dual-linklink SDI, the dual<br />
output is provided on the SDI 3 and SDI 4 connectors. For Quad HD or <strong>4K</strong> SDI, all four of the<br />
mini-connectors are used as outputs, one for each of the <strong>4K</strong> play out quadrants. A cable with<br />
four mini-connectors on one end and four BNCs on the other end is provided for connecting<br />
equipment to the SDI outputs.<br />
One HDMI 1.4a connection is provided for SD, HD, and 2K video formats for either HDMI or DVI<br />
devices.<br />
<strong><strong>Video</strong>Forge</strong> Custom Test Patterns<br />
To display your own custom test patterns or images with the <strong><strong>Video</strong>Forge</strong>:<br />
1. Save custom test pattern or image files to a USB flash drive, in PNG or JPEG format, at<br />
the desired display resolution (e.g. 1920x1080).<br />
2. Connect the flash drive to a <strong><strong>Video</strong>Forge</strong> USB port.<br />
3. Access the <strong><strong>Video</strong>Forge</strong> control interface, as outlined in the “Manual Control Interface”<br />
section, above.<br />
4. On the Patterns tab in the <strong><strong>Video</strong>Forge</strong> control interface, open the Pattern drop down<br />
box. Your custom files will be listed, grouped by VFII-USB drive.<br />
5. Select one of your custom files to display your custom image.<br />
6. Included on the USB flash drive are sample test patterns and images in PNG format for<br />
3840x2160 and 4096x2160. They include a comprehensive resolution pattern and<br />
several reference images that have high contrast, detail and saturation.<br />
3528 Bagley Ave. N. Seattle, WA 98103 USA<br />
Corporate: +1 206 420 7514 | Tech Support: +1 206 457 8949 | www.spectracal.com
<strong><strong>Video</strong>Forge</strong> <strong>4K</strong> - Supported Formats<br />
YCC-<br />
YCC- RGB- RGB- SL- DL- 3Ga- 3Gb-<br />
Format<br />
8 10 8 10 SDI SDI SDI SDI<br />
525 59.94 (480i) X X<br />
X<br />
625 50.00 (576i) X X<br />
X<br />
1080i 50.00<br />
X X X X X<br />
1080i 59.95<br />
X X X X X<br />
1080i 60.00<br />
X X X X X<br />
720p 50.00<br />
X X<br />
X<br />
720p 59.95<br />
X X<br />
X<br />
720p 60.00<br />
X X<br />
X<br />
1080p 23.98<br />
X X X X X<br />
1080p 24.00<br />
X X X X X<br />
1080p 25.00<br />
X X X X X<br />
1080p 29.97<br />
X X X X X<br />
1080p 30.00<br />
X X X X X<br />
1080p 50.00 DL X X X X X<br />
1080p 59.95 DL X X X X X<br />
1080p 60.00 DL X X X X X<br />
1080p 50.00 3Ga X X X X X<br />
1080p 59.95 3Ga X X X X X<br />
1080p 60.00 3Ga X X X X X<br />
1080p 50.00 3Gb X X X X X<br />
1080p 59.95 3Gb X X X X X<br />
1080p 60.00 3Gb X X X X X<br />
1080p2k 23.98 X X X X X<br />
1080p2k 24.00 X X X X X<br />
1080p2k 25.00 X X X X X<br />
4x1920x1080p 23.98 X X X X<br />
4x1920x1080p 24.00 X X X X<br />
4x1920x1080p 25.00 X X X X<br />
4x2048x1080p 23.98 X X X X X<br />
4x2048x1080p 24.00 X X X X X<br />
4x2048x1080p 25.00 X X X X X<br />
YCC-8: YCrCb, 4:2:2, 8-bit<br />
YCC-10: YCrCb, 4:2:2, 10-bit<br />
RGB-8: RGB, 4:4:4, 8-bit<br />
RGB-10: RGB, 4:4:4, 10-bit<br />
SL-SDI: : Single link SDI (mirrored outputs on SDI 3 & SDI 4)<br />
DL-SDI: Dual link SDI (output on SDI 3 / SDI 4)<br />
3Ga-SDI: : Single link 3 Gb/s SDI, 3Ga standard (mirrored outputs on SDI 3 & SDI 4)<br />
3Gb-SDI: Single link 3 Gb/s SDI, 3 GB standard (mirrored outputs on SDI 3 & SDI 4)<br />
QL-SDI: : Quad link 3 Gb/s SDI (SDI 1 = UL, SDI 2 = UR, SDI 3 = LL, SDI 4 = LR)<br />
QL-<br />
SDI<br />
X<br />
X<br />
X<br />
X<br />
X<br />
X<br />
HDMI<br />
X<br />
X<br />
X<br />
X<br />
X<br />
X<br />
X<br />
X<br />
X<br />
X<br />
X<br />
X<br />
X<br />
X<br />
X<br />
X<br />
X<br />
X<br />
X<br />
3528 Bagley Ave. N. Seattle, WA 98103 USA<br />
Corporate: +1 206 420 7514 | Tech Support: +1 206 457 8949 | www.spectracal.com
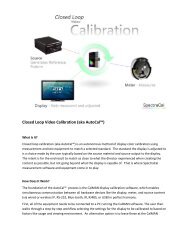
The AVFoundry <strong><strong>Video</strong>Forge</strong> Digital <strong>Video</strong> <strong>Generator</strong> can be automatically controlled by the<br />
CalMAN Display Calibration Software.<br />
Recommended CalMAN Workflows:<br />
• All available measurement and calibration workflows<br />
Required <strong><strong>Video</strong>Forge</strong> Firmware:<br />
• All firmware versions are acceptable<br />
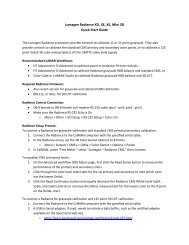
<strong><strong>Video</strong>Forge</strong> <strong>4K</strong><br />
CalMAN Setup <strong>Guide</strong><br />
<strong><strong>Video</strong>Forge</strong> Control Connection:<br />
• Ethernet LAN cable (straight-through or crossover cable)<br />
CalMAN Connection Procedure<br />
To connect CalMAN 5 to the <strong><strong>Video</strong>Forge</strong> for automatic CalMAN control:<br />
1. With an Ethernet cable connecting the <strong><strong>Video</strong>Forge</strong> to a network router/ /power on the<br />
<strong><strong>Video</strong>Forge</strong> and note the unit’s IP address on the LCD.<br />
2. Connect the CalMAN computer to the same network as the <strong><strong>Video</strong>Forge</strong>.<br />
3. On the CalMAN Source Settings tab/click “Find Source,” then select “AV Foundry;<br />
<strong><strong>Video</strong>Forge</strong> II.”<br />
4. Enter the <strong><strong>Video</strong>Forge</strong> IP Address.<br />
5. Click Connect on the Source connect dialog.<br />
CalMAN Source Settings Tab<br />
Triplet Support<br />
The <strong><strong>Video</strong>Forge</strong> provides full RGB triplet support to provide test patterns that are<br />
compatible with 3D cube LUT calibration.<br />
3528 Bagley Ave. N. Seattle, WA 98103 USA<br />
Corporate: +1 206 420 7514 | Tech Support: +1 206 457 8949 | www.spectracal.com
Window Size<br />
• Window 2%<br />
• Window 5%<br />
• Window 10%<br />
• Window 18% (default)<br />
• Window 25%<br />
• Window 50%<br />
• Full 100%<br />
• Constant APL 10<br />
• Constant APL 18<br />
• Constant APL 25<br />
• Constant APL 50<br />
On the Window Size drop down/select your desired pattern window size. (NOTE: For<br />
Plasma and CRT displays,<br />
Constant APL 18 works well.)<br />
3528 Bagley Ave. N. Seattle, WA 98103 USA<br />
Corporate: +1 206 420 7514 | Tech Support: +1 206 457 8949 | www.spectracal.com