QLM and QLD Series DN125 to DN200 Three Port ... - Spirax Sarco
QLM and QLD Series DN125 to DN200 Three Port ... - Spirax Sarco
QLM and QLD Series DN125 to DN200 Three Port ... - Spirax Sarco

You also want an ePaper? Increase the reach of your titles
YUMPU automatically turns print PDFs into web optimized ePapers that Google loves.
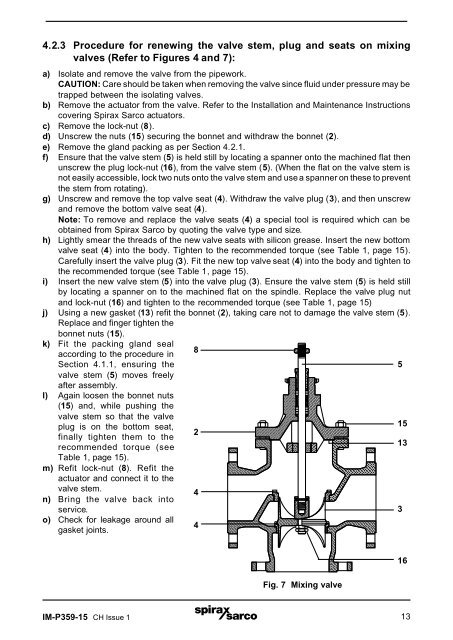
4.2.3 Procedure for renewing the valve stem, plug <strong>and</strong> seats on mixing<br />
valves (Refer <strong>to</strong> Figures 4 <strong>and</strong> 7):<br />
a) Isolate <strong>and</strong> remove the valve from the pipework.<br />
CAUTION: Care should be taken when removing the valve since fluid under pressure may be<br />
trapped between the isolating valves.<br />
b) Remove the actua<strong>to</strong>r from the valve. Refer <strong>to</strong> the Installation <strong>and</strong> Maintenance Instructions<br />
covering <strong>Spirax</strong> <strong>Sarco</strong> actua<strong>to</strong>rs.<br />
c) Remove the lock-nut (8).<br />
d) Unscrew the nuts (15) securing the bonnet <strong>and</strong> withdraw the bonnet (2).<br />
e) Remove the gl<strong>and</strong> packing as per Section 4.2.1.<br />
f) Ensure that the valve stem (5) is held still by locating a spanner on<strong>to</strong> the machined flat then<br />
unscrew the plug lock-nut (16), from the valve stem (5). (When the flat on the valve stem is<br />
not easily accessible, lock two nuts on<strong>to</strong> the valve stem <strong>and</strong> use a spanner on these <strong>to</strong> prevent<br />
the stem from rotating).<br />
g) Unscrew <strong>and</strong> remove the <strong>to</strong>p valve seat (4). Withdraw the valve plug (3), <strong>and</strong> then unscrew<br />
<strong>and</strong> remove the bot<strong>to</strong>m valve seat (4).<br />
Note: To remove <strong>and</strong> replace the valve seats (4) a special <strong>to</strong>ol is required which can be<br />
obtained from <strong>Spirax</strong> <strong>Sarco</strong> by quoting the valve type <strong>and</strong> size.<br />
h) Lightly smear the threads of the new valve seats with silicon grease. Insert the new bot<strong>to</strong>m<br />
valve seat (4) in<strong>to</strong> the body. Tighten <strong>to</strong> the recommended <strong>to</strong>rque (see Table 1, page 15).<br />
Carefully insert the valve plug (3). Fit the new <strong>to</strong>p valve seat (4) in<strong>to</strong> the body <strong>and</strong> tighten <strong>to</strong><br />
the recommended <strong>to</strong>rque (see Table 1, page 15).<br />
i) Insert the new valve stem (5) in<strong>to</strong> the valve plug (3). Ensure the valve stem (5) is held still<br />
by locating a spanner on <strong>to</strong> the machined flat on the spindle. Replace the valve plug nut<br />
<strong>and</strong> lock-nut (16) <strong>and</strong> tighten <strong>to</strong> the recommended <strong>to</strong>rque (see Table 1, page 15)<br />
j) Using a new gasket (13) refit the bonnet (2), taking care not <strong>to</strong> damage the valve stem (5).<br />
Replace <strong>and</strong> finger tighten the<br />
bonnet nuts (15).<br />
k) Fit the packing gl<strong>and</strong> seal<br />
according <strong>to</strong> the procedure in<br />
8<br />
Section 4.1.1, ensuring the<br />
5<br />
valve stem (5) moves freely<br />
after assembly.<br />
l) Again loosen the bonnet nuts<br />
(15) <strong>and</strong>, while pushing the<br />
valve stem so that the valve<br />
plug is on the bot<strong>to</strong>m seat,<br />
15<br />
2<br />
finally tighten them <strong>to</strong> the<br />
recommended <strong>to</strong>rque (see<br />
13<br />
Table 1, page 15).<br />
m) Refit lock-nut (8). Refit the<br />
actua<strong>to</strong>r <strong>and</strong> connect it <strong>to</strong> the<br />
valve stem.<br />
4<br />
n) Bring the valve back in<strong>to</strong><br />
service.<br />
3<br />
o) Check for leakage around all<br />
4<br />
gasket joints.<br />
16<br />
Fig. 7 Mixing valve<br />
IM-P359-15 CH Issue 1 13