QLM and QLD Series DN125 to DN200 Three Port ... - Spirax Sarco
QLM and QLD Series DN125 to DN200 Three Port ... - Spirax Sarco
QLM and QLD Series DN125 to DN200 Three Port ... - Spirax Sarco

Create successful ePaper yourself
Turn your PDF publications into a flip-book with our unique Google optimized e-Paper software.
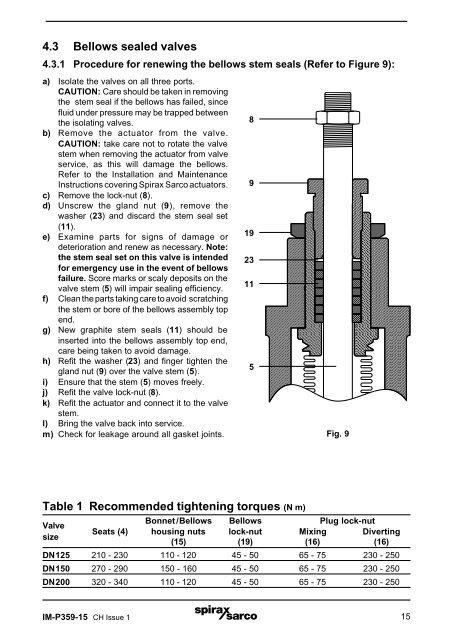
4.3 Bellows sealed valves<br />
4.3.1 Procedure for renewing the bellows stem seals (Refer <strong>to</strong> Figure 9):<br />
a) Isolate the valves on all three ports.<br />
CAUTION: Care should be taken in removing<br />
the stem seal if the bellows has failed, since<br />
fluid under pressure may be trapped between<br />
the isolating valves.<br />
b) Remove the actua<strong>to</strong>r from the valve.<br />
CAUTION: take care not <strong>to</strong> rotate the valve<br />
stem when removing the actua<strong>to</strong>r from valve<br />
service, as this will damage the bellows.<br />
Refer <strong>to</strong> the Installation <strong>and</strong> Maintenance<br />
Instructions covering <strong>Spirax</strong> <strong>Sarco</strong> actua<strong>to</strong>rs.<br />
c) Remove the lock-nut (8).<br />
d) Unscrew the gl<strong>and</strong> nut (9), remove the<br />
washer (23) <strong>and</strong> discard the stem seal set<br />
(11).<br />
e) Examine parts for signs of damage or<br />
deterioration <strong>and</strong> renew as necessary. Note:<br />
the stem seal set on this valve is intended<br />
for emergency use in the event of bellows<br />
failure. Score marks or scaly deposits on the<br />
valve stem (5) will impair sealing efficiency.<br />
f) Clean the parts taking care <strong>to</strong> avoid scratching<br />
the stem or bore of the bellows assembly <strong>to</strong>p<br />
end.<br />
g) New graphite stem seals (11) should be<br />
inserted in<strong>to</strong> the bellows assembly <strong>to</strong>p end,<br />
care being taken <strong>to</strong> avoid damage.<br />
h) Refit the washer (23) <strong>and</strong> finger tighten the<br />
gl<strong>and</strong> nut (9) over the valve stem (5).<br />
i) Ensure that the stem (5) moves freely.<br />
j) Refit the valve lock-nut (8).<br />
k) Refit the actua<strong>to</strong>r <strong>and</strong> connect it <strong>to</strong> the valve<br />
stem.<br />
l) Bring the valve back in<strong>to</strong> service.<br />
m) Check for leakage around all gasket joints.<br />
8<br />
9<br />
19<br />
23<br />
11<br />
5<br />
Fig. 9<br />
Table 1 Recommended tightening <strong>to</strong>rques (N m)<br />
Bonnet /Bellows Bellows Plug lock-nut<br />
Valve<br />
Seats (4) housing nuts lock-nut Mixing Diverting<br />
size<br />
(15) (19) (16) (16)<br />
<strong>DN125</strong> 210 - 230 110 - 120 45 - 50 65 - 75 230 - 250<br />
DN150 270 - 290 150 - 160 45 - 50 65 - 75 230 - 250<br />
<strong>DN200</strong> 320 - 340 110 - 120 45 - 50 65 - 75 230 - 250<br />
IM-P359-15 CH Issue 1 15