O WNER'S MANU AL - Stanton
O WNER'S MANU AL - Stanton
O WNER'S MANU AL - Stanton

Create successful ePaper yourself
Turn your PDF publications into a flip-book with our unique Google optimized e-Paper software.
SA3_manual_FIN<strong>AL</strong> 2/18/05 2:26 PM Page 4<br />
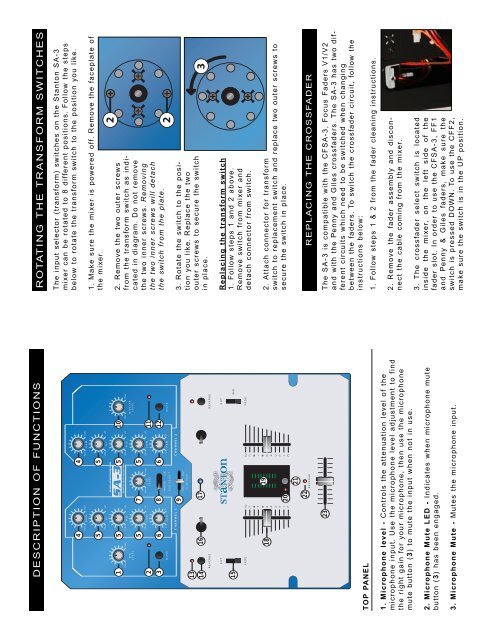
DESCRIPTION OF FUNCTIONS ROTATING THE TRANSFORM SWITCHES<br />
4<br />
5<br />
min max<br />
GAIN<br />
-26 +9<br />
HI<br />
4<br />
5<br />
min max<br />
GAIN<br />
-26 +9<br />
HI<br />
The input selector (transform) switches on the <strong>Stanton</strong> SA-3<br />
mixer can be rotated to 8 different positions. Follow the steps<br />
below to rotate the transform switch to the position you like.<br />
1. Make sure the mixer is powered off. Remove the faceplate of<br />
the mixer.<br />
1<br />
2<br />
3<br />
min max<br />
MIC<br />
LEVEL<br />
MUTE<br />
5<br />
5<br />
6<br />
-26 +9<br />
MID<br />
-26 +9<br />
LOW<br />
L R<br />
PAN<br />
7<br />
8<br />
www.stantondj.com<br />
SCRATCH ARTIST INSTRUMENT<br />
min max<br />
CUE<br />
LEVEL<br />
MASTER<br />
CUE<br />
CUE SELECT<br />
5<br />
5<br />
6<br />
-26 +9<br />
MID<br />
-26 +9<br />
LOW<br />
PAN<br />
R<br />
10<br />
11<br />
12<br />
min max<br />
MASTER<br />
LEVEL<br />
MUTE<br />
2. Remove the two outer screws<br />
from the transform switch as indicated<br />
in diagram. Do not remove<br />
the two inner screws. Removing<br />
the two inner screws will detach<br />
the switch from the plate.<br />
13<br />
14<br />
REVERSE<br />
9<br />
CHANNEL 1 CHANNEL 2<br />
16 17<br />
CH1<br />
CUE PAN<br />
CH2<br />
REVERSE<br />
3. Rotate the switch to the position<br />
you like. Replace the two<br />
outer screws to secure the switch<br />
in place.<br />
15<br />
MID<br />
CUT<br />
FADE FADE<br />
CUT<br />
MID<br />
Replacing the transform switch<br />
1. Follow steps 1 and 2 above.<br />
Remove switch from mixer and<br />
detach connector from switch.<br />
18<br />
20<br />
22<br />
19<br />
21<br />
REVERSE<br />
2. Attach connector for transform<br />
switch to replacement switch and replace two outer screws to<br />
secure the switch in place.<br />
REPLACING THE CROSSFADER<br />
TOP PANEL<br />
23<br />
1. Microphone level - Controls the attenuation level of the<br />
microphone input. Use the microphone level adjustment to find<br />
the right gain for your microphone, then use the microphone<br />
mute button (3) to mute the input when not in use.<br />
2. Microphone Mute LED - Indicates when microphone mute<br />
button (3) has been engaged.<br />
3. Microphone Mute - Mutes the microphone input.<br />
The SA-3 is compatible with the CFSA-3, Focus Faders V1/V2<br />
and with the Penny and Giles crossfaders. The SA-3 has two different<br />
circuits which need to be switched when changing<br />
between the faders. To switch the crossfader circuit, follow the<br />
instructions below:<br />
1. Follow steps 1 & 2 from the fader cleaning instructions.<br />
2. Remove the fader assembly and disconnect<br />
the cable coming from the mixer.<br />
3. The crossfader select switch is located<br />
inside the mixer, on the left side of the<br />
fader slot. In order to use the CFSA-3, FF1<br />
and Penny & Giles faders, make sure the<br />
switch is pressed DOWN. To use the CFF2,<br />
make sure the switch is in the UP position.<br />
L