View installation guide - CruiserCustomizing
View installation guide - CruiserCustomizing
View installation guide - CruiserCustomizing
Create successful ePaper yourself
Turn your PDF publications into a flip-book with our unique Google optimized e-Paper software.
Revision: 1.5 - 10/21/2011<br />
INCLUDED IN THE KIT:<br />
(1) Triple Tree<br />
INSTRUCTIONS:<br />
Installation Procedure:<br />
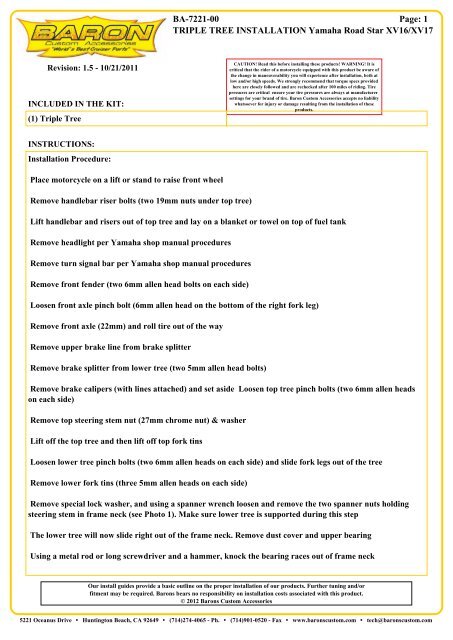
Place motorcycle on a lift or stand to raise front wheel<br />
Remove handlebar riser bolts (two 19mm nuts under top tree)<br />
BA-7221-00<br />
Page: 1<br />
TRIPLE TREE INSTALLATION Yamaha Road Star XV16/XV17<br />
CAUTION! Read this before installing these products! WARNING! It is<br />
critical that the rider of a motorcycle equipped with this product be aware of<br />
the change in maneuverability you will experience after <strong>installation</strong>, both at<br />
low and/or high speeds. We strongly recommend that torque specs provided<br />
here are closely followed and are rechecked after 100 miles of riding. Tire<br />
pressures are critical ensure your tire pressures are always at manufacturer<br />
settings for your brand of tire. Baron Custom Accessories accepts no liability<br />
whatsoever for injury or damage resulting from the <strong>installation</strong> of these<br />
products.<br />
Lift handlebar and risers out of top tree and lay on a blanket or towel on top of fuel tank<br />
Remove headlight per Yamaha shop manual procedures<br />
Remove turn signal bar per Yamaha shop manual procedures<br />
Remove front fender (two 6mm allen head bolts on each side)<br />
Loosen front axle pinch bolt (6mm allen head on the bottom of the right fork leg)<br />
Remove front axle (22mm) and roll tire out of the way<br />
Remove upper brake line from brake splitter<br />
Remove brake splitter from lower tree (two 5mm allen head bolts)<br />
Remove brake calipers (with lines attached) and set aside Loosen top tree pinch bolts (two 6mm allen heads<br />
on each side)<br />
Remove top steering stem nut (27mm chrome nut) & washer<br />
Lift off the top tree and then lift off top fork tins<br />
Loosen lower tree pinch bolts (two 6mm allen heads on each side) and slide fork legs out of the tree<br />
Remove lower fork tins (three 5mm allen heads on each side)<br />
Remove special lock washer, and using a spanner wrench loosen and remove the two spanner nuts holding<br />
steering stem in frame neck (see Photo 1). Make sure lower tree is supported during this step<br />
The lower tree will now slide right out of the frame neck. Remove dust cover and upper bearing<br />
Using a metal rod or long screwdriver and a hammer, knock the bearing races out of frame neck<br />
Our install <strong>guide</strong>s provide a basic outline on the proper <strong>installation</strong> of our products. Further tuning and/or<br />
fitment may be required. Barons bears no responsibility on <strong>installation</strong> costs associated with this product.<br />
© 2012 Barons Custom Accessories<br />
5221 Oceanus Drive Huntington Beach, CA 92649 (714)274-4065 - Ph. (714)901-0520 - Fax www.baronscustom.com tech@baronscustom.com
BA-7221-00<br />
Page: 2<br />
TRIPLE TREE INSTALLATION Yamaha Road Star XV16/XV17<br />
Pack the supplied, new lower bearing with grease. Remember - youre not trying to just coat the outside, you<br />
must get the bearing full of grease on the inside. Use a flat stick or putty knife to press grease into top of<br />
bearings, then fill the race with grease and press it down over the bearings (see Photos 2 & 3)<br />
Pack the supplied, new upper bearing (see Photo 4)<br />
Install both new races in the frame neck (a wooden block and a mallet will work for this if you dont have a<br />
race <strong>installation</strong> tool)<br />
Slide the lower tree/stem assembly up through frame neck and insert new top bearing. Replace dust cover and<br />
first spanner nut. Tighten it as much as you can while still being able to turn the tree freely without any drag<br />
(approx. 37 ft-lbs).<br />
Reinstall rubber isolation washer and top spanner nut. Tighten nut so tabs line up with lower spanner nut<br />
tabs (approx. 2.2 ft-lbs). Replace locking washer (see Photo 1)<br />
Put on top tree, washer and chrome cap nut (finger tight only)<br />
Spray fork legs with glass cleaner to make them slide easier (do not use oil or WD-40)<br />
Slide fork legs in from bottom and up through top tree, making sure they both stop flush with the top of tree<br />
(refer to Yamaha shop manual procedures for proper fork <strong>installation</strong>)<br />
Tighten lower tree pinch bolts first (14 ft-lbs)<br />
Tighten chrome cap nut next (94 ft-lbs)<br />
Finally, tighten top tree pinch bolts (8 ft-lbs)<br />
Replace handlebar/risers and tighten riser bolts (29 ft-lbs)<br />
Replace front wheel and axle (56 ft-lbs) and tighten pinch bolt (14 ft-lbs)<br />
Replace brake calipers and tighten (29 ft-lbs) and install brake splitter on new lower tree (10 ft-lbs)<br />
Pass top brake line through hole in lower tree and attach to splitter using NEW banjo crush washers. Tighten<br />
banjo bolt (20 ft-lbs)<br />
Replace front fender and tighten mount bolts (17 ft-lbs)<br />
Bleed front brake system per Yamaha shop manual procedures. Check hydraulic fittings for leakage<br />
Test brake, clutch and throttle operation to be sure they are functioning properly before you ride<br />
Recheck all bolts/fasteners after 100 miles of riding<br />
Our install <strong>guide</strong>s provide a basic outline on the proper <strong>installation</strong> of our products. Further tuning and/or<br />
fitment may be required. Barons bears no responsibility on <strong>installation</strong> costs associated with this product.<br />
© 2012 Barons Custom Accessories<br />
5221 Oceanus Drive Huntington Beach, CA 92649 (714)274-4065 - Ph. (714)901-0520 - Fax www.baronscustom.com tech@baronscustom.com
BA-7221-00<br />
Page: 3<br />
TRIPLE TREE INSTALLATION Yamaha Road Star XV16/XV17<br />
Our install <strong>guide</strong>s provide a basic outline on the proper <strong>installation</strong> of our products. Further tuning and/or<br />
fitment may be required. Barons bears no responsibility on <strong>installation</strong> costs associated with this product.<br />
© 2012 Barons Custom Accessories<br />
5221 Oceanus Drive Huntington Beach, CA 92649 (714)274-4065 - Ph. (714)901-0520 - Fax www.baronscustom.com tech@baronscustom.com


