Baron Tachometer Installation - CruiserCustomizing
Baron Tachometer Installation - CruiserCustomizing
Baron Tachometer Installation - CruiserCustomizing

You also want an ePaper? Increase the reach of your titles
YUMPU automatically turns print PDFs into web optimized ePapers that Google loves.
311 #1 Industrial Way - Fallbrook, CA 92028 - USA<br />
Phone: (760) 731-1200 Fax: (760) 731-1284<br />
E-mail: tech@baronscustom.com<br />
Website: www.baronscustom.com<br />
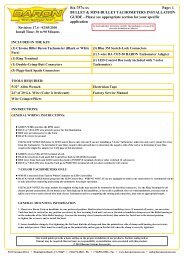
<strong>Baron</strong> <strong>Tachometer</strong> <strong>Installation</strong><br />
Please Note: Some models like Harley-Davidson, Kawasaki Vulcan FI models, Suzuki FI models, Honda VTX 1800 and others may<br />
require the included Tach Adapter. See separate instructions for installation on specific models and tach adaptor use.<br />
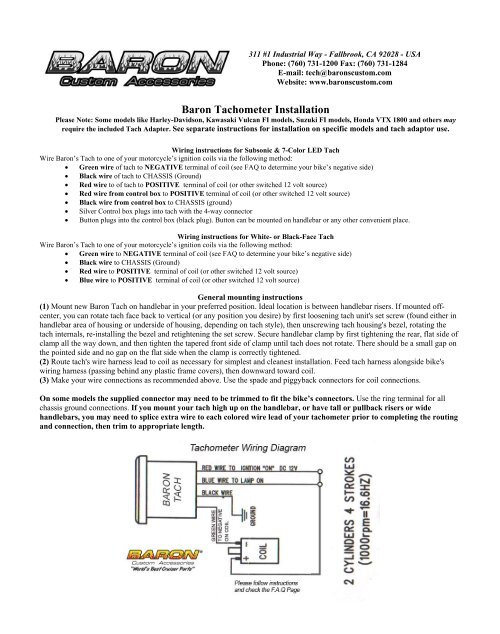
Wiring instructions for Subsonic & 7-Color LED Tach<br />
Wire <strong>Baron</strong>’s Tach to one of your motorcycle’s ignition coils via the following method:<br />
• Green wire of tach to NEGATIVE terminal of coil (see FAQ to determine your bike’s negative side)<br />
• Black wire of tach to CHASSIS (Ground)<br />
• Red wire to of tach to POSITIVE terminal of coil (or other switched 12 volt source)<br />
• Red wire from control box to POSITIVE terminal of coil (or other switched 12 volt source)<br />
• Black wire from control box to CHASSIS (ground)<br />
• Silver Control box plugs into tach with the 4-way connector<br />
• Button plugs into the control box (black plug). Button can be mounted on handlebar or any other convenient place.<br />
Wiring instructions for White- or Black-Face Tach<br />
Wire <strong>Baron</strong>’s Tach to one of your motorcycle’s ignition coils via the following method:<br />
• Green wire to NEGATIVE terminal of coil (see FAQ to determine your bike’s negative side)<br />
• Black wire to CHASSIS (Ground)<br />
• Red wire to POSITIVE terminal of coil (or other switched 12 volt source)<br />
• Blue wire to POSITIVE terminal of coil (or other switched 12 volt source)<br />
General mounting instructions<br />
(1) Mount new <strong>Baron</strong> Tach on handlebar in your preferred position. Ideal location is between handlebar risers. If mounted offcenter,<br />
you can rotate tach face back to vertical (or any position you desire) by first loosening tach unit's set screw (found either in<br />
handlebar area of housing or underside of housing, depending on tach style), then unscrewing tach housing's bezel, rotating the<br />
tach internals, re-installing the bezel and retightening the set screw. Secure handlebar clamp by first tightening the rear, flat side of<br />
clamp all the way down, and then tighten the tapered front side of clamp until tach does not rotate. There should be a small gap on<br />
the pointed side and no gap on the flat side when the clamp is correctly tightened.<br />
(2) Route tach's wire harness lead to coil as necessary for simplest and cleanest installation. Feed tach harness alongside bike's<br />
wiring harness (passing behind any plastic frame covers), then downward toward coil.<br />
(3) Make your wire connections as recommended above. Use the spade and piggyback connectors for coil connections.<br />
On some models the supplied connector may need to be trimmed to fit the bike’s connectors. Use the ring terminal for all<br />
chassis ground connections. If you mount your tach high up on the handlebar, or have tall or pullback risers or wide<br />
handlebars, you may need to splice extra wire to each colored wire lead of your tachometer prior to completing the routing<br />
and connection, then trim to appropriate length.
Frequently Asked Questions (FAQ)<br />
• How do I know if I need the Tach Adapter (BA-7315-50)?<br />
We have tested this adapter with the following bikes: Harley-Davidson Road King, Softail models, Kawasaki Vulcan<br />
900, 1500FI, 1600 & 2000 and the Suzuki C/M50. If your bike has a fuel-injected, single-fire ignition, or if you’ve<br />
installed our tach but it reads half RPM, this adapter should work for you. Please check with your dealer if you are<br />
unsure. Harley Davidson models using the stock tach output from the bike will not require the adapter.<br />
• Can the tach be mounted under the handlebars?<br />
YES. If you have enough room to mount under the handlebars, the instrument can be rotated in the housing to<br />
correctly orient it for under-bar installation. There is a set screw inside the clamp that needs to be loosened to allow the<br />
tach insides to be rotated. Special note for under-bar installations: Be aware - the chances of water intrusion are<br />
greatly increased in this location!<br />
• How can I tell positive from negative on my coil?<br />
Most motorcycles will have two wires going to each of the coils, and each coil will share one common-color wire and<br />
have one unique color wire. The common-color is the positive and the unique color is the negative. For example, a<br />
Yamaha set-up has a red/black on both coils - that is positive. The other coil wire would be orange or gray - that is the<br />
negative side. Honda’s set-up is blue/yellow and yellow/blue for the negative, and black/white for the positive. Suzuki<br />
has orange/white on both coils as positive and has white or black/yellow as the negative side.<br />
• My bike has two (or four) coils - Which one/ones do I use?<br />
Most multi-cylinder bikes have one coil per cylinder. You only need to connect to one of the coils - choose the one<br />
most convenient for wire routing. (Single-fire motorcycles require a tach adaptor [included] that will combine the<br />
signals from two coils)<br />
• My tach is bouncing at idle. Is it bad?<br />
Typically, bouncing tachs are caused by 3 reasons. On some bikes, a low idle can cause the tach to bounce up to 1000<br />
rpm. Most manufacturers suggest 700-900 rpm as an acceptable range for idle. If you choose to keep it lower, you may<br />
experience some bouncing at idle. This does not negatively affect tach operation. The next major cause for tach<br />
bounce is poor connections/ground. We recommend soldering all connections, and finding an appropriate ground<br />
somewhere on the frame or the negative side of the battery.<br />
• My tach face has fogged up, what do I do?<br />
Tach fogging can occur when the outside air temp is warmer than the inside of the tach, and humidity is high. <strong>Baron</strong><br />
tachs feature vent holes in the tach body that are next to the wire exit point in the clamp. It is important that the clamp<br />
be tightened so that these holes are open for air exchange. This means the edge of the clamp that faces the rider should<br />
be tightened down until it touches and the forward edge of the clamp has a gap for the vents to work properly.<br />
• How do I replace the light bulb in my tach?<br />
Remove tach from the handlebars. In the handlebar clamp area of the tach housing there is a set screw - loosen it, then<br />
remove the tach housing bezel by unscrewing it from the housing, and slide the tach instrument out of the housing. On<br />
the back of the tach unit there is a rubber plug - remove the plug. The bulb is in a holder just under the plug. Rotate<br />
holder 1/4 turn to remove, and pull the bulb out. The replacement is a Sylvania 74b (or equivalent) available at most<br />
auto parts stores. The 7-color tachometers have an LED that is not replaceable, but LED’s typically last a very long<br />
time and you should never have to replace it.<br />
Our install guides provide a basic outline on the proper installation of our products. Further tuning and/or fitment<br />
may be required. <strong>Baron</strong> bears no responsibility on installation costs associated with this product.<br />
© 2008 <strong>Baron</strong> Custom Accessories<br />
Revision 7.95 (1/30/08)
Harley-Davidson:<br />
Special Instructions for Specific Bikes:<br />
1980 - 2006 Harley-Davidson (all models). Harley-Davidson models can be installed using one of the following methods<br />
(07+ model instructions below):<br />
Without Adapter (Preferred):<br />
1. Install the tach on your handlebars.<br />
2. Remove the dash on the vehicle and locate the pink wire (sometimes has a plastic end cap on it).<br />
3. Cut the plastic off and splice this pink wire with the green wire from the tachometer.<br />
4. Find the orange wire and attach the tachometer power wires to it (blue and red wires).<br />
5. Locate a suitable ground and attach the black wire from the tachometer to it.<br />
With Adapter:<br />
On Softail & Touring models, you will need to splice into the existing wiring. (<strong>Baron</strong> recommends that all connections be<br />
soldered and shrink-wrapped). Follow the plug/wiring harness from the coils to an opening under the seat or other easily<br />
accessible location. Connect the tach using the included single-fire adapter as follows:<br />
1. Yellow wire from the tach adapter to the blue wire w/orange tracer on harness.<br />
2. Blue wire from the tach adapter to the yellow wire w/blue tracer on harness. Be careful here, there are two yellow<br />
wires! One has a blue tracer and one has a green tracer. They look VERY similar. Use the blue traced wire only.<br />
3. Green wire on the adapter should be connected to the green wire on the tachometer itself (signal input).<br />
Some Harley-Davidson motorcycles, while still equipped with a single-fire ignition, do not require the use of a single-fire<br />
adapter due to their unique coil configuration. If you install the tach and it is reading double what it should be, try<br />
removing the tachometer adapter from the installation.<br />
’07 & Later Models (All connections are under the seat):<br />
1. Remove the gas tank and run the wires along the main wiring harness.<br />
2. Connect the hot wires to the hot tail light wire harness on the right side of the bike.<br />
3. Connect the ground wire to the main ground nut on the frame in front of the battery; the terminals we provide should<br />
work great.<br />
4. The wire that would normally connect to the negative on the coil goes to the ECM mounted on the rear fender.<br />
(Terminal #3 is dedicated for a tach. You need to pick up a Packard connector from your local Harley-<br />
Davidson dealer to make that connection.)<br />
5. Locate a suitable ground and attach the black wire from the tachometer to it.<br />
Honda<br />
VTX1300:<br />
1. Bolt on the tachometer. Run the wires to the back of the headlight.<br />
2. Open up the headlight to access the wiring inside the bucket.<br />
3. Tie the red & blue wires together from the tach and connect them to the black wire/brown stripe.<br />
4. Black wire from the tach connects to the green wire in the headlight.<br />
5. Push the wires back into the headlight and re-assemble. Be sure all connections are soldered and shrink-wrapped.<br />
6. Remove the seat. Remove fuel tank bolt and lift the left side of the tank to expose the coil.<br />
7. Connect green wire from tach to coil’s blue wire with white stripe. Use the piggyback connectors provided.