

P216, P218 P220, P224 Performer Series - Cummins Onan
P216, P218 P220, P224 Performer Series - Cummins Onan
P216, P218 P220, P224 Performer Series - Cummins Onan

You also want an ePaper? Increase the reach of your titles
YUMPU automatically turns print PDFs into web optimized ePapers that Google loves.
OIL FILTER CHANGE<br />
Refer to Periodic Maintenenace Schedule (located in<br />
the Operator’s Manual) for oil filter change interval. If<br />
operating in extremely dusty, high ambient, or low<br />
ambient conditions, change oil filter more often.<br />
Spin off oil filter element and discard it. Thoroughly<br />
clean filter mounting surface and make sure new gasket<br />
is inserted in the element. Apply a thin film of clean oil to<br />
the gasket. Spin element down by hand until gasket just<br />
touches mounting pad and then turn down an additional<br />
1 /2-3/4 turn. Do not overtighten.<br />
With oil in crankcase, start engine and check for leaks<br />
around filter element. Retighten only as much as<br />
necessary to eliminate leaks; do not overtighten.<br />
CRANKCASE BREATHER<br />
The crankcase breather prevents pressure from building<br />
up in the crankcase. It also prevents oil contamination<br />
by removing moisture or gasoline vapors and other<br />
harmful blow-by materials from the crankcase. These<br />
vapors are routed to the carburetor where they are<br />
mixed with incoming air and burned in the combustion<br />
chamber. A sticky breather valve can cause oil leaks,<br />
high oil consumption, rough idle, reduced engine power,<br />
and a rapid formation of sludge and varnish within the<br />
engine.<br />
Crankcase Breather Service<br />
If the crankcase becomes pressurized as evidenced by<br />
oil leaks at the seals or excessive oil in the air cleaner<br />
housing, use the following procedure to service.<br />
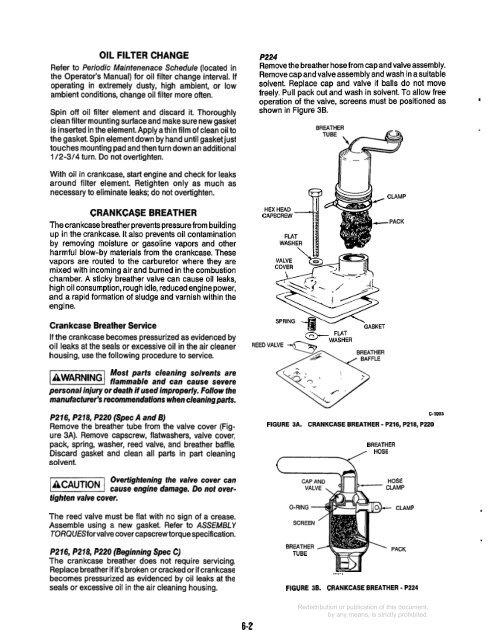
<strong>P224</strong><br />
Remove the breather hose from cap and valve assembly.<br />
Remove cap and valve assembly and wash in a suitable<br />
solvent. Replace cap and valve if balls do not move<br />
freely. Pull pack out and wash in solvent. To allow free<br />
operation of the valve, screens must be positioned as<br />
shown in Figure 3B.<br />
REEDVALVE -cT’a,<br />
CLAMP<br />
-PACK<br />
Most parts cleaning solvents are<br />
lZiEiEl flammable and can cause severe<br />
personal injury or death if used improperly. Follow the<br />
manuiac turer’s recommendations when cleaning parts.<br />
<strong>P216</strong>, <strong>P218</strong>, <strong>P220</strong> (Spec A and 8)<br />
Remove the breather tube from the valve cover (Figure<br />
3A). Remove capscrew, flatwashers, valve cover,<br />
pack, spring, washer, reed valve, and breather baffle.<br />
Discard gasket and clean all parts in part cleaning<br />
solvent.<br />
Overtightening the valve cover can<br />
k@!@@l cause engine damage. Do not overtighten<br />
value cover.<br />
The reed valve must be flat with no sign of a crease.<br />
Assemble using a new gasket. Refer to ASSEMBLY<br />
TORQU€Sforvalve cover capscrew torque specification.<br />
<strong>P216</strong>, <strong>P218</strong>, <strong>P220</strong> (Beginning Spec C)<br />
The crankcase breather does not require servicing.<br />
Replace breather if it’s broken or cracked or if crankcase<br />
becomes pressurized as evidenced by oil leaks at the<br />
seals or excessive oil in the air cleaning housing.<br />
FIGURE 3A.<br />
CRANKCASE BREATHER - <strong>P216</strong>, <strong>P218</strong>, <strong>P220</strong><br />
m<br />
BREATHER<br />
HOSE<br />
CLAMP<br />
TUBE<br />
‘lrl-,<br />
- CLAMP<br />
- PACK<br />
FIGURE 38. CRANKCASE BREATHER - <strong>P224</strong><br />
C-1003<br />
6-2


