

P216, P218 P220, P224 Performer Series - Cummins Onan
P216, P218 P220, P224 Performer Series - Cummins Onan
P216, P218 P220, P224 Performer Series - Cummins Onan

Create successful ePaper yourself
Turn your PDF publications into a flip-book with our unique Google optimized e-Paper software.
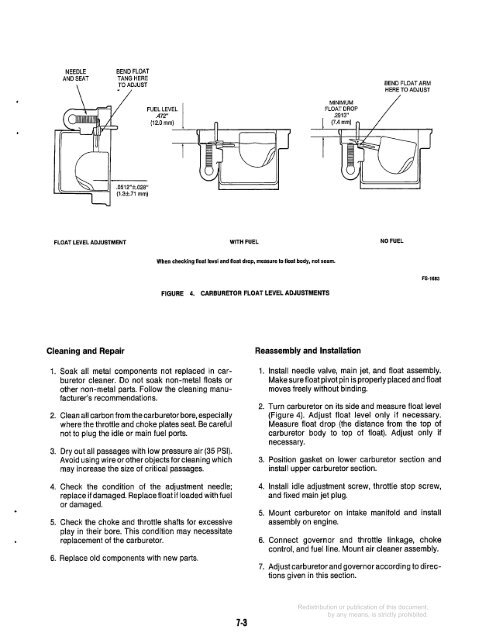
NEEDLE<br />
AND SEAT<br />
\ - /<br />
BEND FLOAT<br />
TANG HERE<br />
TO ADJUST<br />
MINIMUM<br />
FLOAT DROP<br />
2913"<br />
BEND FLOAT ARM<br />
HERE TO ADJUST<br />
/<br />
U<br />
FLOAT LEVEL ADJUSTMENT<br />
WITH FUEL<br />
NO FUEL<br />
When checking float level and float drop, measure to float body, not seam.<br />
FS-1683<br />
FIGURE 4.<br />
CARBURETOR FLOAT LEVEL ADJUSTMENTS<br />
.<br />
Cleaning and Repair<br />
1. Soak all metal components not replaced in carburetor<br />
cleaner. Do not soak non-metal floats or<br />
other non-metal parts. Follow the cleaning manufacturer's<br />
recommendations.<br />
2. Clean all carbon from thecarburetor bore, especially<br />
where the throttle and choke plates seat. Be careful<br />
not to plug the idle or main fuel ports.<br />
3. Dry out all passages with low pressure air (35 PSI).<br />
Avoid using wire or other objects for cleaning which<br />
may increase the size of critical passages.<br />
4. Check the condition of the adjustment needle;<br />
replace if damaged. Replace float if loaded with fuel<br />
or damaged.<br />
5. Check the choke and throttle shafts for excessive<br />
play in their bore. This condition may necessitate<br />
replacement of the carburetor.<br />
6. Replace old components with new parts.<br />
Reassembly and Installation<br />
1. Install needle valve, main jet, and float assembly.<br />
Make sure float pivot pin is properly placed and float<br />
moves freely without binding.<br />
2. Turn carburetor on its side and measure float level<br />
(Figure 4). Adjust float level only if necessary.<br />
Measure float drop (the distance from the top of<br />
carburetor body to top of float). Adjust only if<br />
necessary.<br />
3. Position gasket on lower carburetor section and<br />
install upper carburetor section.<br />
4. Install idle adjustment screw, throttle stop screw,<br />
and fixed main jet plug.<br />
5. Mount carburetor on intake manifold and install<br />
assembly on engine.<br />
6. Connect governor and throttle linkage, choke<br />
control, and fuel line. Mount air cleaner assembly.<br />
7. Adjust carburetor and governor according to directions<br />
given in this section.<br />
7-3


