Cisco Unified Wireless IP Phone 7921G Deployment Guide - SWS a.s.
Cisco Unified Wireless IP Phone 7921G Deployment Guide - SWS a.s.
Cisco Unified Wireless IP Phone 7921G Deployment Guide - SWS a.s.

You also want an ePaper? Increase the reach of your titles
YUMPU automatically turns print PDFs into web optimized ePapers that Google loves.
<strong>Cisco</strong> <strong>Unified</strong> <strong>Wireless</strong> <strong>IP</strong> <strong>Phone</strong> <strong>7921G</strong><br />
<strong>Deployment</strong> <strong>Guide</strong><br />
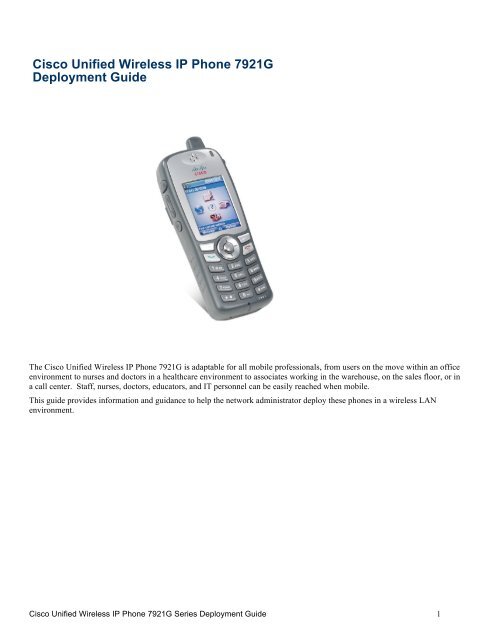
The <strong>Cisco</strong> <strong>Unified</strong> <strong>Wireless</strong> <strong>IP</strong> <strong>Phone</strong> <strong>7921G</strong> is adaptable for all mobile professionals, from users on the move within an office<br />
environment to nurses and doctors in a healthcare environment to associates working in the warehouse, on the sales floor, or in<br />
a call center. Staff, nurses, doctors, educators, and IT personnel can be easily reached when mobile.<br />
This guide provides information and guidance to help the network administrator deploy these phones in a wireless LAN<br />
environment.<br />
<strong>Cisco</strong> <strong>Unified</strong> <strong>Wireless</strong> <strong>IP</strong> <strong>Phone</strong> <strong>7921G</strong> Series <strong>Deployment</strong> <strong>Guide</strong> 1
Revision History<br />
Date<br />
Comments<br />
02/28/2007 Initial Version<br />
03/16/2008 1.0(5) Release<br />
10/13/2008 1.1(1) and 1.2(1) Releases<br />
11/17/2009 1.3(3) Release<br />
5/3/2010 1.3(4) Release<br />
12/15/2010 1.4(1) Release<br />
<strong>Cisco</strong> <strong>Unified</strong> <strong>Wireless</strong> <strong>IP</strong> <strong>Phone</strong> <strong>7921G</strong> Series <strong>Deployment</strong> <strong>Guide</strong> 2
Contents<br />
Requirements for the <strong>Cisco</strong> <strong>Unified</strong> <strong>Wireless</strong> <strong>IP</strong> <strong>Phone</strong> <strong>7921G</strong> ............................................................................................................6 <br />
Site Survey...............................................................................................................................................................................................6 <br />
RF Validation..........................................................................................................................................................................................6 <br />
Call Control ............................................................................................................................................................................................7 <br />
Supported Protocols................................................................................................................................................................................7 <br />
Supported Access Points .........................................................................................................................................................................7 <br />
Supported Antennas ................................................................................................................................................................................9 <br />
<strong>Phone</strong> Models and Localization .............................................................................................................................................................10 <br />
<strong>Phone</strong> Models........................................................................................................................................................................................10 <br />
World Mode (802.11d) .....................................................................................................................................................................11 <br />
Supported Countries .............................................................................................................................................................................11 <br />
Language Support .................................................................................................................................................................................12 <br />
Radio Characteristics..............................................................................................................................................................................12 <br />
<strong>Wireless</strong> Security .....................................................................................................................................................................................13 <br />
Extensible Authentication Protocol - Flexible Authentication via Secure Tunneling (EAP-FAST) .....................................................14 <br />
Extensible Authentication Protocol – Transport Layer Security (EAP-TLS) .......................................................................................16 <br />
Protected Extensible Authentication Protocol (PEAP).........................................................................................................................17 <br />
<strong>Cisco</strong> Centralized Key Management (CCKM)......................................................................................................................................18 <br />
EAP and User Database Compatibility ................................................................................................................................................19 <br />
Voice Security ..........................................................................................................................................................................................20 <br />
Power Management.................................................................................................................................................................................20 <br />
Protocols ...............................................................................................................................................................................................21 <br />
Unscheduled Auto Power Save Delivery (U-APSD)........................................................................................................................21 <br />
Power Save Poll (PS-POLL).............................................................................................................................................................21 <br />
Active Mode......................................................................................................................................................................................21 <br />
Delivery Traffic Indicator Message (DTIM).........................................................................................................................................22 <br />
Scan Modes ...........................................................................................................................................................................................22 <br />
Quality of Service (QoS) .........................................................................................................................................................................22 <br />
Configuring QoS in <strong>Cisco</strong> <strong>Unified</strong> Communications Manager ............................................................................................................23 <br />
Configuring QoS Policies for the Network ...........................................................................................................................................23 <br />
Configuring <strong>Cisco</strong> IOS Access Points ..............................................................................................................................................23 <br />
Configuring <strong>Cisco</strong> Switch Ports .......................................................................................................................................................24 <br />
Configuring Switch Ports for Wired <strong>IP</strong> <strong>Phone</strong>s................................................................................................................................24 <br />
Sample Voice Packet Capture...........................................................................................................................................................25 <br />
Call Admission Control.........................................................................................................................................................................26 <br />
Pre-Call Admission Control..............................................................................................................................................................26 <br />
Roaming Admission Control ............................................................................................................................................................27 <br />
<strong>Cisco</strong> <strong>Unified</strong> <strong>Wireless</strong> <strong>IP</strong> <strong>Phone</strong> <strong>7921G</strong> Series <strong>Deployment</strong> <strong>Guide</strong> 3
Traffic Classification (TCLAS) .............................................................................................................................................................27 <br />
Roaming ...................................................................................................................................................................................................28 <br />
Interband Roaming ...............................................................................................................................................................................28 <br />
Channel Parking................................................................................................................................................................................29 <br />
Multicast...................................................................................................................................................................................................29 <br />
Designing the <strong>Wireless</strong> LAN for Voice..................................................................................................................................................30 <br />
Planning Channel Usage ......................................................................................................................................................................30 <br />
5 GHz (802.11a)................................................................................................................................................................................30 <br />
Using Dynamic Frequency Selection (DFS) on Access Points....................................................................................................31 <br />
2.4 GHz (802.11b/g) .........................................................................................................................................................................32 <br />
Signal Strength and Coverage...........................................................................................................................................................33 <br />
Configuring Data Rates ........................................................................................................................................................................35 <br />
Call Capacity ........................................................................................................................................................................................36 <br />
Dynamic Transmit Power Control (DTPC) ..........................................................................................................................................37 <br />
Multipath...............................................................................................................................................................................................37 <br />
Verification with Site Survey Tools.......................................................................................................................................................38 <br />
<strong>Cisco</strong> <strong>7921G</strong> Neighbor List ..............................................................................................................................................................38 <br />
<strong>Cisco</strong> <strong>7921G</strong> Site Survey..................................................................................................................................................................39 <br />
Configuring <strong>Cisco</strong> <strong>Unified</strong> Communications Manager .......................................................................................................................41 <br />
<strong>Phone</strong> Button Templates .......................................................................................................................................................................41 <br />
Softkey Templates..................................................................................................................................................................................41 <br />
Security Profiles....................................................................................................................................................................................42 <br />
G.722 Advertisement.............................................................................................................................................................................43 <br />
Product Specific Configuration Options...............................................................................................................................................43 <br />
Configuring the <strong>Cisco</strong> <strong>Unified</strong> <strong>Wireless</strong> LAN Controller and Access Points ....................................................................................49 <br />
SSID / WLAN Settings ...........................................................................................................................................................................49 <br />
Controller Settings ................................................................................................................................................................................52 <br />
802.11 Network Settings .......................................................................................................................................................................54 <br />
Auto RF.............................................................................................................................................................................................56 <br />
EDCA Parameters.............................................................................................................................................................................59 <br />
DFS (802.11h) ..................................................................................................................................................................................59 <br />
Call Admission Control Settings ...........................................................................................................................................................60 <br />
Configuring QoS Basic Service Set (QBSS)..........................................................................................................................................63 <br />
Configuring Auto-Immune ....................................................................................................................................................................64 <br />
Configuring the WLAN Controller EAP-Request and EAPOL-Key Timeouts......................................................................................65 <br />
Configuring Proxy ARP ........................................................................................................................................................................66 <br />
Configuring TK<strong>IP</strong> Countermeasure Holdoff Time................................................................................................................................67 <br />
VLANs and Autonomous Access Points ................................................................................................................................................67 <br />
<strong>Cisco</strong> <strong>Unified</strong> <strong>Wireless</strong> <strong>IP</strong> <strong>Phone</strong> <strong>7921G</strong> Series <strong>Deployment</strong> <strong>Guide</strong> 4
Configuring the <strong>Cisco</strong> <strong>Unified</strong> <strong>Wireless</strong> <strong>IP</strong> <strong>Phone</strong> <strong>7921G</strong> ...................................................................................................................67 <br />
Configuring the Network Profile Parameters.......................................................................................................................................68 <br />
Installing Certificates............................................................................................................................................................................74 <br />
Using Templates to Configure <strong>Phone</strong>s..................................................................................................................................................80 <br />
Upgrading <strong>Phone</strong> Firmware.................................................................................................................................................................80 <br />
Wavelink Avalanche..............................................................................................................................................................................81 <br />
Using the Bulk <strong>Deployment</strong> Utility .......................................................................................................................................................90 <br />
Default Export...................................................................................................................................................................................93 <br />
Bulk Export.......................................................................................................................................................................................93 <br />
Pushing Configuration Files to the <strong>Cisco</strong> <strong>7921G</strong> .............................................................................................................................94 <br />
Configuring the Local <strong>Phone</strong> Book and Speed Dials ...........................................................................................................................94 <br />
Increased Font ......................................................................................................................................................................................96 <br />
Using <strong>Phone</strong> Designer ..........................................................................................................................................................................98 <br />
<strong>IP</strong> <strong>Phone</strong> Services ....................................................................................................................................................................................99 <br />
Extensible Markup Language (XML)..................................................................................................................................................100 <br />
Troubleshooting.....................................................................................................................................................................................100 <br />
Stream Statistics..................................................................................................................................................................................100 <br />
Network Statistics................................................................................................................................................................................102 <br />
<strong>Wireless</strong> LAN Statistics .......................................................................................................................................................................104 <br />
Traffic Stream Metrics (TSM) .............................................................................................................................................................104 <br />
<strong>Phone</strong> Logs..........................................................................................................................................................................................105 <br />
Trace Modules ................................................................................................................................................................................106 <br />
Trace Levels....................................................................................................................................................................................107 <br />
Radio Status Indicator ........................................................................................................................................................................107 <br />
Hardware Diagnostics ........................................................................................................................................................................108 <br />
Firmware Recovery.............................................................................................................................................................................108 <br />
Restoring Factory Defaults.................................................................................................................................................................109 <br />
Capturing a Screenshot of the <strong>Phone</strong> Display ....................................................................................................................................109 <br />
Healthcare Environments.....................................................................................................................................................................110 <br />
Cleaning the <strong>Phone</strong>................................................................................................................................................................................110 <br />
<strong>Phone</strong> Accessories..................................................................................................................................................................................110 <br />
Additional Documentation ...................................................................................................................................................................111 <br />
<strong>Cisco</strong> <strong>Unified</strong> <strong>Wireless</strong> <strong>IP</strong> <strong>Phone</strong> <strong>7921G</strong> Series <strong>Deployment</strong> <strong>Guide</strong> 5
Requirements for the <strong>Cisco</strong> <strong>Unified</strong> <strong>Wireless</strong> <strong>IP</strong> <strong>Phone</strong> <strong>7921G</strong><br />
The <strong>Cisco</strong> <strong>Unified</strong> <strong>Wireless</strong> <strong>IP</strong> <strong>Phone</strong> <strong>7921G</strong> is an IEEE 802.11a/b/g wireless <strong>IP</strong> phone that provides voice communications.<br />
The wireless LAN must be validated to ensure it meets the requirements to deploy the <strong>Cisco</strong> <strong>Unified</strong> <strong>Wireless</strong> <strong>IP</strong> <strong>Phone</strong> <strong>7921G</strong>.<br />
Site Survey<br />
Before deploying the <strong>Cisco</strong> <strong>Unified</strong> <strong>Wireless</strong> <strong>IP</strong> <strong>Phone</strong> <strong>7921G</strong> into a production environment, a site survey must be completed<br />
by a <strong>Cisco</strong> certified partner with the advanced wireless LAN specialization. During the site survey the RF spectrum can be<br />
analyzed to determine which channels are usable in the desired band (2.4 GHz or 5 GHz). Typically there is less interference in<br />
the 5 GHz band as well as more non-overlapping channels, so 5 GHz is the preferred band for operation and even more highly<br />
recommended when the <strong>Cisco</strong> <strong>Unified</strong> <strong>Wireless</strong> <strong>IP</strong> <strong>Phone</strong> <strong>7921G</strong> is to be used in a mission critical environment. The site<br />
survey will include heatmaps showing the intended coverage plan for the location. The site survey will also determine which<br />
access point platform type, antenna type, access point configuration (channel and transmit power) to use at the location. See the<br />
“Designing the <strong>Wireless</strong> LAN for Voice” section for more information.<br />
Refer to the Steps to Success website for additional information.<br />
http://www.cisco.com/go/stepstosuccess<br />
RF Validation<br />
In order to determine if VoWLAN can be deployed, the environment must be evaluated to ensure the following items meet<br />
<strong>Cisco</strong> guidelines.<br />
Signal<br />
The cell edge should be designed to -67 dBm where there is a 20-30% overlap of adjacent access points at that signal level.<br />
This ensures the <strong>7921G</strong> phone always has adequate signal and can hold a signal for at least 5 seconds in order to roam seamlessly.<br />
Channel Utilization<br />
Channel Utilization levels should be kept under 50%.<br />
If using the <strong>7921G</strong> phone, this is provided via the QoS Basic Service Set (QBSS), which equates to around 105.<br />
Noise<br />
Noise levels should not exceed -92 dBm, which allows for a Signal to Noise Ratio (SNR) of 25 dB where a -67 dBm signal should be<br />
maintained.<br />
Packet Loss / Delay<br />
Per voice guidelines, packet loss should not exceed 1% packet loss, otherwise voice quality can be degraded significantly.<br />
Jitter should be kept at a minimal (< 100 ms)<br />
Retries<br />
802.11 retransmissions should be less than 20%.<br />
Multipath<br />
Multipath should be kept to a minimal as this can create nulls and reduce signal levels.<br />
Many different tools and applications can be used to evaluate these items in order to certify the deployment.<br />
<strong>Cisco</strong> <strong>Unified</strong> <strong>Wireless</strong> <strong>IP</strong> <strong>Phone</strong> <strong>7921G</strong> Series <strong>Deployment</strong> <strong>Guide</strong> 6
<strong>Cisco</strong> Spectrum Expert<br />
AirMagnet (Survey, WiFi Analyzer, VoFi Analyzer, Spectrum Analyzer)<br />
<strong>Cisco</strong> <strong>Wireless</strong> Control System (WCS) for <strong>Unified</strong> <strong>Wireless</strong> LAN management<br />
Call Control<br />
For call control, the <strong>Cisco</strong> <strong>Unified</strong> <strong>Wireless</strong> <strong>IP</strong> <strong>Phone</strong> <strong>7921G</strong> supports only Skinny Client Control Protocol (SCCP) on the<br />
following applications:<br />
• <strong>Cisco</strong> <strong>Unified</strong> Communications Manager 4.1, 4.2, 4.3, 5.0, 5.1, 6.0, 6.1, 7.0, 7.1, 8.0 and later<br />
• <strong>Cisco</strong> <strong>Unified</strong> Communications Manager Express 4.1, 4.2, 4.3 and later (Minimum of 12.4(15)T7)<br />
• SRST 4.1, 4.2, 4.3 and later (Minimum of 12.4(15)T7)<br />
Device Support in <strong>Cisco</strong> <strong>Unified</strong> Communications Manager<br />
<strong>Cisco</strong> <strong>Unified</strong> Communications Manager requires a device package to be installed or service release update in order to enable<br />
<strong>Cisco</strong> <strong>Unified</strong> <strong>Wireless</strong> <strong>IP</strong> <strong>Phone</strong> <strong>7921G</strong> device support.<br />
<strong>Cisco</strong> <strong>Unified</strong> Communications Manager 5.0(4) or higher requires signed COP files.<br />
Device packages for <strong>Cisco</strong> <strong>Unified</strong> Communications Manager are available at the following location.<br />
http://www.cisco.com/kobayashi/sw-center/sw-voice.shtml<br />
Supported Protocols<br />
Supported voice and wireless LAN protocols include these:<br />
• Real Time Protocol (RTP)<br />
• G.711u-law, G.711a-law, G.729a, G.729ab, G.722, iLBC<br />
• Real Time Control Protocol (RTCP)<br />
• <strong>Cisco</strong> Discovery Protocol (CDP)<br />
• Syslog<br />
• CCX v4<br />
• Wi-Fi MultiMedia (WMM)<br />
• Traffic Specification (TSPEC)<br />
• Traffic Classification (TCLAS)<br />
• Unscheduled Auto Power Save Delivery (U-APSD)<br />
• Power Save Poll (PS-POLL)<br />
Supported Access Points<br />
The <strong>Cisco</strong> <strong>Unified</strong> <strong>Wireless</strong> <strong>IP</strong> <strong>Phone</strong> <strong>7921G</strong> is supported on both the <strong>Cisco</strong> <strong>Unified</strong> and Autonomous solutions.<br />
<strong>Cisco</strong> <strong>Unified</strong> <strong>Wireless</strong> <strong>IP</strong> <strong>Phone</strong> <strong>7921G</strong> Series <strong>Deployment</strong> <strong>Guide</strong> 7
• <strong>Cisco</strong> <strong>Unified</strong> <strong>Wireless</strong> LAN Controller<br />
Minimum = 5.2.193.0<br />
Recommended = 7.0.98.0 or later<br />
• <strong>Cisco</strong> IOS Access Points (Autonomous)<br />
Minimum = 12.3(8)JEA2 or later<br />
Recommended = 12.4(10b)JA3 or later (does not apply to 1100, 1200, 1230)<br />
Note: VoWLAN is not currently supported in conjunction with outdoor MESH technology (1500 series).<br />
3 rd party access points are not supported, as there is no interoperability testing performed against 3 rd party access points.<br />
<strong>Cisco</strong> <strong>Unified</strong> <strong>Wireless</strong> <strong>IP</strong> <strong>Phone</strong> <strong>7921G</strong> Series <strong>Deployment</strong> <strong>Guide</strong> 8
The table below lists the modes that are supported by each <strong>Cisco</strong> access point.<br />
<strong>Cisco</strong> AP<br />
Series<br />
802.11a 802.11b 802.11g 802.11n Autonomous <strong>Unified</strong><br />
500 No Yes Yes No Yes Yes<br />
1100 No Yes Optional No Yes Yes<br />
1130AG Yes Yes Yes No Yes Yes<br />
1140 Yes Yes Yes Yes Yes Yes<br />
1200 Optional Yes Optional No Yes Yes<br />
1230AG Yes Yes Yes No Yes Yes<br />
1240AG Yes Yes Yes No Yes Yes<br />
1250 Yes Yes Yes Yes Yes Yes<br />
1260 Yes Yes Yes Yes No Yes<br />
3500 Yes Yes Yes Yes No Yes<br />
Supported Antennas<br />
Some of the <strong>Cisco</strong> Access Points require or allow external antennas.<br />
<strong>Cisco</strong> <strong>Unified</strong> <strong>Wireless</strong> <strong>IP</strong> <strong>Phone</strong> <strong>7921G</strong> Series <strong>Deployment</strong> <strong>Guide</strong> 9
Please refer to the following URL for the list of supported antennas and how these external antennas should be mounted.<br />
http://www.cisco.com/en/US/prod/collateral/wireless/ps7183/ps469/product_data_sheet09186a008008883b.html<br />
3 rd party antennas are not supported, as there is no interoperability testing performed against 3 rd party antennas including<br />
Distributed Antenna Systems (DAS) and Leaky Coaxial Systems.<br />
Please refer to the following URL for more info on <strong>Cisco</strong> <strong>Wireless</strong> LAN over Distributed Antenna Systems.<br />
http://www.cisco.com/en/US/prod/collateral/wireless/ps5678/ps6973/positioning_statement_c07-565470.html<br />
Note: The <strong>Cisco</strong> 1130, 1140 and 3502i series access points are to be mounted on the ceiling as they have omni-directional<br />
antennas.<br />
<strong>Phone</strong> Models and Localization<br />
<strong>Phone</strong> Models<br />
<strong>Cisco</strong> manufactures four <strong>Cisco</strong> <strong>Unified</strong> <strong>Wireless</strong> <strong>IP</strong> <strong>Phone</strong> <strong>7921G</strong> models that support the following domains.<br />
The regulatory domain can be identified by navigating to Settings > Model Information > WLAN Regulatory Domain and<br />
then referencing the Regulatory Domain number in the table below.<br />
Use this table to identify specific phone versions that support these regulatory domains for use around the world:<br />
Part Number<br />
Regulatory<br />
Domain<br />
Regulatory<br />
Domain<br />
Number<br />
Band Range<br />
Available<br />
Channels<br />
Channel Set<br />
CP-<strong>7921G</strong>-A-K9<br />
FCC<br />
(Americas)<br />
1050 2.412 – 2.462 GHz<br />
5.180 – 5.240 GHz<br />
11<br />
4<br />
1-11<br />
36,40,44,48<br />
5.260 – 5.320 GHz<br />
4<br />
52,56,60,64<br />
5. 500 – 5.700 GHz<br />
8<br />
100-140<br />
5.745 – 5.805 GHz<br />
4<br />
149,153,157,161<br />
CP-<strong>7921G</strong>-E-K9<br />
ETSI<br />
(Europe)<br />
3051 2.412 – 2.472 GHz<br />
5.180 – 5.700 GHz<br />
13<br />
19<br />
1-13<br />
36-48,52-64,100-140<br />
CP-<strong>7921G</strong>-P-K9 Japan 4157 2.412 – 2.472 GHz<br />
2.412 – 2.484 GHz<br />
5.180 – 5.700 GHz<br />
13 (OFDM)<br />
14 (CCK)<br />
19<br />
1-13<br />
1-14<br />
36-48,52-64,100-140<br />
CP-<strong>7921G</strong>-W-K9<br />
Rest of<br />
World<br />
5252 Uses 802.11d to identify available channels and transmit<br />
powers<br />
Note: 802.11j (channels 34, 38, 42, 46) and channel 165 are not supported.<br />
<strong>Cisco</strong> <strong>Unified</strong> <strong>Wireless</strong> <strong>IP</strong> <strong>Phone</strong> <strong>7921G</strong> Series <strong>Deployment</strong> <strong>Guide</strong> 10
World Mode (802.11d)<br />
If using the <strong>Cisco</strong> <strong>Unified</strong> <strong>Wireless</strong> <strong>IP</strong> <strong>Phone</strong> <strong>7921G</strong> World (-W) model, then it is required to enable 802.11d. The <strong>Cisco</strong><br />
<strong>Unified</strong> <strong>Wireless</strong> <strong>IP</strong> <strong>Phone</strong> <strong>7921G</strong> gives precedence to 802.11d to determine the channels and transmit powers to use and<br />
inherits its client configuration from the associated access point.<br />
Enable World Mode (802.11d) for the corresponding country where the access point is located.<br />
If 802.11d information is not available from the access point, then the phone uses the locally configured regulatory domain. If<br />
the <strong>Cisco</strong> <strong>Unified</strong> <strong>Wireless</strong> <strong>IP</strong> <strong>Phone</strong> <strong>7921G</strong> -A, -E or -P model is taken to another country, where the access point uses a<br />
different regulatory domain, then 802.11d will be required for the <strong>Cisco</strong> <strong>Unified</strong> <strong>Wireless</strong> <strong>IP</strong> <strong>Phone</strong> <strong>7921G</strong> to operate<br />
successfully.<br />
When using 802.11a, enable 802.11d to discover which channels can potentially be used in the network. Specifically, for<br />
802.11h support, the phone passively scans some of the 5 GHz channels (DFS) first before actively scanning any network<br />
channels.<br />
If using 2.4 GHz (802.11b/g) and 802.11d is not enabled, then the <strong>Cisco</strong> <strong>Unified</strong> <strong>IP</strong> <strong>Phone</strong> <strong>7921G</strong> can attempt to use channels 1-<br />
11 and reduced transmit power.<br />
Note: World Mode is enabled automatically for the <strong>Cisco</strong> <strong>Unified</strong> <strong>Wireless</strong> LAN Controller.<br />
World Mode must be enabled manually for <strong>Cisco</strong> Autonomous Access Points using the following commands:<br />
Interface dot11radio X<br />
world-mode dot11d country US both<br />
Supported Countries<br />
Below are the countries and their 802.11d codes that are supported by the <strong>Cisco</strong> <strong>Unified</strong> <strong>Wireless</strong> <strong>IP</strong> <strong>Phone</strong> <strong>7921G</strong>.<br />
Argentina (AR) India (IN) Poland (PL)<br />
Australia (AU) Indonesia (ID) Portugal (PT)<br />
Austria (AT) Ireland (IE) Puerto Rico (PR)<br />
Belgium (BE) Israel (IL) Romania (RO)<br />
Brazil (BR) Italy (IT) Russian Federation (RU)<br />
Bulgaria (BG) Japan (JP) Saudi Arabia (SA)<br />
Canada (CA) Korea (KR / KP) Singapore (SG)<br />
Chile (CL) Latvia (LV) Slovakia (SK)<br />
Colombia (CO) Liechtenstein (LI) Slovenia (SI)<br />
Costa Rica (CR) Lithuania (LT) South Africa (ZA)<br />
Cyprus (CY) Luxembourg (LU) Spain (ES)<br />
Czech Republic (CZ) Malaysia (MY) Sweden (SE)<br />
Denmark (DK) Malta (MT) Switzerland (CH)<br />
Estonia (EE) Mexico (MX) Taiwan (TW)<br />
Finland (FI) Monaco (MC) Thailand (TH)<br />
France (FR) Netherlands (NL) Turkey (TR)<br />
<strong>Cisco</strong> <strong>Unified</strong> <strong>Wireless</strong> <strong>IP</strong> <strong>Phone</strong> <strong>7921G</strong> Series <strong>Deployment</strong> <strong>Guide</strong> 11
Germany (DE) New Zealand (NZ) Ukraine (UA)<br />
Gibraltar (GI) Norway (NO) United Arab Emirates (AE)<br />
Greece (GR) Oman (OM) United Kingdom (GB)<br />
Hong Kong (HK) Panama (PA) United States (US<br />
Hungary (HU)<br />
Iceland (IS)<br />
Peru (PE)<br />
Phillipines (PH)<br />
Venezuela (VE)<br />
Vietnam (VN)<br />
Note: Compliance information is available on the <strong>Cisco</strong> Product Approval Status web site at the following URL:<br />
http://tools.cisco.com/cse/prdapp/jsp/externalsearch.do?action=externalsearch&page=EXTERNAL_SEARCH<br />
Language Support<br />
The <strong>Cisco</strong> <strong>Unified</strong> <strong>Wireless</strong> <strong>IP</strong> <strong>Phone</strong> <strong>7921G</strong> currently supports the following languages.<br />
Bulgarian English Japanese Serbian<br />
Catalan Finnish Korean Slovak<br />
Chinese French Norwegian Slovenian<br />
Croatian German Polish Spanish<br />
Czech Greek Portuguese Swedish<br />
Danish Hungarian Romanian<br />
Dutch Italian Russian<br />
The corresponding locale package must be installed to enable support for that language. English is the default language on the<br />
phone.<br />
Download the locale packages from the Localization page at the following URL:<br />
http://www.cisco.com/kobayashi/sw-center/telephony/callmgr/locale-installer.shtml<br />
Radio Characteristics<br />
The following table lists the data rates, ranges, and receiver sensitivity info for <strong>Cisco</strong> <strong>Unified</strong> <strong>Wireless</strong> <strong>IP</strong> <strong>Phone</strong> <strong>7921G</strong>.<br />
802.11a Data Rate Range Receiver Sensitivity<br />
Max Tx Power is 16 dBm 6 Mbps 610 ft (186 m) -89 dBm<br />
9 Mbps 610 ft (186 m) -88 dBm<br />
12 Mbps 558 ft (170 m) -86 dBm<br />
18 Mbps 541 ft (165 m) -85 dBm<br />
24 Mbps 508 ft (155 m) -82 dBm<br />
36 Mbps 426 ft (130 m) -80 dBm<br />
<strong>Cisco</strong> <strong>Unified</strong> <strong>Wireless</strong> <strong>IP</strong> <strong>Phone</strong> <strong>7921G</strong> Series <strong>Deployment</strong> <strong>Guide</strong> 12
48 Mbps 328 ft (100 m) -76 dBm<br />
54 Mbps 295 ft (90 m) -74 dBm<br />
802.11g Data Rate Range Receiver Sensitivity<br />
Max Tx Power is 16 dBm 6 Mbps 722 ft (220 m) -90 dBm<br />
9 Mbps 656 ft (200 m) -89 dBm<br />
12 Mbps 623 ft (190 m) -87 dBm<br />
18 Mbps 623 ft (190 m) -85 dBm<br />
24 Mbps 623 ft (190 m) -82 dBm<br />
36 Mbps 492 ft (150 m) -78 dBm<br />
48 Mbps 410 ft (125 m) -74 dBm<br />
54 Mbps 394 ft (120 m) -73 dBm<br />
802.11b Data Rate Range Receiver Sensitivity<br />
Max Tx Power is 17 dBm 1 Mbps 1,027 ft (313 m) -95 dBm<br />
2 Mbps 951 ft (290 m) -89 dBm<br />
5.5 Mbps 853 ft (260 m) -89 dBm<br />
11 Mbps 787 ft (240 m) -85 dBm<br />
Note: Receiver sensitivity is the minimum signal needed to decode a packet at a certain data rate.<br />
See the “Designing the <strong>Wireless</strong> LAN for Voice” section for more information on signal requirements.<br />
<strong>Wireless</strong> Security<br />
When deploying a wireless LAN, security is essential.<br />
The <strong>Cisco</strong> <strong>Unified</strong> <strong>Wireless</strong> <strong>IP</strong> <strong>Phone</strong> <strong>7921G</strong> supports the following wireless security features.<br />
Authentication<br />
• WPA (802.1x authentication + TK<strong>IP</strong> encryption)<br />
• WPA2 (802.1x authentication + AES encryption)<br />
• WPA-PSK (Pre-Shared key + TK<strong>IP</strong> encryption)<br />
• WPA2-PSK (Pre-Shared key + AES encryption)<br />
• EAP-FAST (Extensible Authentication Protocol – Flexible Authentication via Secure Tunneling)<br />
• EAP-TLS (Extensible Authentication Protocol – Transport Layer Security)<br />
• PEAP (Protected Extensible Authentication Protocol)<br />
• LEAP (Lightweight Extensible Authentication Protocol)<br />
• CCKM (<strong>Cisco</strong> Centralized Key Management)<br />
• Open and Shared Key<br />
<strong>Cisco</strong> <strong>Unified</strong> <strong>Wireless</strong> <strong>IP</strong> <strong>Phone</strong> <strong>7921G</strong> Series <strong>Deployment</strong> <strong>Guide</strong> 13
Encryption<br />
• AES (Advanced Encryption Scheme)<br />
• TK<strong>IP</strong> / MIC (Temporal Key Integrity Protocol / Message Integrity Check)<br />
• WEP (40-bit and 128-bit Wired Equivalent Protocol)<br />
Extensible Authentication Protocol - Flexible Authentication via Secure<br />
Tunneling (EAP-FAST)<br />
This client server security architecture encrypts EAP transactions within a Transport Level Security (TLS) tunnel between the<br />
access point and the Remote Authentication Dial-in User Service (RADIUS) server such as the <strong>Cisco</strong> Access Control Server<br />
(ACS).<br />
The TLS tunnel uses Protected Access Credentials (PACs) for authentication between the client (phone) and the RADIUS<br />
server. The server sends an Authority ID (AID) to the client (phone), which in turn selects the appropriate PAC. The client<br />
(phone) returns a PAC-Opaque to the RADIUS server. The server decrypts the PAC with its master-key. Both endpoints now<br />
have the PAC key and a TLS tunnel is created. EAP-FAST supports automatic PAC provisioning, but it must enabled on the<br />
RADIUS server.<br />
To enable EAP-FAST, a certificate must be installed.<br />
The <strong>Cisco</strong> <strong>Unified</strong> <strong>Wireless</strong> <strong>IP</strong> <strong>Phone</strong> <strong>7921G</strong> currently supports only automatic provisioning of the PAC, so enable “Allow<br />
anonymous in-band PAC provisioning” on the RADIUS server as shown below.<br />
Both EAP-GTC and EAP-MSCHAPv2 must be enabled when “Allow anonymous in-band PAC provisioning” is enabled.<br />
EAP-FAST requires that a user account be created on the authentication server.<br />
<strong>Cisco</strong> <strong>Unified</strong> <strong>Wireless</strong> <strong>IP</strong> <strong>Phone</strong> <strong>7921G</strong> Series <strong>Deployment</strong> <strong>Guide</strong> 14
If anonymous PAC provisioning is not allowed in the product wireless LAN environment then a staging <strong>Cisco</strong> ACS can be<br />
setup for initial PAC provisioning of the <strong>Cisco</strong> <strong>Unified</strong> <strong>Wireless</strong> <strong>IP</strong> <strong>Phone</strong> <strong>7921G</strong>.<br />
This requires that the staging ACS server be setup as a slave EAP-FAST server and components are replicated from the product<br />
master EAP-FAST server, which include user and group database and EAP-FAST master key and policy info.<br />
Ensure the production master EAP-FAST ACS server is setup to send the EAP-FAST master keys and policies to the staging<br />
slave EAP-FAST ACS server, which will then allow the <strong>Cisco</strong> <strong>Unified</strong> <strong>Wireless</strong> <strong>IP</strong> <strong>Phone</strong> <strong>7921G</strong> to use the provisioned PAC in<br />
the production environment where “Allow anonymous in-band PAC provisioning” is disabled.<br />
When it is time to renew the PAC, then authenticated in-band PAC provisioning will be used, so ensure that “Allow<br />
authenticated in-band PAC provisioning” is enabled.<br />
Ensure that the <strong>Cisco</strong> <strong>Unified</strong> <strong>Wireless</strong> <strong>IP</strong> <strong>Phone</strong> <strong>7921G</strong> has connected to the network during the grace period to ensure it can<br />
use its existing PAC created either using the active or retired master key in order to get issued a new PAC.<br />
Is recommended to only have the staging wireless LAN pointed to the staging ACS server and to disable the staging access<br />
point radios when not being used.<br />
<strong>Cisco</strong> <strong>Unified</strong> <strong>Wireless</strong> <strong>IP</strong> <strong>Phone</strong> <strong>7921G</strong> Series <strong>Deployment</strong> <strong>Guide</strong> 15
Extensible Authentication Protocol – Transport Layer Security (EAP-TLS)<br />
Extensible Authentication Protocol Transport Layer Security (EAP-TLS) is using the TLS protocol with PKI to secure<br />
communications to the authentication server.<br />
TLS provides a way to use certificates for both user and server authentication and for dynamic session key generation.<br />
Either the internal Manufacturing Installed Certificate (MIC) or a user installed certificate can be used for authentication.<br />
EAP-TLS provides excellent security, but requires client certificate management.<br />
Ensure that “Certificate CN Comparison” is selected when enabling EAP-TLS.<br />
EAP-TLS also requires that a user account be created on the authentication server matching the common name of the certificate<br />
imported into the <strong>Cisco</strong> <strong>Unified</strong> <strong>Wireless</strong> <strong>IP</strong> <strong>Phone</strong> <strong>7921G</strong>.<br />
It is recommended to use a complex password for this user account.<br />
<strong>Cisco</strong> <strong>Unified</strong> <strong>Wireless</strong> <strong>IP</strong> <strong>Phone</strong> <strong>7921G</strong> Series <strong>Deployment</strong> <strong>Guide</strong> 16
See the “Installing Certificates” section for more information.<br />
Protected Extensible Authentication Protocol (PEAP)<br />
Protected Extensible Authentication Protocol (PEAP) uses server-side public key certificates to authenticate clients by creating<br />
an encrypted SSL/TLS tunnel between the client and the authentication server.<br />
The ensuing exchange of authentication information is then encrypted and user credentials are safe from eavesdropping.<br />
MS-CHAP v2 is the current supported inner authentication protocol (GTC is not supported).<br />
<strong>Cisco</strong> <strong>Unified</strong> <strong>Wireless</strong> <strong>IP</strong> <strong>Phone</strong> <strong>7921G</strong> Series <strong>Deployment</strong> <strong>Guide</strong> 17
PEAP (MS-CHAPv2) requires that a user account be created on the authentication server.<br />
In release 1.2(1), the authentication server can be validated via importing a certificate into the <strong>Cisco</strong> <strong>Unified</strong> <strong>Wireless</strong> <strong>IP</strong> <strong>Phone</strong><br />
<strong>7921G</strong>.<br />
See the “Installing Certificates” section for more information.<br />
<strong>Cisco</strong> Centralized Key Management (CCKM)<br />
When using 802.1x type authentication, it is recommended to implement CCKM to enable fast roaming. 802.1x can introduce<br />
delay during roaming due to its requirement for full re-authentication. CCKM centralizes the key management and reduces the<br />
number of key exchanges. WPA and WPA2 introduce additional transient keys and can lengthen roaming time.<br />
When CCKM is utilized, roaming times can be reduced from 400-500 ms to less than 100 ms, where that transition time from<br />
one access point to another will not be audible to the user.<br />
As of the 1.3(4) release, the <strong>Cisco</strong> <strong>Unified</strong> <strong>Wireless</strong> <strong>IP</strong> <strong>Phone</strong> <strong>7921G</strong> supports CCKM with WPA2 (AES or TK<strong>IP</strong>), WPA (TK<strong>IP</strong><br />
or AES) and 802.1x (WEP) authentication.<br />
Authentication Key Management Encryption<br />
<strong>Cisco</strong> <strong>Unified</strong> <strong>Wireless</strong> <strong>IP</strong> <strong>Phone</strong> <strong>7921G</strong> Series <strong>Deployment</strong> <strong>Guide</strong> 18
EAP-FAST 802.1x, WPA, WPA2 AES, TK<strong>IP</strong>, WEP (40 or 128 bit)<br />
EAP-TLS 802.1x, WPA, WPA2 AES, TK<strong>IP</strong>, WEP (40 or 128 bit)<br />
PEAP 802.1x, WPA, WPA2 AES, TK<strong>IP</strong>, WEP (40 or 128 bit)<br />
LEAP 802.1x, WPA, WPA2 AES, TK<strong>IP</strong>, WEP (40 or 128 bit)<br />
AKM 802.1x, WPA, WPA2 AES, TK<strong>IP</strong>, WEP (40 or 128 bit)<br />
CCKM was not supported with WPA2 in release 1.3(3) or earlier.<br />
WPA Version Cipher Prior to 1.3(4) 1.3(4) and later<br />
WPA<br />
TK<strong>IP</strong> Supported Supported<br />
AES Not Supported Supported<br />
WPA2<br />
TK<strong>IP</strong> Not Supported Supported<br />
AES Not supported Supported<br />
EAP and User Database Compatibility<br />
The following chart indicates which EAP and database configurations are supported by the <strong>Cisco</strong> <strong>Unified</strong> <strong>Wireless</strong> <strong>IP</strong> <strong>Phone</strong><br />
<strong>7921G</strong>.<br />
Database LEAP EAP-TLS<br />
PEAP<br />
(MS-CHAPv2)<br />
ACS Yes Yes Yes Yes<br />
Windows SAM Yes No Yes Yes<br />
Windows AD Yes Yes Yes Yes<br />
LDAP No Yes No No<br />
ODBC (ACS for<br />
Windows only)<br />
LEAP Proxy<br />
RADIUS Server<br />
Yes Yes Yes Yes<br />
Yes No Yes Yes<br />
All Token Servers No No No No<br />
EAP-FAST<br />
(Phase Zero)<br />
<strong>Cisco</strong> <strong>Unified</strong> <strong>Wireless</strong> <strong>IP</strong> <strong>Phone</strong> <strong>7921G</strong> Series <strong>Deployment</strong> <strong>Guide</strong> 19
Voice Security<br />
The <strong>Cisco</strong> <strong>Unified</strong> <strong>Wireless</strong> <strong>IP</strong> <strong>Phone</strong> <strong>7921G</strong> supports the following voice security features.<br />
• Certificates<br />
• Image authentication<br />
• Device authentication<br />
• File authentication<br />
• Signaling authentication<br />
• Secure <strong>Cisco</strong> <strong>Unified</strong> SRST<br />
• Media encryption (SRTP)<br />
• Signaling encryption (TLS)<br />
• Certificate authority proxy function (CAPF)<br />
• Secure profiles<br />
• Encrypted configuration files<br />
• Settings Access (can limit user access to configuration menus)<br />
• Locked network profiles<br />
• Administrator password<br />
Power Management<br />
The <strong>Cisco</strong> <strong>Unified</strong> <strong>Wireless</strong> <strong>IP</strong> <strong>Phone</strong> <strong>7921G</strong> has an option for a standard or extended battery.<br />
The standard battery can provide up to 150 hours standby time or up to 11.5 hours talk time.<br />
The extended battery can provide up to 200 hours standby time or up to 15.5 hours talk time.<br />
With firmware version 1.0(4) or later and when the access point supports the <strong>Cisco</strong> Client Extensions (CCX) proxy ARP<br />
information element, the idle battery life will be optimized.<br />
When on call U-APSD, PS-POLL, or active mode can be utilized depending on the <strong>Cisco</strong> <strong>Unified</strong> <strong>Wireless</strong> <strong>IP</strong> <strong>Phone</strong> <strong>7921G</strong><br />
and Access Point configuration.<br />
To extend on call battery life, the <strong>Cisco</strong> <strong>Unified</strong> <strong>Wireless</strong> <strong>IP</strong> <strong>Phone</strong> <strong>7921G</strong> can use U-APSD or PS-POLL power save methods.<br />
The <strong>Cisco</strong> <strong>Unified</strong> <strong>Wireless</strong> <strong>IP</strong> <strong>Phone</strong> <strong>7921G</strong> will use either U-APSD or PS-POLL when in idle (no active phone call).<br />
The table below lists the maximum on call and idle times for each 802.11 mode and battery type.<br />
802.11 Mode Call State Standard<br />
Battery<br />
Extended<br />
Battery<br />
2.4 GHz On Call 11.5 15.5<br />
Idle 150 200<br />
5 GHz On Call 11.5 15.5<br />
<strong>Cisco</strong> <strong>Unified</strong> <strong>Wireless</strong> <strong>IP</strong> <strong>Phone</strong> <strong>7921G</strong> Series <strong>Deployment</strong> <strong>Guide</strong> 20
Idle 150 200<br />
If the access point does not support CCX or proxy ARP is not enabled, then the idle battery life will be up to fifty percent less.<br />
See the “Configuring Proxy ARP” section for more information.<br />
Protocols<br />
Unscheduled Auto Power Save Delivery (U-APSD)<br />
The <strong>Cisco</strong> <strong>Unified</strong> <strong>Wireless</strong> <strong>IP</strong> <strong>Phone</strong> <strong>7921G</strong> will use U-APSD (Unscheduled Auto Power Save Delivery) for power save when<br />
in idle mode or when a phone call is active if WMM is enabled, where U-APSD is supported.<br />
U-APSD helps optimize battery life.<br />
Below is a sample packet sequence when using U-APSD.<br />
Power Save Poll (PS-POLL)<br />
If Wi-Fi MultiMedia (WMM) is disabled, which will disable U-APSD support, or U-APSD support is not available on the<br />
access point, then the <strong>Cisco</strong> <strong>Unified</strong> <strong>Wireless</strong> <strong>IP</strong> <strong>Phone</strong> <strong>7921G</strong> will use PS-POLL for power save when in idle mode and when a<br />
phone call is active.<br />
Below is a sample packet sequence when using PS-POLL.<br />
Active Mode<br />
If the “Call Power Save Mode” is set to “None”, then the phone will use active mode and no power save will be used, which<br />
will reduce the battery life.<br />
<strong>Cisco</strong> <strong>Unified</strong> <strong>Wireless</strong> <strong>IP</strong> <strong>Phone</strong> <strong>7921G</strong> Series <strong>Deployment</strong> <strong>Guide</strong> 21
Delivery Traffic Indicator Message (DTIM)<br />
Increasing the DTIM period can also increase the battery life. The <strong>Cisco</strong> <strong>Unified</strong> <strong>Wireless</strong> <strong>IP</strong> <strong>Phone</strong> <strong>7921G</strong> can use the DTIM<br />
period to schedule wakeup periods to check for broadcast and multicast packets as well as any unicast packets.<br />
For optimal battery life and performance, we recommend setting the DTIM period to “2” with a beacon period of “100 ms”.<br />
The DTIM period is a tradeoff between battery life and multicast performance.<br />
Broadcast and multicast traffic will be queued until the DTIM period when there are power save enabled clients associated to<br />
the access point, so DTIM will determine how quickly these packets can be delivered to the client. If using multicast<br />
applications, a shorter DTIM period can be used.<br />
Scan Modes<br />
When using only one access point, select Single Access Point Mode on the phone to reduce scanning and optimize battery life<br />
for phones that do not roam.<br />
When using multiple access points where roaming is required, “Single AP Mode” should not be enabled. Instead use the auto<br />
(default) or continuous scan mode, which will allow for seamless roaming.<br />
Continuous scan mode can be optionally enabled to allow for better location tracking.<br />
Quality of Service (QoS)<br />
Quality of Service enables queuing to ensure high priority for voice traffic. To implement appropriate queuing for voice traffic,<br />
use the following suggestions:<br />
• Ensure that WMM is enabled on the access point.<br />
• Create a QoS policy on the access point giving priority to voice (RTP) and call control (SCCP) traffic and apply that<br />
profile to the desired interfaces.<br />
Traffic Type DSCP 802.1p WMM UP<br />
Voice (RTP) EF (46) 5 6<br />
Call Control (SCCP) CS3 (24) 3 4<br />
• Be sure that RTP packets have the proper QoS markings and other protocols are not using the same QoS markings.<br />
• Select the “Platinum” QoS profile for the voice wireless LAN when using <strong>Cisco</strong> <strong>Unified</strong> <strong>Wireless</strong> LAN Controller<br />
technology and set the 802.1p tag to “6”.<br />
• Enable Differentiated Services Code Point (DSCP) preservation on the <strong>Cisco</strong> IOS switch and/or use a QoS policy to set<br />
DSCP to EF for RTP traffic (UDP port range 16384-32767) on the <strong>Cisco</strong> IOS router.<br />
For more information about TCP and UDP ports used by the <strong>Cisco</strong> <strong>Unified</strong> <strong>Wireless</strong> <strong>IP</strong> <strong>Phone</strong> <strong>7921G</strong> and the <strong>Cisco</strong> <strong>Unified</strong><br />
Communications Manager, refer to the <strong>Cisco</strong> <strong>Unified</strong> Communications Manager TCP and UDP Port Usage document at this<br />
URL:<br />
<strong>Cisco</strong> <strong>Unified</strong> <strong>Wireless</strong> <strong>IP</strong> <strong>Phone</strong> <strong>7921G</strong> Series <strong>Deployment</strong> <strong>Guide</strong> 22
http://www.cisco.com/en/US/docs/voice_ip_comm/cucm/port/7_1_2/CCM_7.1.2PortList.pdf<br />
Configuring QoS in <strong>Cisco</strong> <strong>Unified</strong> Communications Manager<br />
The SCCP DSCP values are configured in the <strong>Cisco</strong> <strong>Unified</strong> Communications Manager enterprise parameters. <strong>Cisco</strong> <strong>Unified</strong><br />
Communications Manager uses the default value of CS3 to have devices set the DSCP marking for SCCP packets as shown in<br />
the Enterprise Parameters Configuration page.<br />
Configuring QoS Policies for the Network<br />
Set up QoS policies and settings for the following network devices.<br />
Configuring <strong>Cisco</strong> IOS Access Points<br />
Use the following QoS policy on the <strong>Cisco</strong> IOS access point (AP) to enable DSCP to CoS (UP) mapping. This allows RTP<br />
packets to be placed into the voice queue, if those packets are marked correctly, when received at the access point level.<br />
class-map match-all RTP<br />
match ip dscp ef<br />
class-map match-all SCCP<br />
match ip dscp cs3<br />
!<br />
policy-map Voice<br />
class RTP<br />
set cos 6<br />
class SCCP<br />
!<br />
set cos 4<br />
interface dot11radioX<br />
service-policy input Voice<br />
<strong>Cisco</strong> <strong>Unified</strong> <strong>Wireless</strong> <strong>IP</strong> <strong>Phone</strong> <strong>7921G</strong> Series <strong>Deployment</strong> <strong>Guide</strong> 23
service-policy output Voice<br />
Configuring <strong>Cisco</strong> Switch Ports<br />
Configure the <strong>Cisco</strong> access point switch ports and uplink switch ports for DSCP trust.<br />
mls qos<br />
!<br />
interface X<br />
mls qos trust dscp<br />
Note: When using the <strong>Cisco</strong> <strong>Unified</strong> <strong>Wireless</strong> LAN Controller, DSCP trust must be implemented or trust the UDP data ports<br />
used by the <strong>Cisco</strong> <strong>Unified</strong> <strong>Wireless</strong> LAN Controller (LWAPP = 12222 and 12223; CAPWAP = 5246 and 5247) on all<br />
interfaces where wireless packets will traverse to ensure QoS markings are correctly set. Versions prior to 5.2 use LWAPP,<br />
where versions 5.2 and later use CAPWAP.<br />
Configuring Switch Ports for Wired <strong>IP</strong> <strong>Phone</strong>s<br />
Enable the <strong>Cisco</strong> wired <strong>IP</strong> phone switch ports for <strong>Cisco</strong> phone trust<br />
mls qos<br />
!<br />
Interface X<br />
mls qos trust device cisco-phone<br />
mls qos trust dscp<br />
If DSCP markings are not preserved, then the below configuration can be used to set the DSCP based on the TCP or UDP port<br />
to map RTP and SCCP correctly.<br />
Ensure the following QoS policy is not applied to an interface where wireless traffic traverses.<br />
If using non-secure SCCP, then TCP port 2000 is used. TCP port 2443 is used for secure SCCP.<br />
ip access-list extended SCCP<br />
permit tcp any eq 2000 any<br />
permit tcp any any eq 2000<br />
permit tcp any eq 2443 any<br />
permit tcp any any eq 2443<br />
!<br />
ip access-list extended RTP<br />
!<br />
permit udp any range 16384 32767 any<br />
permit udp any any range 16384 32767<br />
class-map match-all SCCP<br />
match access-group name SCCP<br />
<strong>Cisco</strong> <strong>Unified</strong> <strong>Wireless</strong> <strong>IP</strong> <strong>Phone</strong> <strong>7921G</strong> Series <strong>Deployment</strong> <strong>Guide</strong> 24
class-map match-all RTP<br />
match access-group name RTP<br />
!<br />
policy-map Voice<br />
!<br />
!<br />
class RTP<br />
set dscp ef<br />
class SCCP<br />
set dscp cs3<br />
interface X<br />
service-policy input Voice<br />
service-policy output Voice<br />
Sample Voice Packet Capture<br />
This packet capture below shows that RTP packets bound for the <strong>Cisco</strong> <strong>Unified</strong> <strong>IP</strong> <strong>Phone</strong> <strong>7921G</strong> over the air should be marked<br />
with DSCP = EF and UP = 6.<br />
<strong>Cisco</strong> <strong>Unified</strong> <strong>Wireless</strong> <strong>IP</strong> <strong>Phone</strong> <strong>7921G</strong> Series <strong>Deployment</strong> <strong>Guide</strong> 25
Call Admission Control<br />
Inbound and outbound call admission control can be enabled on the access point.<br />
• Enable Call Admission Control / Wi-Fi MultiMedia Traffic Specifications (TSPEC)<br />
• Set the desired maximum RF bandwidth that is allocated for voice traffic (default = 75%)<br />
• Set the bandwidth that is reserved for roaming clients (default = 6%)<br />
The minimum PHY rate can be configured for which the phone is to use when Call Admission Control (CAC) is enabled.<br />
• Enable a data rate that is enabled on the access point. (Default setting is 12 Mbps)<br />
• <strong>Cisco</strong> Access Points will only accept a minimum PHY rate of 5.5, 6, 11, 12 or 24 Mbps, so ensure that one of these<br />
rates are enabled.<br />
As of the 1.3(3) release, the <strong>Cisco</strong> <strong>Unified</strong> <strong>Wireless</strong> <strong>IP</strong> <strong>Phone</strong> <strong>7921G</strong> will auto-negotiate the minimum PHY rate to be used for<br />
TSPEC. By default it will try the locally configured minimum PHY rate (i.e. 12 Mbps) first, but if that data rate is not enabled<br />
on the access point, then it will try the next highest enabled data rate on the access point. If there is not a higher data rate<br />
enabled, then it will then try the next lowest data rate as the minimum PHY rate.<br />
In releases prior to 1.3(3), the <strong>Cisco</strong> <strong>Unified</strong> <strong>Wireless</strong> <strong>IP</strong> <strong>Phone</strong> <strong>7921G</strong> would use the static minimum PHY rate configured<br />
locally.<br />
If 12 Mbps is not enabled on the access point, then the next highest enabled data rate must be 24 Mbps. For example, if 12<br />
Mbps is disabled but 18 Mbps is enabled, the phone will try the next highest rate of 18 Mbps and fail because that minimum<br />
PHY rate for CAC is not supported by the <strong>Cisco</strong> access point.<br />
The dynamic minimum PHY rate is useful for deployments that require higher capacity where 24 Mbps and higher data rates<br />
are only enabled. For this high capacity deployment configuration and with release 1.3(3), the minimum PHY rate would be<br />
adjusted to 24 Mbps automatically even if the phone is configured statically for a minimum PHY rate of 12 Mbps. In releases<br />
prior to 1.3(3), the minimum PHY rate would have to be changed to 24 Mbps manually from the default of 12 Mbps in order for<br />
CAC to work correctly for this deployment configuration.<br />
If an 802.11b AP is used, the highest available date rate would be 11 Mbps, so 12 Mbps can not be used as the minimum PHY<br />
rate. For this 802.11b (11 Mbps) deployment configuration and with release 1.3(3), the minimum PHY rate would be adjusted<br />
to 11 Mbps automatically even if the phone is configured statically for a minimum PHY rate of 12 Mbps. In releases prior to<br />
1.3(3), the minimum PHY rate would have to be changed to 11 Mbps manually from the default of 12 Mbps in order for CAC<br />
to work correctly for this deployment configuration.<br />
There is no support for load-based CAC or multiple streams on the autonomous access points therefore it is not recommended<br />
to enable CAC on autonomous access points.<br />
If CAC is enabled on the autonomous access point, then SRTP and barge calls will fail.<br />
Pre-Call Admission Control<br />
If Call Admission Control (TSPEC) is enabled on the access point, the <strong>Cisco</strong> <strong>Unified</strong> <strong>Wireless</strong> <strong>IP</strong> <strong>Phone</strong> <strong>7921G</strong> sends an Add<br />
Traffic Stream (ADDTS) to the access point to request bandwidth in order to place or receive a call. If the AP sends an ADDTS<br />
successful message then the <strong>Cisco</strong> <strong>Unified</strong> <strong>Wireless</strong> <strong>IP</strong> <strong>Phone</strong> <strong>7921G</strong> establishes the call. If the call is rejected by the access<br />
point and the wireless <strong>IP</strong> phone has no other access point to roam to, then phone displays “Network Busy”. If the admission is<br />
<strong>Cisco</strong> <strong>Unified</strong> <strong>Wireless</strong> <strong>IP</strong> <strong>Phone</strong> <strong>7921G</strong> Series <strong>Deployment</strong> <strong>Guide</strong> 26
efused, there is no messaging from the <strong>Cisco</strong> <strong>Unified</strong> <strong>Wireless</strong> <strong>IP</strong> <strong>Phone</strong> <strong>7921G</strong> Series to inform the remote endpoint that there<br />
is insufficient bandwidth to establish the call, so the call can continue to ring out within the system until the remote user<br />
terminates the call.<br />
Roaming Admission Control<br />
During a call, the <strong>Cisco</strong> <strong>Unified</strong> <strong>Wireless</strong> <strong>IP</strong> <strong>Phone</strong> <strong>7921G</strong> measures Received Signal Strength Indicator (RSSI) and Packet<br />
Error Rate (PER) values for the current and all available access points to make roaming decisions.<br />
If the original access point where the call was established had Call Admission Control (TSPEC) enabled, then the wireless <strong>IP</strong><br />
phone will send an ADDTS request during the roam to the new access point.<br />
For more information about Call Admission Control and QoS, refer to the “<strong>Cisco</strong> <strong>Unified</strong> <strong>Wireless</strong> Quality of Service” chapter<br />
in the Enterprise Mobility Design <strong>Guide</strong> at this URL:<br />
http://www.cisco.com/en/US/docs/solutions/Enterprise/Mobility/emob41dg/eMob4.1.pdf<br />
Traffic Classification (TCLAS)<br />
Traffic Classification (TCLAS) helps to ensure that the access point properly classifies voice packets.<br />
Without proper classification, voice packets will be treated as best effort which will defeat the purpose of TSPEC and QoS in<br />
general.<br />
<strong>Cisco</strong> <strong>Unified</strong> <strong>Wireless</strong> <strong>IP</strong> <strong>Phone</strong> <strong>7921G</strong> Series <strong>Deployment</strong> <strong>Guide</strong> 27
TCP and UDP port information will be used to set the UP (User Priority) value.<br />
The previous method of classification depends upon preservation of DSCP value throughout the network, where the DSCP<br />
value maps to a particular queue (BE, BK, VI, VO).<br />
However, the DSCP values are not always preserved as this can be viewed as a security risk.<br />
TCLAS is supported in the <strong>Cisco</strong> <strong>Unified</strong> <strong>Wireless</strong> LAN Controller release 5.1.151.0 and later.<br />
Using port based QoS policies is inadequate as all data packets use the same UDP port (LWAPP = 12222; CAPWAP = 5246)<br />
and the access point uses the outside QoS marking to determine which queue the packets should be placed in.<br />
With TCLAS, DSCP preservation is not a requirement.<br />
Call Admission Control (TSPEC) must be enabled on the access point in order to enable TCLAS.<br />
TCLAS will be negotiated within the ADDTS packets, which are used to request bandwidth in order to place or receive a call.<br />
Roaming<br />
When using 802.1x type authentication, it is recommended to implement CCKM to enable fast roaming. 802.1x can introduce<br />
delay during roaming due to its requirement for full re-authentication. CCKM centralizes the key management and reduces the<br />
number of key exchanges. WPA introduces additional transient keys and can lengthen roaming time.<br />
As of the 1.3(4) release, the <strong>Cisco</strong> <strong>Unified</strong> <strong>Wireless</strong> <strong>IP</strong> <strong>Phone</strong> <strong>7921G</strong> supports CCKM with WPA2 (AES or TK<strong>IP</strong>), WPA (TK<strong>IP</strong><br />
or AES) and 802.1x (WEP) authentication.<br />
Authentication<br />
WPA/WPA2 Personal<br />
WPA/WPA2 Enterprise<br />
CCKM<br />
Roaming Time<br />
150 ms<br />
300 ms<br />
< 100 ms<br />
Interband Roaming<br />
Some deployments may use one band for indoor (i.e. 5 GHz) and the other for outdoor coverage (i.e. 2.4 GHz). In this case, set<br />
the phone to either Auto-a or Auto-b/g mode, depending on the preferred band.<br />
For Auto-a and Auto-b/g modes, this is giving preference to one band over another. At power on, the <strong>Cisco</strong> <strong>Unified</strong> <strong>Wireless</strong> <strong>IP</strong><br />
<strong>Phone</strong> <strong>7921G</strong> will scan all 2.4 and 5 GHz channels then attempt to associate to an access point for the configured network using<br />
the preferred band if available. If the preferred band is not available, then the <strong>Cisco</strong> <strong>Unified</strong> <strong>Wireless</strong> <strong>IP</strong> <strong>Phone</strong> <strong>7921G</strong> will try<br />
to use the less preferred band if available. If the phone roams out of coverage of the preferred band, where the less preferred<br />
band signal is available, then the phone will attempt to associate to that less preferred band.<br />
As of the 1.3(4) release, seamless interband roaming between 5 Ghz and 2.4 Ghz bands is supported as both bands are now<br />
scanned simultaneously when on call.<br />
In order for the <strong>Cisco</strong> <strong>Unified</strong> <strong>Wireless</strong> <strong>IP</strong> <strong>Phone</strong> <strong>7921G</strong> to roam from the preferred band to the less preferred band (i.e. roam to<br />
2.4 GHz when configured for Auto-a mode), all access points in the preferred band must have a signal low enough to match the<br />
less preferred band roam threshold and the RSSI differential threshold for roaming must be met. In order to roam back to the<br />
preferred band, there must be at least one access point with sufficient signal matching the preferred band roam threshold.<br />
Prior to the 1.3(4) release, the <strong>Cisco</strong> <strong>Unified</strong> <strong>Wireless</strong> <strong>IP</strong> <strong>Phone</strong> <strong>7921G</strong> would have to roam out of range of the current band<br />
before it would attempt to roam to the other band when configured for an Auto 802.11 mode (i.e. Auto-a, Auto-bg, Auto-RSSI),<br />
<strong>Cisco</strong> <strong>Unified</strong> <strong>Wireless</strong> <strong>IP</strong> <strong>Phone</strong> <strong>7921G</strong> Series <strong>Deployment</strong> <strong>Guide</strong> 28
where the user may experience choppy audio with the weak signal, followed up with a small second audio gap before looking<br />
for the least preferred band. Then once it has failed over to a less preferred band (i.e. associated to 802.11b/g when phone<br />
configured for Auto-a), there was no mechanism in place to check to see if the preferred band is available again or not in order<br />
to roam back to the preferred band.<br />
It is recommended to perform a spectrum analysis to ensure that the desired bands can be enabled in order to perform seamless<br />
interband roaming.<br />
Channel Parking<br />
Channel Parking is a sub-feature of interband roaming, which is designed to conserve idle battery life when the <strong>Cisco</strong> <strong>Unified</strong><br />
<strong>Wireless</strong> <strong>IP</strong> <strong>Phone</strong> <strong>7921G</strong> is configured for an Auto 802.11 mode and continuous scan mode is enabled in the <strong>Cisco</strong> <strong>Unified</strong><br />
Communications Manager.<br />
Continuous scan mode enables constant scanning of all channels regardless of call state, which can also help with location.<br />
When configured for auto scan mode, typically the phone is only scanning when on call and not in idle unless the current signal<br />
drops below a certain RSSI threshold.<br />
When channel parking is active, the <strong>Cisco</strong> <strong>Unified</strong> <strong>Wireless</strong> <strong>IP</strong> <strong>Phone</strong> <strong>7921G</strong> will discontinue the scanning of the 5 GHz band<br />
and potentially roam to a 2.4 GHz neighbor, but also may stay on the currently connected 5 GHz AP if that is the strongest<br />
signal received.<br />
Channel parking will occur when the phone is in idle mode and there are at least four 2.4 GHz access points available where at<br />
least one of those four access points has met the RSSI threshold to enable channel parking.<br />
If configured for Auto-a and continuous scanning is enabled, the phone can potentially roam to 2.4 GHz when in idle even when<br />
the phone is in good 5 GHz coverage as the Auto-RSSI logic is used when in idle, regardless of whether 5 GHz channels are<br />
parked or not. When on call the local configured mode will be used (i.e. Auto-a), so it will attempt to associate to the preferred<br />
band if available.<br />
Channel parking will become inactive either when there are less than four 2.4 GHz access points, the RSSI for all 2.4 GHz<br />
access points is low enough to meet the RSSI threshold to disable channel parking or there is a current inbound or outbound<br />
call. When channel parking becomes inactive, the phone will rapidly scan the 5 GHz band, where it can potentially roam back<br />
to 5 GHz if configured for Auto-a, as roaming is based on band preference and then RSSI when on call.<br />
When the call is terminated, channel parking may become active again.<br />
Multicast<br />
When enabling multicast in the wireless LAN, impacts on battery life, performance, and capacity must be considered.<br />
The <strong>Cisco</strong> <strong>Unified</strong> <strong>Wireless</strong> <strong>IP</strong> <strong>Phone</strong> <strong>7921G</strong> uses the DTIM period to receive the queued broadcast and multicast packets.<br />
If there are many packets queued up, then they client may have to stay awake longer thus potentially reducing battery life.<br />
With multicast, there is no reliability that the packet will be received the by the client.<br />
The multicast traffic will be sent at the highest basic data rate enabled on the access point, so will want to ensure that only the<br />
lowest enabled rate is configured as the only basic rate.<br />
The client will send the IGMP join request to receive that multicast stream. The client will send the IGMP leave when the<br />
session is to be ended.<br />
The <strong>Cisco</strong> <strong>Unified</strong> <strong>Wireless</strong> <strong>IP</strong> <strong>Phone</strong> <strong>7921G</strong> supports the IGMP query feature, which can be used to reduce the amount of<br />
multicast traffic on the wireless LAN when not necessary.<br />
Ensure that IGMP snooping is also enabled on all switches.<br />
<strong>Cisco</strong> <strong>Unified</strong> <strong>Wireless</strong> <strong>IP</strong> <strong>Phone</strong> <strong>7921G</strong> Series <strong>Deployment</strong> <strong>Guide</strong> 29
Designing the <strong>Wireless</strong> LAN for Voice<br />
The following network design guidelines must be followed in order to accommodate for adequate coverage, call capacity and<br />
seamless roaming for the <strong>Cisco</strong> <strong>Unified</strong> <strong>Wireless</strong> <strong>IP</strong> <strong>Phone</strong> <strong>7921G</strong>.<br />
For more information about these topics, refer to the “VoWLAN Design Recommendations” chapter in the Enterprise Mobility<br />
Design <strong>Guide</strong> at this URL:<br />
http://www.cisco.com/en/US/docs/solutions/Enterprise/Mobility/emob41dg/eMob4.1.pdf<br />
Planning Channel Usage<br />
Use the following guidelines to plan channel usage for these wireless environments.<br />
5 GHz (802.11a)<br />
The <strong>Cisco</strong> <strong>Unified</strong> <strong>Wireless</strong> <strong>IP</strong> <strong>Phone</strong> <strong>7921G</strong> supports Dynamic Frequency Selection (DFS) and Transmit Power Control (TPC)<br />
from 802.11h, which are required when using channels operating at 5.25 - 5.725 GHz, which are 15 of the 23 possible channels.<br />
DFS dynamically instructs a transmitter to switch to another channel whenever radar signal is detected. If the access point<br />
detects radar, the radio on the access point goes on hold for at least 60 seconds while the access point passively scans for<br />
another usable channel.<br />
TPC allows the client and access point to exchange information, so that the client can dynamically adjust the transmit power.<br />
The client uses only enough energy to maintain association to the access point at a given data rate. As a result, the client<br />
contributes less to adjacent cell interference, which allows for more densely deployed, high-performance wireless LANs.<br />
Lower power on the client provides longer battery life because less power is used by the radio.<br />
5 GHz channels overlap their adjacent channel, so there should be at least 1 channel of separation for adjacent access points.<br />
<strong>Cisco</strong> <strong>Unified</strong> <strong>Wireless</strong> <strong>IP</strong> <strong>Phone</strong> <strong>7921G</strong> Series <strong>Deployment</strong> <strong>Guide</strong> 30
Using Dynamic Frequency Selection (DFS) on Access Points<br />
For autonomous solution access points, select Dynamic Frequency Selection (DFS) to use auto channel selection.<br />
When DFS is enabled, enable at least one band (bands 1-4).<br />
For unified access points, enable Auto RF unless there is an intermittent interferer in an area which select access points can have<br />
the channel statically assigned.<br />
In case of radar activity, have at least one access point per area that uses a non-DFS channel (UNII-1). This ensures that a<br />
channel is available when an access point’s radio is in its hold-off period while scanning for a new usable channel.<br />
For autonomous access points, enable band 1 only which allows the access point to use only a UNII-1 channel.<br />
For unified access points, can manually select a UNII-1 channel (channels 36, 40, 44, 48) for the desired access points.<br />
A UNII-3 channel (5.745 - 5.805 GHz) can optionally be used if available.<br />
In this diagram, 5 GHz cells use a non-DFS channel while other nearby cells use DFS channels to permit maximum call<br />
capacity under all conditions.<br />
Ch 36<br />
Ch 149<br />
Ch 56 Ch 48<br />
Ch 52<br />
Ch 44<br />
Ch 161<br />
Ch 60<br />
Minimum 20% Overlap<br />
For 5 GHz, 20 channels are available in the Americas and 19 channels in Europe and Japan.<br />
Where UNII-3 is available, it is recommend to use UNII-1, UNII-2 and UNII-3, to utilize a 12 channel set.<br />
If planning to use UNII-2 extended channels (channels 100 - 140), it is recommended to disable UNII-2 (channels 52-64) on the<br />
access point to avoid having so many channels enabled.<br />
Having many 5 GHz channels enabled in the wireless LAN can delay discovery of new access points.<br />
<strong>Cisco</strong> <strong>Unified</strong> <strong>Wireless</strong> <strong>IP</strong> <strong>Phone</strong> <strong>7921G</strong> Series <strong>Deployment</strong> <strong>Guide</strong> 31
2.4 GHz (802.11b/g)<br />
In the 2.4 GHz (802.11b/g environment, only non-overlapping channels must be utilized when deploying VoWLAN. Nonoverlapping<br />
channels have 22 MHz of separation and are at least 5 channels apart.<br />
There are only 3 non-overlapping channels in the 2.4 GHz frequency range (channels 1, 6, 11). In Japan, channel 14 can be<br />
utilized as a fourth non-overlapping channel when using 802.11b access points.<br />
Non-overlapping channels must be used and allow at least 20 percent overlap with adjacent channels when deploying phones in<br />
the 802.11b/g environment.<br />
Ch 11<br />
Ch 1<br />
Ch 6 Ch 11<br />
Ch 6<br />
Ch 11<br />
Ch 1<br />
Ch 6<br />
Minimum 20% Overlap<br />
<strong>Cisco</strong> <strong>Unified</strong> <strong>Wireless</strong> <strong>IP</strong> <strong>Phone</strong> <strong>7921G</strong> Series <strong>Deployment</strong> <strong>Guide</strong> 32
Signal Strength and Coverage<br />
To ensure acceptable voice quality, the <strong>Cisco</strong> <strong>Unified</strong> <strong>Wireless</strong> <strong>IP</strong> <strong>Phone</strong> <strong>7921G</strong> should always have a signal of -67 dBm or<br />
higher when using 2.4 or 5 GHz and ensure the Packet Error Rate (PER) is no higher than 1%.<br />
A minimum Signal to Noise Ratio (SNR) of 25dB = -92dBm noise level with -67 dBm signal should be maintained.<br />
It is recommended to have at least two access points on non-overlapping channels with at least -67 dBm signal with the 25 dB<br />
SNR to provide redundancy.<br />
To achieve maximum capacity and throughput, the wireless LAN should be designed to 24 Mbps. Higher data rates (36-54<br />
Mbps) can optionally be enabled.<br />
Recommended to set the minimum data rate to 11 Mbps or 12 Mbps for 2.4 GHz (dependent upon 802.11b client support<br />
policy) and 12 Mbps for 5 GHz, which should also be the only rate configured as a basic rate.<br />
Due to the above requirements, a single channel plan should not be deployed.<br />
For more information about signal strength and cell edge design, refer to the “VoWLAN Design Recommendations” chapter in<br />
the Enterprise Mobility Design <strong>Guide</strong> at this URL:<br />
http://www.cisco.com/en/US/docs/solutions/Enterprise/Mobility/emob41dg/eMob4.1.pdf<br />
Power (dBm)<br />
RSSI /<br />
Signal<br />
Strength<br />
Signal to<br />
Noise<br />
Ratio<br />
Noise<br />
Level<br />
Time (Seconds)<br />
<strong>Cisco</strong> <strong>Unified</strong> <strong>Wireless</strong> <strong>IP</strong> <strong>Phone</strong> <strong>7921G</strong> Series <strong>Deployment</strong> <strong>Guide</strong> 33
When designing the placement of access points, be sure that all key areas have sufficient coverage (signal).<br />
Typical wireless LAN deployments for data only applications do not provide coverage for some areas where VoWLAN service<br />
is necessary such as elevators, stairways, and outside corridors.<br />
<strong>Wireless</strong> LAN interference is generated by microwave ovens, 2.4 GHz cordless phones, Bluetooth devices, or other electronic<br />
equipment operating in the 2.4 GHz band.<br />
Microwave ovens operate on 2450 MHz, which is between channels 8 and 9 of 802.11b/g. Some microwaves are shielded more<br />
than others and that shielding reduces the spread of the energy. Microwave energy can impact channel 11, and some<br />
microwaves can affect the entire frequency range (channels 1 through 11). To avoid microwave interference, select channel 1<br />
for use with access points that are located near microwaves.<br />
Most microwave ovens, Bluetooth, and frequency hopping devices do not have the same effect on the 5 GHz frequency. The<br />
802.11a technology provides more non-overlapping channels and typically lower initial RF utilization. For voice deployments,<br />
it is suggested to use 802.11a for voice and use 802.11b/g for data.<br />
However there are products that also utilize the non-licensed 5 GHz frequency (i.e. 5.8 GHz cordless phones, which can impact<br />
UNII-3 channels).<br />
File / Supply<br />
Room<br />
Elevator<br />
Shafts<br />
Office<br />
Lab<br />
Break Room<br />
(Microwave Ovens<br />
2450 MHz)<br />
Conference<br />
Room<br />
Cubes<br />
Stairwells (Reinforced<br />
Building Area)<br />
CEO<br />
The <strong>Cisco</strong> <strong>Unified</strong> WCS can be utilized to verify signal strength and coverage.<br />
<strong>Cisco</strong> <strong>Unified</strong> <strong>Wireless</strong> <strong>IP</strong> <strong>Phone</strong> <strong>7921G</strong> Series <strong>Deployment</strong> <strong>Guide</strong> 34
Configuring Data Rates<br />
It is recommended to disable rates below 12 Mbps for 802.11a and below 12 Mbps for 802.11b/g deployments where capacity<br />
and range are factored in for best results.<br />
If 802.11b clients are not allowed in the wireless LAN, then it is recommended to disable the 1, 2, 5.5, 11 Mbps data rates.<br />
When 802.11b clients exist in the wireless network, then an 802.11b rate must be enabled and only an 802.11b rate can be<br />
configured as a basic rate. In this case, is suggested to enable the data rates 11 Mbps and higher.<br />
The recommended data rate configuration is the following:<br />
802.11 Mode Basic (Mandatory)<br />
Data Rates<br />
Supported (Optional)<br />
Data Rates<br />
Disabled<br />
Data Rates<br />
802.11a 12 Mbps 18 - 24, Mbps 6, 9, Mbps<br />
802.11b 11 Mbps None 1, 2, 5.5 Mbps<br />
802.11g 12 Mbps 18 – 24, Mbps 6, 9, Mbps<br />
802.11b/g 11 Mbps 12 – 24, Mbps 1, 2, 5.5, 6, 9, Mbps<br />
Data rates higher than 24 Mbps (36, 48 and 54 Mbps) can optionally be enabled or disabled, but there is no advantage from a<br />
capacity or throughput perspective to enable these rates for a voice application.<br />
<strong>Cisco</strong> <strong>Unified</strong> <strong>Wireless</strong> <strong>IP</strong> <strong>Phone</strong> <strong>7921G</strong> Series <strong>Deployment</strong> <strong>Guide</strong> 35
Enabling these rates could potentially increase the number of retries for a data frame.<br />
Other applications may be able to benefit from having these higher data rates enabled.<br />
Note: Some environments may require that a lower data rate be enabled due to use of legacy clients, environmental factors or<br />
maximum range is required.<br />
Set only the lowest data rate enabled as the single basic rate. Multicast packets will be sent at the highest basic data rate<br />
enabled.<br />
Note that capacity and throughput are reduced when lower rates are enabled.<br />
If Call Admission Control (TSPEC) is enabled then the Traffic Stream Rate Set (TSRS) feature will also be enabled, which will<br />
allow lower rates to be enabled for legacy devices, but prevent the <strong>Cisco</strong> <strong>Unified</strong> <strong>Wireless</strong> <strong>IP</strong> <strong>Phone</strong> <strong>7921G</strong> to transmit at rates<br />
below 12 Mbps for 802.11a and 11 Mbps for 802.11b/g, while also allow set the ceiling data rate to a more reliable data rate (24<br />
Mbps). Disallowing packets to be transmitted at lower rates preserves capacity. Sending voice frames at a more reliable rate<br />
initially can potentially reduce the number of retries of a data frame to ensure the packet transmission is successful on the first<br />
try.<br />
See the “Product Specific Configuration Options” section for information on how to configure the Restricted Data Rates<br />
options on the <strong>Cisco</strong> <strong>Unified</strong> <strong>Wireless</strong> <strong>IP</strong> <strong>Phone</strong> <strong>7921G</strong> in order to utilize the TSRS feature.<br />
Call Capacity<br />
Design the network to accommodate the desired call capacity.<br />
The <strong>Cisco</strong> Access Point can support up to 27 bi-directional RTP streams for both 802.11a and 802.11g at a data rate of 24 Mbps<br />
or higher. To achieve this capacity, there must be minimal wireless LAN background traffic and radio frequency (RF)<br />
utilization.<br />
The number of calls may vary depending on the data rate, initial channel utilization, and the environment.<br />
Max # of Streams 802.11 Mode Data Rate<br />
13 802.11a, 802.11g 6 Mbps<br />
20 802.11a, 802.11g 12 Mbps<br />
27 802.11a, 802.11g 24 – 54 Mbps<br />
<strong>Cisco</strong> <strong>Unified</strong> <strong>Wireless</strong> <strong>IP</strong> <strong>Phone</strong> <strong>7921G</strong> Series <strong>Deployment</strong> <strong>Guide</strong> 36
Dynamic Transmit Power Control (DTPC)<br />
To successfully exchange packets between the wireless <strong>IP</strong> phone and the access point, Dynamic Transmit Power Control<br />
(DTPC) should be enabled.<br />
When using an access point that supports DTPC, set the client power to match the local access point power.<br />
Do not use default setting of Max power for client power on <strong>Cisco</strong> autonomous access points as that will not advertise DTPC to<br />
the client.<br />
If the access point does not support DTPC, then the <strong>Cisco</strong> <strong>Unified</strong> <strong>Wireless</strong> <strong>IP</strong> <strong>Phone</strong> <strong>7921G</strong> will use the highest available<br />
transmit power depending on the current 802.11 mode and data rate.<br />
The transmit power on the <strong>Cisco</strong> <strong>Unified</strong> <strong>Wireless</strong> <strong>IP</strong> <strong>Phone</strong> <strong>7921G</strong> can also optionally be configured to match the highest<br />
transmit power of an access point in the wireless LAN. This setting prevents one-way audio when RF traffic is heard in one<br />
direction only.<br />
By default the <strong>Cisco</strong> <strong>Unified</strong> <strong>Wireless</strong> <strong>IP</strong> <strong>Phone</strong> <strong>7921G</strong> will use the highest available transmit power by default (i.e. 17 dBm /<br />
50 mW for 2.4 GHz and 16 dBm / 40 mW for 5 GHz).<br />
The access point’s radio transmit power should not have a transmit power greater than what the <strong>Cisco</strong> <strong>Unified</strong> <strong>Wireless</strong> <strong>IP</strong><br />
<strong>Phone</strong> <strong>7921G</strong> can support.<br />
Multipath<br />
Multipath occurs when RF signals take multiple paths from a source to a destination.<br />
A part of the signal goes to the destination while another part bounces off an obstruction, then goes on to the destination. As a<br />
result, part of the signal encounters delay and travels a longer path to the destination which creates signal energy loss.<br />
When the different waveforms combine, they cause distortion and effect the decoding capability of the receiver as the signal<br />
quality is poor.<br />
Multipath can exist in environments where there are reflective surfaces (i.e. metal, glass, etc.). Avoid mounting access points<br />
on these surfaces.<br />
Below is a list of multipath effects:<br />
Data Corruption<br />
Occurs when multipath is so severe that the receiver is unable to detect the transmitted information.<br />
Signal Nulling<br />
Occurs when the reflected waves arrive exactly out of phase with the main signal and cancel the main signal completely.<br />
Increased Signal Amplitude<br />
<strong>Cisco</strong> <strong>Unified</strong> <strong>Wireless</strong> <strong>IP</strong> <strong>Phone</strong> <strong>7921G</strong> Series <strong>Deployment</strong> <strong>Guide</strong> 37
Occurs when the reflected waves arrive in phase with the main signal and add on to the main signal thereby increasing the<br />
signal strength.<br />
Decreased Signal Amplitude<br />
Occurs when the reflected waves arrive out of phase to some extent with the main signal thereby reducing the signal<br />
amplitude.<br />
Use of Orthogonal Frequency Division Multiplexing (OFDM), which is used by 802.11a and 802.11g, can help to reduce issues<br />
seen in high multipath environments.<br />
If using 802.11b in a high multipath environment, lower data rates should be used in those areas (i.e. 1 and 2 Mbps).<br />
Use of antenna diversity can also help in such environments.<br />
Verification with Site Survey Tools<br />
These are many tools and applications that can be utilized to verify coverage, quality and configuration.<br />
• <strong>Cisco</strong> <strong>Wireless</strong> Control System (WCS) for <strong>Unified</strong> <strong>Wireless</strong> LAN management<br />
• <strong>Cisco</strong> <strong>Wireless</strong> LAN Solution Engine (WLSE) for Autonomous <strong>Wireless</strong> LAN management<br />
• <strong>Cisco</strong> Spectrum Expert<br />
• AirMagnet (Survey, WiFi Analyzer, VoFi Analyzer, Spectrum Analyzer)<br />
• <strong>Cisco</strong> <strong>Unified</strong> <strong>Wireless</strong> <strong>IP</strong> <strong>Phone</strong> <strong>7921G</strong><br />
<strong>Cisco</strong> <strong>7921G</strong> Neighbor List<br />
The <strong>Cisco</strong> <strong>Unified</strong> <strong>Wireless</strong> <strong>IP</strong> <strong>Phone</strong> <strong>7921G</strong> can be utilized to verify coverage by using the Neighbor List menu.<br />
By Default, the <strong>Cisco</strong> <strong>Unified</strong> <strong>Wireless</strong> <strong>IP</strong> <strong>Phone</strong> <strong>7921G</strong> only scans when the current signal lowers to a certain threshold, so<br />
only one access point may be visible in the list if configured for auto scan mode.<br />
<strong>Cisco</strong> <strong>Unified</strong> <strong>Wireless</strong> <strong>IP</strong> <strong>Phone</strong> <strong>7921G</strong> Series <strong>Deployment</strong> <strong>Guide</strong> 38
To see all access points in the neighbor list menu, place a call from the <strong>Cisco</strong> <strong>Unified</strong> <strong>Wireless</strong> <strong>IP</strong> <strong>Phone</strong> <strong>7921G</strong> to a wired <strong>IP</strong><br />
phone, where scanning occurs constantly while the phone call is active in auto scan mode.<br />
Otherwise configure continuous scan mode.<br />
The connected access point will be highlighted in red.<br />
Access the neighbor list menu on the phone by pressing Settings > Status > Neighbor List<br />
<strong>Cisco</strong> <strong>7921G</strong> Site Survey<br />
The <strong>Cisco</strong> <strong>Unified</strong> <strong>Wireless</strong> <strong>IP</strong> <strong>Phone</strong> <strong>7921G</strong> has a Site Survey application as of release 1.1(1), which is an offline mode that<br />
gathers information about the access points for the configured network profile and generates and HTML report after exiting the<br />
application.<br />
To access the Site Survey application, navigate to Settings > Status > Site Survey.<br />
To view the HTML report, select System > Site Survey from the <strong>Cisco</strong> <strong>Unified</strong> <strong>Wireless</strong> <strong>IP</strong> <strong>Phone</strong> <strong>7921G</strong> webpage.<br />
This information can be utilized to confirm access point configuration as well as coverage.<br />
The neighbor table shows which access points (along the column) are neighbors of the access points with the strongest signal<br />
listed in the row. The percentage of time that the access point had the highest RSSI is displayed as well as the RSSI range for<br />
that access point when it was observed. The access point name is hyperlinked to the access point detail listed below.<br />
<strong>Cisco</strong> <strong>Unified</strong> <strong>Wireless</strong> <strong>IP</strong> <strong>Phone</strong> <strong>7921G</strong> Series <strong>Deployment</strong> <strong>Guide</strong> 39
<strong>Cisco</strong> <strong>Unified</strong> <strong>Wireless</strong> <strong>IP</strong> <strong>Phone</strong> <strong>7921G</strong> Series <strong>Deployment</strong> <strong>Guide</strong> 40
Configuring <strong>Cisco</strong> <strong>Unified</strong> Communications Manager<br />
<strong>Cisco</strong> <strong>Unified</strong> Communications Manager provides many different phone, calling and security features.<br />
<strong>Phone</strong> Button Templates<br />
The <strong>Cisco</strong> <strong>Unified</strong> <strong>Wireless</strong> <strong>IP</strong> <strong>Phone</strong> <strong>7921G</strong> supports 6 lines. The default phone button template includes support for 2 lines<br />
and 4 speed dials.<br />
Custom phone button templates can be created with the option for many different features, which can then be applied on a<br />
phone by phone basis.<br />
Softkey Templates<br />
Custom softkey templates can be created with the option of giving additional feature access or limiting feature access.<br />
Softkeys are assigned based on the state of the phone (on hook, connected, on hold, ring in, off hook, connected transfer, digits<br />
after first, connected conference, ring out, off hook with feature, remote in use, connected no feature).<br />
The order of the softkeys can also be arranged when creating a custom softkey template.<br />
The <strong>Cisco</strong> <strong>Unified</strong> <strong>Wireless</strong> <strong>IP</strong> <strong>Phone</strong> <strong>7921G</strong> has 2 softkeys available. The feature listed first in the softkey template will be<br />
displayed on the left softkey if on a call, where the other features will be listed under the options menu on the right softkey.<br />
<strong>Cisco</strong> <strong>Unified</strong> <strong>Wireless</strong> <strong>IP</strong> <strong>Phone</strong> <strong>7921G</strong> Series <strong>Deployment</strong> <strong>Guide</strong> 41
Security Profiles<br />
Security profiles can be utilized to enable authenticated mode or encrypted mode, where signaling, media and phone<br />
configuration file encryption.<br />
The Certificate Authority Proxy Function (CAPF) to be operational.<br />
Each <strong>Cisco</strong> <strong>Unified</strong> <strong>Wireless</strong> <strong>IP</strong> <strong>Phone</strong> <strong>7921G</strong> has a Manufactured Installed Certificate (MIC).<br />
<strong>Cisco</strong> <strong>Unified</strong> <strong>Wireless</strong> <strong>IP</strong> <strong>Phone</strong> <strong>7921G</strong> Series <strong>Deployment</strong> <strong>Guide</strong> 42
G.722 Advertisement<br />
<strong>Cisco</strong> <strong>Unified</strong> Communications Manager versions 5.0 and later support the ability to configure whether G.722 is to be a<br />
supported codec system wide or not.<br />
Earlier versions of <strong>Cisco</strong> Communications Manager do not have this capability, where a <strong>Cisco</strong> <strong>Unified</strong> <strong>Wireless</strong> <strong>IP</strong> <strong>Phone</strong><br />
<strong>7921G</strong> with release 1.1(1) or later will attempt to use G.722 assuming the other endpoint also advertises G.722 capabilities.<br />
If using a version of <strong>Cisco</strong> <strong>Unified</strong> Communications Manager prior to 5.0 and want to disable G.722 capabilities, then the latest<br />
device package will need to be applied to the <strong>Cisco</strong> <strong>Unified</strong> Communications Manager to enable this product specific<br />
configuration option for each <strong>Cisco</strong> <strong>Unified</strong> <strong>Wireless</strong> <strong>IP</strong> <strong>Phone</strong> <strong>7921G</strong>.<br />
For more information, refer to the <strong>Cisco</strong> <strong>Unified</strong> Communications Manager documentation.<br />
http://www.cisco.com/en/US/products/sw/voicesw/ps556/tsd_products_support_series_home.html<br />
Product Specific Configuration Options<br />
On the <strong>IP</strong> <strong>Phone</strong> Configuration page in <strong>Cisco</strong> <strong>Unified</strong> Communications Manager Administration, the following <strong>Cisco</strong> <strong>Unified</strong><br />
<strong>Wireless</strong> <strong>IP</strong> <strong>Phone</strong> <strong>7921G</strong> configuration options are available.<br />
For an explanation of these options, click the "?" on the configuration page.<br />
Product specific configuration options can be configured in bulk via the Bulk Admin Tool if using <strong>Cisco</strong> <strong>Unified</strong><br />
Communications Manager 5.0 and later. If using a prior version, then must be configured separately.<br />
As of the 1.4(1) release Multiple Level Vendor Configuration is allowed to override common settings.<br />
Some of the product specific configuration options can be configured on an enterprise phone, common phone profile or<br />
individual phone configuration level.<br />
<strong>Cisco</strong> <strong>Unified</strong> <strong>Wireless</strong> <strong>IP</strong> <strong>Phone</strong> <strong>7921G</strong> Series <strong>Deployment</strong> <strong>Guide</strong> 43
Field Name<br />
Disable Speakerphone<br />
Gratuitous ARP<br />
Settings Access<br />
Web Access<br />
Description<br />
Speakerphone capabilities can optionally be disabled.<br />
Determines whether the phone will learn MAC addresses from Gratuitous ARP<br />
responses or not.<br />
Settings Access can be used to limit user access to certain menus (i.e. Network<br />
Profiles).<br />
This parameter indicates whether the phone will accept connections from a web<br />
browser or another HTTP client. Web Access can be set to Full, where<br />
configuration changes can be made remotely or Read Only to provide information<br />
but not allowing changes to be made.<br />
<strong>Cisco</strong> <strong>Unified</strong> <strong>Wireless</strong> <strong>IP</strong> <strong>Phone</strong> <strong>7921G</strong> Series <strong>Deployment</strong> <strong>Guide</strong> 44
Locked Profiles<br />
Load Server<br />
Admin Password<br />
Special Numbers<br />
Application URL<br />
“Send” Key Action<br />
Days Display Not Active<br />
Display On Time<br />
Display On Duration<br />
Display Idle Timeout<br />
<strong>Phone</strong> Book Web Access<br />
Unlock-Settings Sequence<br />
Application Button Activation<br />
Timer<br />
Individual profiles can also be locked, which does not allow the user to modify<br />
those settings.<br />
A load server can be specified in <strong>IP</strong> format (x.x.x.x) if wanting to use an alternate<br />
TFTP server for phone firmware downloads.<br />
The admin password is used for web access. With <strong>Cisco</strong> <strong>Unified</strong> Communications<br />
Manager 5.0 or later the admin password must be managed in Communications<br />
Manager Administrator page, where previous versions allow local management.<br />
Special numbers can be programmed to dial out regardless of keypad lock state (i.e.<br />
911).<br />
The application URL can be configured, which will convert the application button<br />
to a service URL button or as a speed dial.<br />
The application URL can be configured to link to a Push To Talk server for quick<br />
access.<br />
(I.e. PTT server =<br />
http://x.x.x.x:8085/PushToTalk/display<strong>Phone</strong>GroupsMenu.do?sep=#DEVICENAM<br />
E#)<br />
To configure the application button as a speed dial, enter in the format as “Dial:X”<br />
(i.e. Dial:23675).<br />
“Send” key action determines whether the green dial button is to use onhook<br />
dialing and serve as last number redial, where a list of previously dialed numbers<br />
will be listed, or to use offhook dialing, which will play dial tone.<br />
This field allows the user to specifiy the days that the backlight is to remain off by<br />
default. To turn off the backlight for multiple days, hold down the control key<br />
while selecting the days. Saturday and Sunday is the default setting.<br />
This field indicates the time of day the display is to automatically turn itself on if it<br />
is an active day. The value should be in a 24 hour format. The default setting is<br />
07:30.<br />
This field indicates the amount of time the display is to be active for after the<br />
display on time. The default setting is 10:30 (hours:minutes), so the display would<br />
be turned off at 18:00 (6 pm).<br />
This field indicates how long to wait before the display is turned off after the last<br />
user activity. This timer gets reset after each interaction. The default setting is<br />
01:00 (hours:minutes).<br />
<strong>Phone</strong> book web access must be set to “Allow Admin” in order to access the phone<br />
book via the web page.<br />
By default, **# must be entered to unlock a menu that contains configurable items,<br />
which can optionally be disabled.<br />
The activation timer and priority of the application button can also be specified.<br />
This determines how long the button must be pressed and held to activate.<br />
<strong>Cisco</strong> <strong>Unified</strong> <strong>Wireless</strong> <strong>IP</strong> <strong>Phone</strong> <strong>7921G</strong> Series <strong>Deployment</strong> <strong>Guide</strong> 45
Application Button Priority<br />
Out of Range Alert<br />
Scan Mode<br />
Restricted Data Rates<br />
Power Off When Charging<br />
<strong>Cisco</strong> Discover Protocol (CDP)<br />
Advertise G.722 Codec<br />
Home Screen<br />
F<strong>IP</strong>S Mode<br />
Auto Line Select<br />
Minimum Ring Volume<br />
If the priority is low, then will only function when the keypad is unlocked and on<br />
the home screen. Medium priority will allow the application button to function<br />
when in any menu or XML screen and high priority will allow the application<br />
button to function when in any state including keypad lock.<br />
An out of range alert can be configured to beep once or periodically to audibly<br />
notify the user that they have traveled out of the coverage area.<br />
Scan mode allows for auto, continuous, and single AP options, where auto<br />
primarily scans only when on call and single AP only at power on.<br />
The restricted data rates feature utilizes the Traffic Stream Rate Set (TSRS)<br />
information element from CCX v4, which can define a data range (upper and<br />
lower) for the client to use (i.e. 12 - 24 Mbps). This can be beneficial for<br />
environments that have legacy clients requiring lower data rates to be enabled on<br />
the access point, but also preventing other clients from downshifting to lower rates,<br />
which lowers overall throughput and capacity. When enabled the <strong>Cisco</strong> <strong>Unified</strong><br />
<strong>Wireless</strong> <strong>IP</strong> <strong>Phone</strong> <strong>7921G</strong> will not transmit below 12 Mbps for 802.11a and 11<br />
Mbps for 802.11b/g.<br />
Power off when charging feature will power off the phone when placed on AC<br />
power.<br />
Enables or disables CDP.<br />
G.722 capabilities can be configured on a phone by phone basis and optionally<br />
override the system default.<br />
By default the <strong>Cisco</strong> <strong>Unified</strong> <strong>Wireless</strong> <strong>IP</strong> <strong>Phone</strong> <strong>7921G</strong> will show the traditional<br />
screen with the four icons for directory, services, settings and line access.<br />
The Federal Information Process Standards (F<strong>IP</strong>S) mode can optionally be enabled.<br />
When enabled, indicates that the phone will shift the call focus to incoming calls on<br />
all lines. When disabled, the phone will only shift the focus to incoming calls on<br />
the currently used line.<br />
This parameter controls the minimum ring volume on the phone. This value is set<br />
by the administrator, and can not be changed by an end user. The end user can<br />
increase the ring volume, but may not decrease the ring volume below the level<br />
defined. The minimum ring volume range is from 0 to 7, with 0 (silent) being the<br />
default value.<br />
Below shows the main phone screen (left) and line view (right) display options for the home screen.<br />
<strong>Cisco</strong> <strong>Unified</strong> <strong>Wireless</strong> <strong>IP</strong> <strong>Phone</strong> <strong>7921G</strong> Series <strong>Deployment</strong> <strong>Guide</strong> 46
Note: If configuring the “Admin Password” in <strong>Cisco</strong> <strong>Unified</strong> Communications Manager versions 5.0, 5.1, 6.0, 6.1, 7.0, 7.1,<br />
8.0 or later and web access is set to “Full”, then it is recommended to enable TFTP encryption via the device security profile.<br />
As of the 1.3(3) release, if settings access is set to “Disabled”, then the current ring volume will be locked in and will no longer<br />
be configurable.<br />
To configure product specific configuration options for the <strong>Cisco</strong> <strong>Unified</strong> <strong>Wireless</strong> <strong>IP</strong> <strong>Phone</strong> <strong>7921G</strong> with <strong>Cisco</strong> <strong>Unified</strong><br />
Communications Manager Express, create an ephone template with the necessary options.<br />
"service phone "<br />
Field Name Module Value<br />
Disable Speakerphone disableSpeaker false = Enabled; true = Disabled<br />
Gratuitous ARP garp 0 = Enabled; 1 = Disabled<br />
Settings Access settingsAccess 0 = Disabled; 1 = Enabled; 2 = Restricted<br />
Web Access webAccess 0 = Full; 1 = Disabled; 2 = ReadOnly<br />
Locked Profiles WLANProfile 0 = Unlocked; 1 = Locked, 2 = Restricted<br />
Load Server loadServer x.x.x.x<br />
Admin Password adminPassword (i.e. <strong>Cisco</strong>)<br />
Special Numbers specialNumbers (i.e. 411,911)<br />
Application URL PushToTalkURL http://x.x.x.x<br />
“Send” Key Action sendKeyAction 0 = Onhook Dialing; 1 = Offhook Dialing<br />
Days Display Not Active daysDisplayNotActive = <br />
<strong>Cisco</strong> <strong>Unified</strong> <strong>Wireless</strong> <strong>IP</strong> <strong>Phone</strong> <strong>7921G</strong> Series <strong>Deployment</strong> <strong>Guide</strong> 47
Display On Time displayOnTime (([0-1][0-9])|(2[0-3])):[0-5][0-9]<br />
Example: 07:30<br />
Display On Duration displayOnDuration (([0-1][0-9])|(2[0-3])):[0-5][0-9]<br />
Example: 10:30<br />
Display Idle Timeout displayIdleTimeout (([0-1][0-9])|(2[0-3])):[0-5][0-9]<br />
Example: 01:00<br />
<strong>Phone</strong> Book Web Access phoneBookWebAccess 0 = Deny All; 1 = Allow Admin<br />
Unlock-Settings Sequence unlockSettingsSequence 0 = Disabled; 1 = Enabled<br />
Application Button<br />
Activation Timer<br />
Application Button<br />
Priority<br />
appButtonTimer<br />
appButtonPriority<br />
0 = Disabled; = seconds<br />
0 = Low; 1 = Medium; 2 = High<br />
Out of Range Alert outOfRangeAlert 0 = Disabled; 1 = Beep Once; = Beep<br />
every seconds<br />
Scan Mode scanningMode 0 = Auto; 1 = Single AP; 2 = Continuous<br />
Restricted Data Rates restrictDataRates 0 = Disabled; 1 = Enabled<br />
Power Off When Charging powerOffWhenCharging 0 = Disabled; 1 = Enabled<br />
<strong>Cisco</strong> Discover Protocol<br />
(CDP)<br />
cdpEnable<br />
0 = Disabled; 1 = Enabled<br />
Advertise G.722 Codec g722CodecSupport 0 = Use System Default; 1 = Disabled; 2 =<br />
Enabled<br />
Home Screen homeScreen 0 = Main <strong>Phone</strong> Screen; 1 = Line View<br />
F<strong>IP</strong>S Mode fipsMode 0 = Disabled; 1 = Enabled<br />
Auto Line Select autoSelectLineEnable 0 = Disabled; 1 = Enabled<br />
Minimum Ring Volume minimumRingVolume 0 = Silent; = Different Volume Levels<br />
Application Button thumbButton1 PTTH<br />
With <strong>Cisco</strong> <strong>Unified</strong> Communications Manager Express, the “thumbButton1” command can tie the application button to a<br />
specific line.<br />
For example, if line 2 is an intercom line tied to a multicast paging group, then this can be configured to achieve Push To Talk.<br />
Enable individual phone configuration files with the following commands.<br />
telephony-service<br />
<strong>Cisco</strong> <strong>Unified</strong> <strong>Wireless</strong> <strong>IP</strong> <strong>Phone</strong> <strong>7921G</strong> Series <strong>Deployment</strong> <strong>Guide</strong> 48
cnf-file perphone<br />
create cnf-files<br />
For more information on these features, see the <strong>Cisco</strong> <strong>Unified</strong> <strong>Wireless</strong> <strong>IP</strong> <strong>Phone</strong> <strong>7921G</strong> Administration <strong>Guide</strong> or the <strong>Cisco</strong><br />
<strong>Unified</strong> <strong>Wireless</strong> <strong>IP</strong> <strong>Phone</strong> <strong>7921G</strong> Release Notes.<br />
http://www.cisco.com/en/US/products/hw/phones/ps379/prod_maintenance_guides_list.html<br />
http://www.cisco.com/en/US/products/hw/phones/ps379/prod_release_notes_list.html<br />
Configuring the <strong>Cisco</strong> <strong>Unified</strong> <strong>Wireless</strong> LAN Controller and Access<br />
Points<br />
When configuring the access points, use the following guidelines:<br />
• Set “Quality of Service (QoS)” to “Platinum”.<br />
• Ensure the “WMM Policy” is set to “Allowed” or “Required”<br />
• Ensure “Aironet IE” is enabled<br />
• Disable “P2P (Peer to Peer) Blocking Action” / “Public Secure Packet Forwarding (PSPF)”<br />
• Disable “DHCP Address Assignment”<br />
• Ensure “MFP Client Protection” is set to disabled or optional<br />
• Ensure “Client Band Select” is not enabled<br />
• Ensure “Admission Control Mandatory” is “Enabled” for Voice<br />
• Ensure “Load-based CAC” is “Enabled” for Voice<br />
• Ensure “Admission Control Mandatory” is “Disabled” for Video<br />
• Ensure the “EDCA Profile” is set to “Voice Optimized”<br />
• Ensure “Enable Low Latency MAC” is disabled<br />
• Ensure “Aggressive Load Balancing” in the Controller configuration or “Client Load Balancing” in the WLAN<br />
configuration are disabled<br />
• Enable “Symmetric Mobile Tunneling Mode” if Layer 3 mobility is being used<br />
• Ensure “ARPUnicast” is disabled, where proxy ARP will then be enabled<br />
• Ensure that “DTPC” is “Enabled”<br />
• Enable “Short Preamble” if using 2.4 GHz<br />
Note: If clients from other regions are present and will attempt to associate with the wireless LAN, then ensure that World<br />
Mode (802.11d) is enabled.<br />
When using 802.1x authentication, it is recommended to implement CCKM to offer fast secure roaming.<br />
SSID / WLAN Settings<br />
The SSID to be used by voice clients can be configured to only apply to a certain 802.11 radio type.<br />
<strong>Cisco</strong> <strong>Unified</strong> <strong>Wireless</strong> <strong>IP</strong> <strong>Phone</strong> <strong>7921G</strong> Series <strong>Deployment</strong> <strong>Guide</strong> 49
It is recommended to have the <strong>Cisco</strong> <strong>Unified</strong> <strong>Wireless</strong> <strong>IP</strong> <strong>Phone</strong> <strong>7921G</strong> operate on the 5 GHz band due to have many channels<br />
available and not as many interferers as the 2.4 GHz band has.<br />
In order to utilize CCKM, enable WPA2 policy with AES encryption and 802.1x + CCKM for authenticated key management<br />
type when the <strong>Cisco</strong> <strong>Unified</strong> <strong>Wireless</strong> <strong>IP</strong> <strong>Phone</strong> <strong>7921G</strong> is running firmware version 1.3(4) or later in order to enable fast secure<br />
roaming.<br />
If the <strong>Cisco</strong> <strong>Unified</strong> <strong>Wireless</strong> <strong>IP</strong> <strong>Phone</strong> <strong>7921G</strong> is running firmware version 1.3(3) or earlier, then enable WPA policy with TK<strong>IP</strong><br />
encryption and 802.1x + CCKM for authenticated key management type in order to enable fast secure roaming.<br />
<strong>Cisco</strong> <strong>Unified</strong> <strong>Wireless</strong> <strong>IP</strong> <strong>Phone</strong> <strong>7921G</strong> Series <strong>Deployment</strong> <strong>Guide</strong> 50
The WMM policy can be set to “Required” only if the <strong>Cisco</strong> <strong>Unified</strong> <strong>Wireless</strong> <strong>IP</strong> <strong>Phone</strong> <strong>7921G</strong> or other WMM enabled phones<br />
will be using this SSID.<br />
If 7920 or other non-WMM clients will associate using this SSID, then ensure the WMM policy is set to “Allowed”.<br />
Enable “7920 AP CAC” to advertise Qos Basic Service Set (QBSS) to the client.<br />
Configure session timeout as necessary. It is recommended to extend the timeout to avoid possible interruptions during reauthentication<br />
(i.e. 86400).<br />
Enable Aironet Extensions (Aironet IE).<br />
Ensure P2P Blocking Action should be disabled.<br />
Disable client exclusion for the voice SSID.<br />
DHCP Address Assignment should be disabled.<br />
MFP client protection should be disabled or only set to optional.<br />
For optimal battery performance and quality, use DTIM of 2 with a beacon period of 100ms.<br />
Ensure Client Load Balancing and Client Band Select are disabled for the voce SSID.<br />
<strong>Cisco</strong> <strong>Unified</strong> <strong>Wireless</strong> <strong>IP</strong> <strong>Phone</strong> <strong>7921G</strong> Series <strong>Deployment</strong> <strong>Guide</strong> 51
For the autonomous access point, ensure that the SSID is configured for open + eap as and network-eap when using 802.1x<br />
authentication.<br />
As of the 1.3(2) release, the <strong>Cisco</strong> <strong>Unified</strong> <strong>Wireless</strong> <strong>IP</strong> <strong>Phone</strong> <strong>7921G</strong> utilizes open + eap when doing 802.1x authentication, but<br />
utilized network-eap in previous releases.<br />
dot11 ssid voice<br />
vlan 21<br />
authentication open eap eap_methods<br />
authentication network-eap eap_methods<br />
authentication key-management wpa cckm<br />
admit-traffic<br />
If the autonomous access point is registered to a WDS (<strong>Wireless</strong> Domain Services) server, ensure both leap and eap types of<br />
authentication are enabled in the WDS configuration.<br />
wlccp authentication-server infrastructure method_Infrastructure<br />
wlccp authentication-server client mac method_Clients<br />
wlccp authentication-server client eap method_Clients<br />
wlccp authentication-server client leap method_Clients<br />
wlccp wds priority 255 interface BVI1<br />
Controller Settings<br />
In releases prior to 6.0, Aggressive Load Balancing was configured in the General Controller settings.<br />
In 6.0 and later, this is referred to as Client Load Balancing and is configurable under the WLAN configuration (SSID<br />
settings).<br />
<strong>Cisco</strong> <strong>Unified</strong> <strong>Wireless</strong> <strong>IP</strong> <strong>Phone</strong> <strong>7921G</strong> Series <strong>Deployment</strong> <strong>Guide</strong> 52
If using layer 3 mobility, then symmetric tunneling should be enabled .<br />
In the recent versions, Symmetric Mobility Tunneling is enabled by default and non-configurable.<br />
When multiple <strong>Cisco</strong> <strong>Unified</strong> <strong>Wireless</strong> LAN Controllers are to be in the same mobility group, then the <strong>IP</strong> address and MAC<br />
address of each <strong>Cisco</strong> <strong>Unified</strong> <strong>Wireless</strong> LAN Controller should be added to the Static Mobility Group Members configuration.<br />
<strong>Cisco</strong> <strong>Unified</strong> <strong>Wireless</strong> <strong>IP</strong> <strong>Phone</strong> <strong>7921G</strong> Series <strong>Deployment</strong> <strong>Guide</strong> 53
802.11 Network Settings<br />
If using 5 GHz, ensure the 802.11a network status is set to enabled.<br />
Set the beacon period to 100ms.<br />
Ensure DTPC Support is enabled.<br />
If using 802.11n capable access points, ensure ClientLink is enabled.<br />
Configure 12 Mbps as the mandatory (basic) rate and 18 – 24 or 54 Mbps as supported (optional) rates.<br />
36-54 Mbps can optionally be disabled, if there are not any applications that can benefit from those rates.<br />
Enable CCX Location Measurement.<br />
<strong>Cisco</strong> <strong>Unified</strong> <strong>Wireless</strong> <strong>IP</strong> <strong>Phone</strong> <strong>7921G</strong> Series <strong>Deployment</strong> <strong>Guide</strong> 54
If using 2.4 GHz, ensure the 802.11b/g network status and 802.11g is set to enabled.<br />
Set the beacon period to 100ms.<br />
Use the short preamble setting in the 2.4 GHz radio configuration setting on the access point when no legacy clients that require<br />
a long preamble are present in the wireless LAN. By using the short preamble instead of long preamble, the wireless network<br />
performance is improved.<br />
Ensure DTPC Support is enabled.<br />
If using 802.11n capable access points, ensure ClientLink is enabled.<br />
Configure 12 Mbps as the mandatory (basic) rate and 18 – 24 or 54 Mbps as supported (optional) rates assuming that there will<br />
not be any 802.11b only clients that will connect to the wireless LAN.<br />
If there are existing 802.11b clients, then 11 Mbps should be set as the mandatory (basic) rate and 12-24 or 54 Mbps as<br />
supported (optional).<br />
36-54 Mbps can optionally be disabled, if there are not any applications that can benefit from those rates.<br />
Enable CCX Location Measurement.<br />
<strong>Cisco</strong> <strong>Unified</strong> <strong>Wireless</strong> <strong>IP</strong> <strong>Phone</strong> <strong>7921G</strong> Series <strong>Deployment</strong> <strong>Guide</strong> 55
Auto RF<br />
When using the <strong>Cisco</strong> <strong>Unified</strong> <strong>Wireless</strong> LAN Controller it is recommended to enable Auto RF to manage the channel and<br />
transmit power settings. If electing to utilize the Auto-RF feature on the <strong>Cisco</strong> <strong>Unified</strong> <strong>Wireless</strong> LAN Controller, it is<br />
recommended to use version 4.1.185.0 or later.<br />
Configure the access point transmit power level assignment method for either 5 or 2.4 GHz depending on which band is to be<br />
utilized.<br />
<strong>Cisco</strong> <strong>Unified</strong> <strong>Wireless</strong> <strong>IP</strong> <strong>Phone</strong> <strong>7921G</strong> Series <strong>Deployment</strong> <strong>Guide</strong> 56
If using 5 GHz, ensure that channel 165 is not enabled in the DCA list as the <strong>Cisco</strong> <strong>Unified</strong> <strong>Wireless</strong> <strong>IP</strong> <strong>Phone</strong> <strong>7921G</strong> does not<br />
support channel 165.<br />
If using 2.4 GHz, only channels 1, 6, and 11 should be enabled in the DCA list.<br />
<strong>Cisco</strong> <strong>Unified</strong> <strong>Wireless</strong> <strong>IP</strong> <strong>Phone</strong> <strong>7921G</strong> Series <strong>Deployment</strong> <strong>Guide</strong> 57
Individual access points can be configured to override the global setting to use dynamic channel and transmit power assignment<br />
for either 5 or 2.4 GHz depending on which band is to be utilized.<br />
Other access points enabled can be enabled for Auto RF and workaround the access points that are statically configured.<br />
This may be necessary if there is an intermittent interferer present in an area.<br />
Enable ClientLink if using 802.11n capable access points.<br />
CleanAir should be enabled if using capable access points (i.e. <strong>Cisco</strong> Aironet 3500 Series).<br />
<strong>Cisco</strong> <strong>Unified</strong> <strong>Wireless</strong> <strong>IP</strong> <strong>Phone</strong> <strong>7921G</strong> Series <strong>Deployment</strong> <strong>Guide</strong> 58
EDCA Parameters<br />
Set the EDCA profile for “Voice Optimized” and disable “Low Latency MAC” for either 5 or 2.4 GHz depending on which<br />
band is to be utilized.<br />
Low Latency MAC (LLM) reduces the number of retransmissions to 2-3 per packet depending on the access point platform, so<br />
it can cause issues if multiple data rates are enabled.<br />
LLM is not supported on the <strong>Cisco</strong> 802.11n access points.<br />
DFS (802.11h)<br />
In the DFS (802.11h) configuration, channel announcement and quite mode should be enabled.<br />
Power constraint should be left un-configured or set to 0 dBm as DTPC will be used by the <strong>Cisco</strong> <strong>Unified</strong> <strong>Wireless</strong> <strong>IP</strong> <strong>Phone</strong><br />
<strong>7921G</strong> to control the transmission power.<br />
In later versions of the <strong>Cisco</strong> <strong>Unified</strong> <strong>Wireless</strong> LAN Controller it does not allow both TPC (Power Constraint) and DTPC<br />
(Dynamic Transmit Power Control) to be enabled simultaneously.<br />
<strong>Cisco</strong> <strong>Unified</strong> <strong>Wireless</strong> <strong>IP</strong> <strong>Phone</strong> <strong>7921G</strong> Series <strong>Deployment</strong> <strong>Guide</strong> 59
Call Admission Control Settings<br />
Enable Call Admission Control (TSPEC) for Voice and configure maximum bandwidth and reserved roaming bandwidth<br />
percentages for either 5 or 2.4 GHz depending on which band is to be utilized.<br />
Maximum bandwidth default setting for voice is 75% where 6% of that bandwidth is reserved for roaming clients.<br />
Roaming clients are not limited to using the reserved roaming bandwidth, but is to reserve some bandwidth in case all other<br />
bandwidth is utilized.<br />
Will want to ensure load-based CAC is enabled, which is available in the 4.1 release for the <strong>Cisco</strong> <strong>Unified</strong> <strong>Wireless</strong> LAN<br />
Controller, but not currently available on the autonomous access point platform.<br />
Load-based CAC will account for non-TSPEC clients as well as other energy on the channel.<br />
Enable Traffic Stream Metrics (TSM).<br />
<strong>Cisco</strong> <strong>Unified</strong> <strong>Wireless</strong> <strong>IP</strong> <strong>Phone</strong> <strong>7921G</strong> Series <strong>Deployment</strong> <strong>Guide</strong> 60
Call Admission Control for Video should be disabled.<br />
<strong>Cisco</strong> <strong>Unified</strong> <strong>Wireless</strong> <strong>IP</strong> <strong>Phone</strong> <strong>7921G</strong> Series <strong>Deployment</strong> <strong>Guide</strong> 61
After enabling Call Admission Control, the following configuration should be enabled, which can be displayed in the “show<br />
run-config”.<br />
Call Admision Control (CAC) configuration<br />
Voice AC - Admission control (ACM)............ Enabled<br />
Voice max RF bandwidth........................ 75<br />
Voice reserved roaming bandwidth.............. 6<br />
Voice load-based CAC mode..................... Enabled<br />
Voice tspec inactivity timeout................ Disabled<br />
Video AC - Admission control (ACM)............ Disabled<br />
Voice Stream-Size............................. 84000<br />
Voice Max-Streams............................. 2<br />
Video max RF bandwidth........................ 25<br />
Video reserved roaming bandwidth.............. 6<br />
The voice stream-size and voice max-streams values can be adjusted as necessary by using the following command.<br />
config 802.11a cac voice stream-size 84000 max-streams 2<br />
Ensure QoS is setup correctly under the WLAN / SSID configuration, which can be displayed via “show wlan ”.<br />
Quality of Service............................... Platinum (voice)<br />
WMM.............................................. Allowed<br />
Dot11-<strong>Phone</strong> Mode (7920).......................... ap-cac-limit<br />
Wired Protocol................................... 802.1P (Tag=6)<br />
When enabling Call Admission Control on the autonomous access point, the admission must be unblocked on the SSID as well.<br />
It is required to enable Call Admission Control on the SSID configuration, regardless of Admission Control being enabled for<br />
Voice or Video.<br />
Load-based CAC and support for multiple streams are not present on the autonomous access points therefore it is not<br />
recommended to enable CAC on autonomous access points.<br />
The autonomous access point only allows for 1 stream and the stream size is not customizable, therefore SRTP and barge will<br />
not work if CAC is enabled.<br />
dot11 ssid voice<br />
vlan 21<br />
authentication open eap eap_methods<br />
authentication network-eap eap_methods<br />
authentication key-management wpa cckm<br />
admit-traffic<br />
Also ensure that the PHY rate configured on the <strong>Cisco</strong> <strong>Unified</strong> <strong>Wireless</strong> <strong>IP</strong> <strong>Phone</strong> <strong>7921G</strong> is enabled as a nominal rate in the<br />
STREAM configuration of the autonomous access point.<br />
Recommend to use the defaults, where 5.5, 6.0, 11.0, 12.0 and 24.0 Mbps are enabled as nominal rates for 802.11b/g and 6.0,<br />
12.0 and 24.0 Mbps enabled for 802.11a.<br />
<strong>Cisco</strong> <strong>Unified</strong> <strong>Wireless</strong> <strong>IP</strong> <strong>Phone</strong> <strong>7921G</strong> Series <strong>Deployment</strong> <strong>Guide</strong> 62
If enabling the STREAM feature either directly or via selecting “Optimized Voice” for the radio access category in the QoS<br />
configuration section, ensure that only voice packets (RTP) are being put into the voice queue. Signaling packets (SCCP)<br />
should be put into a separate queue. This can be ensured by setting up a QoS policy mapping the DSCP to the correct queue.<br />
For more information about Call Admission Control and QoS, refer to the “Configuring QoS” chapter in the <strong>Cisco</strong> IOS<br />
Software Configuration <strong>Guide</strong> for <strong>Cisco</strong> Aironet Access Points at this URL:<br />
http://www.cisco.com/en/US/docs/wireless/access_point/12.3_8_JA/configuration/guide/s38qos.html<br />
Configuring QoS Basic Service Set (QBSS)<br />
There are three different versions of QoS Basic Service Set (QBSS) that the <strong>Cisco</strong> <strong>Unified</strong> <strong>Wireless</strong> <strong>IP</strong> <strong>Phone</strong> <strong>7921G</strong> supports.<br />
The first version from <strong>Cisco</strong> was on a 0-100 scale and was not based on clear channel assessment (CCA), so it does not account<br />
for channel utilization, but only the 802.11 traffic traversing that individual access point’s radio. So it does not account for<br />
other 802.11 energy or interferers using the same frequencies. The max threshold is defined on the client side, which is set to<br />
45. This would allow for up to 7 calls at 11 Mbps plus some background traffic.<br />
QBSS is also a part of 802.11e, which is on a 0-255 scale and is CCA based. So this gives a true representation on how busy<br />
the channel is. The max threshold is also defined on the client side, which is set to 105.<br />
The second version from <strong>Cisco</strong> is based on the 802.11e version, but allows the default max threshold of 105 to be optionally<br />
configured.<br />
Each version of QBSS can be optionally be configured on the access point.<br />
For the <strong>Cisco</strong> <strong>Unified</strong> <strong>Wireless</strong> LAN Controller, enabling WMM will enable the 802.11e version of QBSS. There are also the<br />
“7920 Client CAC” and “7920 AP CAC” options, where “7920 Client CAC” will enable <strong>Cisco</strong> version 1 and “7920 AP<br />
CAC” enables <strong>Cisco</strong> version 2. See the “SSID / WLAN QoS Settings” section for more info.<br />
For the <strong>Cisco</strong> Autonomous Access Point, “dot11 phone” or “dot11 phone dot11e” will enable QBSS.<br />
“Dot11 phone” will enable the 2 <strong>Cisco</strong> versions, where “dot11 phone dot11e” will enable both CCA versions (802.11e and<br />
<strong>Cisco</strong> version 2). It is recommended to enable “dot11 phone dot11e”.<br />
<strong>Cisco</strong> <strong>Unified</strong> <strong>Wireless</strong> <strong>IP</strong> <strong>Phone</strong> <strong>7921G</strong> Series <strong>Deployment</strong> <strong>Guide</strong> 63
Below are the commands to change the QBSS max threshold for each platform type.<br />
<strong>Cisco</strong> <strong>Unified</strong> <strong>Wireless</strong> LAN Controller = “config advanced 802.11b 7920VSIEConfig call-admission-limit ”<br />
<strong>Cisco</strong> Autonomous Access Point = “dot11 phone cac-thresh ”<br />
Configuring Auto-Immune<br />
It is recommended to disable the Auto-Immune feature on the <strong>Cisco</strong> <strong>Unified</strong> <strong>Wireless</strong> LAN Controller.<br />
The Auto-Immune feature was introduced in the 4.2.176.0 release, which was enabled by default and non-configurable.<br />
As of the 4.2.207.0, 5.2.193.0 and 6.0.182.0 releases this feature is disabled by default but can be enabled optionally.<br />
To view the Auto-Immune configuration on the <strong>Cisco</strong> <strong>Unified</strong> <strong>Wireless</strong> LAN Controller, telnet or SSH to the controller and<br />
enter the following command.<br />
(<strong>Cisco</strong> Controller) >show wps summary<br />
Auto-Immune<br />
<strong>Cisco</strong> <strong>Unified</strong> <strong>Wireless</strong> <strong>IP</strong> <strong>Phone</strong> <strong>7921G</strong> Series <strong>Deployment</strong> <strong>Guide</strong> 64
Auto-Immune.................................... Disabled<br />
Client Exclusion Policy<br />
Excessive 802.11-association failures.......... Enabled<br />
Excessive 802.11-authentication failures....... Enabled<br />
Excessive 802.1x-authentication................ Enabled<br />
<strong>IP</strong>-theft....................................... Enabled<br />
Excessive Web authentication failure........... Enabled<br />
Signature Policy<br />
Signature Processing........................... Enabled<br />
To disable the Auto-Immune feature on the <strong>Cisco</strong> <strong>Unified</strong> <strong>Wireless</strong> LAN Controller, telnet or SSH to the controller and enter<br />
the following command.<br />
(<strong>Cisco</strong> Controller) >config wps auto-immune disable<br />
Configuring the WLAN Controller EAP-Request and EAPOL-Key Timeouts<br />
If using EAP, the EAP-Request Timeout on the <strong>Cisco</strong> <strong>Unified</strong> <strong>Wireless</strong> LAN Controller should be set to at least 20 seconds.<br />
In later versions of <strong>Cisco</strong> <strong>Unified</strong> <strong>Wireless</strong> LAN Controller software, the default EAP-Request Timeout was changed from 2 to<br />
30 seconds.<br />
The default timeout on the <strong>Cisco</strong> ACS server is 20 seconds.<br />
To view the EAP configuration on the <strong>Cisco</strong> <strong>Unified</strong> <strong>Wireless</strong> LAN Controller, telnet or SSH to the controller and enter the<br />
following command.<br />
(<strong>Cisco</strong> Controller) >show advanced eap<br />
EAP-Identity-Request Timeout (seconds)........... 30<br />
EAP-Identity-Request Max Retries................. 2<br />
EAP Key-Index for Dynamic WEP.................... 0<br />
EAP Max-Login Ignore Identity Response........... enable<br />
EAP-Request Timeout (seconds).................... 30<br />
EAP-Request Max Retries.......................... 2<br />
EAPOL-Key Timeout (milliseconds)...................... 1000<br />
EAPOL-Key Max Retries............................ 2<br />
To change the EAP-Request Timeout on the <strong>Cisco</strong> <strong>Unified</strong> <strong>Wireless</strong> LAN Controller, telnet or SSH to the controller and enter<br />
the following command.<br />
(<strong>Cisco</strong> Controller) >config advanced eap request-timeout 30<br />
<strong>Cisco</strong> <strong>Unified</strong> <strong>Wireless</strong> <strong>IP</strong> <strong>Phone</strong> <strong>7921G</strong> Series <strong>Deployment</strong> <strong>Guide</strong> 65
As of 6.0.182.0 release, the EAPOL-Key Timeout is configurable in milliseconds, where in previous releases it was only<br />
allowed to be configured in seconds.<br />
It is recommended to set the EAPOL_Key timeout to 200 milliseconds.<br />
The EAPOL-Key Timeout should not exceed 1 second (1000 milliseconds).<br />
Configuring Proxy ARP<br />
To advertise the proxy ARP information element, ensure that Aironet extensions are enabled.<br />
Ensure proxy ARP is enabled, where ARP Unicast Mode will be displayed as disabled on the <strong>Cisco</strong> <strong>Unified</strong> <strong>Wireless</strong> LAN<br />
Controller.<br />
Telnet or SSH to the controller and enter “show network” or “show network summary” depending on the <strong>Cisco</strong> <strong>Unified</strong><br />
<strong>Wireless</strong> LAN Controller version.<br />
If ARP Unicast Mode is enabled, enter “config network arpunicast disable”.<br />
As of the 5.1.151.0 release, proxy ARP is always enabled and non-configurable.<br />
For autonomous access points, enter “dot11 arp-cache optional”.<br />
<strong>Cisco</strong> <strong>Unified</strong> <strong>Wireless</strong> <strong>IP</strong> <strong>Phone</strong> <strong>7921G</strong> Series <strong>Deployment</strong> <strong>Guide</strong> 66
Configuring TK<strong>IP</strong> Countermeasure Holdoff Time<br />
TK<strong>IP</strong> countermeasure mode can occur if the Access Point receives two message integrity check (MIC) errors within a 60<br />
second period. When this occurs, the Access Point will de-authenticate all TK<strong>IP</strong> clients associated to that 802.11 radio and<br />
holdoff any clients for the countermeasure holdoff time (default = 60 seconds).<br />
To change the TK<strong>IP</strong> countermeasure holdoff time on the <strong>Cisco</strong> <strong>Unified</strong> <strong>Wireless</strong> LAN Controller, telnet or SSH to the<br />
controller and enter the following command:<br />
(<strong>Cisco</strong> Controller) >config wlan security tkip hold-down <br />
For the autonomous Access Point, enter the time in seconds to holdoff clients if a TK<strong>IP</strong> countermeasure event occurs.<br />
Interface dot11radio X<br />
countermeasure tkip hold-time <br />
For more information about these topics, refer to the Enterprise Mobility Design <strong>Guide</strong> at this URL:<br />
http://www.cisco.com/en/US/docs/solutions/Enterprise/Mobility/emob41dg/eMob4.1.pdf<br />
VLANs and Autonomous Access Points<br />
Segment wireless voice and data into separate VLANs.<br />
When using autonomous access points, use a dedicated native VLAN. Autonomous access points use Inter-Access Point<br />
Protocol (IAPP), which is a multicast protocol.<br />
For the native VLAN, it is recommend not to use VLAN 1 to ensure that IAPP packets are exchanged successfully.<br />
Ensure that Public Secure Packet Forwarding (PSPF) is not enabled for the voice VLAN as this will prevent clients from<br />
communicating directly when associated to the same access point. If PSPF is enabled, then the result will be no way audio.<br />
The network ID in the SSID configuration, should only be disabled if Layer 3 mobility is enabled where the <strong>Wireless</strong> LAN<br />
Services Module (WLSM) is deployed.<br />
Configuring the <strong>Cisco</strong> <strong>Unified</strong> <strong>Wireless</strong> <strong>IP</strong> <strong>Phone</strong> <strong>7921G</strong><br />
There are three methods for configuring network settings on the <strong>Cisco</strong> <strong>Unified</strong> <strong>Wireless</strong> <strong>IP</strong> <strong>Phone</strong> <strong>7921G</strong>:<br />
Configuring <strong>Phone</strong>s with the Keypad<br />
The network profiles can be configured by navigating to Settings > Network Profiles.<br />
It may be required to unlock the screen by pressing **#.<br />
For more information, refer to the “Configuring Settings on the <strong>Cisco</strong> <strong>Unified</strong> <strong>Wireless</strong> <strong>IP</strong> <strong>Phone</strong> <strong>7921G</strong>” in the<br />
<strong>Cisco</strong> <strong>Unified</strong> <strong>Wireless</strong> <strong>IP</strong> <strong>Phone</strong> <strong>7921G</strong> Administration <strong>Guide</strong> at this URL:<br />
http://www.cisco.com/en/US/products/hw/phones/ps379/prod_maintenance_guides_list.html<br />
<strong>Cisco</strong> <strong>Unified</strong> <strong>Wireless</strong> <strong>IP</strong> <strong>Phone</strong> <strong>7921G</strong> Series <strong>Deployment</strong> <strong>Guide</strong> 67
Configuring <strong>Phone</strong>s with the Web Interface<br />
The <strong>Cisco</strong> <strong>Unified</strong> <strong>Wireless</strong> <strong>IP</strong> <strong>Phone</strong> <strong>7921G</strong> has an HTTPS enabled web interface that can be accessed via the 802.11a/b/g<br />
radio or USB.<br />
If using USB, then set a static <strong>IP</strong> on the PC’s USB network interface (i.e. 192.168.1.X /24). By default, the <strong>Cisco</strong> <strong>Unified</strong><br />
<strong>Wireless</strong> <strong>IP</strong> <strong>Phone</strong> <strong>7921G</strong> USB is statically set to 192.168.1.100 /24.<br />
In order to make configuration changes via the web interface, then web access must be set to “Full”, which will also enable a<br />
few additional menus.<br />
Log into the administration web pages by using these defaults:<br />
username = “admin” / password = “<strong>Cisco</strong>”<br />
Note: It is not recommended to use the 192.168.1.0 /24 network for the wireless LAN interface as that network is used by the<br />
USB interface by default. If wanting to use the 192.168.1.0 /24 network for the wireless LAN, then either change the USB <strong>IP</strong><br />
address on the phone or do not charge the phone via USB.<br />
Configuring <strong>Phone</strong>s with Wavelink Avalanche<br />
Wavelink Avalanche is a comprehensive management solution for the <strong>Wireless</strong> LAN enterprise providing complete visibility<br />
and control of <strong>Wireless</strong> LAN infrastructure and mobile client devices from a central console.<br />
Wavelink Avalanche eases the configuration, deployment and management of <strong>Wireless</strong> LAN networks while offering extensive<br />
flexibility through the support of a wide range of mobile devices and infrastructure.<br />
Refer to the Wavelink section below for more info.<br />
For more information, refer to the “Using the <strong>Cisco</strong> <strong>Unified</strong> <strong>Wireless</strong> <strong>IP</strong> <strong>Phone</strong> <strong>7921G</strong> Web Pages” in the<br />
<strong>Cisco</strong> <strong>Unified</strong> <strong>Wireless</strong> <strong>IP</strong> <strong>Phone</strong> <strong>7921G</strong> Administration <strong>Guide</strong> at this URL:<br />
http://www.cisco.com/en/US/products/hw/phones/ps379/prod_maintenance_guides_list.html<br />
Configuring the Network Profile Parameters<br />
Use the following guidelines to configure network profiles.<br />
• The <strong>Cisco</strong> <strong>Unified</strong> <strong>Wireless</strong> <strong>IP</strong> <strong>Phone</strong> <strong>7921G</strong> supports multiple network profiles that allow one SSID per network<br />
profile. 0 length SSIDs are not allowed.<br />
• 5 different 802.11 modes are available.<br />
<br />
Auto-RSSI<br />
802.11a<br />
<br />
<br />
<br />
802.11b/g<br />
Auto-a<br />
Auto-b/g<br />
• As of the 1.3(3) release, Auto-a is the default 802.11 mode, so it will scan both 2.4 and 5 GHz channels and attempt to<br />
on the 5 GHz band if the configured network is available.<br />
• In previous releases, the <strong>Cisco</strong> <strong>Unified</strong> <strong>Wireless</strong> <strong>IP</strong> <strong>Phone</strong> <strong>7921G</strong> would default to Auto-RSSI mode, which would<br />
attempt to associate to the access point with the strongest signal.<br />
<strong>Cisco</strong> <strong>Unified</strong> <strong>Wireless</strong> <strong>IP</strong> <strong>Phone</strong> <strong>7921G</strong> Series <strong>Deployment</strong> <strong>Guide</strong> 68
• 802.11a mode will only scan 5 GHz channels and 802.11b/g mode will only scan 2.4 GHz channels, where it will then<br />
attempt to associate to an access point if the configured network is available.<br />
• For Auto-a and Auto-b/g modes, this is giving preference to one band over another. At power on, will scan all 2.4 and<br />
5 GHz channels then attempt to associate to an access point for the configured network using the preferred band if<br />
available. If the preferred band is not available, then the <strong>Cisco</strong> <strong>Unified</strong> <strong>Wireless</strong> <strong>Phone</strong> <strong>7921G</strong> will try to use the less<br />
preferred band if available. If the phone roams out of coverage of the preferred band, where the less preferred band<br />
signal is available, then the phone will attempt to associate to that less preferred band.<br />
• To extend battery life, ensure the call power save mode is configured for U-APSD/PS-POLL mode to utilize power<br />
save mode during active calls.<br />
• Active mode “None” may need to be used instead of U-APSD/PS-POLL if the access point does not support power<br />
save enabled clients.<br />
• As of the 1.3(3) release, the Prompt Mode feature can be optionally enabled. When enabled, the password will not be<br />
stored in flash, but only in memory after entering manually after each power on sequence for seamless roaming.<br />
However, the username can be stored after entering at the prompt, but can be overridden at the next login. If the<br />
prompt is dismissed, then there is a “Login” softkey presented in order to invoke the login process. The Prompt Mode<br />
feature is only supported with Network Profile 1. If multiple network profiles are enabled and Prompt Mode is<br />
enabled, then the user would have to dismiss the login in order to switch to other enabled network profiles.<br />
• Below are the available security modes supported and which key management and encryption types can be used for<br />
each mode.<br />
Security Mode Key Management Encryption<br />
Open N/A N/A<br />
Open+WEP Static WEP (40 or 128 bit)<br />
Shared Key Static WEP (40 or 128 bit)<br />
LEAP 802.1x, WPA, WPA2 TK<strong>IP</strong>, AES, WEP (40 or 128 bit)<br />
EAP-FAST 802.1x, WPA, WPA2 TK<strong>IP</strong>, AES, WEP (40 or 128 bit)<br />
EAP-TLS 802.1x, WPA, WPA2 TK<strong>IP</strong>, AES, WEP (40 or 128 bit)<br />
PEAP 802.1x, WPA, WPA2 TK<strong>IP</strong>, AES, WEP (40 or 128 bit)<br />
AKM 802.1x, WPA, WPA2, WPA-PSK, WPA2-PSK TK<strong>IP</strong>, AES, WEP (40 or 128 bit)<br />
Open with WEP and Shared Key security modes require that the static WEP settings be entered.<br />
Key Style Key Size Characters<br />
ASCII 40 5<br />
ASCII 128 13<br />
HEX 40 10 (0-9, A-F)<br />
HEX 128 26 (0-9, A-F)<br />
<strong>Cisco</strong> <strong>Unified</strong> <strong>Wireless</strong> <strong>IP</strong> <strong>Phone</strong> <strong>7921G</strong> Series <strong>Deployment</strong> <strong>Guide</strong> 69
• The AKM security mode is an auto authentication mode that can use either LEAP for 802.1x authentication or<br />
WPA Pre-Shared Key.<br />
• If using 802.11i (Pre-Shared key), enter the ASCII or hexadecimal formatted key.<br />
Pre-Shared Key requires that a passphrase be entered in ASCII or hexadecimal format.<br />
ASCII = 8-63 characters<br />
HEX = 64 characters (0-9,A-F)<br />
• AKM mode requires a key management type to be enabled on the Access Point.<br />
For 802.1x authentication methods, WPA, WPA2 or CCKM is required.<br />
For non-802.1x authentication, WPA-PSK or WPA2-PSK is required.<br />
• If using open authentication plus WEP encryption or shared key authentication, enter the static WEP key<br />
information that matches the access point configuration.<br />
Note: CCKM will be negotiated if enabled on the Access Point when using 802.1x authentication with LEAP, EAP-FAST,<br />
EAP-TLS, PEAP or AKM modes.<br />
WEP with AKM is only applicable with 802.1x authentication (not WPA-PSK).<br />
If using 802.1x authentication via LEAP, EAP-FAST, PEAP or AKM (authenticated key-management) authentication modes,<br />
then a username and password must be configured. AKM mode will use LEAP as the 802.1x method.<br />
• Select whether to use Dynamic Host Configuration Protocol (DHCP) or configure static <strong>IP</strong> information.<br />
• If option 150 or 66 is not configured to provide the TFTP server <strong>IP</strong> address via the network’s DHCP scope, then enter<br />
the TFTP server <strong>IP</strong> address info.<br />
• To enable PEAP with server validation, select “Validate Server Certificate” after importing the authentication server<br />
certificate.<br />
• When using EAP-TLS, select either “Manufacturing Issued” or “User Installed” for the “Client EAP-TLS<br />
Certificate” option after selecting EAP-TLS.<br />
Note: WEP128 is listed as WEP104 on the <strong>Cisco</strong> <strong>Unified</strong> <strong>Wireless</strong> LAN Controllers.<br />
<strong>Cisco</strong> <strong>Unified</strong> <strong>Wireless</strong> <strong>IP</strong> <strong>Phone</strong> <strong>7921G</strong> Series <strong>Deployment</strong> <strong>Guide</strong> 70
<strong>Cisco</strong> <strong>Unified</strong> <strong>Wireless</strong> <strong>IP</strong> <strong>Phone</strong> <strong>7921G</strong> Series <strong>Deployment</strong> <strong>Guide</strong> 71
Note: If the TFTP <strong>IP</strong> is changed which is not included in the current Certificate Trust List (CTL) file, then TFTP will fail and<br />
may prevent the phone from registering successfully to the <strong>Cisco</strong> <strong>Unified</strong> Communications Manager. The CTL file will need to<br />
be erased manually in the Security Configuration menu from the <strong>Cisco</strong> <strong>Unified</strong> <strong>Wireless</strong> <strong>IP</strong> <strong>Phone</strong> <strong>7921G</strong>.<br />
Configuring Advanced Network Profile Settings<br />
In the Advanced Network Profile settings, the minimum PHY rate can be adjusted. If 12 Mbps is not enabled in the wireless<br />
LAN, then this parameter may need to be configured or enable 12 Mbps on the access point.<br />
Antenna diversity can also be configured as necessary.<br />
By limiting number of channels to be scanned, this can help reduce the time for access point discovery while passively scanning<br />
DFS channels in 802.11a mode. This can also help preserve battery life.<br />
If using this feature, then only disable those channels that are not used in the wireless LAN. If a channel is disabled that is<br />
currently used by an access point, then the <strong>Cisco</strong> <strong>Unified</strong> <strong>Wireless</strong> <strong>IP</strong> <strong>Phone</strong> <strong>7921G</strong> might not associate to the wireless LAN<br />
successfully.<br />
If all channels that are used in the wireless LAN are disabled on the phone, then use one of these methods to browse to the<br />
<strong>Cisco</strong> <strong>Unified</strong> <strong>Wireless</strong> <strong>IP</strong> <strong>Phone</strong> <strong>7921G</strong> webpage:<br />
• USB cable connected to the PC where full web access was previously enabled<br />
• Re-enable all channels by using the factory default<br />
<strong>Cisco</strong> <strong>Unified</strong> <strong>Wireless</strong> <strong>IP</strong> <strong>Phone</strong> <strong>7921G</strong> Series <strong>Deployment</strong> <strong>Guide</strong> 72
<strong>Cisco</strong> <strong>Unified</strong> <strong>Wireless</strong> <strong>IP</strong> <strong>Phone</strong> <strong>7921G</strong> Series <strong>Deployment</strong> <strong>Guide</strong> 73
Installing Certificates<br />
The <strong>Cisco</strong> <strong>Unified</strong> <strong>Wireless</strong> <strong>IP</strong> <strong>Phone</strong> <strong>7921G</strong> supports DER encoded binary X.509 certificates, which can be utilized with EAP-<br />
TLS or for authentication server validation when using PEAP (MS-CHAPv2).<br />
Extensible Authentication Protocol Transport Layer Security (EAP-TLS) is using the TLS protocol with PKI to secure<br />
communications to the authentication server.<br />
TLS provides a way to use certificates for both user and server authentication and for dynamic session key generation.<br />
EAP-TLS provides excellent security, but requires client certificate management.<br />
Microsoft Certificate Authority (CA) servers are recommended as we have certified interoperability only with those CA types.<br />
Other CA server types may not be completely interoperable with the <strong>Cisco</strong> <strong>Unified</strong> <strong>Wireless</strong> <strong>IP</strong> <strong>Phone</strong> <strong>7921G</strong>.<br />
Can utilize either the internal MIC (Manufacturing Installed Certificate) or install a User Installed certificate to be used for<br />
authentication.<br />
To use the MIC in the <strong>Cisco</strong> <strong>Unified</strong> <strong>Wireless</strong> <strong>IP</strong> <strong>Phone</strong> <strong>7921G</strong>, the Manufacturing Root and Manufacturing CA certificates<br />
must be exported and installed onto the RADIUS server.<br />
After selecting “Export”, import the certificates into the RADIUS server and enable them in the certificate trust list.<br />
For the user installed certificate method, select “Install” on the main certificates page, which will launch the installation wizard.<br />
To generate the certificate signing request, enter the certificate information and import the certificate from the Certificate<br />
Authority (CA) server that is signing the certificate. The signing CA root certificate is used for validation purposes to ensure<br />
that the user certificate was indeed signed by the correct CA.<br />
The Common Name defaults to “CP-<strong>7921G</strong>-SEP”, but can be customized, but must not be greater than 32<br />
characters.<br />
<strong>Cisco</strong> <strong>Unified</strong> <strong>Wireless</strong> <strong>IP</strong> <strong>Phone</strong> <strong>7921G</strong> Series <strong>Deployment</strong> <strong>Guide</strong> 74
Browse to the Certificate Authority certificate and select “Submit”.<br />
Only certificates with a key size of 1024 or 2048 are supported.<br />
Certificates dated January 1 2038 and later are not supported.<br />
After “Submit” is selected, the certificate will then be generated.<br />
The certificate will then be displayed and is now ready to be signed.<br />
Select all of the certificate data in order to copy it to the Certificate Authority server to be signed.<br />
<strong>Cisco</strong> <strong>Unified</strong> <strong>Wireless</strong> <strong>IP</strong> <strong>Phone</strong> <strong>7921G</strong> Series <strong>Deployment</strong> <strong>Guide</strong> 75
Select the method to submit a certificate request by using a base-64 encoded PKCS file.<br />
Paste the certificate data from the <strong>Cisco</strong> <strong>Unified</strong> <strong>Wireless</strong> <strong>IP</strong> <strong>Phone</strong> <strong>7921G</strong> to the Certificate Authority signing server and<br />
submit for signing.<br />
When the certificate has been signed, download the CA certificate in DER encoded format (base 64 encoded certificates are not<br />
supported).<br />
<strong>Cisco</strong> <strong>Unified</strong> <strong>Wireless</strong> <strong>IP</strong> <strong>Phone</strong> <strong>7921G</strong> Series <strong>Deployment</strong> <strong>Guide</strong> 76
Ensure Client Authentication is listed in the Enhanced Key Usage section of the certificate details.<br />
After selecting “Import Step”, browse to the signed user certificate and select “Import” to complete the process.<br />
<strong>Cisco</strong> <strong>Unified</strong> <strong>Wireless</strong> <strong>IP</strong> <strong>Phone</strong> <strong>7921G</strong> Series <strong>Deployment</strong> <strong>Guide</strong> 77
Once the certificate is installed successfully, a confirmation page will be displayed.<br />
The CA chain should already be enabled in the authentication server’s certificate trust list.<br />
The authentication server certificate must also be imported into the <strong>Cisco</strong> <strong>Unified</strong> <strong>Wireless</strong> <strong>IP</strong> <strong>Phone</strong> <strong>7921G</strong> for both the MIC<br />
and User Installed methods. If the authentication server certificate was signed by a Certificate Authority (CA) server, then that<br />
DER encoded root certificate will need to be imported into the <strong>Cisco</strong> <strong>Unified</strong> <strong>Wireless</strong> <strong>IP</strong> <strong>Phone</strong> <strong>7921G</strong>.<br />
If the <strong>Cisco</strong> <strong>Unified</strong> <strong>Wireless</strong> <strong>IP</strong> <strong>Phone</strong> <strong>7921G</strong> has not registered to a <strong>Cisco</strong> <strong>Unified</strong> Communications Manager yet, then the date<br />
and time must be configured manually for the first time.<br />
<strong>Cisco</strong> <strong>Unified</strong> <strong>Wireless</strong> <strong>IP</strong> <strong>Phone</strong> <strong>7921G</strong> Series <strong>Deployment</strong> <strong>Guide</strong> 78
The <strong>Cisco</strong> <strong>Unified</strong> <strong>Wireless</strong> <strong>IP</strong> <strong>Phone</strong> <strong>7921G</strong> must be restarted after installing the certificate.<br />
Click on the hyperlink to navigate to the “<strong>Phone</strong> Restart” page.<br />
<strong>Cisco</strong> <strong>Unified</strong> <strong>Wireless</strong> <strong>IP</strong> <strong>Phone</strong> <strong>7921G</strong> Series <strong>Deployment</strong> <strong>Guide</strong> 79
Click the “Restart” button to power cycle the phone.<br />
Using Templates to Configure <strong>Phone</strong>s<br />
<strong>Phone</strong> configuration templates can be exported and imported to other phones for quick configuration. The phone configuration<br />
template will be encrypted using the specified encryption key (8-20 characters).<br />
In order to access the Backup Settings menu, the web access must be set to “Full”.<br />
For security reasons, the <strong>Wireless</strong> LAN security information (Username/Password, WPA Pre-shared key information, and WEP<br />
key information) is not exported by default. In order to export this <strong>Wireless</strong> LAN security information, the network profile<br />
must be configured to allow this capability. For each network profile where the <strong>Wireless</strong> LAN security information is to be<br />
exported, configure the “Export Security Credentials” option to “True”. After selecting “True”, the <strong>Wireless</strong> LAN security<br />
information will need to be re-entered. This will then allow that information to be exported and then imported to other <strong>Cisco</strong><br />
<strong>Unified</strong> <strong>Wireless</strong> <strong>IP</strong> <strong>Phone</strong> <strong>7921G</strong> phones.<br />
Upgrading <strong>Phone</strong> Firmware<br />
There are two methods for upgrading the <strong>Cisco</strong> <strong>Unified</strong> <strong>Wireless</strong> <strong>IP</strong> <strong>Phone</strong> <strong>7921G</strong> firmware, which is either via wireless TFTP<br />
or the phone web interface.<br />
<strong>Wireless</strong> TFTP<br />
<strong>Cisco</strong> <strong>Unified</strong> <strong>Wireless</strong> <strong>IP</strong> <strong>Phone</strong> <strong>7921G</strong> Series <strong>Deployment</strong> <strong>Guide</strong> 80
To upgrade the phone firmware, run the executable for <strong>Cisco</strong> <strong>Unified</strong> Communications Manager version 4.1, 4,2 and 4.3 or<br />
install the COP file for versions 5.0, 5.1, 6.0, 6.1, 7.0, 7.1, 8.0 and later.<br />
For information on how to install the COP file on CM versions 5.0 and later, refer to the <strong>Cisco</strong> <strong>Unified</strong> Communications<br />
Manager Operating System Administrator <strong>Guide</strong> at this URL:<br />
http://www.cisco.com/en/US/docs/voice_ip_comm/cucm/cucos/7_1_2/cucos/iptpch7.html<br />
During TFTP server download, the phone configuration file is parsed and the device load is identified. The phone<br />
downloads the firmware files to flash if it is not running the specified image already.<br />
<strong>Cisco</strong> <strong>Unified</strong> Communications Manager device load takes precedence over the TFTP firmware version.<br />
The Load Server can be specified as an alternate TFTP server to retrieve firmware files in the <strong>Cisco</strong> <strong>Unified</strong> <strong>Wireless</strong> <strong>IP</strong> <strong>Phone</strong><br />
<strong>7921G</strong> product specific configuration in <strong>Cisco</strong> <strong>Unified</strong> Communications Manager Administration.<br />
To install the firmware on <strong>Cisco</strong> <strong>Unified</strong> Communications Manager Express, extract the contents of the TAR file and upload<br />
into the router’s flash. Each file will need to be enabled for TFTP download. Configure the phone load and reset the phones to<br />
upgrade the firmware.<br />
Example below:<br />
tftp-server flash: CP<strong>7921G</strong>-1.4.1.LOADS<br />
tftp-server flash:APPS-1.4.1.SBN<br />
tftp-server flash:GUI-1.4.1.SBN<br />
tftp-server flash:SYS-1.4.1.SBN<br />
tftp-server flash:TNUX-1.4.1.SBN<br />
tftp-server flash:TNUXR-1.4.1.SBN<br />
tftp-server flash:WLAN-1.4.1.SBN<br />
!<br />
telephony-service<br />
load 7921 CP<strong>7921G</strong>-1.4.1.LOADS<br />
Web Interface<br />
The phone firmware can be upgraded via the web interface by navigating to <strong>Phone</strong> Upgrade and browsing to the firmware TAR<br />
file.<br />
In order to access the <strong>Phone</strong> Upgrade menu, the web access must be set to “Full”.<br />
Note: If the <strong>Cisco</strong> <strong>Unified</strong> <strong>Wireless</strong> <strong>IP</strong> <strong>Phone</strong> <strong>7921G</strong> registers to <strong>Cisco</strong> <strong>Unified</strong> Communications Manager, web access to the<br />
<strong>Cisco</strong> <strong>Unified</strong> <strong>Wireless</strong> <strong>IP</strong> <strong>Phone</strong> <strong>7921G</strong> gets set to read-only mode. In this mode, firmware upgrades via the web interface are<br />
not allowed.<br />
Ultimately the <strong>Cisco</strong> <strong>Unified</strong> <strong>Wireless</strong> <strong>IP</strong> <strong>Phone</strong> <strong>7921G</strong> will use what is set as the phone load in the <strong>Cisco</strong> <strong>Unified</strong><br />
Communications Manager.<br />
Wavelink Avalanche<br />
<strong>Cisco</strong> <strong>Unified</strong> <strong>Wireless</strong> <strong>IP</strong> <strong>Phone</strong> <strong>7921G</strong> Series <strong>Deployment</strong> <strong>Guide</strong> 81
The Wavelink Avalanche server <strong>IP</strong> address can be set either via DHCP option 149 or statically.<br />
To provide the server <strong>IP</strong> address automatically, configure option 149 on the DHCP server.<br />
ip dhcp pool 10.10.11.0<br />
network 10.10.11.0 255.255.255.0<br />
default-router 10.10.11.1<br />
dns-server 10.10.10.20<br />
domain-name cisco.com<br />
option 150 ip 10.10.10.22<br />
option 149 ip 10.10.11.128<br />
Custom parameters can also be set via the <strong>Cisco</strong> <strong>Unified</strong> <strong>Wireless</strong> <strong>IP</strong> <strong>Phone</strong> <strong>7921G</strong> web page in order to help group clients for<br />
better management.<br />
When clients register with the Wavelink server, they will appear in the console.<br />
To set client properties right click on the client and select “Client Settings”.<br />
<strong>Cisco</strong> <strong>Unified</strong> <strong>Wireless</strong> <strong>IP</strong> <strong>Phone</strong> <strong>7921G</strong> Series <strong>Deployment</strong> <strong>Guide</strong> 82
The <strong>Cisco</strong> <strong>Unified</strong> <strong>Wireless</strong> <strong>IP</strong> <strong>Phone</strong> <strong>7921G</strong> will have parameters enabled by default.<br />
EnablerVer = 3.11-01<br />
ModelName = CP<strong>7921G</strong><br />
Additional properties can be added as necessary for better client management.<br />
<strong>Cisco</strong> <strong>Unified</strong> <strong>Wireless</strong> <strong>IP</strong> <strong>Phone</strong> <strong>7921G</strong> Series <strong>Deployment</strong> <strong>Guide</strong> 83
Mobile Device Groups can be created to group clients based on client properties.<br />
Enter the selection criteria either manually or using the wizard after right clicking on the mobile device group and selecting<br />
“Settings”.<br />
<strong>Cisco</strong> <strong>Unified</strong> <strong>Wireless</strong> <strong>IP</strong> <strong>Phone</strong> <strong>7921G</strong> Series <strong>Deployment</strong> <strong>Guide</strong> 84
To install the <strong>7921G</strong> Configuration Utility for Wavelink Avalanche, select “Install Software Package” under the Software<br />
Management menu.<br />
Browse to the <strong>7921G</strong> Configuration Utility package file (i.e. 7921CU-1.2.1.AVA).<br />
Create a software collection to add the package to.<br />
The license agreement will be displayed, after selecting “Next”,<br />
Click on “Finish” when the installation is complete.<br />
Note: The 7921CU must be installed locally on the Wavelink Avalanche server.<br />
<strong>Cisco</strong> <strong>Unified</strong> <strong>Wireless</strong> <strong>IP</strong> <strong>Phone</strong> <strong>7921G</strong> Series <strong>Deployment</strong> <strong>Guide</strong> 85
The software package must then be enabled by right clicking on the package and selecting “Enable Package”.<br />
Selection collections can also be created with their own selection criteria to determine which clients should receive the software<br />
package.<br />
<strong>Cisco</strong> <strong>Unified</strong> <strong>Wireless</strong> <strong>IP</strong> <strong>Phone</strong> <strong>7921G</strong> Series <strong>Deployment</strong> <strong>Guide</strong> 86
To configure the software package, right click on the package and select “7921CU”.<br />
The <strong>7921G</strong> Configuration Utility will then be launched.<br />
<strong>Cisco</strong> <strong>Unified</strong> <strong>Wireless</strong> <strong>IP</strong> <strong>Phone</strong> <strong>7921G</strong> Series <strong>Deployment</strong> <strong>Guide</strong> 87
Enter the profile name and enable the profile.<br />
Configure the network profiles by specifying the <strong>Wireless</strong> LAN credentials.<br />
PEAP and EAP-TLS are not supported in the Configuration Utility for Wavelink.<br />
<strong>Cisco</strong> <strong>Unified</strong> <strong>Wireless</strong> <strong>IP</strong> <strong>Phone</strong> <strong>7921G</strong> Series <strong>Deployment</strong> <strong>Guide</strong> 88
Configure the network settings for the network profile.<br />
<strong>Cisco</strong> <strong>Unified</strong> <strong>Wireless</strong> <strong>IP</strong> <strong>Phone</strong> <strong>7921G</strong> Series <strong>Deployment</strong> <strong>Guide</strong> 89
Ensure that Wavelink server enable is set to “Yes”.<br />
Configure whether the client will get the Wavelink <strong>IP</strong> info from DHCP or configured statically.<br />
Optionally set additional client parameters as necessary.<br />
When the template has been completely configured, then select “Export to Wavelink” under the File menu.<br />
A confirmation will then be displayed after the template has been exported successfully.<br />
After the template has become available, will then need to push the package to the necessary clients.<br />
This can be done on a device group or client level.<br />
To update a single client, right click on it and select “Update Now”.<br />
Can also optionally set “Force package sync during Update Now” in the client properties.<br />
Using the Bulk <strong>Deployment</strong> Utility<br />
The Bulk <strong>Deployment</strong> Utility for the <strong>Cisco</strong> <strong>Unified</strong> <strong>Wireless</strong> <strong>IP</strong> <strong>Phone</strong> <strong>7921G</strong> is intended to help quicken the provisioning and<br />
deployment process of many phones when unique 802.1x accounts are used with EAP-FAST, PEAP (MS-CHAPv2) or LEAP<br />
or if a common set of credentials are used by all phones (i.e. WPA2-PSK or a common 802.1x account).<br />
The utility allows the creation configuration files, which can be exported then enabled for TFTP download by the <strong>Cisco</strong> <strong>Unified</strong><br />
<strong>Wireless</strong> <strong>IP</strong> <strong>Phone</strong> <strong>7921G</strong>.<br />
<strong>Cisco</strong> <strong>Unified</strong> <strong>Wireless</strong> <strong>IP</strong> <strong>Phone</strong> <strong>7921G</strong> Series <strong>Deployment</strong> <strong>Guide</strong> 90
This utility does not support certificate provisioning, which would be required in order to support server validation for PEAP or<br />
EAP-TLS.<br />
The utility does allow PEAP to be configured, but without the server validation option.<br />
The Bulk <strong>Deployment</strong> Utility supports up to 1000 entries per CSV for export. If more than 1000 phones are being deployed,<br />
then multiple CSV files will need to be created and imported.<br />
If doing a bulk export, the username and password is applied to network profile 1 only.<br />
Before exporting the TFTP downloadable configuration files, a template must be created containing the Network Profile, USB,<br />
Trace and Wavelink settings.<br />
Configure the Profile Name as necessary.<br />
Configure the network profile WLAN settings (SSID, 802.11 mode, Security Mode, WLAN credentials) to match the voice<br />
WLAN.<br />
If planning to use unique 802.1x accounts with the Bulk Export method, the username and password do not need to be<br />
configured, as that will be specified in the CSV file.<br />
By default, DHCP is enabled and is the recommended method, otherwise, would need a template per phone if planning to use<br />
static <strong>IP</strong> addressing.<br />
An alternate TFTP server can be set if the <strong>Cisco</strong> Communications Manager’s TFTP server <strong>IP</strong> is not set in option 150 for the<br />
DHCP scope.<br />
<strong>Cisco</strong> <strong>Unified</strong> <strong>Wireless</strong> <strong>IP</strong> <strong>Phone</strong> <strong>7921G</strong> Series <strong>Deployment</strong> <strong>Guide</strong> 91
Templates can be created for later use, by selecting File > Save As.<br />
Do not overwrite the “7921Cfg.xml” file as that is the default template used when the utility opens.<br />
<strong>Phone</strong> configuration files can be exported by either the Default Export method or the Bulk Export method.<br />
If a common set of credentials is to be used by all phones (i.e. WPA2-PSK or a common 802.1x account), then use the Default<br />
Export method.<br />
If unique 802.1x accounts are to be deployed, then use the Bulk Export method.<br />
<strong>Cisco</strong> <strong>Unified</strong> <strong>Wireless</strong> <strong>IP</strong> <strong>Phone</strong> <strong>7921G</strong> Series <strong>Deployment</strong> <strong>Guide</strong> 92
Default Export<br />
If needing to deploy the <strong>Cisco</strong> <strong>Unified</strong> <strong>Wireless</strong> <strong>IP</strong> <strong>Phone</strong> <strong>7921G</strong> with identical WLAN settings, then select the “Default<br />
Export” method.<br />
After selecting “Default Export” the utility will create a TFTP downloadable configuration file based on the common data<br />
entered, which is exported to the application install path (C:\Program Files\<strong>Cisco</strong> Systems\7921BD).<br />
A confirmation window will be displayed when the default TFTP downloadable config file has been exported successfully.<br />
The default file will be in the format of “WLANDefault.xml”, which the phone does a TFTP get for when it powers on or<br />
during re-provisioning.<br />
Bulk Export<br />
If needing to deploy the <strong>Cisco</strong> <strong>Unified</strong> <strong>Wireless</strong> <strong>IP</strong> <strong>Phone</strong> <strong>7921G</strong> with unique 802.1x accounts utilizing EAP-FAST, PEAP or<br />
LEAP, then select the “Bulk Export” method.<br />
The common data entered plus a CSV containing the phone MAC address, username and password will be used to create the<br />
template.<br />
After selecting “Bulk Export”, a prompt to display the CSV file will be presented.<br />
<strong>Cisco</strong> <strong>Unified</strong> <strong>Wireless</strong> <strong>IP</strong> <strong>Phone</strong> <strong>7921G</strong> Series <strong>Deployment</strong> <strong>Guide</strong> 93
Up to 1000 entries are supported per CSV file.<br />
The “userinfo.csv” file in the install path can be used as a template.<br />
MAC,Username,Password<br />
001e7abb19c8,admin,<strong>Cisco</strong><br />
Once the CSV file is imported, the utility will create TFTP downloadable configuration files for each phone, which are exported<br />
to the application install path (C:\Program Files\<strong>Cisco</strong> Systems\7921BD).<br />
A confirmation window will be displayed when the TFTP downloadable config files have been exported successfully.<br />
The files will be in the format of “WLAN.xml”, which the phone does a TFTP get for when it powers on or reprovisions.<br />
Pushing Configuration Files to the <strong>Cisco</strong> <strong>7921G</strong><br />
The Bulk <strong>Deployment</strong> Utility does not have TFTP server capabilities, so a 3 rd party TFTP server will need to be installed and<br />
have the phone configuration files enabled for TFTP download.<br />
It is recommended to install the TFTP server on the same system where the Bulk <strong>Deployment</strong> Utility is installed and have a<br />
staging environment setup with the default phone credentials in order for the phone to auto-download the configuration files by<br />
simply powering on the phones.<br />
The staging environment setup, would need to have a single access point with the SSID “cisco” where the security mode is set<br />
to open authentication and option 150 of the DHCP scope for the staging network to be configured to point to the TFTP server<br />
hosting the phone configuration files.<br />
It is not recommended to copy the configuration files to the <strong>Cisco</strong> Communication Manager’s TFTP server.<br />
Once the <strong>Cisco</strong> <strong>Unified</strong> <strong>Wireless</strong> <strong>IP</strong> <strong>Phone</strong> <strong>7921G</strong> gets its configuration file, then it will re-provision with the new settings and<br />
attempt to join the intended WLAN based on the new credentials received.<br />
The Bulk <strong>Deployment</strong> Utility is available for download on CCO.<br />
http://www.cisco.com/cgi-bin/tablebuild.pl/ip-7900ser-crypto<br />
Configuring the Local <strong>Phone</strong> Book and Speed Dials<br />
Release 1.1(1) and later contain local phone book and speed dials support.<br />
As of the 1.4(1) release up to 200 contacts (100 contacts in previous releases).<br />
99 speed dials referenced from the local phone book can be added for quick dial access. Speed dial #1 is reserved for<br />
voicemail.<br />
The left softkey on the home screen can be programmed for “Message” to access voice mail or to “PhBook” to access the local<br />
phone book.<br />
The local phone book and speed dials can be configured via the local keypad or via the <strong>Cisco</strong> <strong>Unified</strong> <strong>Wireless</strong> <strong>IP</strong> <strong>Phone</strong> <strong>7921G</strong><br />
web interface. Since the web password is not managed by the user, the web interface is primarily intended for use by the<br />
system administrator, where they can upload information into the phone book for the user. This requires that the “<strong>Phone</strong> Book<br />
Web Access” product specific configuration item be set to “Allow Admin” as well as web access set to “Full”.<br />
<strong>Cisco</strong> <strong>Unified</strong> <strong>Wireless</strong> <strong>IP</strong> <strong>Phone</strong> <strong>7921G</strong> Series <strong>Deployment</strong> <strong>Guide</strong> 94
The phone book data can be exported which can be imported onto other phones.<br />
Release 1.2(1) supports XML and CSV format as well as the CSV format used by the <strong>Cisco</strong> <strong>Unified</strong> <strong>Wireless</strong> <strong>IP</strong> <strong>Phone</strong> 7920.<br />
<strong>Cisco</strong> <strong>Unified</strong> <strong>Wireless</strong> <strong>IP</strong> <strong>Phone</strong> <strong>7921G</strong> Series <strong>Deployment</strong> <strong>Guide</strong> 95
Increased Font<br />
As of the 1.4(1) release, there are options for default (original) font or increased font.<br />
The font size can optionally be configured locally on the phone.<br />
(Settings><strong>Phone</strong> Settings>Display Settings>Font Size)<br />
<strong>Cisco</strong> <strong>Unified</strong> <strong>Wireless</strong> <strong>IP</strong> <strong>Phone</strong> <strong>7921G</strong> Series <strong>Deployment</strong> <strong>Guide</strong> 96
Default Font<br />
Increased Font<br />
<strong>Cisco</strong> <strong>Unified</strong> <strong>Wireless</strong> <strong>IP</strong> <strong>Phone</strong> <strong>7921G</strong> Series <strong>Deployment</strong> <strong>Guide</strong> 97
Using <strong>Phone</strong> Designer<br />
The <strong>Phone</strong> Designer application allows the ability to have a customer wallpaper and ringtone for each phone.<br />
The <strong>Cisco</strong> <strong>Unified</strong> <strong>Wireless</strong> <strong>IP</strong> <strong>Phone</strong> <strong>7921G</strong> is supported in <strong>Phone</strong> Designer version 7.1(3) and later.<br />
Personalization must also be enabled in the <strong>Cisco</strong> <strong>Unified</strong> Communications Manager either in Enterprise Parameters, Common<br />
<strong>Phone</strong> Profile or on a per phone level.<br />
After installing the phone designer, a username and password as well as the <strong>IP</strong> address of the <strong>Cisco</strong> <strong>Unified</strong> Communications<br />
Manager must be configured.<br />
The user account must be created in the <strong>Cisco</strong> <strong>Unified</strong> Communications Manager and associated to the corresponding phone.<br />
In order to configure the wallpaper, either select a pre-defined wallpaper or import a wallpaper from the local computer by<br />
selecting “Import”.<br />
To display the wallpaper on the phone, select “Preview on <strong>Phone</strong>”.<br />
To activate and save the wallpaper to the phone flash, select “Save to <strong>Phone</strong>”.<br />
<strong>Cisco</strong> <strong>Unified</strong> <strong>Wireless</strong> <strong>IP</strong> <strong>Phone</strong> <strong>7921G</strong> Series <strong>Deployment</strong> <strong>Guide</strong> 98
In order to configure the ringtone, either select a pre-defined ringtone or import a ringtone from the local computer by selecting<br />
“Import”.<br />
To hear the ringtone on the phone, select “Preview on <strong>Phone</strong>”.<br />
To activate and save the ringtone to the phone flash, select “Save to <strong>Phone</strong>”.<br />
The <strong>Phone</strong> Designer application can be downloaded from the following location.<br />
http://tools.cisco.com/support/downloads/go/Redirect.x?mdfid=278875240<br />
<strong>IP</strong> <strong>Phone</strong> Services<br />
The <strong>Cisco</strong> <strong>Unified</strong> <strong>Wireless</strong> <strong>IP</strong> <strong>Phone</strong> <strong>7921G</strong> is capable of supporting Extensible Markup Language (XML) applications as well<br />
as Java Mobile Information Device Profile (MIDP) applications.<br />
Java MIDP support is included in the 1.4(1) release for the <strong>Cisco</strong> <strong>Unified</strong> <strong>Wireless</strong> <strong>IP</strong> <strong>Phone</strong> <strong>7921G</strong>.<br />
<strong>Cisco</strong> <strong>Unified</strong> <strong>Wireless</strong> <strong>IP</strong> <strong>Phone</strong> <strong>7921G</strong> Series <strong>Deployment</strong> <strong>Guide</strong> 99
For information on <strong>IP</strong> phone services configuration, refer to the following URL.<br />
http://www.cisco.com/en/US/docs/voice_ip_comm/cucm/admin/8_0_2/ccmcfg/b06phsrv.html<br />
Extensible Markup Language (XML)<br />
The following document provides the information needed for eXtensible Markup Language (XML) and X/Open System<br />
Interface (XSI) programmers and system administrators to develop and deploy <strong>IP</strong> phone services.<br />
http://www.cisco.com/en/US/docs/voice_ip_comm/cuipph/all_models/xsi/8_0_1/xsi_dev_guide.html<br />
Below are features that are unique to the <strong>Cisco</strong> <strong>Unified</strong> <strong>Wireless</strong> <strong>IP</strong> <strong>Phone</strong> <strong>7921G</strong>.<br />
Vibrate URI<br />
http://www.cisco.com/en/US/docs/voice_ip_comm/cuipph/all_models/xsi/8_0_1/supporteduris.html#wp1052264<br />
Device URI<br />
http://www.cisco.com/en/US/docs/voice_ip_comm/cuipph/all_models/xsi/8_0_1/supporteduris.html#wp1078268<br />
Troubleshooting<br />
Stream Statistics<br />
The <strong>Cisco</strong> <strong>Unified</strong> <strong>Wireless</strong> <strong>IP</strong> <strong>Phone</strong> <strong>7921G</strong> provides call statistic information, where MOS, jitter and packet counters are<br />
displayed. DSCP for transmit and receive paths are also displayed, which can help to ensure that packets are being placed into<br />
the correct queues upstream and downstream.<br />
Browse to the phone’s web interface (https://x.x.x.x) and select “Stream Statistics” to view this information.<br />
<strong>Cisco</strong> <strong>Unified</strong> <strong>Wireless</strong> <strong>IP</strong> <strong>Phone</strong> <strong>7921G</strong> Series <strong>Deployment</strong> <strong>Guide</strong> 100
This information is also available locally on the phone under Settings > Status > Call Statistics or if on a phone call press the<br />
center button twice.<br />
For more information, see the “Troubleshooting the <strong>Cisco</strong> <strong>Unified</strong> <strong>Wireless</strong> <strong>IP</strong> <strong>Phone</strong> <strong>7921G</strong>” chapter in the <strong>Cisco</strong> <strong>Unified</strong><br />
<strong>Wireless</strong> <strong>IP</strong> <strong>Phone</strong> <strong>7921G</strong> Administration <strong>Guide</strong> at this URL:<br />
http://www.cisco.com/en/US/products/hw/phones/ps379/prod_maintenance_guides_list.html<br />
<strong>Cisco</strong> <strong>Unified</strong> <strong>Wireless</strong> <strong>IP</strong> <strong>Phone</strong> <strong>7921G</strong> Series <strong>Deployment</strong> <strong>Guide</strong> 101
Network Statistics<br />
Queue statistics can also be displayed by navigating to Settings > Status > Network Statistics.<br />
If on a phone call, should see the “DataRcvVO” counter increasing assuming QoS has been deployed correctly.<br />
This reflects that voice packets are being properly marked as UP6 (VO) downstream to the <strong>Cisco</strong> <strong>Unified</strong> <strong>Wireless</strong> <strong>IP</strong> <strong>Phone</strong><br />
<strong>7921G</strong>.<br />
<strong>Cisco</strong> <strong>Unified</strong> <strong>Wireless</strong> <strong>IP</strong> <strong>Phone</strong> <strong>7921G</strong> Series <strong>Deployment</strong> <strong>Guide</strong> 102
<strong>Cisco</strong> <strong>Unified</strong> <strong>Wireless</strong> <strong>IP</strong> <strong>Phone</strong> <strong>7921G</strong> Series <strong>Deployment</strong> <strong>Guide</strong> 103
<strong>Wireless</strong> LAN Statistics<br />
Traffic Stream Metrics (TSM)<br />
The Traffic Stream Metrics feature requires the client to report voice traffic related measurements to the AP.<br />
The parameters (queue delay, media delay, packet loss, packet count, roaming delay, roaming count) will be gathered by the AP<br />
and escalated to the WLAN management system, which will help maintain a database that can be used for the benefit of the<br />
stations by ensuring low packet latency and loss.<br />
Check the box “Metrics Collection” in the global 802.11 Voice Parameters to enable Traffic Stream Metrics.<br />
<strong>Cisco</strong> <strong>Unified</strong> <strong>Wireless</strong> <strong>IP</strong> <strong>Phone</strong> <strong>7921G</strong> Series <strong>Deployment</strong> <strong>Guide</strong> 104
See the “Call Admission Control Settings” section for further information on how to enable TSM.<br />
To view Traffic Stream Metrics data for a client, select TSM from the drop down menu for which band the <strong>Cisco</strong> <strong>Unified</strong><br />
<strong>Wireless</strong> <strong>IP</strong> <strong>Phone</strong> <strong>7921G</strong> is using.<br />
The Traffic Stream Metrics data entries will then be displayed.<br />
Select one of the entries to display the uplink and downlink statistics.<br />
<strong>Phone</strong> Logs<br />
<strong>Phone</strong> logs for troubleshooting purposes can be obtained from the <strong>Cisco</strong> <strong>Unified</strong> <strong>Wireless</strong> <strong>IP</strong> <strong>Phone</strong> <strong>7921G</strong> web interface.<br />
The phone logs are stored in memory only by default, but can optionally enable “Preserve Logs” where the logs will be stored<br />
in flash.<br />
Syslog can also be enabled to capture logging real-time via the wireless LAN or USB interface.<br />
<strong>Cisco</strong> <strong>Unified</strong> <strong>Wireless</strong> <strong>IP</strong> <strong>Phone</strong> <strong>7921G</strong> Series <strong>Deployment</strong> <strong>Guide</strong> 105
Trace Modules<br />
Kernel<br />
<strong>Wireless</strong> LAN Driver<br />
<strong>Wireless</strong> LAN Manager<br />
Configuration<br />
Call Control<br />
Network Services<br />
Security Subsystem<br />
Operating System<br />
Channel scanning, roaming, authentication<br />
WLAN Management, QoS<br />
<strong>Phone</strong> configuration, firmware upgrade<br />
<strong>Cisco</strong> <strong>Unified</strong> Communications Manager messaging (SCCP)<br />
DHCP, TFTP, CDP, WWW, Syslog<br />
Application level security<br />
<strong>Cisco</strong> <strong>Unified</strong> <strong>Wireless</strong> <strong>IP</strong> <strong>Phone</strong> <strong>7921G</strong> Series <strong>Deployment</strong> <strong>Guide</strong> 106
User Interface<br />
Audio System<br />
System<br />
Keypad, softkeys, MMI<br />
RTP, SRTP, RTCP, DSP<br />
Event Manager<br />
Trace Levels<br />
Various levels of tracing are available which provide different levels of messaging.<br />
Emergency, Alert, Critical, Error, Warning, Notice, Info, Debug<br />
Note: All trace modules are set to Error level by default.<br />
Voice quality can potentially be impacted if higher trace levels are configured or if “Preserve Logs” is enabled, which will<br />
write the logs to flash memory.<br />
In firmware 1.1(1) and later, the trace level will reset to “Error” level by default unless configured to preserve the trace levels.<br />
Radio Status Indicator<br />
As of the 1.3(3) release, the <strong>Cisco</strong> <strong>Unified</strong> <strong>Wireless</strong> <strong>IP</strong> <strong>Phone</strong> <strong>7921G</strong> can help determine whether the radios is functional or not<br />
by displaying a number of bars for the signal indicator.<br />
The number of bars equates to the signal received by the access point and will display those bars in either grey, yellow or green<br />
depending on the current status.<br />
Below the correlation between the color and status are defined.<br />
Grey – The phone is in range of some network, but it may not be in range of the configured network.<br />
This could also be due to a SSID configuration issue.<br />
Yellow – The phone has detected it is in range of the configured network and 802.11 band and is attempting to<br />
authenticate to the access point. If the indicator does not move to the green status, then there could be an issue with the<br />
authentication configuration.<br />
Green – The phone is currently authenticated to the access point.<br />
<strong>Cisco</strong> <strong>Unified</strong> <strong>Wireless</strong> <strong>IP</strong> <strong>Phone</strong> <strong>7921G</strong> Series <strong>Deployment</strong> <strong>Guide</strong> 107
Hardware Diagnostics<br />
As of the 1.3(4) release, a self-diagnostics tool is now available which can help with hardware analysis.<br />
The Diagnostics menu is located under <strong>Phone</strong> Settings menu, where then the Keypad, Speaker, Microphone and <strong>Wireless</strong> LAN<br />
Radio and Antenna can be validated.<br />
The WLAN diagnostics menu is the standard Site Survey utility, which will use the current network profile information to<br />
perform passive and active scans for the configured SSID and 802.11 mode.<br />
Firmware Recovery<br />
If the <strong>Cisco</strong> <strong>Unified</strong> <strong>Wireless</strong> <strong>IP</strong> <strong>Phone</strong> <strong>7921G</strong> does no boot properly, then the firmware can be recovered via the USB<br />
connection.<br />
1. Power on the phone while holding down the application button and the speakerphone button simultaneiously and keep<br />
it helf until “Starting Recovery Mode” is displayed.<br />
2. A firmware check will then be performed.<br />
<strong>Cisco</strong> <strong>Unified</strong> <strong>Wireless</strong> <strong>IP</strong> <strong>Phone</strong> <strong>7921G</strong> Series <strong>Deployment</strong> <strong>Guide</strong> 108
3. Insert the USB cable into the phone after USB initialization is complete.<br />
(Ensure that the USB driver has been installed prior and that an <strong>IP</strong> in the 192.168.1.0 /24 network has been configured<br />
for that network connection)<br />
4. When “Web Access Available...” is displayed, then navigate to http://192.168.1.100.<br />
5. Browse to the TAR file, then click on “Upload”.<br />
Restoring Factory Defaults<br />
The configuration can be cleared by using the factory default menu option on the phone.<br />
The factory default option erases all user-defined entries in Network Profiles, <strong>Phone</strong> Settings, and Call History.<br />
To erase the local configuration, follow these steps:<br />
1. Choose Settings > <strong>Phone</strong> Settings.<br />
2. Press “**2” on the keypad.<br />
The phone briefly displays “Restore to Default?”<br />
3. Press the “Yes” softkey to confirm or “No” to cancel.<br />
The phone resets after selecting “Yes”.<br />
Capturing a Screenshot of the <strong>Phone</strong> Display<br />
The current display can be captured by browsing to http://x.x.x.x/CGI/Screenshot, where x.x.x.x is the <strong>IP</strong> address of the <strong>Cisco</strong><br />
<strong>Unified</strong> <strong>Wireless</strong> <strong>IP</strong> <strong>Phone</strong> <strong>7921G</strong>. At the prompt enter the username and password for the account for which the phone is<br />
associated to.<br />
<strong>Cisco</strong> <strong>Unified</strong> <strong>Wireless</strong> <strong>IP</strong> <strong>Phone</strong> <strong>7921G</strong> Series <strong>Deployment</strong> <strong>Guide</strong> 109
Healthcare Environments<br />
This product is not a medical device and uses an unlicensed frequency band that is susceptible to interference from other<br />
devices or equipment.<br />
Cleaning the <strong>Phone</strong><br />
Gently wipe the <strong>Cisco</strong> <strong>Unified</strong> <strong>Wireless</strong> <strong>IP</strong> <strong>Phone</strong> <strong>7921G</strong> screen and housing with a soft, dry cloth.<br />
Do not use any liquids or powders to clean the phone. Using anything other than a soft, dry cloth can damage the phone and<br />
cause failures.<br />
Carry cases can potentially help protect the phone from moisture, dust, and dirt, and provide drop protection.<br />
<strong>Phone</strong> Accessories<br />
The following accessories are available for the <strong>Cisco</strong> <strong>Unified</strong> <strong>Wireless</strong> <strong>IP</strong> <strong>Phone</strong> <strong>7921G</strong>.<br />
For more information, refer to the <strong>Cisco</strong> <strong>Unified</strong> <strong>Wireless</strong> <strong>IP</strong> <strong>Phone</strong> <strong>7921G</strong> Accessories <strong>Guide</strong> at this URL:<br />
http://www.cisco.com/en/US/products/hw/phones/ps379/products_user_guide_list.html<br />
• Batteries Standard and Extended<br />
• Carry Cases Holster and Leather<br />
• Desktop Charger<br />
• Multi-Charger<br />
• Lock Set<br />
• Shoulder Strap (for leather carry case)<br />
• USB Cable<br />
3 rd Party Accessories<br />
• Carry Cases www.zcover.com<br />
www.systemwear.com<br />
• Headsets www.plantronics.com<br />
(Quick Disconnect 2.5 mm Adapter – part # 65287-01)<br />
Note: The <strong>Cisco</strong> <strong>Unified</strong> <strong>Wireless</strong> <strong>IP</strong> <strong>Phone</strong> <strong>7921G</strong> is unable to utilize accessories from the <strong>Cisco</strong> <strong>Unified</strong> <strong>Wireless</strong> <strong>IP</strong> <strong>Phone</strong><br />
7925G Series as they are not compatible.<br />
<strong>Cisco</strong> <strong>Unified</strong> <strong>Wireless</strong> <strong>IP</strong> <strong>Phone</strong> <strong>7921G</strong> Series <strong>Deployment</strong> <strong>Guide</strong> 110
Additional Documentation<br />
<strong>Cisco</strong> <strong>Unified</strong> <strong>Wireless</strong> <strong>IP</strong> <strong>Phone</strong> <strong>7921G</strong> Data Sheet<br />
http://www.cisco.com/en/US/prod/collateral/voicesw/ps6788/phones/ps379/product_data_sheet0900aecd805e315d.html<br />
<strong>Cisco</strong> <strong>Unified</strong> <strong>Wireless</strong> <strong>IP</strong> <strong>Phone</strong> <strong>7921G</strong> Administration <strong>Guide</strong><br />
http://www.cisco.com/en/US/products/hw/phones/ps379/prod_maintenance_guides_list.html<br />
<strong>Cisco</strong> <strong>Unified</strong> <strong>Wireless</strong> <strong>IP</strong> <strong>Phone</strong> <strong>7921G</strong> <strong>Phone</strong> <strong>Guide</strong> and Quick Reference<br />
http://www.cisco.com/en/US/products/hw/phones/ps379/products_user_guide_list.html<br />
<strong>Cisco</strong> <strong>Unified</strong> <strong>Wireless</strong> <strong>IP</strong> <strong>Phone</strong> <strong>7921G</strong> Firmware<br />
http://www.cisco.com/cgi-bin/tablebuild.pl/ip-7900ser-crypto<br />
<strong>Cisco</strong> <strong>Unified</strong> Communications Manager<br />
http://www.cisco.com/en/US/products/sw/voicesw/ps556/tsd_products_support_series_home.html<br />
<strong>Cisco</strong> <strong>Unified</strong> Communications Manager Express<br />
http://www.cisco.com/en/US/products/ps7273/tsd_products_support_series_home.html<br />
<strong>Cisco</strong> Voice Software<br />
http://www.cisco.com/kobayashi/sw-center/sw-voice.shtml<br />
<strong>Cisco</strong> Localization<br />
http://www.cisco.com/kobayashi/sw-center/telephony/callmgr/locale-installer.shtml<br />
<strong>Cisco</strong> <strong>Unified</strong> <strong>IP</strong> <strong>Phone</strong> Services Application Development Notes<br />
http://www.cisco.com/en/US/docs/voice_ip_comm/cuipph/all_models/xsi/8_0_1/xsi_dev_guide.html<br />
<strong>Cisco</strong> <strong>Unified</strong> Communications SRND<br />
http://www.cisco.com/en/US/docs/voice_ip_comm/cucm/srnd/7x/uc7_0.html<br />
Mobility SRND<br />
http://www.cisco.com/application/pdf/en/us/guest/netsol/ns279/c649/ccmigration_09186a00808d9330.pdf<br />
<strong>Cisco</strong> <strong>Unified</strong> <strong>Wireless</strong> LAN Controller Documentation<br />
<strong>Cisco</strong> <strong>Unified</strong> <strong>Wireless</strong> <strong>IP</strong> <strong>Phone</strong> <strong>7921G</strong> Series <strong>Deployment</strong> <strong>Guide</strong> 111
http://www.cisco.com/en/US/products/ps6366/products_installation_and_configuration_guides_list.html<br />
Autonomous Access Point Documentation<br />
http://www.cisco.com/en/US/products/ps6521/products_installation_and_configuration_guides_list.html<br />
Open Source License Notices for the <strong>Cisco</strong> <strong>Unified</strong> <strong>IP</strong> <strong>Phone</strong>s 7900 Series<br />
http://www.cisco.com/en/US/products/hw/phones/ps379/products_licensing_information_listing.html<br />
<strong>Cisco</strong> <strong>Unified</strong> <strong>Wireless</strong> <strong>IP</strong> <strong>Phone</strong> <strong>7921G</strong> Series <strong>Deployment</strong> <strong>Guide</strong> 112
____________________________________________________________________________________________________<br />
CCDE, CCENT, <strong>Cisco</strong> Eos, <strong>Cisco</strong> Lumin, <strong>Cisco</strong> Nexus, <strong>Cisco</strong> StadiumVision, <strong>Cisco</strong> TelePresence, <strong>Cisco</strong> WebEx, the <strong>Cisco</strong> logo,<br />
DCE, and Welcome to the Human Network are trademarks; Changing the Way We Work, Live, Play, and Learn and <strong>Cisco</strong> Store are<br />
service marks; and Access Registrar, Aironet, AsyncOS, Bringing the Meeting To You, Catalyst, CCDA, CCDP, CCIE, CC<strong>IP</strong>,<br />
CCNA, CCNP, CCSP, CCVP, <strong>Cisco</strong>, the <strong>Cisco</strong> Certified Internetwork Expert logo, <strong>Cisco</strong> IOS, <strong>Cisco</strong> Press, <strong>Cisco</strong> Systems, <strong>Cisco</strong><br />
Systems Capital, the <strong>Cisco</strong> Systems logo, <strong>Cisco</strong> Unity, Collaboration Without Limitation, EtherFast, EtherSwitch, Event Center, Fast<br />
Step, Follow Me Browsing, FormShare, GigaDrive, HomeLink, Internet Quotient, IOS, i<strong>Phone</strong>, iQuick Study, IronPort, the IronPort<br />
logo, LightStream, Linksys, MediaTone, MeetingPlace, MeetingPlace Chime Sound, MGX, Networkers, Networking Academy,<br />
Network Registrar, PCNow, PIX, PowerPanels, ProConnect, ScriptShare, SenderBase, SMARTnet, Spectrum Expert, StackWise, The<br />
Fastest Way to Increase Your Internet Quotient, TransPath, WebEx, and the WebEx logo are registered trademarks of <strong>Cisco</strong> Systems,<br />
Inc. and/or its affiliates in the United States and certain other countries.<br />
All other trademarks mentioned in this document or website are the property of their respective owners. The use of the word partner<br />
does not imply a partnership relationship between <strong>Cisco</strong> and any other company. (0809R)<br />
© 2008 <strong>Cisco</strong> Systems, All rights reserved.<br />
<strong>Cisco</strong> <strong>Unified</strong> <strong>Wireless</strong> <strong>IP</strong> <strong>Phone</strong> <strong>7921G</strong> Series <strong>Deployment</strong> <strong>Guide</strong> 113