Successful Dentures Part II - Removable Prosthodontics
Successful Dentures Part II - Removable Prosthodontics
Successful Dentures Part II - Removable Prosthodontics

You also want an ePaper? Increase the reach of your titles
YUMPU automatically turns print PDFs into web optimized ePapers that Google loves.
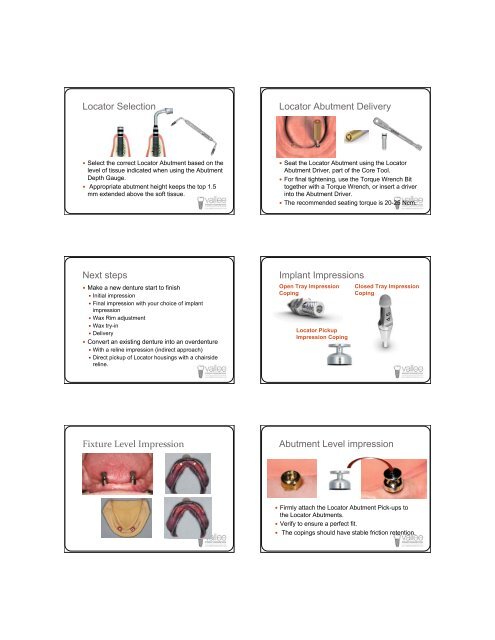
Locator Selection<br />
Locator Abutment Delivery<br />
Select the correct Locator Abutment based on the<br />
level of tissue indicated when using the Abutment<br />
Depth Gauge.<br />
Appropriate abutment height keeps the top 1.5<br />
mm extended above the soft tissue.<br />
Seat the Locator Abutment using the Locator<br />
Abutment Driver, part of the Core Tool.<br />
For final tightening, use the Torque Wrench Bit<br />
together with a Torque Wrench, or insert a driver<br />
into the Abutment Driver.<br />
The recommended seating torque is 20-25 Ncm.<br />
Next steps<br />
Make a new denture start to finish<br />
Initial impression<br />
Final impression with your choice of implant<br />
impression<br />
Wax Rim adjustment<br />
Wax try-in<br />
Delivery<br />
Convert an existing denture into an overdenture<br />
With a reline impression (indirect approach)<br />
Direct pickup of Locator housings with a chairside<br />
reline.<br />
Implant Impressions<br />
Open Tray Impression<br />
Coping<br />
Locator Pickup<br />
Impression Coping<br />
Closed Tray Impression<br />
Coping<br />
Fixture Level Impression<br />
Abutment Level impression<br />
Firmly attach the Locator Abutment Pick-ups to<br />
the Locator Abutments.<br />
Verify to ensure a perfect fit.<br />
The copings should have stable friction retention.