

PDF Version - Glidewell Dental Labs
PDF Version - Glidewell Dental Labs
PDF Version - Glidewell Dental Labs

Create successful ePaper yourself
Turn your PDF publications into a flip-book with our unique Google optimized e-Paper software.
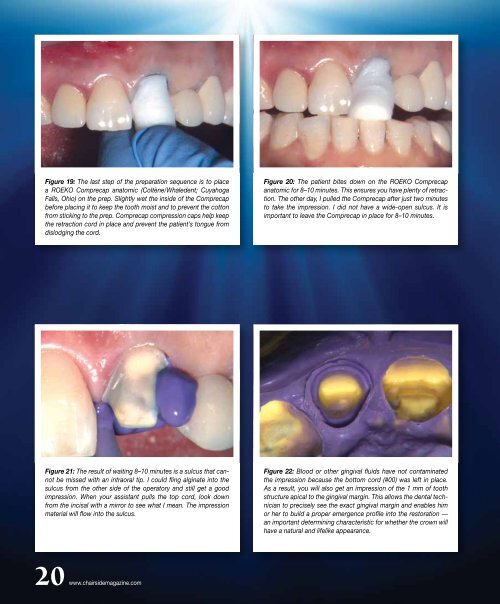
Figure 19: The last step of the preparation sequence is to place<br />
a ROEKO Comprecap anatomic (Coltène/Whaledent; Cuyahoga<br />
Falls, Ohio) on the prep. Slightly wet the inside of the Comprecap<br />
before placing it to keep the tooth moist and to prevent the cotton<br />
from sticking to the prep. Comprecap compression caps help keep<br />
the retraction cord in place and prevent the patient’s tongue from<br />
dislodging the cord.<br />
Figure 20: The patient bites down on the ROEKO Comprecap<br />
anatomic for 8–10 minutes. This ensures you have plenty of retraction.<br />
The other day, I pulled the Comprecap after just two minutes<br />
to take the impression. I did not have a wide-open sulcus. It is<br />
important to leave the Comprecap in place for 8–10 minutes.<br />
Figure 21: The result of waiting 8–10 minutes is a sulcus that cannot<br />
be missed with an intraoral tip. I could fling alginate into the<br />
sulcus from the other side of the operatory and still get a good<br />
impression. When your assistant pulls the top cord, look down<br />
from the incisal with a mirror to see what I mean. The impression<br />
material will flow into the sulcus.<br />
Figure 22: Blood or other gingival fluids have not contaminated<br />
the impression because the bottom cord (#00) was left in place.<br />
As a result, you will also get an impression of the 1 mm of tooth<br />
structure apical to the gingival margin. This allows the dental technician<br />
to precisely see the exact gingival margin and enables him<br />
or her to build a proper emergence profile into the restoration —<br />
an important determining characteristic for whether the crown will<br />
have a natural and lifelike appearance.<br />
20 www.chairsidemagazine.com


