4-Legged Animal Project - Amaco
4-Legged Animal Project - Amaco
4-Legged Animal Project - Amaco

You also want an ePaper? Increase the reach of your titles
YUMPU automatically turns print PDFs into web optimized ePapers that Google loves.
#2<br />
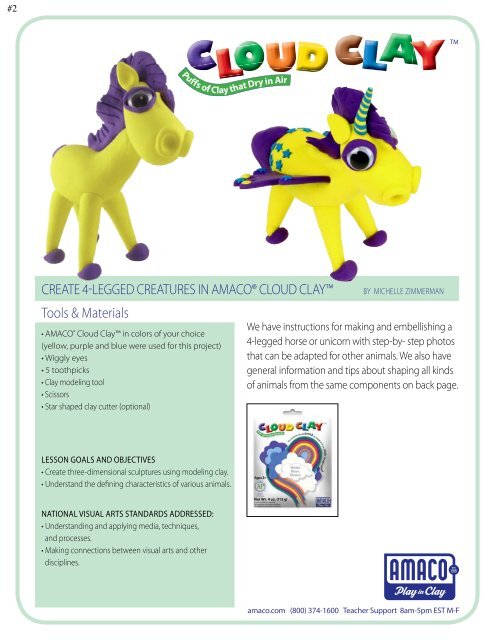
Puffs of Clay that Dry in Air<br />
Create 4-legged creatures in AMACO® Cloud Clay<br />
tools & Materials<br />
• AMACO ® Cloud Clay in colors of your choice<br />
(yellow, purple and blue were used for this project)<br />
• Wiggly eyes<br />
• 5 toothpicks<br />
• Clay modeling tool<br />
• Scissors<br />
• Star shaped clay cutter (optional)<br />
By michelle zimmerman<br />
We have instructions for making and embellishing a<br />
4-legged horse or unicorn with step-by- step photos<br />
that can be adapted for other animals. We also have<br />
general information and tips about shaping all kinds<br />
of animals from the same components on back page.<br />
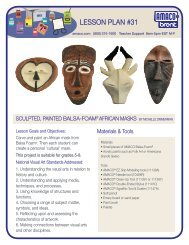
Lesson Goals and Objectives<br />
• Create three-dimensional sculptures using modeling clay.<br />
• Understand the defining characteristics of various animals.<br />
National Visual Arts Standards Addressed:<br />
• Understanding and applying media, techniques,<br />
and processes.<br />
• Making connections between visual arts and other<br />
disciplines.<br />
amaco.com (800) 374-1600 Teacher Support 8am-5pm EST M-F
Pictures & Instructions<br />
Technique<br />
1. Cut your packet of clay into 16 pieces – this makes it easy to measure just<br />
how much you need. Take 5 pieces of yellow clay for the horse. You will need<br />
1 piece of purple for the mane and tail and extra clay for wings and other fun<br />
embellishments.<br />
2. Take one and a half pieces of yellow clay and cover four of the toothpicks<br />
for the legs.<br />
3. Take two and a half pieces of yellow clay and roll a large oval for the body.<br />
Pull the neck out of the body angling it upwards. Place a toothpick in the<br />
neck.<br />
<br />
2<br />
3<br />
4. Take one piece of yellow clay and roll a small oval of clay for the head.<br />
Use your thumb to push up on the back of the head to make a flat surface to<br />
join the head to the body.<br />
<br />
4<br />
5. Press the head onto the toothpick to join it to the body.<br />
<br />
5<br />
6. Press the legs into the body making sure the toothpicks enter the body, and<br />
that the clay at the top of the legs bond with the clay on the horse’s body.<br />
Stand the horse upright and make sure it balances on its feet.<br />
<br />
6<br />
7. Using the purple clay, shape the horse’s mane and attach it along the top of<br />
the horse’s neck and head.<br />
Make a tail from some of the purple clay and attach to the horse’s body.<br />
Using scissors, make cuts along the horse’s mane to make it look more<br />
realistic.<br />
<br />
7, 8<br />
8. Attach small balls of yellow clay to the head where the nostrils will go. Press<br />
the rounded tip of a modeling tool into the center of the clay balls to form the<br />
horse’s nostrils.<br />
9. Take a small amount of purple clay and roll it into two small balls. Flatten<br />
the balls to a flat circle and place one wiggly eye on each and bend the clay<br />
around the eyeball.<br />
Attach the eyes in position on the horse’s face.<br />
10. Make two small teardrops of yellow clay for the ears. Flatten them slightly<br />
and attach to the horse’s head.<br />
9<br />
<br />
10<br />
11. Make four small balls of purple clay for the hooves. Flatten the middle of<br />
the balls with your finger and cut off one edge of the flattened ball. Attach<br />
the remaining piece of clay to the bottom of the horse’s foot as a hoof.<br />
<br />
11<br />
12. You can stop once your horse is at this stage or you can continue and add<br />
fun things to it.<br />
<br />
12<br />
TO MAKE YOUR HORSE A UNICORN<br />
(Add Stars or Spots, a Horn and Wings)<br />
13. Add Stars or Spots<br />
To make stars for the horse’s back, flatten a piece of blue Cloud Clay until it<br />
is very thin and, when dry, punch small stars from it with a tiny metal (cookie)<br />
cutter or hand attach them to the horse.<br />
Or instead of punching out shapes, you can add spots to your horse by taking<br />
small balls of clay, pressing them flat and then pressing them onto the horse’s<br />
body and its face.<br />
<br />
13<br />
14. Add a Horn<br />
Twist a mix of purple and yellow clay together to make a thin cone and attach<br />
to the horse’s head as a horn, so it becomes a unicorn.<br />
<br />
14<br />
15. Add Wings<br />
Flatten a sheet of blue Cloud Clay and cut two wing shapes from it. Once<br />
they are dry enough to hold their shape, press them into the sides of the<br />
horse.<br />
15<br />
<br />
General Instructions for making four-legged crITTERS<br />
Technique<br />
A basic 4-legged creature consists of four legs, a body and a head. However, depending on their relative shape, the<br />
animals themselves can look very different such as a pig and a giraffe. Take a moment and think about the Cloud<br />
Clay critter you’re making, about its height, width and its basic body shapes. Making a quick sketch may help you<br />
understand this.<br />
Legs<br />
If you are making an animal with short legs, break the toothpick down to the size you need. When it is covered<br />
with clay, leave some of the toothpick uncovered, as this will be pushed into the body to anchor the legs. For really<br />
tall legged animals, tape 2 toothpicks together or use a piece of thin doweling, making sure that the support runs<br />
through the entire leg and into the body.<br />
Body<br />
A pig or elephant is shaped like a round ball, while a buffalo or bull is shaped more like an egg shape, with the bigger<br />
end at the front of the animal. A cat, dog or bear is an egg shape with the smaller side facing the head. A giraffe or<br />
horse is an egg shape with the neck pulled out from the egg.<br />
Neck/Support<br />
For most animals it’s best to stick a toothpick into the body or neck to help support the head. For some critters, like<br />
the giraffe, this might not work because the giraffe’s neck curves and, in some cases, is very thin, so a bendable wire<br />
could be used or two toothpicks taped together for length and slightly crooked where joined.<br />
Heads<br />
Heads are shapes upon shapes. A bear face for example is ball (nose) on a half circle (muzzle) on a circle (head). A<br />
pig is a circle (nose) pushed flat onto a circle (head). An elephant is a circle with the nose pulled out from it. A horse,<br />
camel or giraffe is an elongated egg shape with the smaller end of the egg pushed to an angle with your thumb.<br />
Ears, Eyes, Noses<br />
Ear, eye and nose placement as well as any other special characteristics (a zebra’s stripes, a bull’s horns, a horse’s mane,<br />
etc) are the final step. If necessary, prop your critter up just as you’d like it to be until it is dry enough to support its<br />
own weight, then apply details.