AMACO® Fine-Art Metal Enameling Kiln FA-5-E
AMACO® Fine-Art Metal Enameling Kiln FA-5-E
AMACO® Fine-Art Metal Enameling Kiln FA-5-E

You also want an ePaper? Increase the reach of your titles
YUMPU automatically turns print PDFs into web optimized ePapers that Google loves.
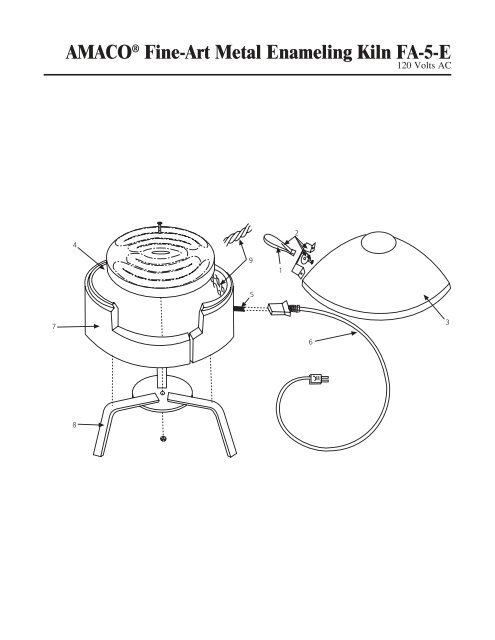
AMACO ® <strong>Fine</strong>-<strong>Art</strong> <strong>Metal</strong> <strong>Enameling</strong> <strong>Kiln</strong> <strong>FA</strong>-5-E<br />
120 Volts AC<br />
4<br />
2<br />
9<br />
1<br />
5<br />
7<br />
3<br />
6<br />
8
AMACO ® FINE-ART METAL ENAMELING KILN No. <strong>FA</strong>-5-E<br />
GENERAL INSTRUCTIONS<br />
Place the kiln on a heat resistant surface such as metal or marble. Never set it directly on a wood, varnished,<br />
painted, or formica surface. Be sure that ceramic fiber rope is positioned around the element terminals<br />
to prevent accidental contact between enameling tools and possible shock.<br />
This kiln, specially constructed for metal enameling, has a 900 watt heating element and consumes about<br />
the same amount of current as an electric iron. The kiln operates on a 110-115 volt AC circuit. A lower voltage<br />
will result in slower heating, while a higher voltage will result in faster firing and, ultimately, will shorten<br />
the life of the element. When disconnecting the kiln, always do so at the wall outlet. Always disconnect the<br />
kiln when not in use. It is much better to shut down and restart the kiln several times than to have the kiln<br />
active over long periods of time. Never leave the kiln unattended.<br />
PREHEATING THE KILN<br />
Preheat the <strong>Fine</strong>-<strong>Art</strong> <strong>Metal</strong> <strong>Enameling</strong> <strong>Kiln</strong> for about 15 minutes to reach an enameling temperature of<br />
approximately 1500°F (815°C). The element will be a bright yellow-orange color when the temperature is<br />
right for best enameling results. Because this unit heats so quickly, current is saved by operating it only when<br />
enameling, and this prolongs the life of the element.<br />
APPLYING ENAMELS<br />
Detailed directions for enameling on gold, silver, and copper can be found in the No. 7 Booklet “AMACO ®<br />
<strong>Metal</strong> <strong>Enameling</strong>" supplied with this kiln. The beginning enamelist should read it carefully for an understanding<br />
of the complete enameling process — preparing the metal, applying enamels, finishing pieces, etc.<br />
There is a speedy enameling process suitable for enameling small pieces on one side, which is not described<br />
in Booklet No. 7. Steps in this process are:<br />
1. Coat shiny clean copper piece with enameling oil. No special scouring or acid cleaning is<br />
necessary.<br />
2. With an 80-mesh screen or a scrap of nylon hose stretched over bottle opening, dust on a thin<br />
application of dry enamel. No metal should show.<br />
3. Fire at once in a preheated kiln. Piece will smoke and flame briefly as oil burns out.<br />
4. Cool on heat resistant surface.<br />
5. Drop piece in AMACO ® <strong>Metal</strong> Cleaner to remove oxidation scale, rinse in water, and dry.<br />
6. Brush enamel surface with enameling oil and dust on the second application of dry enamel —<br />
recommended for depth of color and brilliance. This process is completed in a matter of<br />
minutes, and the piece is ready for finishing.<br />
FIRING PROCEDURE<br />
First, be sure that the kiln has been pre-heated to enameling temperature. As pieces are fired by conduction,<br />
place bare metal, or metal coated with Amacote, directly onto element except when counterenameling<br />
(enameling the back of a piece). Be sure that no enamel is on the bottom of the piece because the enamel<br />
will melt and cause the piece to stick to the element.<br />
Firing Pieces Small Enough To Go Through the <strong>Kiln</strong> Opening. Use a long, thin and wide spatula with<br />
a wood handle to lift the piece through the kiln opening. Place the bare metal side directly onto the element<br />
and toward the center. No timing is necessary. Watch the piece through the kiln opening and remove it as<br />
soon as it is red hot and glossy. Pieces may be removed for inspection without causing harm. Put pieces that<br />
look bumpy, wrinkled or granular, back into the kiln immediately and fire until glossy and smooth. Do not<br />
overfire pieces. Firing time for small pieces is usually three minutes or less. Place red hot pieces on a heat<br />
resistant surface to cool.<br />
P. 2—<strong>FA</strong>-5-E—6/04
COUNTERENAMELING<br />
Counterenameling gives a more professional look to enameled pieces and prevents excessive chipping and<br />
cracking by equalizing the strain on the metal.<br />
After one side is completely decorated and fired, the other side of a small piece is easy to counterenamel. If<br />
counterenameling by dusting on enamels, remember to use gum solution to coat the metal and also as an<br />
over spray with atomizer on the enameling application. When jewelry findings are to be applied with a soft<br />
solder, a bare spot must be left where they are to be attached.<br />
Place the piece with counterenameled side underneath onto the metal stilts, which holds the piece by the<br />
edges. When the enamel is completely dry, place stilts and piece as a unit into the kiln using long tweezers<br />
or spatula. Counterenamel takes longer to fire because the piece is raised above the element. When the<br />
enamel on the bottom side becomes glossy, remove the unit from the kiln.<br />
SOFT SOLDERING<br />
This kiln can be used for attaching jewelry findings with soft solder when all enameling processes are completed.<br />
Place the enameled piece upside down on the top of the kiln. Watch for the solder to melt. Carefully<br />
remove the soldered piece from the kiln lid, and allow to cool.<br />
ELEMENT CARE AND REPLACEMENT<br />
Element Care: Element surface must be kept clean. Spilled enamel will quickly penetrate to the wire coil and<br />
cause failure. Also, element will become sticky and prevent removal of work piece. Grind away any spilled<br />
enamel with a wet grinding stone. Center bolt must be tight to prevent movement of element plate which<br />
will break wires at terminal. Do not apply kiln wash to element surface. Any surface coating will cause temperature<br />
build-up at wire surface and cause burn out. Always disconnect power supply when servicing kiln.<br />
Element Replacement: If element stops heating, disconnect kiln. Check to see if connections are loose at<br />
terminals. If not, the element has burned out and must be replaced.<br />
1. Remove nuts to disconnect wires at terminals.<br />
2. Remove center bolt from element, then lift element out.<br />
3. Place new element in firing chamber and align metal legs.<br />
4. Install center bolt to hold element, bowl, and legs securely.<br />
5. Place terminal loops over bolts that come through wall. Be sure wires do not cross or touch<br />
each other.<br />
6. Place a nut on each terminal and tighten.<br />
7. Replace fiber rope around exposed terminals.<br />
P. 3—<strong>FA</strong>-5-E—6/04
REPLACEMENT PARTS LIST<br />
AMACO ® FINE-ART METAL ENAMELING KILN<br />
<strong>FA</strong>-5-E<br />
DETAIL PART DESCRIPTION PARTS/<br />
NO. NO. KILN<br />
1 27337R Handle (Only) 1<br />
2 27336B Handle Assembly 1<br />
3 27335P Cover or Lid W/O Handle 1<br />
4 27333M Element Assembly 1<br />
5 27345A Heater Pins, Set of 2 Pins 1 Set<br />
6 + Cord, Supply 1<br />
7 27341H Bottom Burner Bowl 1<br />
8 27343X Tri-pod Stand 1<br />
9 27332L Fiberfrax Rope - 5" Length 1<br />
+ Standard Hardware/Electrical Item available locally.<br />
Prices available upon request.<br />
American <strong>Art</strong> Clay Company, Inc.<br />
6060 Guion Road, Indianapolis, Indiana 46254-1222 USA • (800) 374-1600 • Fax: (317) 248-9300 • www.amaco.com<br />
P. 4—<strong>FA</strong>-5-E—6/04