TIG InverTer welder - Harbor Freight Tools
TIG InverTer welder - Harbor Freight Tools
TIG InverTer welder - Harbor Freight Tools
You also want an ePaper? Increase the reach of your titles
YUMPU automatically turns print PDFs into web optimized ePapers that Google loves.
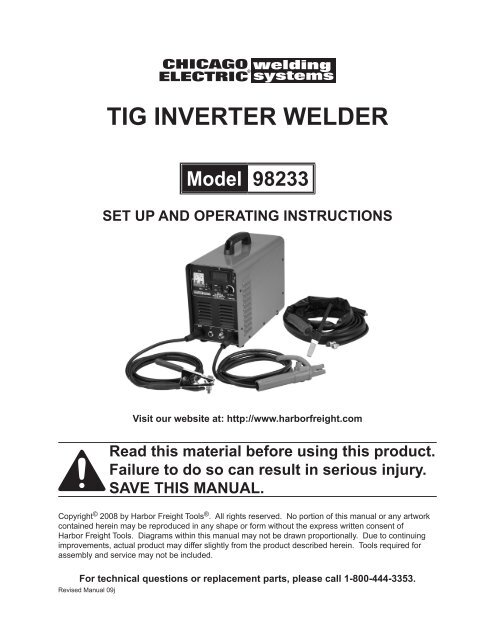
<strong>TIG</strong> inverter <strong>welder</strong><br />
Model 98233<br />
Set up and Operating Instructions<br />
Visit our website at: http://www.harborfreight.com<br />
Read this material before using this product.<br />
Failure to do so can result in serious injury.<br />
Save this manual.<br />
Copyright © 2008 by <strong>Harbor</strong> <strong>Freight</strong> <strong>Tools</strong> ® . All rights reserved. No portion of this manual or any artwork<br />
contained herein may be reproduced in any shape or form without the express written consent of<br />
<strong>Harbor</strong> <strong>Freight</strong> <strong>Tools</strong>. Diagrams within this manual may not be drawn proportionally. Due to continuing<br />
improvements, actual product may differ slightly from the product described herein. <strong>Tools</strong> required for<br />
assembly and service may not be included.<br />
For technical questions or replacement parts, please call 1-800-444-3353.<br />
Revised Manual 09j
Contents<br />
Important SAFETY<br />
Information ............................ 3<br />
General Power Tool<br />
Safety Warnings.......................3<br />
<strong>TIG</strong> Welder Safety Warnings ..5<br />
Grounding ................................. 9<br />
Grounded <strong>Tools</strong> ..........................9<br />
Extension Cords .........................9<br />
Symbology ...................................10<br />
Specifications ........................ 11<br />
Unpacking ................................ 11<br />
List of contents ........................ 11<br />
Operating Instructions .... 11<br />
Tool Set Up .................................. 11<br />
Work Piece and Work Area<br />
Set Up .......................................... 11<br />
General Operating<br />
Instructions ........................ 13<br />
Maintenance And<br />
Servicing ............................... 15<br />
Cleaning, Maintenance, and<br />
Lubrication ...............................15<br />
Troubleshooting ......................16<br />
Main unit Parts List ............. 17<br />
Main unit diagram ................. 17<br />
Torch Parts List ................... 18<br />
Torch parts diagram .......... 18<br />
Electrical diagram ............. 19<br />
Limited 1 Year / 90 day<br />
warranty .............................. 20<br />
SKU 98233 For technical questions, please call 1-800-444-3353. Page 2
Save This Manual<br />
Keep this manual for the safety warnings<br />
and precautions, assembly, operating,<br />
inspection, maintenance and cleaning<br />
procedures. Write the product’s serial<br />
number in the back of the manual near the<br />
assembly diagram (or month and year of<br />
purchase if product has no number). Keep<br />
this manual and the receipt in a safe and<br />
dry place for future reference.<br />
Important SAFETY<br />
Information<br />
In this manual, on the labeling,<br />
and all other information provided<br />
with this product:<br />
This is the safety alert<br />
symbol. It is used to alert<br />
you to potential personal<br />
injury hazards. Obey all<br />
safety messages that<br />
follow this symbol to avoid<br />
possible injury or death.<br />
DANGER indicates<br />
a hazardous<br />
situation which, if not<br />
avoided, will result in death or<br />
serious injury.<br />
WARNING<br />
indicates a<br />
hazardous situation which, if<br />
not avoided, could result in<br />
death or serious injury.<br />
CAUTION, used<br />
with the safety<br />
alert symbol, indicates a<br />
hazardous situation which, if<br />
not avoided, could result in<br />
minor or moderate injury.<br />
1.<br />
2.<br />
NOTICE is used to<br />
address practices<br />
not related to personal injury.<br />
CAUTION, without<br />
the safety alert<br />
symbol, is used to address<br />
practices not related to<br />
personal injury.<br />
General Power Tool Safety<br />
Warnings<br />
WARNING Read all safety<br />
warnings and instructions.<br />
Failure to follow the warnings and<br />
instructions may result in electric<br />
shock, fire and/or serious injury.<br />
Save all warnings and<br />
instructions for future reference.<br />
The term ″power tool″ in the<br />
warnings refers to your mainsoperated<br />
(corded) power tool.<br />
Work area safety<br />
a. Keep work area clean and well lit.<br />
Cluttered or dark areas invite accidents.<br />
b. Do not operate power tools in<br />
explosive atmospheres, such as in<br />
the presence of flammable liquids,<br />
gases or dust. Power tools create<br />
sparks which may ignite the dust or<br />
fumes.<br />
c. Keep children and bystanders<br />
away while operating a power tool.<br />
Distractions can cause you to lose<br />
control.<br />
Electrical safety<br />
Power tool plugs must match the<br />
a.<br />
outlet. Never modify the plug in<br />
any way. Do not use any adapter<br />
plugs with grounded power tools.<br />
SKU 98233 For technical questions, please call 1-800-444-3353. Page 3
3.<br />
Unmodified plugs and matching outlets<br />
will reduce risk of electric shock.<br />
b. Avoid body contact with grounded<br />
surfaces such as pipes, radiators,<br />
ranges and refrigerators. There is<br />
an increased risk of electric shock if<br />
your body is grounded.<br />
c. Do not expose power tools to rain<br />
or wet conditions. Water entering<br />
a power tool will increase the risk of<br />
electric shock.<br />
d. Do not abuse the cord. Never use<br />
the cord for carrying, pulling or<br />
unplugging the power tool. Keep<br />
cord away from heat, oil, sharp<br />
edges or moving parts. Damaged<br />
or entangled cords increase the risk<br />
of electric shock.<br />
e. When operating a power tool out-<br />
doors, use an extension cord suitable<br />
for outdoor use. Use of a cord<br />
suitable for outdoor use reduces the<br />
risk of electric shock.<br />
f. If operating a power tool in a damp<br />
location is unavoidable, use a<br />
Ground Fault Circuit Interrupter<br />
(GFCI) protected supply. Use of<br />
a GFCI reduces the risk of electric<br />
shock.<br />
Personal safety<br />
a. Stay alert, watch what you are do-<br />
ing and use common sense when<br />
operating a power tool. Do not use<br />
a power tool while you are tired<br />
or under the influence of drugs,<br />
alcohol or medication. A moment<br />
of inattention while operating power<br />
tools may result in serious personal<br />
injury.<br />
b. Use safety equipment. Always<br />
wear ANSI-approved safety glasses<br />
and arc shaded, impact safety full<br />
face shield. Safety equipment such<br />
as NIOSH-approved respirator,<br />
heavy-duty work gloves, non-skid<br />
safety shoes, or hearing protection<br />
used for appropriate conditions will<br />
reduce personal injuries.<br />
c. Prevent unintentional starting.<br />
Ensure the switch is in the off-position<br />
before connecting to power<br />
source or moving the tool. Carrying<br />
power tools with your finger on<br />
the switch or energizing power tools<br />
that have the switch on invites accidents.<br />
d. Remove any adjusting key or<br />
wrench before turning the power<br />
tool on. A wrench or a key left attached<br />
to a rotating part of the power<br />
tool may result in personal injury.<br />
e. Do not overreach. Keep proper<br />
footing and balance at all times.<br />
This enables better control of the<br />
power tool in unexpected situations.<br />
f. Dress properly. Do not wear loose<br />
clothing or jewelry. Keep your<br />
hair, clothing and gloves away<br />
from moving parts. Loose clothes,<br />
jewelry or long hair can be caught in<br />
moving parts.<br />
g. If devices are provided for the con-<br />
nection of dust extraction and collection<br />
facilities, ensure these are<br />
connected and properly used. Use<br />
of these devices can reduce dustrelated<br />
hazards.<br />
Only use safety equipment that<br />
h.<br />
has been approved by an appropriate<br />
standards agency. Unapproved<br />
safety equipment may not provide<br />
adequate protection. Eye protection<br />
must be ANSI-approved and breathing<br />
protection must be NIOSH-ap-<br />
SKU 98233 For technical questions, please call 1-800-444-3353. Page 4
4.<br />
proved for the specific hazards in the<br />
work area.<br />
Power tool use and care<br />
a. Do not force the power tool. Use<br />
the correct power tool for your application.<br />
The correct power tool will<br />
do the job better and safer at the rate<br />
for which it was designed.<br />
b. Do not use the power tool if the<br />
switch does not turn it on and off.<br />
Any power tool that cannot be controlled<br />
with the switch is dangerous<br />
and must be repaired.<br />
c. Disconnect the plug from the<br />
power source from the power tool<br />
before making any adjustments,<br />
changing accessories, or storing<br />
power tools. Such preventive safety<br />
measures reduce the risk of starting<br />
the power tool accidentally.<br />
d. Store idle power tools out of the<br />
reach of children and do not allow<br />
persons unfamiliar with the power<br />
tool or these instructions to operate<br />
the power tool. Power tools are<br />
dangerous in the hands of untrained<br />
users.<br />
e. Maintain power tools. Check for<br />
misalignment or binding of moving<br />
parts, breakage of parts and any<br />
other condition that may affect the<br />
power tool’s operation. If damaged,<br />
have the power tool repaired<br />
before use. Many accidents are<br />
caused by poorly maintained power<br />
tools.<br />
f. Keep cutting tools sharp and<br />
clean. Properly maintained cutting<br />
tools with sharp cutting edges are<br />
less likely to bind and are easier to<br />
control.<br />
5.<br />
1.<br />
2.<br />
3.<br />
4.<br />
g. Use the power tool, accessories<br />
and tool bits etc. in accordance<br />
with these instructions, taking into<br />
account the working conditions<br />
and the work to be performed. Use<br />
of the power tool for operations different<br />
from those intended could result<br />
in a hazardous situation.<br />
Service<br />
a. Have your power tool serviced by<br />
a qualified repair person using<br />
only identical replacement parts.<br />
This will ensure that the safety of the<br />
power tool is maintained.<br />
<strong>TIG</strong> Welder Safety Warnings<br />
Connection of a plug to this unit<br />
must only be performed by a certified<br />
electrician.<br />
Do not exceed 20 PSI for shielding<br />
gas; 10 PSI is recommended.<br />
Avoid electrical shock. Do not permit<br />
electrically live parts, cables, or<br />
electrodes to contact skin, clothing, or<br />
gloves. Wear ANSI-approved protective<br />
clothing. This unit draws enough<br />
current to cause serious injury or<br />
death. Before turning the <strong>welder</strong> on,<br />
check the electrode holder to be sure<br />
that there are no protruding screws,<br />
and that all insulation is secure. Do<br />
not weld unless you are insulated<br />
from ground and the work piece.<br />
Avoid eye and body damage. Arc<br />
rays and infrared radiation can injure<br />
eyes and burn skin. Wear ANSI approved<br />
eye and body protection. Do<br />
not allow viewing by visitors without<br />
proper eye and body protection. Use<br />
a Face Shield with arc shaded filter<br />
plate.<br />
SKU 98233 For technical questions, please call 1-800-444-3353. Page 5
5.<br />
6.<br />
7.<br />
Move flammable and explosive material<br />
at least 35 feet from the welding<br />
arc to prevent welding sparks or molten<br />
metal from starting a fire. Keep a<br />
type ABC fire extinguisher within easy<br />
reach. Thoroughly clean the object<br />
being welded of any paint, grease, or<br />
other foreign material.<br />
If working on a wall or ceiling prevent<br />
ignition of combustibles on the other<br />
side by moving them to a safe location.<br />
Industrial applications must follow<br />
OSHA guidelines.<br />
8. Prevent eye<br />
injury and<br />
burns. Wearing<br />
and using<br />
ANSI-approved personal safety<br />
clothing and safety devices reduce<br />
the risk for injury.<br />
9.<br />
10.<br />
11.<br />
12.<br />
Leather leggings, fire resistant shoes<br />
or boots should be worn when using<br />
this product. Do not wear pants with<br />
cuffs, shirts with open pockets, or<br />
any clothing that can catch and hold<br />
molten metal or sparks.<br />
Keep clothing and work surfaces free<br />
of grease, oil, solvents, or any flammable<br />
substances. Wear dry, insulating<br />
gloves and protective clothing.<br />
Wear an approved head covering<br />
to protect the head and neck. Use<br />
aprons, cape, sleeves, shoulder covers,<br />
and bibs designed and approved<br />
for welding and cut ting procedures.<br />
When welding/cutting overhead or in<br />
confined spaces, wear flame resistant<br />
ear plugs or ear muffs to keep sparks<br />
out of ears.<br />
13. Prevent accidental fires.<br />
Remove any combustible<br />
material from the work<br />
area.<br />
14.<br />
15.<br />
16.<br />
17.<br />
18.<br />
19.<br />
When possible, move the work to a<br />
location well away from combustible<br />
materials. If relocation is not possible,<br />
protect the combustibles with a<br />
cover made of fire resistant material.<br />
Do not use near degreasing or painting<br />
operations.<br />
Enclose the work area with portable<br />
fire resistant screens. Protect combustible<br />
walls, ceilings, floors, etc.,<br />
from sparks and heat with fire resistant<br />
covers.<br />
Do not weld or cut on materials having<br />
a combustible coating or combustible<br />
internal structure, as in walls or<br />
ceilings, without an approved method<br />
for eliminating the hazard.<br />
After spot welding, make a thorough<br />
examination for evidence of fire. Be<br />
aware that easily-visible smoke or<br />
flame may not be present for some<br />
time after the fire has started. Provide<br />
adequate ventilation in work<br />
areas to prevent accumulation of<br />
flammable gases, vapors, and dust.<br />
Do not apply heat to a container that<br />
has held an unknown substance or a<br />
combustible material whose contents,<br />
when heated, can produce flammable<br />
or explosive vapors. Clean<br />
and purge containers before applying<br />
heat. Vent closed containers, including<br />
castings, before preheating, welding,<br />
or cutting.<br />
Do not touch live electrical parts.<br />
Wear dry, insulating gloves. Do not<br />
touch electrode or conductor tong<br />
SKU 98233 For technical questions, please call 1-800-444-3353. Page 6
20.<br />
with bare hand. Do not wear wet or<br />
damaged gloves.<br />
Ensure that the unit is placed on a<br />
stable location before use. If this unit<br />
falls while plugged in, severe injury,<br />
electric shock, or fire may result.<br />
WARNING<br />
22.<br />
23.<br />
Where ventilation is questionable,<br />
have a qualified technician take an air<br />
sampling to determine the need for<br />
corrective measures. Use mechanical<br />
ventilation to improve air quality.<br />
If engineering controls are not feasible,<br />
use an approved respirator.<br />
Follow OSHA guidelines for Permissible<br />
Exposure Limits (PEL’s) for various<br />
fumes and gases.<br />
Inhalation Hazard:<br />
Welding and Plasma Cutting Produce<br />
toxic fumes.<br />
Exposure to welding or cutting<br />
exhaust fumes can increase the risk<br />
of developing certain cancers, such as<br />
cancer of the larynx and lung cancer.<br />
Also, some diseases that may be linked<br />
to exposure to welding or plasma cutting<br />
exhaust fumes are:<br />
• Early onset of Parkinson’s Disease<br />
• Heart disease • Ulcers<br />
• Damage to the reproductive organs<br />
• Inflammation of the small intestine or<br />
stomach • Kidney damage<br />
• Respiratory diseases such as<br />
emphysema, bronchitis, or pneumonia<br />
Use natural or forced air ventilation and<br />
wear a respirator approved by NIOSH to<br />
protect against the fumes produced to<br />
reduce the risk of developing the above<br />
illnesses.<br />
24.<br />
25.<br />
26.<br />
27.<br />
28.<br />
Follow the American Conference of<br />
Governmental Industrial Hygienists<br />
recommendations for Threshold Limit<br />
Values (TLV’s) for fumes and gases.<br />
Have a recognized specialist in<br />
Industrial Hygiene or Environmental<br />
Services check the operation and air<br />
quality and make recommendations<br />
for the specific welding or cutting situation.<br />
Maintain labels and nameplates on<br />
the tool. These carry important safety<br />
information. If unreadable or missing,<br />
contact <strong>Harbor</strong> <strong>Freight</strong> <strong>Tools</strong> for a<br />
replacement.<br />
Avoid unintentional starting. Prepare<br />
to begin work before turning on the<br />
tool.<br />
Do not leave the tool unattended<br />
when it is plugged into an electrical<br />
outlet. Turn off the tool, and unplug it<br />
from its electrical outlet before leaving.<br />
21.<br />
Avoid overexposure to fumes and<br />
gases. Always keep your head out<br />
of the fumes. Do not breathe the<br />
fumes. Use enough ventilation or<br />
exhaust, or both, to keep fumes and<br />
gases from your breathing zone and<br />
general area.<br />
29.<br />
30.<br />
Do not splice welding cables.<br />
Do not weld sealed containers. All<br />
containers should be considered unsafe<br />
unless they have been rendered<br />
safe or declared safe by a qualified<br />
person.<br />
SKU 98233 For technical questions, please call 1-800-444-3353. Page 7
31.<br />
32.<br />
33.<br />
34.<br />
35.<br />
36.<br />
37.<br />
This product is not a toy. Keep it out<br />
of reach of children.<br />
People with pacemakers should<br />
consult their physician(s) before use.<br />
Electromagnetic fields in close proximity<br />
to heart pacemaker could cause<br />
pacemaker interference or pacemaker<br />
failure. In addition, people with<br />
pacemakers should:<br />
• Avoid operating alone.<br />
• Do not use with power switch locked<br />
on.<br />
• Properly maintain and inspect to<br />
avoid electrical shock.<br />
• Any power cord must be properly<br />
grounded. Ground Fault Circuit Interrupter<br />
(GFCI) should also be implemented<br />
– it prevents sustained electrical<br />
shock.<br />
A GFCI may provide protection from<br />
the “wall to the <strong>welder</strong>”, but a GFCI<br />
will not protect you from faults between<br />
the “<strong>welder</strong> and the work”.<br />
Because a GFCI cannot protect<br />
you from faults between the “<strong>welder</strong><br />
and the work” using proper welding<br />
technique and personal protection<br />
equipment while welding is crucial.<br />
Ground the workpiece as well as the<br />
<strong>welder</strong>.<br />
Use a non-conductive safety mat on<br />
the work surface to insulate the operator<br />
from the work surface.<br />
Turn off, unplug, and discharge electrodes<br />
after use and before service.<br />
Do not attempt to cool the welding tip<br />
with fluids. Allow the tip to cool down<br />
gradually.<br />
38.<br />
39.<br />
40.<br />
Secure cylinders upright to prevent<br />
them from falling. All cylinders should<br />
be used and stored in an upright position.<br />
Never drop or strike a cylinder.<br />
Do not use cylinders that have been<br />
dented. Cylinder caps should be used<br />
when moving or storing cylinders.<br />
Empty cylinders should be kept in<br />
specified areas and clearly marked<br />
“empty.”<br />
Some dust created by power sanding,<br />
sawing, grinding, drilling, and<br />
other construction activities, contains<br />
chemicals known [to the State of California]<br />
to cause cancer, birth defects<br />
or other reproductive harm. Some<br />
examples of these chemicals are:<br />
• Lead from lead-based paints<br />
• Crystalline silica from bricks and cement<br />
or other masonry products<br />
• Arsenic and chromium from chemically<br />
treated lumber<br />
Your risk from these exposures varies,<br />
depending on how often you do<br />
this type of work. To reduce your<br />
exposure to these chemicals: work in<br />
a well ventilated area, and work with<br />
approved safety equipment, such as<br />
those dust masks that are specially<br />
designed to filter out microscopic<br />
particles. (California Health & Safety<br />
Code § 25249.5, et seq.)<br />
WARNING: Handling the cord on<br />
this product will expose you to lead,<br />
a chemical known to the State of<br />
California to cause cancer, and birth<br />
defects or other reproductive harm.<br />
Wash hands after handling. (California<br />
Health & Safety Code § 25249.5,<br />
et seq.)<br />
The warnings, precautions, and instructions<br />
discussed in this instruction<br />
manual cannot cover all possible conditions<br />
and situations that may occur.<br />
It must be understood by the operator<br />
that common sense and caution are<br />
SKU 98233 For technical questions, please call 1-800-444-3353. Page 8
1.<br />
2.<br />
factors which cannot be built into this<br />
product, but must be supplied by the<br />
operator.<br />
Save these<br />
instructions.<br />
Grounding<br />
To prevent<br />
electric shock<br />
and death from<br />
incorrect grounding<br />
wire connection:<br />
Check with a qualified<br />
electrician if you are in doubt<br />
as to whether the outlet is<br />
properly grounded. Have a<br />
plug installed by a certified<br />
electrician. Do not use the<br />
tool if the power cord or plug<br />
is damaged. If damaged, have<br />
it repaired by a service facility<br />
before use. If the plug will not<br />
fit the outlet, have a proper<br />
outlet installed by a qualified<br />
electrician.<br />
Grounded <strong>Tools</strong><br />
The grounding prong in the plug is<br />
connected through the green wire inside<br />
the cord to the grounding system<br />
in the tool. The green wire in the cord<br />
must be the only wire connected to<br />
the tool’s grounding system and must<br />
never be attached to an electrically<br />
“live” terminal.<br />
The tool must be plugged into an<br />
appropriate outlet, properly installed<br />
and grounded in accordance with all<br />
codes and ordinances.<br />
1.<br />
2.<br />
3.<br />
4.<br />
5.<br />
6.<br />
7.<br />
Extension Cords<br />
As the distance from the supply outlet<br />
increases, you must use a heavier<br />
gauge extension cord. Using extension<br />
cords with inadequately sized<br />
wire causes a serious drop in voltage,<br />
resulting in loss of power and possible<br />
tool damage.<br />
(See Table A.)<br />
The smaller the gauge number of the<br />
wire, the greater the capacity of the<br />
cord. For example, a 14 gauge cord<br />
can carry a higher current than a 16<br />
gauge cord. (See Table A.)<br />
When using more than one extension<br />
cord to make up the total length,<br />
make sure each cord contains at<br />
least the minimum wire size required.<br />
(See Table A.)<br />
If you are using one extension cord<br />
for more than one tool, add the<br />
nameplate amperes and use the sum<br />
to determine the required minimum<br />
cord size. (See Table A.)<br />
If you are using an extension cord<br />
outdoors, make sure it is marked with<br />
the suffix “W-A” (“W” in Canada) to<br />
indicate it is acceptable for outdoor<br />
use.<br />
Make sure the extension cord is properly<br />
wired and in good electrical condition.<br />
Always replace a damaged<br />
extension cord or have it repaired by<br />
a qualified electrician before using it.<br />
Protect the extension cords from<br />
sharp objects, excessive heat, and<br />
damp or wet areas.<br />
SKU 98233 For technical questions, please call 1-800-444-3353. Page 9
RECOMMENDED MINIMUM WIRE<br />
GAUGE FOR EXTENSION CORDS*<br />
(120/240 VOLT)<br />
NAMEPLATE<br />
AMPERES<br />
(at full load)<br />
25’<br />
EXTENSION CORD<br />
LENGTH<br />
50’<br />
75’<br />
100’<br />
150’<br />
0 – 2.0 18 18 18 18 16<br />
2.1 – 3.4 18 18 18 16 14<br />
3.5 – 5.0 18 18 16 14 12<br />
5.1 – 7.0 18 16 14 12 12<br />
7.1 – 12.0 18 14 12 10 -<br />
12.1 – 16.0 14 12 10 - -<br />
16.1 – 20.0 12 10 - - -<br />
TABLE A<br />
* Based on limiting the line<br />
voltage drop to five volts at<br />
150% of the rated amperes.<br />
Symbology<br />
Double Insulated<br />
Canadian Standards Association<br />
V~<br />
A<br />
n 0 xxxx/min.<br />
Underwriters Laboratories, Inc.<br />
Volts Alternating Current<br />
Amperes<br />
No Load Revolutions per Minute<br />
(RPM)<br />
SKU 98233 For technical questions, please call 1-800-444-3353. Page 10
Specifications<br />
Electrical Requirements<br />
Welding Current Range<br />
Duty Cycle<br />
Gas Fittings<br />
Gas Input<br />
230 V~ / 60 Hz<br />
19.8 Amp<br />
10 to 165 A<br />
60% @ 165 Amps<br />
80% @ 126 Amps<br />
100% @ 98 Amps<br />
Intake: 9/16” 18 TPI<br />
Outlet: 3/8” 24 TPI<br />
10 PSI<br />
Tungsten Electrode Size 5/32”<br />
Capacity<br />
Unpacking<br />
up to 1/4” Steel Plate<br />
When unpacking, check to make sure<br />
that the item is intact and undamaged. If<br />
any parts are missing or broken, please<br />
call <strong>Harbor</strong> <strong>Freight</strong> <strong>Tools</strong> at the number<br />
shown on the cover of this manual as soon<br />
as possible.<br />
List of contents<br />
Description<br />
Qty<br />
Electrode Holder 1<br />
<strong>TIG</strong> Torch 1<br />
Ceramic Gas Nozzle 4<br />
1/8" Copper Collet Body 1<br />
Copper Collet 4<br />
Black Cap 1<br />
Ground Clamp 1<br />
Set up Instructions<br />
Read the entire Important<br />
Safety Information<br />
section at the beginning of this<br />
manual including all text under<br />
subheadings therein before set<br />
up or use of this product.<br />
Tool Set Up<br />
To prevent<br />
serious injury<br />
from accidental<br />
operation:<br />
Turn the Power Switch of the<br />
tool to its “OFF” position and<br />
unplug the tool from its<br />
electrical outlet before<br />
performing any inspection,<br />
maintenance, or cleaning<br />
procedures.<br />
Connection of a 230V UL listed plug<br />
rated to at least 20 Amps to this unit<br />
must only be performed by a certified<br />
electrician. The plug installed for the<br />
Welder must match the receptacle.<br />
Work Piece and Work Area Set Up<br />
1.<br />
2.<br />
3.<br />
4.<br />
Designate a work area that is clean<br />
and well-lit. The work area must not<br />
allow access by children or pets to<br />
prevent injury and distraction.<br />
Route the power cord along a safe<br />
route to reach the work area without<br />
creating a tripping hazard or exposing<br />
the power cord to possible damage.<br />
The power cord must reach the work<br />
area with enough extra length to allow<br />
free movement while working.<br />
Secure loose work pieces using a<br />
vise or clamps (not included) to prevent<br />
movement while working. For<br />
greater safety; ground the workpiece.<br />
There must not be hazardous objects,<br />
such as utility lines or foreign<br />
objects, nearby that will present a<br />
hazard while working.<br />
SKU 98233 For technical questions, please call 1-800-444-3353. Page 11
Front of Welder<br />
Power<br />
Switch<br />
Digital<br />
Display<br />
Overload<br />
Light<br />
Current<br />
Output<br />
Knob<br />
Power<br />
Supply<br />
Light<br />
Back of Welder<br />
Name Plate<br />
Power Input<br />
Cooling Fan<br />
Gas Inlet<br />
Proper <strong>TIG</strong> Connection<br />
Grounding<br />
Clamp and<br />
Cable (34)<br />
Grounding<br />
<strong>TIG</strong> Torch and<br />
Cable (32)<br />
Gas<br />
Flow<br />
Delay<br />
Switch<br />
Cable<br />
Connection<br />
(ground)<br />
<strong>TIG</strong><br />
switch<br />
connect<br />
Gas<br />
Outlet<br />
Stick<br />
or <strong>TIG</strong><br />
Switch<br />
Cable<br />
Connection<br />
(<strong>welder</strong>)<br />
Proper Arc (stick) Welding Connection<br />
Grounding<br />
Clamp and<br />
Cable (34)<br />
Electrode<br />
Clamp and<br />
Cable (33)<br />
SKU 98233 For technical questions, please call 1-800-444-3353. Page 12
Operating Instructions<br />
1.<br />
2.<br />
Wear protective<br />
gear during use;<br />
ANSI-approved, shade<br />
number level 14 eye<br />
protection, a full face shield<br />
(or welding mask), ear<br />
protection, welding gloves<br />
and apron, NIOSH-approved<br />
respirator, and fire resistant<br />
work clothes without pockets<br />
should be worn when welding.<br />
Light from the arc can cause<br />
permanent damage to the<br />
eyes and skin. Do not breathe<br />
arc fumes.<br />
Place the Welder on a level surface<br />
that can bear its weight near the work<br />
area.<br />
Connect a 12 AWG ground wire (not<br />
included) to the Ground Post on the<br />
rear of the Welder (see page 12) and<br />
route it to ground. If possible, ground<br />
the workpiece independent of the<br />
<strong>welder</strong>.<br />
<strong>TIG</strong> Connection<br />
2.<br />
3.<br />
4.<br />
5.<br />
Plug the cable of the Grounding<br />
Clamp (34) into the <strong>welder</strong> and secure<br />
the clamp to a clean, exposed<br />
metal part of the workpiece.<br />
Assemble the desired accessories<br />
and rod inside the tip of the <strong>TIG</strong> Torch<br />
handle.<br />
a. Unscrew the Ceramic Nozzle (6A)<br />
on the Torch Handle (4A).<br />
b. Unscrew the Collet Housing (5A).<br />
c. Place a 5/32” prepared tungsten<br />
welding rod (not included) into the<br />
torch.<br />
d. Screw the Collet Housing and Ceramic<br />
Nozzle back onto the Torch.<br />
Connect a hose and coupling from<br />
the gas regulator on an Argon gas<br />
tank (none included) to the Argon<br />
Gas Inlet on the back of the unit. Follow<br />
the gas cylinder manufacturer’s<br />
instructions for set-up and use.<br />
The Gas Flow Delay Switch allows<br />
control of how long the shielding gas<br />
flows. To conserve shielding gas<br />
switch it to “short”. If the welded surface<br />
is being tarnished, change the<br />
switch to “long”.<br />
<strong>TIG</strong> Welding<br />
Cable<br />
Plug<br />
<strong>TIG</strong> Torch<br />
Control<br />
Gas<br />
Outlet<br />
Hose<br />
1. Connect the <strong>TIG</strong> torch control, cable<br />
plug, and gas outlet hose as shown<br />
on page 12. Twist to lock in place.<br />
6.<br />
7.<br />
8.<br />
Turn the Current Adjustment Knob to<br />
meet the needs of the job.<br />
Move the Stick or <strong>TIG</strong> Switch to “<strong>TIG</strong>”<br />
(bottom position).<br />
Plug the power cord into a grounded<br />
230V electric socket and turn the<br />
Welder on.<br />
DANGER! To prevent serious<br />
injury and death: The <strong>TIG</strong> Welder<br />
will immediately turn on when the<br />
SKU 98233 For technical questions, please call 1-800-444-3353. Page 13
9.<br />
10.<br />
trigger is held down. When the<br />
operator is not holding the Torch,<br />
it must be sitting on a nonconductive,<br />
nonflammable surface.<br />
Hold the Trigger down and tilt the<br />
torch forward. Keep a constant<br />
distance between the torch and the<br />
workpiece but do not contact it.<br />
DANGER! To prevent serious<br />
injury and death: Feed the filler<br />
metal being used into the arc with<br />
a properly insulated holder (not<br />
included).<br />
If too much current is drawn from the<br />
<strong>welder</strong>; the Thermal Overload protector<br />
will activate, the Overload indicator<br />
will light, and the <strong>welder</strong> will turn<br />
off until it cools down. It will automatically<br />
reset.<br />
Arc (stick) Connection<br />
1.<br />
2.<br />
3.<br />
Connect the Electrode Clamp and<br />
Cable (33) to the Arc Welder, as<br />
shown on page 12 and twist to lock in<br />
place.<br />
Plug the cable of the Grounding<br />
Clamp (34) into the <strong>welder</strong> and secure<br />
the clamp to a clean, exposed<br />
metal part of the workpiece.<br />
Place the metal portion of the welding<br />
rod inside the jaws of the Electrode<br />
Clamp. Welding rod types vary for<br />
welding different metals.<br />
Arc Welding<br />
4.<br />
Move the Stick or <strong>TIG</strong> Switch to “Arc”<br />
(top position).<br />
6.<br />
7.<br />
8.<br />
9.<br />
10.<br />
11.<br />
12.<br />
Plug the power cord into a grounded<br />
230V electric socket and turn the<br />
Welder on.<br />
DANGER! To prevent serious<br />
injury and death: If the operator<br />
is not holding the Torch, it must<br />
be sitting on a nonconductive,<br />
nonflammable surface. The Stick<br />
Welder will immediately turn on<br />
when the power button is turned<br />
on.<br />
Stroke the workpiece lightly to ignite<br />
the arc. Do not strike like a match.<br />
Never tap the electrode wire to ignite<br />
the arc; it will damage the electrode.<br />
When the arc ignites, tilt the electrode<br />
forward and hold it near the workpiece.<br />
If too much current is drawn from the<br />
<strong>welder</strong>; the Thermal Overload protector<br />
will activate, the Overload indicator<br />
will light, and the <strong>welder</strong> will turn<br />
off until it cools down. It will automatically<br />
reset.<br />
When finished welding; lift the electrode<br />
from the workpiece, discharge<br />
the electrode to ground and turn the<br />
Welder off.<br />
Place the handle down on a nonflammable,<br />
nonconductive surface.<br />
To prevent accidents disconnect the<br />
tool from its power supply after use.<br />
Allow the tool to cool down, clean,<br />
then store the tool indoors out of children’s<br />
reach.<br />
5.<br />
Turn the Current Adjustment Knob to<br />
meet the needs of the job.<br />
REV 08i<br />
SKU 98233 For technical questions, please call 1-800-444-3353. Page 14
Maintenance And<br />
Servicing<br />
Procedures not specifically<br />
explained in this manual<br />
must be performed only by a<br />
qualified technician.<br />
To prevent<br />
serious injury<br />
from accidental<br />
operation:<br />
Turn the Power Switch of the<br />
tool to its “OFF” position and<br />
unplug the tool from its<br />
electrical outlet before<br />
performing any inspection,<br />
maintenance, or cleaning<br />
procedures.<br />
4. The Ceramic Nozzle (6A) will occasionally<br />
need to be cleaned of spatter<br />
from welding. Clean it with a metal<br />
brush. When the nozzle deteriorates<br />
or can no longer be cleaned, it will<br />
need to be replaced. Unscrew the<br />
nozzle and replace it with a new one.<br />
5. WARNING! If the supply cord of<br />
this power tool is damaged, it must<br />
be replaced only by a qualified<br />
service technician.<br />
To prevent serious<br />
injury from tool<br />
failure:<br />
Do not use damaged<br />
equipment. If abnormal noise<br />
or vibration occurs, have the<br />
problem corrected before<br />
further use.<br />
Cleaning, Maintenance, and<br />
Lubrication<br />
1. BEFORE EACH USE, inspect the<br />
general condition of the tool. Check<br />
for loose screws, misalignment or<br />
binding of moving parts, cracked or<br />
broken parts, damaged electrical wiring,<br />
and any other condition that may<br />
affect its safe operation.<br />
2. After Use, clean external surfaces<br />
of the tool with clean cloth.<br />
3.<br />
Periodically clear out the cooling vent<br />
and fan with compressed air.<br />
SKU 98233 For technical questions, please call 1-800-444-3353. Page 15
PLEASE READ THE FOLLOWING CAREFULLY<br />
The manufacturer and/or distributor has provided the parts list and assembly<br />
diagram in this manual as a reference tool only. Neither the manufacturer or<br />
distributor makes any representation or warranty of any kind to the buyer that<br />
he or she is qualified to make any repairs to the product, or that he or she is<br />
qualified to replace any parts of the product. In fact, the manufacturer and/<br />
or distributor expressly states that all repairs and parts replacements should<br />
be undertaken by certified and licensed technicians, and not by the buyer. The<br />
buyer assumes all risk and liability arising out of his or her repairs to the<br />
original product or replacement parts thereto, or arising out of his or her<br />
installation of replacement parts thereto.<br />
Troubleshooting<br />
Problem Possible Causes Likely Solutions<br />
Tool will not start 1. No power at outlet.<br />
1. Check power at outlet.<br />
No weld output<br />
with ready light on<br />
No weld output;<br />
high temperature<br />
light on<br />
Erratic or improper<br />
arc or welding<br />
output<br />
Fan not operating<br />
Main Supply Fuse<br />
shuts off frequently<br />
2.<br />
3.<br />
1.<br />
Cord not connected.<br />
Line voltage incorrect.<br />
Weld cable loose.<br />
2. Bad work clamp to workpiece<br />
connection.<br />
1.<br />
2.<br />
Welder overheated.<br />
Duty cycle or amps too high.<br />
3. Airflow is blocked.<br />
1. Bad weld connections.<br />
2.<br />
3.<br />
Polarity incorrect.<br />
Workpiece painted or dirty.<br />
4. Ceramic Nozzle obstructed by<br />
welding spatter.<br />
1. Fan blocked/dirty.<br />
2.<br />
Check that cord is plugged in.<br />
3. Make sure the <strong>welder</strong> is plugged into a 230V<br />
electrical outlet.<br />
1. Tighten weld cable connection at <strong>welder</strong>.<br />
2. Make sure the area where the clamp is<br />
attached is clean, exposed metal; free of dirt,<br />
paint and oil.<br />
1. Allow unit to cool with the fan on.<br />
2.<br />
Reduce duty cycle or amps.<br />
3. Clean vents and fan out with compressed air.<br />
1. Clean and tighten weld connections.<br />
2.<br />
3.<br />
4.<br />
Connect polarity correctly.<br />
Clean workpiece thoroughly.<br />
Clean or replace nozzle.<br />
1. Remove obstruction and clean with<br />
compressed air.<br />
2. Fan broken.<br />
2. Have the fan replaced by a qualified service<br />
technician.<br />
Circuit Breaker rating is too low. Install a circuit breaker rated for greater than 20<br />
Amps.<br />
Follow all safety precautions whenever diagnosing or servicing the<br />
tool. Disconnect power supply before service.<br />
SKU 98233 For technical questions, please call 1-800-444-3353. Page 16
Main unit Parts List<br />
Part Description Qty<br />
1 Handle 1<br />
2 Cover 1<br />
3 Back Cover 1<br />
4 Divider 1<br />
5 PCB 1<br />
6 Transformer 1<br />
7 Drive PCB 1<br />
8 Control PCB 1<br />
9 Display 1<br />
10 Light 1<br />
11 Light 1<br />
12 Toggle Switch 1<br />
13 Toggle Switch 1<br />
14 Socket 1<br />
15 Gas Inlet 1<br />
16 Socket 1<br />
17 Coupling Coil 1<br />
18 Transformer 1<br />
Main unit Parts List<br />
Part Description Qty<br />
19 Reactance 1<br />
20 Resister 1<br />
21 Inductor 1<br />
22 Radiator 1<br />
23 Inductor 1<br />
24 Rectifier 1<br />
25 Fan 1<br />
26 Fan Guard 1<br />
27 Inverter PCB 1<br />
28 Electromagnet 1<br />
29 High Pressure PCB 1<br />
30 Splitter 1<br />
31 Torch Switch Mounting 1<br />
32 <strong>TIG</strong> Torch and Cable (not shown) 1<br />
33 Electrode Clamp and Cable 1<br />
(not shown)<br />
34 Ground Clamp and Cable<br />
(not shown)<br />
1<br />
Main unit diagram<br />
SKU 98233 For technical questions, please call 1-800-444-3353. Page 17
Torch Parts List<br />
Part Description Qty<br />
1A Long Back Cap 1<br />
2A Short Back Cap 1<br />
3A1 Collet 1/16” (1.6mm) 1<br />
3A2 Collet 2/25” (2.0mm) 1<br />
3A3 Collet 3/32” (2.4mm) 1<br />
3A4 Collet 1/8” (3.2mm) 1<br />
Torch Parts List<br />
Part Description Qty<br />
4A Torch Handle 1<br />
5A Collet Housing 1<br />
6A1 Ceramic Nozzle size 4; 10N50 1<br />
6A2 Ceramic Nozzle size 5; 10N49 1<br />
6A3 Ceramic Nozzle size 6; 10N48 1<br />
6A4 Ceramic Nozzle size 7; 10N47 1<br />
Torch parts diagram<br />
1A<br />
3A<br />
2A<br />
4A<br />
5A<br />
6A1-4<br />
Record Product’s Serial Number Here:<br />
Note: If product has no serial number, record month and year of purchase instead.<br />
Note: Some parts are listed and shown for illustration purposes only, and are not available<br />
individually as replacement parts.<br />
SKU 98233 For technical questions, please call 1-800-444-3353. Page 18
Electrical diagram<br />
SKU 98233 For technical questions, please call 1-800-444-3353. Page 19
Limited 1 Year / 90 day warranty<br />
<strong>Harbor</strong> <strong>Freight</strong> <strong>Tools</strong> Co. makes every effort to assure that its products meet high<br />
quality and durability standards, and warrants to the original purchaser that for a period<br />
of ninety days from date of purchase that the torch, liner, wire feed mechanism (if applicable),<br />
welding clamps, electrode holders, cables and accessories packed with the<br />
<strong>welder</strong> are free of defects in materials and workmanship. This Limited 90 Day/1 Year<br />
Warranty shall not apply to consumable parts such as tips, welding wire, and gas<br />
nozzles. <strong>Harbor</strong> <strong>Freight</strong> <strong>Tools</strong> also warrants to the original purchaser, for a period of<br />
one year from date of purchase, that the transformer and rectifier are free from defects<br />
in materials and workmanship (90 days if used by a professional contractor or if used as<br />
rental equipment). This warranty does not apply to damage due directly or indirectly to<br />
misuse, abuse, negligence or accidents, repairs or alterations outside our facilities, normal<br />
wear and tear, or to lack of maintenance. We shall in no event be liable for death,<br />
injuries to persons or property, or for incidental, contingent, special or consequential<br />
damages arising from the use of our product. Some states do not allow the exclusion<br />
or limitation of incidental or consequential damages, so the above limitation of exclusion<br />
may not apply to you. This warranty is expressly in lieu of all other<br />
warranties, express or implied, including the warranties of merchantability<br />
and fitness.<br />
To take advantage of this warranty, the product or part must be returned to us with<br />
transportation charges prepaid. Proof of purchase date and an explanation of the complaint<br />
must accompany the merchandise. If our inspection verifies the defect, we will either<br />
repair or replace the product at our election or we may elect to refund the purchase<br />
price if we cannot readily and quickly provide you with a replacement. We will return repaired<br />
products at our expense, but if we determine there is no defect, or that the defect<br />
resulted from causes not within the scope of our warranty, then you must bear the cost<br />
of returning the product.<br />
This warranty gives you specific legal rights and you may also have other rights<br />
which vary from state to state.<br />
3491 Mission Oaks Blvd. • PO Box 6009 • Camarillo, CA 93011 • (800) 444-3353<br />
SKU 98233 For technical questions, please call 1-800-444-3353. Page 20


