

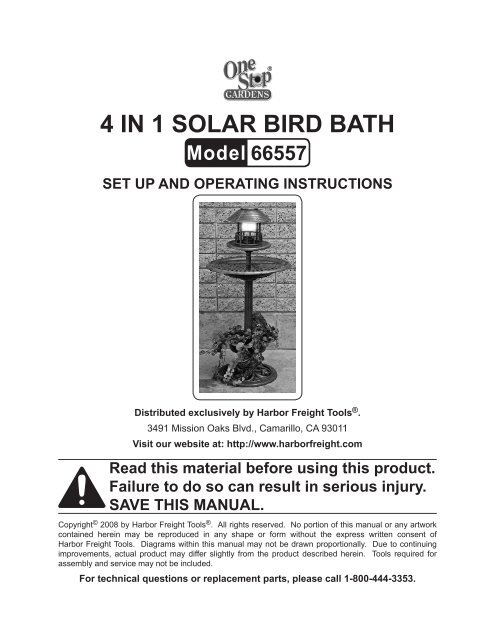
4 in 1 solar bird bath - Harbor Freight Tools
4 in 1 solar bird bath - Harbor Freight Tools
4 in 1 solar bird bath - Harbor Freight Tools

You also want an ePaper? Increase the reach of your titles
YUMPU automatically turns print PDFs into web optimized ePapers that Google loves.
4 <strong>in</strong> 1 <strong>solar</strong> <strong>bird</strong> <strong>bath</strong><br />
66557<br />
Set up and Operat<strong>in</strong>g Instructions<br />
Distributed exclusively by <strong>Harbor</strong> <strong>Freight</strong> <strong>Tools</strong> ® .<br />
3491 Mission Oaks Blvd., Camarillo, CA 93011<br />
Visit our website at: http://www.harborfreight.com<br />
Read this material before us<strong>in</strong>g this product.<br />
Failure to do so can result <strong>in</strong> serious <strong>in</strong>jury.<br />
Save this manual.<br />
Copyright © 2008 by <strong>Harbor</strong> <strong>Freight</strong> <strong>Tools</strong> ® . All rights reserved. No portion of this manual or any artwork<br />
conta<strong>in</strong>ed here<strong>in</strong> may be reproduced <strong>in</strong> any shape or form without the express written consent of<br />
<strong>Harbor</strong> <strong>Freight</strong> <strong>Tools</strong>. Diagrams with<strong>in</strong> this manual may not be drawn proportionally. Due to cont<strong>in</strong>u<strong>in</strong>g<br />
improvements, actual product may differ slightly from the product described here<strong>in</strong>. <strong>Tools</strong> required for<br />
assembly and service may not be <strong>in</strong>cluded.<br />
For technical questions or replacement parts, please call 1-800-444-3353.
Save This Manual<br />
Keep this manual for the safety warn<strong>in</strong>gs<br />
and precautions, assembly, operat<strong>in</strong>g,<br />
<strong>in</strong>spection, ma<strong>in</strong>tenance and clean<strong>in</strong>g<br />
procedures. Write the product’s serial<br />
number <strong>in</strong> the back of the manual near the<br />
assembly diagram (or month and year of<br />
purchase if product has no number). Keep<br />
this manual and the receipt <strong>in</strong> a safe and<br />
dry place for future reference.<br />
Important SAFETY<br />
Information<br />
In this manual, on the label<strong>in</strong>g,<br />
and all other <strong>in</strong>formation provided<br />
with this product:<br />
This is the safety alert<br />
symbol. It is used to alert<br />
you to potential personal<br />
<strong>in</strong>jury hazards. Obey all<br />
safety messages that<br />
follow this symbol to avoid<br />
possible <strong>in</strong>jury or death.<br />
DANGER <strong>in</strong>dicates<br />
a hazardous<br />
situation which, if not<br />
avoided, will result <strong>in</strong> death or<br />
serious <strong>in</strong>jury.<br />
WARNING<br />
<strong>in</strong>dicates a<br />
hazardous situation which, if<br />
not avoided, could result <strong>in</strong><br />
death or serious <strong>in</strong>jury.<br />
CAUTION, used<br />
with the safety<br />
alert symbol, <strong>in</strong>dicates a<br />
hazardous situation which, if<br />
not avoided, could result <strong>in</strong><br />
m<strong>in</strong>or or moderate <strong>in</strong>jury.<br />
1.<br />
2.<br />
3.<br />
4.<br />
5.<br />
1.<br />
2.<br />
3.<br />
4.<br />
5.<br />
6.<br />
NOTICE is used to<br />
address practices<br />
not related to personal <strong>in</strong>jury.<br />
CAUTION, without<br />
the safety alert<br />
symbol, is used to address<br />
practices not related to<br />
personal <strong>in</strong>jury.<br />
Assembly Precautions<br />
Assemble only accord<strong>in</strong>g to these<br />
<strong>in</strong>structions. Improper assembly can<br />
create hazards.<br />
Wear ANSI-approved safety goggles<br />
and heavy-duty work gloves dur<strong>in</strong>g<br />
assembly.<br />
Keep assembly area clean and well<br />
lit.<br />
Keep bystanders out of the area dur<strong>in</strong>g<br />
assembly.<br />
Do not assemble when tired or when<br />
under the <strong>in</strong>fluence of drugs or medication.<br />
Bird Bath Safety Warn<strong>in</strong>gs<br />
Locate Bird Bath on a level surface<br />
and use the stakes provided to secure<br />
<strong>in</strong> place.<br />
Inspect before every use; do not use<br />
if parts are loose or damaged.<br />
Use as <strong>in</strong>tended only.<br />
Keep out of reach of children.<br />
CONTAINS NiCd BATTERY. BAT-<br />
TERY MUST BE RECYCLED OR<br />
DISPOSED OF PROPERLY.<br />
Only <strong>in</strong>sert rechargeable NiCd batteries<br />
<strong>in</strong>to this device.<br />
SKU 66557 For technical questions, please call 1-800-444-3353. Page 2
7.<br />
The warn<strong>in</strong>gs, precautions, and <strong>in</strong>structions<br />
discussed <strong>in</strong> this <strong>in</strong>struction<br />
manual cannot cover all possible conditions<br />
and situations that may occur.<br />
It must be understood by the operator<br />
that common sense and caution are<br />
factors which cannot be built <strong>in</strong>to this<br />
product, but must be supplied by the<br />
operator.<br />
Save these<br />
<strong>in</strong>structions.<br />
SKU 66557 For technical questions, please call 1-800-444-3353. Page 3
Solar Panel<br />
Dimensions<br />
Battery<br />
Specifications<br />
2 ⅛” x 2 ⅛”<br />
Ni-Cd, “AA”,<br />
rechargeable<br />
Unpack<strong>in</strong>g<br />
When unpack<strong>in</strong>g, make sure that the<br />
item is <strong>in</strong>tact and undamaged. If any parts<br />
are miss<strong>in</strong>g or broken, please call <strong>Harbor</strong><br />
<strong>Freight</strong> <strong>Tools</strong> at the number shown on the<br />
cover of this manual as soon as possible.<br />
ASSEMBLY<br />
Read the entire Important<br />
Safety Information<br />
section at the beg<strong>in</strong>n<strong>in</strong>g of this<br />
manual <strong>in</strong>clud<strong>in</strong>g all text under<br />
subhead<strong>in</strong>gs there<strong>in</strong> before set<br />
up or use of this product.<br />
Note: For additional <strong>in</strong>formation regard<strong>in</strong>g<br />
the parts listed <strong>in</strong> the follow<strong>in</strong>g pages,<br />
refer to the Assembly Diagram near<br />
the end of this manual.<br />
1.<br />
2.<br />
3.<br />
4.<br />
5.<br />
Screw Lower Pole (10) <strong>in</strong>to Base<br />
(11).<br />
Center Planter (18) over Lower Pole<br />
(10) and screw Upper Pole (9) <strong>in</strong>to<br />
Lower Pole (10).<br />
Thread Stud (15) <strong>in</strong>to Upper Pole (9),<br />
slide Washer (16) on Stud, then connect<br />
Bas<strong>in</strong> (8) and Small Pole (6) to<br />
Upper Pole with Stud (15).<br />
Attach Tripod (13) to Small Pole (6)<br />
with Bolt (17).<br />
To assemble Bird Feeder with Roof<br />
and Solar Light:<br />
6.<br />
a. Insert 4 Fence Posts (7) <strong>in</strong>to holes<br />
on top of Floor (5) and secure from<br />
underneath Floor with Screws (3),<br />
then snap ends of Fence <strong>in</strong>to adjacent<br />
Fence Posts;<br />
b. Insert Dish (12) <strong>in</strong>to hole <strong>in</strong> center<br />
top of Floor;<br />
c. Slide Ceil<strong>in</strong>g (4) onto Fence Posts<br />
(7) and secure with Screws (3);<br />
d. Position Roof (2) over Ceil<strong>in</strong>g (4),<br />
l<strong>in</strong><strong>in</strong>g up “J” shaped guides on underside<br />
of Roof near Fence poles.<br />
Twist Roof clockwise to lock guides<br />
<strong>in</strong> place over poles;<br />
e. Slide Solar Light (1) <strong>in</strong>to open<strong>in</strong>g <strong>in</strong><br />
top of Roof (2).<br />
Attach Tripod (13) to underside of<br />
Bird Feeder Shelf (5) with Flat Bottom<br />
Screws (14).<br />
Operat<strong>in</strong>g Instructions<br />
1.<br />
2.<br />
3.<br />
Read the entire Important<br />
Safety Information<br />
section at the beg<strong>in</strong>n<strong>in</strong>g of this<br />
manual <strong>in</strong>clud<strong>in</strong>g all text under<br />
subhead<strong>in</strong>gs there<strong>in</strong> before set<br />
up or use of this product.<br />
Decide where you want to place the<br />
Bird Bath. Choose a location which<br />
receives full, direct sunlight for a<br />
m<strong>in</strong>imum of six hours a day and is on<br />
a level surface.<br />
Verify that <strong>in</strong>stallation surface has no<br />
hidden utility l<strong>in</strong>es before proceed<strong>in</strong>g.<br />
Use Stakes (19) to secure Base (11)<br />
<strong>in</strong> place.<br />
To Charge Solar Panel for the first<br />
time:<br />
a. Open Battery Compartment and<br />
remove shipp<strong>in</strong>g tab. Set Power<br />
SKU 66557 For technical questions, please call 1-800-444-3353. Page 4
Switch located under Solar Panel<br />
(1A) to “OFF”. (See “Replac<strong>in</strong>g The<br />
Battery” for access to Battery Compartment<br />
and ON/OFF switch.)<br />
b. Solar Light will need to charge for<br />
at least 8-12 hours before us<strong>in</strong>g it<br />
for the first time. Dur<strong>in</strong>g the day,<br />
the Solar Panel on the Solar Light<br />
(1) converts sunlight <strong>in</strong>to electricity,<br />
recharg<strong>in</strong>g the battery. The amount<br />
of light received depends on placement<br />
of Bird Bath, geographic location<br />
and weather. If the weather is<br />
cloudy and the panel did not receive<br />
a full charge, the Solar Light may not<br />
run for the full 10 hours. It will catch<br />
up after six hours of direct sun.<br />
c. After the Solar Panel is charged<br />
for the first time, you can leave the<br />
Power Switch on, or turn it off and<br />
on, as needed.<br />
4.<br />
To complete other Bird Bath components:<br />
a. Fill Dish (12) with <strong>bird</strong> seed (sold<br />
separately).<br />
b. Fill Bas<strong>in</strong> (8) with water. Change<br />
regularly.<br />
c. Plant plants (sold separately) <strong>in</strong><br />
Planter (18).<br />
SKU 66557 For technical questions, please call 1-800-444-3353. Page 5
Ma<strong>in</strong>tenance And<br />
Servic<strong>in</strong>g<br />
Do not use damaged<br />
equipment.<br />
1. Before EACH USE, <strong>in</strong>spect general<br />
condition of product. Check for<br />
cracked or broken parts, and any<br />
other condition that may affect safe<br />
operation.<br />
4.<br />
5.<br />
Install new battery <strong>in</strong>to Battery Compartment.<br />
Make certa<strong>in</strong> that battery<br />
is placed accord<strong>in</strong>g to correct polarity.<br />
Replace Battery Cover, l<strong>in</strong><strong>in</strong>g up<br />
flanges and turn<strong>in</strong>g clockwise to<br />
close.<br />
2.<br />
3.<br />
Periodically clean <strong>solar</strong> panel and<br />
exterior of the Bird Bath with clean,<br />
moist cloth. Dirty <strong>solar</strong> panels can<br />
cause the unit to not draw sufficient<br />
power for the light.<br />
Replace Battery as noted below.<br />
Replac<strong>in</strong>g the Battery<br />
Power Switch<br />
Battery<br />
Battery Cover<br />
1. Replace the rechargeable battery<br />
every 12 months.<br />
2.<br />
3.<br />
Twist Battery Cover (which holds the<br />
Solar Panel (1A)) counter-clockwise<br />
to remove Battery Cover. Turn Power<br />
Switch to “OFF”.<br />
Remove and properly recycle old<br />
battery from Battery Compartment.<br />
Make certa<strong>in</strong> that new battery is NiCd<br />
(“AA”) rechargeable.<br />
SKU 66557 For technical questions, please call 1-800-444-3353. Page 6
PLEASE READ THE FOLLOWING CAREFULLY<br />
The manufacturer and/or distributor has provided the parts list and assembly<br />
diagram <strong>in</strong> this manual as a reference tool only. Neither the manufacturer or<br />
distributor makes any representation or warranty of any k<strong>in</strong>d to the buyer that<br />
he or she is qualified to make any repairs to the product, or that he or she is<br />
qualified to replace any parts of the product. In fact, the manufacturer and/<br />
or distributor expressly states that all repairs and parts replacements should<br />
be undertaken by certified and licensed technicians, and not by the buyer. The<br />
buyer assumes all risk and liability aris<strong>in</strong>g out of his or her repairs to the<br />
orig<strong>in</strong>al product or replacement parts thereto, or aris<strong>in</strong>g out of his or her<br />
<strong>in</strong>stallation of replacement parts thereto.<br />
SKU 66557 For technical questions, please call 1-800-444-3353. Page 7
Parts List<br />
Part Description Qty.<br />
1 Solar Light 1<br />
1A Solar Panel w Battery<br />
-<br />
Compartment (on Solar Light)<br />
2 Roof 1<br />
3 ½” Screw 8<br />
4 Ceil<strong>in</strong>g 1<br />
5 Floor 1<br />
6 Small Pole 1<br />
7 Fence Post 4<br />
8 Bas<strong>in</strong> 1<br />
9 Upper Pole 1<br />
10 Lower Pole 1<br />
11 Base 1<br />
12 Dish 1<br />
13 Tripod 1<br />
14 ⅜” Flat Bottom Screw 3<br />
15 Stud 1<br />
16 Washer 1<br />
17 Bolt 1<br />
18 Planter 1<br />
19 Stake 4<br />
ASSEMBLY DIAGRAM<br />
1A<br />
1<br />
2<br />
4<br />
3<br />
12<br />
7<br />
5<br />
17<br />
14<br />
13<br />
15 and 16<br />
6<br />
8<br />
Note: Parts 14, 15,<br />
16 and 17 are<br />
<strong>in</strong>dicated, but<br />
not shown, on<br />
diagram.<br />
9<br />
18<br />
Record Product’s Serial Number Here:<br />
<br />
Note: If product has no serial number,<br />
record month and year of purchase<br />
<strong>in</strong>stead.<br />
Note: Some parts are listed and shown for<br />
illustration purposes only, and are not<br />
available <strong>in</strong>dividually as replacement<br />
parts.<br />
19<br />
10<br />
11<br />
SKU 66557 For technical questions, please call 1-800-444-3353. Page 8


