

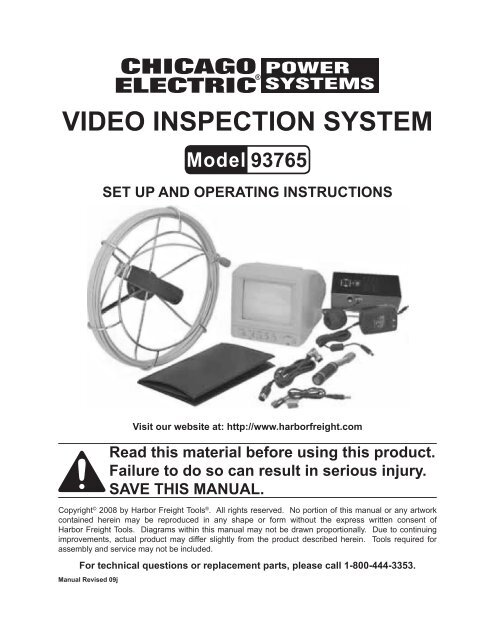
VIDEO INSPECTION SYSTEM - Harbor Freight Tools
VIDEO INSPECTION SYSTEM - Harbor Freight Tools
VIDEO INSPECTION SYSTEM - Harbor Freight Tools

Create successful ePaper yourself
Turn your PDF publications into a flip-book with our unique Google optimized e-Paper software.
<strong>VIDEO</strong> <strong>INSPECTION</strong> <strong>SYSTEM</strong><br />
93765<br />
Set up and Operating Instructions<br />
Visit our website at: http://www.harborfreight.com<br />
Read this material before using this product.<br />
Failure to do so can result in serious injury.<br />
Save this manual.<br />
Copyright © 2008 by <strong>Harbor</strong> <strong>Freight</strong> <strong>Tools</strong> ® . All rights reserved. No portion of this manual or any artwork<br />
contained herein may be reproduced in any shape or form without the express written consent of<br />
<strong>Harbor</strong> <strong>Freight</strong> <strong>Tools</strong>. Diagrams within this manual may not be drawn proportionally. Due to continuing<br />
improvements, actual product may differ slightly from the product described herein. <strong>Tools</strong> required for<br />
assembly and service may not be included.<br />
For technical questions or replacement parts, please call 1-800-444-3353.<br />
Manual Revised 09j
PRODUCT SPECIFICATIONS<br />
Pipe Capacity<br />
Power Adapter Specifications<br />
(Monitor)<br />
Battery Specifications<br />
Monitor Specifications<br />
Camera Specifications<br />
Cable Reel Specifications<br />
Weight<br />
Ideal for pipes 1-1/2” to 4-3/4” inner diameter with multiple bends<br />
Class II Transformer<br />
5’-6” Power Cord<br />
120 V~ / 60 Hz input; 12 VDC / 1200mA output<br />
12 V Li-Ion with Built-in Charger<br />
100-240 V~ / 60 Hz input; 12 VDC / 1 A charger output<br />
Charge Time: 6 Hours / Operating Time: Approx. 4 Hours<br />
5-1/4” Diagonal Screen Measurement<br />
6” W x 6” H x 8” Deep Overall Dimensions<br />
Black & White Screen<br />
420 TV Line Resolution<br />
10 Watts Power Consumption<br />
-20° F ~ 120° F Operating Temperature<br />
7/8” Diameter x 3” Long<br />
1/2” Lens Diameter<br />
6” Total Length w/Spring & Connector<br />
60° Angle of Vision (Horizontal & Vertical)<br />
1-1/2” Depth of Vision<br />
420 TV Line Resolution<br />
Eight Infrared LED’s<br />
-20° F ~ 120° F Operating Temperature<br />
4” Deep x 13” Diameter<br />
5-1/4” Long Rubber Covered Grip<br />
65 Ft. Cable<br />
23 Pounds<br />
Note: Battery, Monitor, and Power Adapters are not water-resistant.<br />
The Video camera may be used for various applications including: inspecting<br />
water supply pipes, waste water pipes, electrical conduit, air conditioning ducts, cable<br />
ducts, vacuum system ducts, plumbing pipes, etc.<br />
SAVE THIS MANUAL<br />
You will need this manual for the safety warnings and precautions, assembly,<br />
operating, inspection, maintenance and cleaning procedures, parts list and assembly<br />
diagram. Keep your invoice with this manual. Write the invoice number on the inside<br />
of the front cover. Keep this manual and invoice in a safe and dry place for future reference.<br />
UNPACKING<br />
When unpacking, check to make sure all the parts shown at the end of this manual<br />
are included. If any parts are missing or broken, please call <strong>Harbor</strong> <strong>Freight</strong> <strong>Tools</strong> at the<br />
number shown on the cover of this manual as soon as possible.<br />
REV 09e, 09j<br />
SKU 93765<br />
For technical questions, please call 1-800-444-3353.<br />
Page 2
GENERAL SAFETY RULES<br />
WARNING!<br />
READ AND UNDERSTAND ALL<br />
INSTRUCTIONS<br />
Failure to follow all instructions listed<br />
below may result in<br />
electric shock, fire, and/or serious<br />
injury.<br />
1.<br />
2.<br />
1.<br />
2.<br />
SAVE THESE INSTRUCTIONS<br />
WORK AREA<br />
Keep work area clean and well lit.<br />
Cluttered benches and dark areas<br />
invite accidents.<br />
Do not operate in explosive<br />
atmospheres, such as in the<br />
presence of flammable liquids, gases,<br />
or dust. Powered products create<br />
sparks which may ignite the dust or<br />
fumes.<br />
ELECTRICAL SAFETY<br />
Grounded devices must be<br />
plugged into an outlet properly<br />
installed and grounded in<br />
accordance with all codes and<br />
ordinances. Never modify the<br />
plug in any way. Do not use any<br />
adapter plugs. Check with a<br />
qualified electrician if you are in<br />
doubt as to whether the outlet is<br />
properly grounded. If the devices<br />
should electrically malfunction or<br />
break down, grounding provides a<br />
low resistance path to carry electricity<br />
away from the user<br />
Do not expose to rain or wet<br />
conditions. Water entering a device<br />
will increase the risk of electric shock.<br />
1.<br />
2.<br />
3.<br />
4.<br />
1.<br />
2.<br />
3.<br />
PERSONAL SAFETY<br />
Stay alert. Watch what you are<br />
doing, and use common sense<br />
when operating a device. Do not<br />
use a device while tired or under<br />
the influence of drugs, alcohol, or<br />
medication. A moment of inattention<br />
while operating devices may result in<br />
serious personal injury.<br />
Dress properly. Do not wear loose<br />
clothing or jewelry. Contain long<br />
hair. Keep hair, clothing, and<br />
gloves away from moving parts.<br />
Loose clothes, jewelry, or long hair<br />
can be caught in moving parts.<br />
Do not overreach. Keep proper<br />
footing and balance at all times.<br />
Proper footing and balance enables<br />
better control of the device in<br />
unexpected situations.<br />
Wear ANSI-approved safety impact<br />
goggles when using this product.<br />
Dust mask, non-skid safety shoes,<br />
and a hard hat must be used for<br />
appropriate conditions.<br />
DEVICE USE AND CARE<br />
Use the correct device for your<br />
application. The correct device will<br />
do the job better and safer at the rate<br />
for which it is designed.<br />
Do not use this product if the<br />
Power Switch does not turn it on<br />
or off. Any product that cannot be<br />
controlled with the Power Switch is<br />
dangerous and must be replaced.<br />
Turn off the Power Switch and<br />
disconnect the Power Adapter<br />
from the electrical outlet before<br />
making any adjustments, changing<br />
SKU 93765<br />
For technical questions, please call 1-800-444-3353.<br />
Page 3
4.<br />
5.<br />
6.<br />
7.<br />
1.<br />
2.<br />
accessories, or storing the<br />
product. Such preventive safety<br />
measures reduce the risk of electric<br />
shock.<br />
Store idle devices out of reach of<br />
children and other untrained persons.<br />
Devices are dangerous in the<br />
hands of untrained users.<br />
Maintain devices with care. Keep<br />
the product and its accessories<br />
clean and in proper working order.<br />
Properly maintained devices are less<br />
likely to malfunction and are easier<br />
to control. Do not use a damaged<br />
device. Tag damaged devices “Do<br />
not use” until repaired.<br />
Check for misalignment or binding<br />
of moving parts, breakage of parts,<br />
and any other condition that may<br />
affect the device’s operation. If<br />
damaged, have the device serviced<br />
before using. Many accidents are<br />
caused by poorly maintained devices.<br />
Use only accessories that are<br />
recommended by the manufacturer<br />
for your model. Accessories that<br />
may be suitable for one device may<br />
become hazardous when used on<br />
another device.<br />
SERVICE<br />
Device service must be performed<br />
only by qualified repair personnel.<br />
Service or maintenance performed by<br />
unqualified personnel could result in<br />
a risk of injury.<br />
When servicing a device, use only<br />
identical replacement parts. Follow<br />
instructions in the “Inspection,<br />
Maintenance, And Cleaning”<br />
section of this manual. Use of<br />
1.<br />
unauthorized parts or failure to follow<br />
maintenance instructions may create<br />
a risk of electric shock or injury.<br />
Lithium Battery Safety Warnings<br />
Lithium batteries store a<br />
large amount of energy<br />
and will vent fire or<br />
explode if mistreated:<br />
Keep Battery Pack dry.<br />
2. Do not do any of the following<br />
to the battery pack:<br />
a. Open,<br />
b. Drop,<br />
c. Short-circuit,<br />
d. Incinerate, or<br />
e. Expose to temperatures greater<br />
than 140°F.<br />
3.<br />
4.<br />
5.<br />
6.<br />
Charge Battery Pack only according<br />
to the instructions indicated in this<br />
manual.<br />
Inspect Battery Pack before every<br />
use; do not use or charge if damaged.<br />
The charge time for the Battery is<br />
6 hours. Do not charge the Battery<br />
for longer than 6 hours as damage to<br />
the Battery and/or Video system may<br />
result.<br />
Keep the Battery disconnected<br />
unless the system is being used.<br />
When connected, the system will<br />
constantly drain the Battery.<br />
SKU 93765<br />
For technical questions, please call 1-800-444-3353.<br />
Page 4
7.<br />
Switch to a fresh Battery when device<br />
performance begins to diminish.<br />
Severe heat is most destructive<br />
to a Battery. The more heat generated,<br />
the faster the Battery loses its<br />
power. A Battery that gets too hot<br />
can be permanently damaged. Never<br />
over-discharge a Battery by attempting<br />
to use the Monitor after it indicates<br />
low Battery power.<br />
8. The battery gets hot while<br />
charging. The built-in<br />
charger’s heat can build<br />
up to unsafe levels and<br />
create a fire hazard if it does not<br />
receive adequate ventilation, due to<br />
an electrical fault, or if it is used in a<br />
hot environment.<br />
Do not place the battery on a flammable<br />
surface. Do not obstruct any<br />
vents on the battery. Especially<br />
avoid placing the battery on carpets<br />
and rugs; they are not only<br />
flammable, but they also obstruct<br />
vents under the battery.<br />
1.<br />
2.<br />
3.<br />
SPECIFIC SAFETY RULES<br />
If this unit is to be used with a<br />
potable water supply, the unit<br />
must be thoroughly sterilized and<br />
cleaned before use. Also, flush<br />
the water supply when finished and<br />
before use.<br />
Keep the Monitor out of direct<br />
sunlight. Do not allow the Monitor<br />
to overheat, freeze, or be exposed to<br />
wet conditions. Do not locate the<br />
Monitor near radiators, ovens, or<br />
any other heat source.<br />
Handle the Monitor and Camera<br />
with care. Do not allow the Monitor<br />
SKU 93765<br />
or Camera undergo shaking or strong<br />
vibration.<br />
To allow air circulation, locate the<br />
Monitor at least two inches from<br />
walls, cabinets, or other enclosures.<br />
For technical questions, please call 1-800-444-3353.<br />
4.<br />
5.<br />
6.<br />
7.<br />
8.<br />
9.<br />
10.<br />
When connecting the Camera to<br />
the Monitor the power must be off<br />
or both units will be damaged.<br />
Maintain labels and nameplates on<br />
the Product. These carry important<br />
information. If unreadable or missing,<br />
contact <strong>Harbor</strong> <strong>Freight</strong> <strong>Tools</strong> for a<br />
replacement.<br />
When replacing the Fuse in the<br />
Battery, only use another Fuse of<br />
the same type and rating. Use of a<br />
different Fuse or object may result in<br />
property damage, explosion, or fire.<br />
People with pacemakers should<br />
consult their physician(s) before use.<br />
Electromagnetic fields in close proximity<br />
to heart pacemaker could cause<br />
pacemaker interference or pacemaker<br />
failure.<br />
WARNING: Handling the cord on<br />
this product will expose you to lead,<br />
a chemical known to the State of<br />
California to cause cancer, and birth<br />
defects or other reproductive harm.<br />
Wash hands after handling.<br />
(California Health & Safety Code §<br />
25249.5, et seq.)<br />
The warnings and cautions discussed<br />
in this manual cannot cover all possible<br />
conditions and situations that<br />
may occur. It must be understood<br />
by the operator that common sense<br />
and caution are factors which cannot<br />
be built into this product, but must be<br />
supplied by the operator.<br />
Page 5
Grounding<br />
To prevent<br />
electric shock<br />
and death from<br />
incorrect grounding<br />
wire connection:<br />
Check with a qualified<br />
electrician if you are in doubt<br />
as to whether the outlet is<br />
properly grounded. Do not<br />
modify the power cord plug<br />
provided with the device.<br />
Never remove the grounding<br />
prong from the plug. Do not<br />
use the device if the power<br />
cord or plug is damaged. If<br />
damaged, have it repaired by<br />
a service facility before use. If<br />
the plug will not fit the outlet,<br />
have a proper outlet installed<br />
by a qualified electrician.<br />
2.<br />
cal Code. (See Outlets for 2-Prong<br />
Plug.)<br />
Double insulated devices may be<br />
used in either of the 120 volt outlets<br />
shown in the preceding illustration.<br />
(See Outlets for 2-Prong Plug.)<br />
Extension Cords<br />
1. Grounded devices require a three<br />
wire extension cord. Double Insulated<br />
devices can use either a two or<br />
three wire extension cord.<br />
2.<br />
As the distance from the supply outlet<br />
increases, you must use a heavier<br />
gauge extension cord. Using extension<br />
cords with inadequately sized<br />
wire causes a serious drop in voltage,<br />
resulting in loss of power and possible<br />
device damage.<br />
(See Table A.)<br />
Double Insulated Devices:<br />
Devices with Two Prong Plugs<br />
3.<br />
The smaller the gauge number of the<br />
wire, the greater the capacity of the<br />
cord. For example, a 14 gauge cord<br />
can carry a higher current than a 16<br />
gauge cord. (See Table A.)<br />
4.<br />
When using more than one extension<br />
cord to make up the total length,<br />
make sure each cord contains at<br />
least the minimum wire size required.<br />
(See Table A.)<br />
1.<br />
Outlets for 2-Prong Plug<br />
Devices marked “Double Insulated”<br />
do not require grounding. They have<br />
a special double insulation system<br />
which satisfies OSHA requirements<br />
and complies with the applicable<br />
standards of Underwriters Laboratories,<br />
Inc., the Canadian Standard<br />
Association, and the National Electri-<br />
5.<br />
6.<br />
If you are using one extension cord<br />
for more than one device, add the<br />
nameplate amperes and use the sum<br />
to determine the required minimum<br />
cord size. (See Table A.)<br />
If you are using an extension cord<br />
outdoors, make sure it is marked with<br />
the suffix “W-A” (“W” in Canada) to<br />
indicate it is acceptable for outdoor<br />
use.<br />
SKU 93765<br />
For technical questions, please call 1-800-444-3353.<br />
Page 6
7.<br />
Make sure the extension cord is properly<br />
wired and in good electrical condition.<br />
Always replace a damaged<br />
extension cord or have it repaired by<br />
a qualified electrician before using it.<br />
8.<br />
Protect the extension cords from<br />
sharp objects, excessive heat, and<br />
damp or wet areas.<br />
RECOMMENDED MINIMUM WIRE<br />
GAUGE FOR EXTENSION CORDS*<br />
(120/240 VOLT)<br />
NAMEPLATE<br />
AMPERES<br />
(at full load)<br />
25’<br />
EXTENSION CORD<br />
LENGTH<br />
50’<br />
75’<br />
100’<br />
150’<br />
0 – 2.0 18 18 18 18 16<br />
2.1 – 3.4 18 18 18 16 14<br />
3.5 – 5.0 18 18 16 14 12<br />
5.1 – 7.0 18 16 14 12 12<br />
7.1 – 12.0 18 14 12 10 -<br />
12.1 – 16.0 14 12 10 - -<br />
16.1 – 20.0 12 10 - - -<br />
TABLE A<br />
* Based on limiting the line<br />
voltage drop to five volts at<br />
150% of the rated amperes.<br />
Symbology<br />
Double Insulated<br />
Canadian Standards Association<br />
V~<br />
A<br />
n 0 xxxx/min.<br />
Underwriters Laboratories, Inc.<br />
Volts Alternating Current<br />
Amperes<br />
No Load Revolutions per Minute<br />
(RPM)<br />
SKU 93765<br />
For technical questions, please call 1-800-444-3353.<br />
Page 7
Battery AC<br />
Cord (7B)<br />
BATTERY<br />
(4A)<br />
To Monitor<br />
12 VDC OUT<br />
1.<br />
2.<br />
120 Volt, Grounded,<br />
Electrical Outlet<br />
Charging the Battery<br />
Charge the Battery (4) first before<br />
use. Thereafter, subsequent charge<br />
times are 6 hours. Never charge the<br />
Battery for longer than 6 hours, as<br />
damage to the Battery and/or video<br />
system will occur.<br />
To charge the Battery(4A), plug Battery<br />
AC Cord (7B) to the battery box<br />
and 120 volt, grounded, electrical<br />
outlet. (See Figure A.)<br />
3.<br />
4.<br />
Figure A<br />
The charge indicator on the battery<br />
box will stay RED until the charge is<br />
complete. Once the charge is complete,<br />
the indicator will turn GREEN.<br />
Unplug the AC cord from its electrical<br />
outlet and remove it from the Battery<br />
(4A) box. Do not charge the Battery<br />
longer than 6 hours.<br />
Note: The Battery box may feel warm to<br />
touch, which is normal during the<br />
charging process.<br />
SKU 93765<br />
For technical questions, please call 1-800-444-3353.<br />
Page 8
Monitor Controls:<br />
MONITOR<br />
(FRONT VIEW)<br />
A. Camera Selection Switch<br />
B. LED Switch<br />
C. LED Dimmer<br />
D. Contrast<br />
E. Brightness<br />
F. Monitor Power Switch<br />
G. DC 12 Volt-Input (Plug in 12VDC Power System Here)<br />
H. External Video-In Switch<br />
I. Video-Out (Used to Record to a VCR)<br />
J. External Video-Input<br />
K. Camera 1 Input<br />
L. Camera 2 Input<br />
CAMERA LED DIMMER CONT. BRIGHT. POWER<br />
C1<br />
C2<br />
ON<br />
OFF MIN. MAX.<br />
A B C D E F<br />
G H I J K L<br />
ON<br />
OFF<br />
MONITOR<br />
(BACK VIEW)<br />
C1<br />
C2<br />
Figure B<br />
DC 12 VOLT<br />
INPUT<br />
VCR/CAMERA<br />
<strong>VIDEO</strong><br />
OUT<br />
<strong>VIDEO</strong><br />
IN<br />
Operation<br />
1.<br />
When connecting the Camera (1)<br />
to the Monitor (2) the power must<br />
be off or both units may be damaged.<br />
2. IMPORTANT: To avoid damage to<br />
the Camera (1) and/or Cable (3) use<br />
caution when inserting or retracting<br />
the equipment in pipes, ducts, etc.<br />
Avoid sharp corners and edges; the<br />
cable can kink and break internally if<br />
bent sharply. If necessary, insert the<br />
Ball Protector (9) over the Camera for<br />
added protection. The Ball Protector<br />
may also help keep the Camera<br />
clean.<br />
SKU 93765<br />
For technical questions, please call 1-800-444-3353.<br />
Page 9
To camera (1)<br />
To monitor camera<br />
input Jack (K, L)<br />
To monitor<br />
DC 12 Voltinput<br />
jack (G)<br />
Monitor (Rear view)<br />
12 VDC OUT<br />
DC 12V 1 IN In<br />
Video<br />
Out<br />
Video<br />
in CAM1 CAM2<br />
To VCR<br />
(Not included)<br />
Figure C<br />
3.<br />
4.<br />
Set the Monitor (2) on a clean, dry,<br />
flat, level surface capable of supporting<br />
the weight of the Monitor and its<br />
accessories. If necessary, attach<br />
the Sunshade (8 over the front of the<br />
Monitor to reduce glare.<br />
(See Figure C, and Assy. Diagram.)<br />
Plug the Cable (3) into one of the<br />
Camera ports (K, L) on the back of<br />
the Monitor (2).<br />
(See Figures E and F.)<br />
5-1. To Hook-Up With The Battery:<br />
a. Set the Battery (4A) on a dry surface,<br />
on a plate or other flat, stable<br />
surface out of the sun and close<br />
enough for the Battery Cord (5) to<br />
reach the rear of the Monitor (2).<br />
(See Figure C.)<br />
b. Attach the BLACK (–) connector on<br />
the Battery Cord (5) to the BLACK<br />
(–) terminal on the Battery (4A).<br />
(See Figure C.)<br />
c. Attach the RED (+) connector on<br />
the Battery Cord (5) to the RED (+)<br />
REV 06d<br />
SKU 93765<br />
terminal on the Battery (4A).<br />
(See Figure C.)<br />
d. Plug the other end of the Battery<br />
Cord (5) into the DC 12 Volt-Input<br />
Jack on the back of the Monitor (2).<br />
(See Figure C.)<br />
5-2. To Hook-Up With The Power<br />
Adapter:<br />
a. Plug the Power Adapter (7) into the<br />
nearest 120 volt, grounded, electrical<br />
outlet.<br />
b. Plug the end of the Power Adapter’s<br />
(7) cord into the DC 12 Volt-Input<br />
Jack on the back of the Monitor (2).<br />
Set the VCR/Camera Switch (H) on<br />
the back of the Monitor (2) to “CAM-<br />
ERA”. (See Figure B.)<br />
For technical questions, please call 1-800-444-3353.<br />
6.<br />
7. Turn on the POWER Switch (F) on<br />
the front of the Monitor (2).<br />
(See Figure B.)<br />
8.<br />
Press the LED Switch (4) to turn the<br />
LED’s on. The LED’s may not be visible<br />
in a normally lit room. Point the<br />
camera at the front of the monitor and<br />
Page 10
look at the monitor screen to see if<br />
the LED’s are on or not.<br />
(See Figure B.)<br />
NOTE: This product is ideal for<br />
pipes 1-1/2”-4-3/4” inner diameter<br />
with multiple bends.<br />
9.<br />
Push in on the Camera (A) button<br />
if using the C1 Camera Input (K).<br />
Leave the button out if using the C2<br />
Input (L). An image should appear<br />
on the Monitor (2). If not, recheck the<br />
connections. (See Figure B.)<br />
13.<br />
Adjust the Brightness (E) and Contrast<br />
(D) on the front of the Monitor<br />
(2). If additional light is needed, push<br />
on the LED Switch (B) on the front<br />
of the Monitor. Adjust the brightness<br />
of the LED lights with the Dimmer<br />
Switch (C). (See Figure B.)<br />
14.<br />
To reel the Cable (3) back in, carefully<br />
guide the Cable (3) back into the<br />
reel with one hand, while turning the<br />
reel with the other. To prevent damage,<br />
do not sharply bend the cable.<br />
10. CAUTION! Do not<br />
sharply bend the cable;<br />
the cable will be damaged<br />
if severely bent.<br />
Carefully remove the camera end of<br />
the Cable (3) out the center of the<br />
reel, as shown in the illustration<br />
above. Thread it through the hook on<br />
the handle.<br />
11.<br />
Securely thread the Camera (1) onto<br />
the end of the Cable (3) if it is not<br />
already connected.<br />
15.<br />
16.<br />
17.<br />
When finished, carefully remove the<br />
Camera (1) from the pipe, duct, etc.<br />
Turn off the POWER Switch (F) on<br />
the front of the Monitor (2). Disconnect<br />
the alligator clips on the Battery<br />
Cord (5) from the Battery (4). Then,<br />
unplug the Battery Cord from the<br />
Monitor. (See Figure C.)<br />
If necessary, use a disinfectant to<br />
clean the Camera (1), Ball Protector<br />
(9), and Cable (3) after use. Then<br />
dry. Do not immerse the Monitor (2),<br />
Battery (4), Power Adapters (7), or<br />
any other accessory in liquid.<br />
(See Assy. Diagram.)<br />
Store the Video Inspection System<br />
in its Carrying Case (6) and keep the<br />
Carrying Case in a clean, dry location<br />
out of reach of children.<br />
12.<br />
Turn the reel to unwind the Cable<br />
from the reel while gently feeding it<br />
into the pipe, duct, etc. until the Cable<br />
(3) is at the desired depth. DO NOT<br />
FORCE CABLE.<br />
REV 06d; 08l; 09c; 09j<br />
SKU 93765<br />
For technical questions, please call 1-800-444-3353.<br />
Page 11
<strong>INSPECTION</strong>, MAINTENANCE,<br />
AND CLEANING<br />
WARNING! Turn off the power<br />
and disconnect the battery before<br />
performing any inspection, maintenance,<br />
or cleaning procedures.<br />
1. Before each use, inspect the general<br />
condition of the Video Inspection System.<br />
Check for loose screws, misalignment<br />
or binding of moving parts,<br />
cracked or broken parts, damaged<br />
electrical wiring, and any other condition<br />
that may affect its safe operation.<br />
If abnormal noise or vibration occurs,<br />
have the problem corrected before<br />
further use. Do not use damaged<br />
equipment.<br />
2. Before each use, make sure the terminal<br />
contacts on the Battery (4) are<br />
clean and free of corrosion.<br />
3. After each use, wipe the Camera<br />
Lens and all components to remove<br />
any dirt and moisture. If necessary,<br />
use a disinfectant to clean the<br />
Camera (1), Ball Protector (9), and<br />
Cable (3) after use. Then dry. Do not<br />
immerse the Monitor (2), Battery (4),<br />
Power Adapters (7), or any other accessory<br />
in liquid.<br />
CAUTION! All maintenance,<br />
service, or repairs not mentioned<br />
in this manual must only be performed<br />
by a qualified service technician.<br />
REV 06d; 08l<br />
SKU 93765<br />
For technical questions, please call 1-800-444-3353.<br />
Page 12
TROUBLESHOOTING<br />
Problem<br />
System displays a rolling, shrunk, or<br />
unstable picture.<br />
Camera LED’s not lit.<br />
LED’s light, but no image on screen.<br />
Image on screen is dark when camera is in<br />
pipe.<br />
Screen on monitor is white.<br />
Monitor does not work with battery.<br />
Monitor works, but LED doesn't.<br />
Fuzzy or vertical lines on monitor screen<br />
when the camera is used in hot environment.<br />
Monitor does not work.<br />
Unit operates intermittently when short cable<br />
is moved.<br />
Camera lens is loose, cracked or broken.<br />
1.<br />
2.<br />
Check all connections.<br />
Charge the Battery fully.<br />
Possible Solutions<br />
3. Have a qualified service technician check for a<br />
defective Battery and/or other defective components<br />
in the System.<br />
1. LED’s may not be seen clearly in brightly lit room.<br />
Point Camera at monitor while on to see if LED’s are<br />
actually on.<br />
2.<br />
Adjust LED Dimmer to change LED brightness.<br />
Adjust contrast and brightness.<br />
1.<br />
2.<br />
Turn LED On on monitor.<br />
Adjust LED dimmer.<br />
3. Use ball protector with camera to keep lens above<br />
sludge.<br />
4.<br />
5.<br />
Clean lens and LED’s.<br />
Check cable connections are secure.<br />
Adjust contrast and brightness.<br />
1.<br />
2.<br />
1.<br />
2.<br />
Recharge/replace battery.<br />
Use line power adapter.<br />
Adjust dimmer.<br />
Replace camera, if needed.<br />
3. Check fiberglass cable and connections for damage<br />
and replace, if needed.<br />
1.<br />
2.<br />
3.<br />
1.<br />
2.<br />
3.<br />
Allow camera to cool.<br />
Use in environments -20 °F to 120 °F only.<br />
Have qualified technician service/replace camera.<br />
Recharge/replace battery.<br />
Operate unit using line power adapter.<br />
Have qualified technician service monitor.<br />
Replace short cable.<br />
Replace camera.<br />
REV 09c<br />
SKU 93765<br />
For technical questions, please call 1-800-444-3353.<br />
Page 13
PARTS LIST & ASSEMBLY DIAGRAM<br />
Part Description Qty.<br />
1 Camera 1<br />
2 Monitor 1<br />
3 Cable Reel w/65 Ft. Cable 1<br />
4A Li-Ion Battery 1<br />
6 Carrying Case 1<br />
7 Power Adapter 1<br />
7B Battery AC Cord 1<br />
8 Sunshade 1<br />
9 Ball Protector 1<br />
10 Short Cable 1<br />
10<br />
1<br />
2<br />
6<br />
9<br />
7<br />
4A<br />
3<br />
8<br />
7B<br />
Note: Some parts are listed and shown for illustration purposes only, and are not available<br />
individually as replacement parts.<br />
SKU 93765<br />
For technical questions, please call 1-800-444-3353.<br />
Page 14
PLEASE READ THE<br />
FOLLOWING CAREFULLY<br />
THE MANUFACTURER AND/OR DISTRIBUTOR<br />
HAS PROVIDED THE PARTS LIST AND ASSEM-<br />
BLY DIAGRAM IN THIS MANUAL AS A REFER-<br />
ENCE TOOL ONLY. NEITHER THE MANUFAC-<br />
TURER OR DISTRIBUTOR MAKES ANY REPRE-<br />
SENTATION OR WARRANTY OF ANY KIND TO<br />
THE BUYER THAT HE OR SHE IS QUALIFIED TO<br />
REPLACE ANY PARTS OF THE PRODUCT. IN<br />
FACT, THE MANUFACTURER AND/OR DISTRIB-<br />
UTOR EXPRESSLY STATES THAT ALL REPAIRS<br />
AND PARTS REPLACEMENTS SHOULD BE<br />
UNDERTAKEN BY CERTIFIED AND LICENSED<br />
TECHNICIANS, AND NOT BY THE BUYER. THE<br />
BUYER ASSUMES ALL RISKS AND LIABILITY<br />
ARISING OUT OF HIS OR HER REPAIRS TO<br />
THE ORIGINAL PRODUCT OR REPLACEMENT<br />
PARTS THERETO, OR ARISING OUT OF HIS OR<br />
HER INSTALLATION OF REPLACEMENT PARTS<br />
THERETO.<br />
LIMITED 90 DAY WARRANTY<br />
<strong>Harbor</strong> <strong>Freight</strong> <strong>Tools</strong> Co. makes every<br />
effort to assure that its products meet<br />
high quality and durability standards, and<br />
warrants to the original purchaser that this<br />
product is free from defects in materials<br />
and workmanship for the period of 90 days<br />
from the date of purchase. This warranty<br />
does not apply to damage due directly or<br />
indirectly, to misuse, abuse, negligence or<br />
accidents, repairs or alterations outside<br />
our facilities, criminal activity, improper installation,<br />
normal wear and tear, or to lack<br />
of maintenance. We shall in no event be<br />
liable for death, injuries to persons or property,<br />
or for incidental, contingent, special<br />
or consequential damages arising from the<br />
use of our product. Some states do not allow<br />
the exclusion or limitation of incidental<br />
or consequential damages, so the above<br />
limitation of exclusion may not apply to<br />
you. This warranty is expressly in<br />
lieu of all other warranties, express<br />
or implied, including the<br />
REV 08h<br />
SKU 93765<br />
warranties of merchantability<br />
and fitness.<br />
To take advantage of this warranty,<br />
the product or part must be returned to us<br />
with transportation charges prepaid. Proof<br />
of purchase date and an explanation of the<br />
complaint must accompany the merchandise.<br />
If our inspection verifies the defect,<br />
we will either repair or replace the product<br />
at our election or we may elect to refund<br />
the purchase price if we cannot readily<br />
and quickly provide you with a replacement.<br />
We will return repaired products at<br />
our expense, but if we determine there is<br />
no defect, or that the defect resulted from<br />
causes not within the scope of our warranty,<br />
then you must bear the cost of returning<br />
the product.<br />
This warranty gives you specific legal<br />
rights and you may also have other rights<br />
which vary from state to state.<br />
3491 Mission Oaks Blvd. • PO Box<br />
6009 • Camarillo, CA 93011 • (800)<br />
444-3353<br />
For technical questions, please call 1-800-444-3353.<br />
Page 15


