Uway UM562 - Trail Camera
Uway UM562 - Trail Camera
Uway UM562 - Trail Camera

Create successful ePaper yourself
Turn your PDF publications into a flip-book with our unique Google optimized e-Paper software.
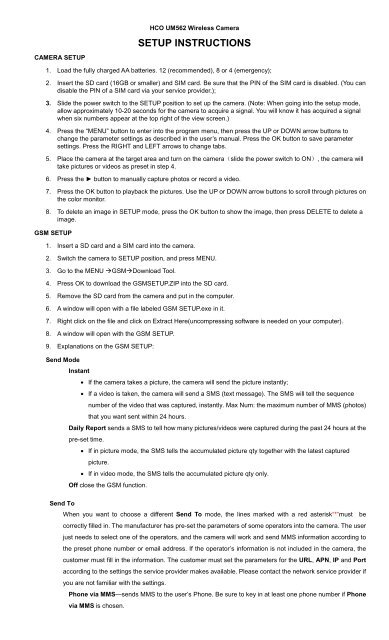
CAMERA SETUP<br />
HCO <strong>UM562</strong> Wireless <strong>Camera</strong><br />
SETUP INSTRUCTIONS<br />
1. Load the fully charged AA batteries. 12 (recommended), 8 or 4 (emergency);<br />
2. Insert the SD card (16GB or smaller) and SIM card. Be sure that the PIN of the SIM card is disabled. (You can<br />
disable the PIN of a SIM card via your service provider.);<br />
3. Slide the power switch to the SETUP position to set up the camera. (Note: When going into the setup mode,<br />
allow approximately 10-20 seconds for the camera to acquire a signal. You will know it has acquired a signal<br />
when six numbers appear at the top right of the view screen.)<br />
4. Press the “MENU” button to enter into the program menu, then press the UP or DOWN arrow buttons to<br />
change the parameter settings as described in the user’s manual. Press the OK button to save parameter<br />
settings. Press the RIGHT and LEFT arrows to change tabs.<br />
5. Place the camera at the target area and turn on the camera(slide the power switch to ON), the camera will<br />
take pictures or videos as preset in step 4.<br />
6. Press the ► button to manually capture photos or record a video.<br />
7. Press the OK button to playback the pictures. Use the UP or DOWN arrow buttons to scroll through pictures on<br />
the color monitor.<br />
8. To delete an image in SETUP mode, press the OK button to show the image, then press DELETE to delete a<br />
image.<br />
GSM SETUP<br />
1. Insert a SD card and a SIM card into the camera.<br />
2. Switch the camera to SETUP position, and press MENU.<br />
3. Go to the MENU GSMDownload Tool.<br />
4. Press OK to download the GSMSETUP.ZIP into the SD card.<br />
5. Remove the SD card from the camera and put in the computer.<br />
6. A window will open with a file labeled GSM SETUP.exe in it.<br />
7. Right click on the file and click on Extract Here(uncompressing software is needed on your computer).<br />
8. A window will open with the GSM SETUP.<br />
9. Explanations on the GSM SETUP:<br />
Send Mode<br />
Instant<br />
• If the camera takes a picture, the camera will send the picture instantly;<br />
• If a video is taken, the camera will send a SMS (text message). The SMS will tell the sequence<br />
number of the video that was captured, instantly. Max Num: the maximum number of MMS (photos)<br />
that you want sent within 24 hours.<br />
Daily Report sends a SMS to tell how many pictures/videos were captured during the past 24 hours at the<br />
pre-set time.<br />
• If in picture mode, the SMS tells the accumulated picture qty together with the latest captured<br />
picture.<br />
• If in video mode, the SMS tells the accumulated picture qty only.<br />
Off close the GSM function.<br />
Send To<br />
When you want to choose a different Send To mode, the lines marked with a red asterisk“*”must be<br />
correctly filled in. The manufacturer has pre-set the parameters of some operators into the camera. The user<br />
just needs to select one of the operators, and the camera will work and send MMS information according to<br />
the preset phone number or email address. If the operator’s information is not included in the camera, the<br />
customer must fill in the information. The customer must set the parameters for the URL, APN, IP and Port<br />
according to the settings the service provider makes available. Please contact the network service provider if<br />
you are not familiar with the settings.<br />
Phone via MMS—sends MMS to the user’s Phone. Be sure to key in at least one phone number if Phone<br />
via MMS is chosen.
Email via MMS—sends MMS to the user’s Email address. Be sure to key in at least one email address if<br />
email via GPRS is chosen.<br />
Email via GPRS—sends MMS to the user’s Email address via GPRS NETWORK. If email via GPRS is<br />
chosen, please be sure to:<br />
• Confirm the GPRS SETTING such as APN、Account、Password;<br />
• Confirm the SMTP parameters (Simple Mail Transfer Protocol);<br />
• Fill in at least one email address in the recipient column.<br />
ATT setup screenshot<br />
10. Save the edited GSM SETUP.exe to a SD card, and then exit.<br />
11. Insert the SD card into the <strong>UM562</strong> camera.<br />
12. Switch the camera on to SETUP. After 2~3s, the camera view screen will show update success.<br />
13. Choose the settings that you need to finish the process.<br />
Note:<br />
• MMS (photos) is sent through a GPRS(data) network. If you want to send photos to an email address, make<br />
sure that you have a Data Plan on your account. Our device supports four bands:850MHz, 900MHz, 1800MHz<br />
and 1900MHz.<br />
• Be sure to open the GPRS service(Data Plan) for both the camera and your cellular receiving phone.<br />
• There is a maximum limit on the number of pictures sent daily to your phone. Please make sure the MAX MMS<br />
number in Instant mode is set to the number of pictures you want to receive.<br />
• The signal strength of the mobile phone network may vary, which may lead to failures when sending a MMS. Be<br />
sure the antenna is securely connected and proper GSM network coverage is available.<br />
• In SETUP mode, the camera will shut down automatically after 3 minutes without activity. Please turn on the<br />
power again for new input.<br />
HCO Outdoor Products<br />
www.hcooutdoors.com<br />
3120 Medlock Bridge Rd. Ste. H400<br />
Norcross, GA 30071<br />
Tel: 770-582-0004