Soul Edge Manual - Crazy Kong Arcade
Soul Edge Manual - Crazy Kong Arcade
Soul Edge Manual - Crazy Kong Arcade

Create successful ePaper yourself
Turn your PDF publications into a flip-book with our unique Google optimized e-Paper software.
®<br />
<br />
Operators <strong>Manual</strong><br />
IT IS THE RESPONSIBILITY OF THE OPERATOR TO MAINTAIN CUSTOMER SAFETY<br />
AT ALL TIMES, AND IT IS IMPERATIVE THAT THE DETAILS SET OUT IN THIS<br />
MANUAL ARE FOLLOWED PRECISELY.<br />
Part No. 90500084
© 1995 all rights reserved.<br />
No part of this publication may be reproduced by any mechanical, photographic or<br />
electronic process, or in the form of phonographic recording, nor may it be stored in a<br />
retrieval system, transmitted or otherwise copied for public or private use, without<br />
permission from<br />
NAMCO EUROPE LTD.<br />
While the information contained in this manual is given in good faith and was accurate<br />
at the time of publication, NAMCO EUROPE LTD. reserve the right to make changes<br />
and alterations without notice.<br />
This machine has been manufactured in accordance with European Community<br />
directives (1st. January 1996), and as such bears the marking. Any changes or<br />
modifications to this machine must be in accordance with European Community<br />
directives (1st. January 1996).<br />
If you make any unauthorised changes to this product, you may contravene European<br />
Community directives (1st. January 1996)<br />
Published by:<br />
NAMCO EUROPE LTD.<br />
Namco House,<br />
8 Acton Park Estate,<br />
The Vale,<br />
London. W3 7QE<br />
Phone:- 0208-324-6000<br />
Fax:- 0208-324-6010
SAFETY WARNING<br />
In order to use this machine safely, be sure to read this Operators <strong>Manual</strong> carefully<br />
before installation, adjustment or use of this machine.<br />
Whenever the owner of this machine entrusts disassembly, installation, adjustment,<br />
routine maintenance or trouble shooting to another person, the owner should ensure that<br />
that person read the appropriate precautions and relevant sections of this manual before<br />
starting work.<br />
In order that no accidents occur when the machine is in operation, strictly follow<br />
the notes on safety described below. Also, carefully read section 2, “Precautions”<br />
Warnings for Operation (<br />
Requirements)<br />
NOTE:<br />
NOTE:<br />
Only operate this machine after checking that it has been installed<br />
correctly and in accordance with the installation and commisioning<br />
manual.<br />
If there is an error or problem with this machine, operation must be<br />
stopped immediately and the problem rectified before further use.<br />
Warnings for Disassembly, Installation, Routine Maintenance, and Troubleshooting.<br />
DANGER:<br />
DANGER:<br />
DANGER:<br />
DANGER:<br />
NOTE:<br />
Namco Ltd. bears absolutely no responsibility for accidents or injuries<br />
resulting from unauthorized changes to this machine.<br />
Ensure that the machine has been turned OFF before making<br />
adjustments or carrying out maintenance. Also ensure only qualified<br />
personnel carry out maintenance or turn the power ON to this<br />
machine.<br />
The power supply and inside the monitor will remain hot and have<br />
areas of high voltage even though the machine has been turned OFF,<br />
and there is a possibility of burns or electric shock. Be careful not to<br />
touch these areas.<br />
In order to avoid injuries due to mis-operation, be sure that the<br />
voltage of the main power supply is within the prescribed limits. Also<br />
to prevent possible electric shocks due to failure, this machine MUST<br />
be fitted with a securely connected earthed plug.<br />
Do not turn the power switch ON until the machine has been installed<br />
correctly.
Contents<br />
Operators <strong>Manual</strong> ...................................................................................1<br />
SAFETY WARNING .................................................................................3<br />
1. SPECIFICATIONS .............................................................................5<br />
2. PRECAUTIONS ................................................................................6<br />
2-1 Cautions When Installing................................................................6<br />
2-2 Cautions when Handling. ...........................................................................6<br />
2-3 Cautions when Transporting.......................................................................6<br />
2-4 Cautions when handling the PCB. ..............................................................6<br />
3. ADJUSTMENTS................................................................................7<br />
3-1 Turning on the Power .................................................................................7<br />
3-2 Switches for Adjustment .............................................................................7<br />
3-4 Test Mode ...................................................................................................8<br />
3-4-1 Switch Test ....................................................................................8<br />
3-4-2 Sound Test ....................................................................................9<br />
3-4-3 Coin Options ................................................................................10<br />
3-4-4 Game Options .............................................................................10<br />
3-4-5 Factory Settings........................................................................... 11<br />
3-5 PC Board Connectors ..............................................................................12<br />
4. PARTS.............................................................................................13<br />
5. SCHEMATIC ...................................................................................14<br />
Page 4
1. SPECIFICATIONS<br />
POWER SUPPLY :-<br />
220/240volts AC<br />
COIN ACCEPTOR:-<br />
Mars CashFlow - 1 Channel<br />
MONITOR :-<br />
Hantarex 28" Polo Colour Monitor with auto degauss.<br />
DIMENSIONS :-<br />
790(w) x 1200(d) x 2080(h)<br />
WEIGHT :-<br />
175kg.<br />
ACCESSORIES :- Keys: (Cash Door) .....................2<br />
(Coin Door) ...................... 2<br />
(Back Door) .....................2<br />
IEC Mains Lead ......................................1<br />
Operators <strong>Manual</strong> ...................................1<br />
Monitor <strong>Manual</strong> ....................................... 1<br />
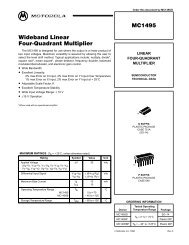
2P Attack Horizontal<br />
1P Attack Vertical<br />
1P Attack Horizontal<br />
1P Start<br />
2P Start<br />
2P Attack Vertical<br />
1P 8way Joystick<br />
1P Kick Button<br />
2P Guard Button<br />
2P Kick Button<br />
1P Guard Button<br />
2P 8way Joystick<br />
Page 5
2. PRECAUTIONS<br />
2-1 Cautions When Installing.<br />
This game is designed for indoor use only. The game must not be installed outdoors or<br />
under the following conditions:-<br />
a. In areas directly exposed to sunlight, high humidity, direct water contact, dust,<br />
high heat or extreme cold.<br />
b. In locations that would present an obstacle in the case of an emergency, i.e. near<br />
fire equipment or emergency exits.<br />
c. On an unstable surface or subject to floor vibration.<br />
2-2 Cautions when Handling.<br />
a. AC power must always be turned OFF, and the game disconnected, before<br />
replacing any parts or connecting/disconnecting connectors.<br />
b. When unplugging the game from an electrical outlet, always grasp the plug, not<br />
the mains lead.<br />
c. The machine must be earthed with a securely connected earthed plug.<br />
d. Care must be taken at all times to avoid electric shock when inspecting or<br />
adjusting the game.<br />
2-3 Cautions when Transporting.<br />
a. Do not subject the game to physical shock when transporting or moving it.<br />
b. Always return the levellers to the UP position before moving the machine.<br />
c. Take care not to rope any moulded (plastic) parts when transporting.<br />
2-4 Cautions when handling the PCB.<br />
a. Never test the PCB for continuity with a multimeter or similar device. The PCB<br />
contains sensitive devices which could be damaged or even destroyed by the<br />
internal voltage of such test equipment.<br />
b. Foreign matter or dust on the PCB may cause failure. Turn off the power and<br />
clean the PCB with a dry soft brush.<br />
c. When transporting the PCB ensure adequate packing protection to prevent<br />
damage.<br />
Page<br />
6
3. ADJUSTMENTS<br />
3-1 Turning on the Power<br />
After installing the machine, turn on the power. The power switch is located<br />
above the mains inlet on the rear of the cabinet.<br />
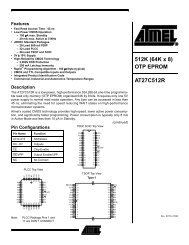
3-2 Switches for Adjustment<br />
Open the coin door to find the switches for adjustments, located on the service<br />
bracket.<br />
1. Service Switch<br />
Press this switch to obtain game credits without incrementing the coin counter.<br />
2. Test Switch<br />
Slide this switch "ON" to enter test mode.<br />
Test mode allows game testing and the changing of game settings.<br />
(See "3-4 Test Mode" on page 8)<br />
There are two DIP switches located on the PCB.<br />
Switch 1 when set ON will enter the game into test mode. Always ensure this<br />
switch is set to OFF and use the test switch on the service bracket for testing<br />
the machine. Switch 2 when set ON will freeze the screen.<br />
3-3 Volume Adjust<br />
The volume control is located on the PCB. Turn the control to increase or decrease<br />
the volume.<br />
SERVICE BRACKET<br />
PCB<br />
COIN COUNTER<br />
48W extended<br />
edge connector<br />
56W edge connector<br />
(JAMMA)<br />
1 2<br />
Option Switch<br />
Volume<br />
TEST SWITCH<br />
SERVICE SWITCH<br />
Page<br />
7
3-4 Test Mode<br />
1. Open the coin door for access to the service bracket, then slide the test switch<br />
"ON". The "Test Menu Screen" will appear on the monitor display.<br />
2. Operating the 1 Player joystick up or down will step through the items.<br />
3. Pressing the 1 Player Attack (H) Button will select an item.<br />
4. Operating the 1 Player joystick up or down will change the settings.<br />
5. Pressing the 1 Player Attack (H) Button will store the change.<br />
6. Pressing the 1 Player Attack (V) Button will return the display to the Test Menu<br />
Screen.<br />
The test switch must always be "OFF" during normal game mode.<br />
SWITCH TEST.......................................... For testing switches<br />
SOUND TEST ........................................... For testing the sound<br />
COIN OPTIONS ........................................ For setting game pricing<br />
GAME OPTIONS ...................................... For setting of difficulty etc.<br />
UARTS TEST ............................................ Not Used<br />
POLYGON TEST ...................................... For testing graphics<br />
A.D.S ......................................................... Not Used<br />
COLOR TEST ........................................... For monitor set-up<br />
CONVERGENCE TEST ............................ For monitor set-up<br />
RS-232C TEST ......................................... Not Used<br />
Test Menu Screen<br />
3-4-1 Switch Test<br />
On entering the switch Test, the following screen appears on the monitor.<br />
Operating the joysticks will cause the + to change to X for each of the eight<br />
positions.<br />
When testing:<br />
1P Attack (H) 1P 0000 will change to 1P 1000<br />
1P Attack (V) 1P 0000 will change to 1P 2000<br />
1P Kick 3P 0000 will change to 3P 1000<br />
1P Guard 3P 0000 will change to 3P 2000<br />
2P Attack (H) 2P 0000 will change to 2P 1000<br />
2P Attack (V) 2P 0000 will change to 2P 2000<br />
2P Kick 4P 0000 will change to 4P 1000<br />
2P Guard 4P 0000 will change to 4P 2000<br />
Pressing 1P Attack (V) will return to the Test Menu Screen<br />
Page<br />
8
1P 0000 2P 0000<br />
+ + + + + +<br />
+ X + + X +<br />
+ + + + + +<br />
3P 0000 4P 0000<br />
+ + + + + +<br />
+ X + + X +<br />
+ + + + + +<br />
SERVICE SWITCH +<br />
TEST SWITCH<br />
X<br />
DIP 1 +<br />
DIP 2 +<br />
COIN 1 +<br />
COIN 2 +<br />
COIN 3 +<br />
COIN 4 +<br />
PRESS ATTACK (V) TO EXIT<br />
3-4-2 Sound Test<br />
On entering the Sound Test, the following<br />
display will appear on the monitor.<br />
Pushing the 1 player joystick to the right<br />
will make the number step up and pushing<br />
the joystick to the left will make the number<br />
step down.<br />
SONG 000<br />
Each number will produce a different sound<br />
when the 1 player Punch 1 button is<br />
pressed.<br />
Song 001 will produce a tone first on the left<br />
speaker, then on the right speaker and then<br />
on both speakers together.<br />
Page<br />
9
3-4-3 Coin Options<br />
Note:- The price of play on this machine is set within the CashFlow coin mech.<br />
Ensure that the coin options on the screen are set as shown in the<br />
following table.<br />
GAME OPTIONS<br />
GAME COST --------------------------------------------------- (1)<br />
1 COIN 1 CREDIT<br />
DISCOUNT TO CONTINUE -------------------------------- (2)<br />
NO<br />
COIN 1 MECH VALUE --------------------------------------- (3)<br />
1 COIN COUNT AS 1 COIN<br />
COIN 2 MECH VALUE --------------------------------------- (4)<br />
1 COIN COUNT AS 1 COIN<br />
COIN 3 MECH VALUE --------------------------------------- (5)<br />
1 COIN COUNT AS 1 COIN<br />
COIN 4 MECH VALUE --------------------------------------- (6)<br />
1 COIN COUNT AS 1 COIN<br />
BONUS FOR QUANTITY BUY-IN ------------------------ (7)<br />
NONE<br />
CREDIT MODE ------------------------------------------------ (8)<br />
COMMON<br />
COIN COUNTER ---------------------------------------------- (9)<br />
TYPE A: 1 COUNTER<br />
FREE PLAY --------------------------------------------------- (10)<br />
NO<br />
Coin Option Screen<br />
3-4-4 Game Options<br />
GAME OPTIONS<br />
DIFFICULTY LEVEL : HARD ------------------------------ (11)<br />
STAGE WIDTH : 18 M --------------------------------------- (12)<br />
FIGHT COUNT(1P GAME) : 2 ---------------------------- (13)<br />
FIGHT COUNT (2P GAME) : 2 --------------------------- (14)<br />
LIFE BAR (IP GAME) : 110% ----------------------------- (15)<br />
LIFE BAR (2P GAME) : 125% ---------------------------- (16)<br />
GUARD DAMAGE : OFF ----------------------------------- (17)<br />
ROUND TIME : 40sec -------------------------------------- (18)<br />
CHARACTER CHANGE AT CONTINUE : YES ------ (19)<br />
CHARACTER CHANGE AT 2P GAME : YES--------- (20)<br />
MUSIC IN ATTRACT : YES ------------------------------- (21)<br />
SPEAKER OUT : STEREO -------------------------------- (22)<br />
EVENT MODE : OFF---------------------------------------- (23)<br />
HIT COLOUR : GREEN ------------------------------------ (24)<br />
Game Option Screen<br />
Page<br />
10
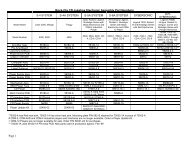
3-4-5 Factory Settings<br />
ITEM CONTENTS FACTORY SET<br />
1 GAME COST COIN PULSES REQUIRED FOR CREDIT ----- settable 1 - 9 1<br />
2 DISCOUNT 50% DISCOUNT FOR CONTINUE ----- YES / NO NO<br />
3 COIN 1 MECH VALUE NUMBER OF PULSES ON METER ----- settable 1 - 9 1<br />
4 COIN 2 MECH VALUE NUMBER OF PULSES ON METER ----- settable 1 - 9 1<br />
5&6 NOT USED<br />
7 BONUS COIN EXTRA COIN PULSE AT SPECIFIED COINS IN NONE<br />
8 CREDIT MODE COMMON (Credit common to player 1 & 2) / EACH ONE (Player 1 & 2 seperate) COMMON<br />
9 COIN COUNTER TYPE A (1 Coin Counter) / TYPE B (2 Coin Counters) TYPE A<br />
10 FREE PLAY YES / NO NO<br />
11 DIFFICULTY LEVEL EASY / MEDIUM / HARD / VERY HARD / ULTRA HARD HARD<br />
12 STAGE WIDTH SETS THE SIZE OF COMBAT AREA 18 M<br />
13 FIGHT COUNT (1P GAME) Settable 1 - 4 2<br />
14 FIGHT COUNT (2P GAME) Settable 1 - 4 2<br />
15 LIFE BAR (1P GAME) 95 / 110 / 125 / 140 / 160 110<br />
16 LIFE BAR (2P GAME) 95 / 110 / 125 / 140 / 160 125<br />
17 GUARD DAMAGE OFF / ON (ON : A Character is damaged a little even when blocking) OFF<br />
18 ROUND TIME 20sec / 30sec / 40sec / 50sec / 60sec 40sec<br />
19<br />
20<br />
CHARACTER CHANGE AT<br />
CONTINUE<br />
YES/NO<br />
CHARACTER CHANGE AT 2P<br />
YES / NO<br />
GAME<br />
21 MUSIC IN ATTRACT YES / NO YES<br />
22 SPEAKER OUT STEREO / MONO STEREO<br />
23 EVENT MODE OFF / ON (Game is over per each 2P game) OFF<br />
24 HIT COLOUR GREEN / RED GREEN<br />
YES<br />
YES<br />
Page<br />
11
3-5 PC Board Connectors<br />
JAMMA 56way <strong>Edge</strong> Connector<br />
Solder Side Terminal No Part Side<br />
GND A 1 GND<br />
GND B 2 GND<br />
+5v C 3 +5v<br />
+5v D 4 +5v<br />
E 5<br />
+12v F 6 +12v<br />
Polarizing Key H 7 Polarizing Key<br />
Coin Counter 2 j 8 Coin Counter 1<br />
K 9 Coin Lockout<br />
Speaker (-) L 10 Speaker (+)<br />
Audio (GND) M 11 Audio (+)<br />
Video GREEN N 12 Video RED<br />
Video SYNC P 13 Video BLUE<br />
Service Switch R 14 Video GND<br />
S 15 Test Switch<br />
Coin Switch 2 T 16 Coin Switch 1<br />
2P Start Switch U 17 1P Start Switch<br />
2P Lever UP V 18 1P Lever UP<br />
2P Lever DOWN W 1P Lever DOWN<br />
2P Lever LEFT X 1P Lever LEFT<br />
2P Lever RIGHT Y 1P Lever RIGHT<br />
2P Attack - H Z 22 1P Attack - H<br />
2P Attack - V a 23 1P Attack - V<br />
2P Kick b 24 1P Kick<br />
c 25<br />
d 26<br />
GND e 27 GND<br />
GND f 28 GND<br />
• Do not make connections to blank positions.<br />
• Lockout / Coin Counter both operate on +12v.<br />
• The supply voltage must be within 5%.<br />
• +5V / 2.5A minimum<br />
• +12v / 2A minimum<br />
48w Extended <strong>Edge</strong> Connector<br />
Solder Side Terminal No Part Side<br />
Speaker R (-) A1 B1 Speaker R (+)<br />
A2<br />
A3<br />
A4<br />
B2<br />
B3<br />
B4<br />
Polarizing Key A5 B5 Polarizing Key<br />
A6<br />
A7<br />
B6<br />
B7<br />
2PGuard Button A8 B8<br />
A9 B9 GND<br />
A10 B10 GND<br />
A11<br />
A12<br />
A13<br />
A14<br />
A15<br />
A16<br />
A17<br />
A18<br />
A19<br />
B11<br />
B12<br />
B13<br />
B14<br />
B15<br />
B16<br />
B17<br />
B18<br />
B19<br />
1P Guard Button A20 B20<br />
A21<br />
A22<br />
A23<br />
A24<br />
B21<br />
B22<br />
B23<br />
B24<br />
Speaker Connections<br />
• Connect the (L) speaker to the speaker<br />
output of the 56w JAMMA connector<br />
• Connect the (R) speaker to the Speaker R<br />
(+) & (-) of the 48w Extended connector<br />
Page<br />
12
4. PARTS<br />
Decals & Plastics<br />
DESCRIPTION<br />
PART No.<br />
Cabinet Decal LHS - Upper 40000290<br />
Cabinet Decal LHS - Lower 40000291<br />
Cabinet Decal RHS - Upper 40000292<br />
Cabinet Decal RHS - Lower 40000293<br />
Cabinet Decal Front - LHS 40000294<br />
Cabinet Decal Front - RHS 40000295<br />
Cabinet Decal "NAMCO" LHS/RHS/Front 40000061<br />
Character Plexi 30000225<br />
Play Panel Overlay 33000120<br />
Header Box Vac-Form 45000728<br />
Top Flash Acrylic 30000226<br />
Cabinet<br />
DESCRIPTION<br />
PART No.<br />
Monitor 28" Hantarex 84000026<br />
Front Glass - Bronze 31000022<br />
Interlock Switch 60000006<br />
Interlock Switch Cover 39000028<br />
M16 Adjustable Foot 88300079<br />
Switch Mode Power Supply 83000002<br />
Mains Filter 67000303<br />
Speaker 4½" 20w (with shield can) 62000006<br />
Schaffner Mains In Assy 66000016<br />
Schaffner Boot 66000017<br />
Fuse 5amp 20mm Slo-Blo 63500600<br />
18" 15w Fluorescent Tube 64500009<br />
Choke 240v 15w 63300000<br />
Starter 63000000<br />
Service Switch - SPNO 60000059<br />
Test Switch - DPCO 60000023<br />
3.5 - 6v Panel Meter 65000002<br />
Joystick 8way Brent Fast Action Type 61000017<br />
Push Button - Yellow 60200266<br />
Push Button - Green 60200267<br />
Push Button - Red 60200264<br />
Push Button - Blue 60200263<br />
Push Button - White 60200262<br />
Page<br />
13
5. SCHEMATIC<br />
Page 14
Page 15