Wacker - VPA 1740 - Sheldon Hire
Wacker - VPA 1740 - Sheldon Hire
Wacker - VPA 1740 - Sheldon Hire

Create successful ePaper yourself
Turn your PDF publications into a flip-book with our unique Google optimized e-Paper software.
Foreword<br />
WARNING<br />
Engine exhaust, some of its constituents, and certain vehicle<br />
components contain or emit chemicals known to the State of California<br />
to cause cancer and birth defects or other reproductive harm.<br />
1. Foreword<br />
This manual provides information and procedures to safely operate<br />
and maintain this <strong>Wacker</strong> model. For your own safety and protection<br />
from injury, carefully read, understand and observe the safety<br />
instructions described in this manual.<br />
Keep this manual or a copy of it with the machine. If you lose this<br />
manual or need an additional copy, please contact <strong>Wacker</strong><br />
Corporation. This machine is built with user safety in mind; however,<br />
it can present hazards if improperly operated and serviced. Follow<br />
operating instructions carefully! If you have questions about operating<br />
or servicing this equipment, please contact <strong>Wacker</strong> Corporation.<br />
The information contained in this manual was based on machines in<br />
production at the time of publication. <strong>Wacker</strong> Corporation reserves the<br />
right to change any portion of this information without notice.<br />
All rights, especially copying and distribution rights are reserved.<br />
Copyright 2002 by <strong>Wacker</strong> Corporation.<br />
No part of this publication may be reproduced in any form or by any<br />
means, electronic or mechanical, including photocopying, without<br />
express written permission from <strong>Wacker</strong> Corporation.<br />
Any type of reproduction or distribution not authorized by <strong>Wacker</strong><br />
Corporation represents an infringement of valid copyrights and will be<br />
prosecuted. We expressly reserve the right to make technical<br />
modifications, even without due notice, which aim at improving our<br />
machines or their safety standards.<br />
wc_tx000001gb.fm 3
Safety Information<br />
2. Safety Information<br />
<strong>VPA</strong><br />
This manual contains DANGER, WARNING, CAUTION, and NOTE<br />
callouts which must be followed to reduce the possibility of personal<br />
injury, damage to the equipment, or improper service.<br />
This is the safety alert symbol. It is used to alert you to potential<br />
personal injury hazards. Obey all safety messages that follow this<br />
symbol to avoid possible injury or death.<br />
DANGER indicates an imminently hazardous situation which, if not<br />
avoided, will result in death or serious injury.<br />
DANGER<br />
WARNING indicates a potentially hazardous situation which, if not<br />
avoided, could result in death or serious injury.<br />
WARNING<br />
CAUTION<br />
CAUTION indicates a potentially hazardous situation which, if not<br />
avoided, may result in minor or moderate injury.<br />
CAUTION: Used without the safety alert symbol, CAUTION indicates<br />
a potentially hazardous situation which, if not avoided, may result in<br />
property damage.<br />
Note: Contains additional information important to a procedure.<br />
2.1 Laws Pertaining to Spark Arresters<br />
Notice: State Health Safety Codes and Public Resources Codes<br />
specify that in certain locations spark arresters be used on internal<br />
combustion engines that use hydrocarbon fuels. A spark arrester is a<br />
device designed to prevent accidental discharge of sparks or flames<br />
from the engine exhaust. Spark arresters are qualified and rated by<br />
the United States Forest Service for this purpose.<br />
In order to comply with local laws regarding spark arresters, consult<br />
the engine distributor or the local Health and Safety Administrator.<br />
wc_si000028gb.fm 4
<strong>VPA</strong><br />
2.2 Operating Safety<br />
Safety Information<br />
Familiarity and proper training are required for the safe operation of<br />
equipment! Equipment operated improperly or by untrained personnel<br />
can be dangerous! Read the operating instructions contained in both<br />
this manual and the engine manual and familiarize yourself with the<br />
location and proper use of all controls. Inexperienced operators should<br />
receive instruction from someone familiar with the equipment before<br />
being allowed to operate the machine.<br />
2.2.1 NEVER allow anyone to operate this equipment without proper<br />
training. People operating this equipment must be familiar with the<br />
risks and hazards associated with it.<br />
2.2.2 NEVER touch the engine or muffler while the engine is on or<br />
immediately after it has been turned off. These areas get hot and may<br />
cause burns.<br />
2.2.3 NEVER use accessories or attachments that are not recommended by<br />
<strong>Wacker</strong>. Damage to equipment and injury to the user may result.<br />
2.2.4 NEVER operate the machine with the belt guard missing. Exposed<br />
drive belt and pulleys create potentially dangerous hazards that can<br />
cause serious injuries.<br />
2.2.5 NEVER leave machine running unattended.<br />
2.2.6 ALWAYS be sure operator is familiar with proper safety precautions<br />
and operation techniques before using machine.<br />
2.2.7 ALWAYS wear protective clothing appropriate to the job site when<br />
operating equipment.<br />
2.2.8 ALWAYS wear hearing protection when operating equipment.<br />
2.2.9 ALWAYS close fuel valve on engines equipped with one when<br />
machine is not being operated.<br />
2.2.10 ALWAYS store equipment properly when it is not being used.<br />
Equipment should be stored in a clean, dry location out of the reach of<br />
children.<br />
2.2.11 ALWAYS operate machine with all safety devices and guards in place<br />
and in working order. DO NOT modify or defeat safety devices. DO<br />
NOT operate machine if any safety devices or guards are missing or<br />
inoperative.<br />
2.2.12 ALWAYS read, understand, and follow procedures in Operator's<br />
Manual before attempting to operate equipment.<br />
WARNING<br />
wc_si000028gb.fm 5
Safety Information<br />
2.3 Operator Safety while using Internal Combustion Engines<br />
<strong>VPA</strong><br />
Internal combustion engines present special hazards during operation<br />
and fueling! Read and follow warning instructions in engine owner's<br />
manual and safety guidelines below. Failure to follow warnings and<br />
DANGER<br />
safety guidelines could result in severe injury or death.<br />
2.3.1 DO NOT run machine indoors or in an enclosed area such as a deep<br />
trench unless adequate ventilation, through such items as exhaust<br />
fans or hoses, is provided. Exhaust gas from the engine contains<br />
poisonous carbon monoxide gas; exposure to carbon monoxide can<br />
cause loss of consciousness and may lead to death.<br />
2.3.2 DO NOT smoke while operating machine.<br />
2.3.3 DO NOT smoke when refueling engine.<br />
2.3.4 DO NOT refuel hot or running engine.<br />
2.3.5 DO NOT refuel engine near open flame.<br />
2.3.6 DO NOT spill fuel when refueling engine.<br />
2.3.7 DO NOT run engine near open flames.<br />
2.3.8 ALWAYS refill fuel tank in well-ventilated area.<br />
2.3.9 ALWAYS replace fuel tank cap after refueling.<br />
2.3.10 ALWAYS check fuel lines and fuel tank for leaks and cracks before<br />
starting engine. Do not run machine if fuel leaks are present or fuel<br />
lines are loose.<br />
wc_si000028gb.fm 6
<strong>VPA</strong><br />
2.4 Service Safety<br />
Safety Information<br />
WARNING<br />
Poorly maintained equipment can become a safety hazard! In order<br />
for the equipment to operate safely and properly over a long period of<br />
time, periodic maintenance and occasional repairs are necessary.<br />
2.4.1 DO NOT attempt to clean or service machine while it is running.<br />
Rotating parts can cause severe injury.<br />
2.4.2 DO NOT crank a flooded engine with the spark plug removed on<br />
gasoline-powered engines. Fuel trapped in the cylinder will squirt out<br />
the spark plug opening.<br />
2.4.3 DO NOT test for spark on gasoline-powered engines, if engine is<br />
flooded or the smell of gasoline is present. A stray spark could ignite<br />
fumes.<br />
2.4.4 DO NOT use gasoline or other types of fuels or flammable solvents to<br />
clean parts, especially in enclosed areas. Fumes from fuels and<br />
solvents can become explosive.<br />
2.4.5 ALWAYS keep area around muffler free of debris such as leaves,<br />
paper, cartons, etc. A hot muffler could ignite them, starting a fire.<br />
2.4.6 ALWAYS replace worn or damaged components with spare parts<br />
designed and recommended by <strong>Wacker</strong>.<br />
2.4.7 ALWAYS disconnect spark plug on machines equipped with gasoline<br />
engines, before servicing, to avoid accidental start-up.<br />
2.4.8 ALWAYS keep machine clean and labels legible. Replace all missing<br />
and hard-to-read labels. Labels provide important operating<br />
instructions and warn of dangers and hazards.<br />
wc_si000028gb.fm 7
Safety Information<br />
2.5 Label Locations<br />
<strong>VPA</strong><br />
WARNING<br />
WARNUNG<br />
ADVERTENCIA<br />
AVERTISSEMENT<br />
10W30<br />
1 2 3 4 5 6 7 1 2<br />
wc_si000028gb.fm 8
<strong>VPA</strong><br />
2.6 Warning and Informational Labels<br />
Safety Information<br />
<strong>Wacker</strong> machines use international pictorial labels where needed.<br />
These labels are described below:<br />
Label<br />
Meaning<br />
To prevent hearing loss, wear hearing protection<br />
when operating this machine.<br />
Read the operator's manual for machine information.<br />
Check engine oil level.<br />
Use SAE10W30.<br />
9 ! <br />
Check fuel level.<br />
WARNING!<br />
Hot surface.<br />
Machine sound power level in dB(A).<br />
wc_si000028gb.fm 9
Safety Information<br />
<strong>VPA</strong><br />
Label<br />
Meaning<br />
WARNING!<br />
Hand injury if caught in moving belt.<br />
Always replace belt guard.<br />
CAUTION!<br />
Read and understand the supplied operator's<br />
manual before operating this machine. Failure<br />
to do so increases the risk of injury to yourself<br />
or others.<br />
CAUTION!<br />
Lifting point<br />
DANGER!<br />
Engines emit carbon monoxide; operate only<br />
in well ventilated area. Read the operator's<br />
manual.<br />
No sparks, flames or burning objects near<br />
machine. Shut off engine before refueling.<br />
A nameplate listing the Model Number, Item<br />
Number, Revision, and Serial Number is<br />
attached to each unit. Please record the information<br />
found on this plate so it will be available<br />
should the nameplate become lost or<br />
damaged. When ordering parts or requesting<br />
service information, you will always be asked<br />
to specify the model, item number, revision<br />
number, and serial number of the unit.<br />
wc_si000028gb.fm 10
<strong>VPA</strong><br />
Label<br />
Meaning<br />
Safety Information<br />
This machine may be covered by one or more<br />
patents.<br />
wc_si000028gb.fm 11
Safety Information<br />
2.7 Operating Labels<br />
<strong>VPA</strong><br />
<strong>Wacker</strong> machines use international pictorial labels where needed.<br />
These labels are described below:<br />
Label<br />
Meaning<br />
Open fuel flow valve.<br />
Push or turn engine switch to ON position.<br />
Close choke.<br />
Place throttle in the IDLE position.<br />
Pull rewind starter.<br />
Close fuel flow valve.<br />
wc_si000028gb.fm 12
<strong>VPA</strong><br />
Label<br />
1<br />
Meaning<br />
Safety Information<br />
Push or turn engine switch to OFF position.<br />
Open choke.<br />
Place throttle in the FAST position.<br />
Throttle control lever:<br />
Rabbit = Full or Fast<br />
Turtle = Idle or Slow<br />
wc_si000028gb.fm 13
Technical Data<br />
3. Technical Data<br />
<strong>VPA</strong><br />
3.1 Engine Data<br />
<strong>VPA</strong><strong>1740</strong><br />
0006794<br />
0008062<br />
<strong>VPA</strong>1750<br />
0006792<br />
Engine<br />
Engine Make<br />
Engine Model<br />
Honda<br />
GX 160 K1 QX2<br />
Rated Power kW (Hp) 4.1 (5.5)<br />
Engine Speed - full rpm 3600 ± 100<br />
Engine Speed - idle rpm 1600 ± 100<br />
Clutch Engagement rpm 2100<br />
Spark Plug type NGK BPR 6ES<br />
Electrode Gap mm (in) 0.7–0.8 (0.028–0.031)<br />
Air Cleaner type Dual Element<br />
Engine Lubrication oil grade SAE 10W30<br />
service class<br />
SG or SF<br />
Engine Oil Capacity ml (oz.) 600 (20)<br />
Fuel type Regular unleaded gasoline<br />
Fuel Tank Capacity l (qts.) 3.7 (3.9)<br />
Valve Clearance (cold) mm (in.) Inlet: 0.15 (0.006)<br />
Outlet: 0.20 (0.008)<br />
wc_td000015gb.fm 14
<strong>VPA</strong><br />
3.2 Machine Data<br />
Technical Data<br />
<strong>VPA</strong><strong>1740</strong><br />
0006794<br />
0008062<br />
<strong>VPA</strong>1750<br />
0006792<br />
Plate<br />
Operating Weight kg (lbs.) 91 (200) 98 (217)<br />
Water Tank Capacity l (qts.) 12 (13)<br />
Exciter Speed rpm / belt 5800 ± 100<br />
Exciter Lubrication ml (oz.) 800 (27)<br />
SAE 30W<br />
3.3 Sound and Vibration Specifications<br />
The required sound specifications, per Appendix 1, Paragraph 1.7.4.f<br />
of the EC-Machine Regulations, are:<br />
• the sound pressure level at operator’s location (L pA ) = 97 dB(A)<br />
• the sound power level (L WA ) = 106 dB(A)<br />
These sound values were determined according to ISO 3744 for the<br />
sound power level (L WA ) and ISO 6081 for the sound pressure level<br />
(L pA ) at the operator’s location.<br />
The weighted effective acceleration value, determined according to<br />
ISO 8662 Part 1, is 17 m/s 2 .<br />
The sound and vibration specifications were obtained with the unit<br />
operating on crushed gravel at nominal engine speed.<br />
wc_td000015gb.fm 15
Technical Data<br />
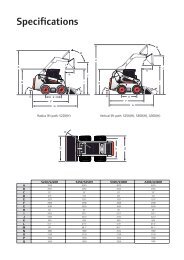
3.4 Dimensions<br />
<strong>VPA</strong><br />
mm (in.)<br />
% & <br />
& " ! ! <br />
$ ! # # <br />
' ' ! ' <br />
" # # <br />
# ' # <br />
8 2 ) % " <br />
8 2 ) % # <br />
M ? C H & &<br />
wc_td000015gb.fm 16
<strong>VPA</strong><br />
4. Operation<br />
Operation<br />
4.1 Recommended Fuel<br />
4.2 Before Starting<br />
The engine requires regular grade unleaded gasoline. Use only fresh,<br />
clean gasoline. Gasoline containing water or dirt will damage fuel<br />
system. Consult engine owner’s manual for complete fuel<br />
specifications.<br />
4.2.1 Read and understand safety and operating instructions at beginning of<br />
this manual.<br />
4.2.2 Check:<br />
• oil level in engine.<br />
• fuel level.<br />
• condition of air cleaner.<br />
• tightness of external fasteners.<br />
• condition of fuel lines.<br />
4.3 To Start<br />
See Graphic: wc_gr000014<br />
4.3.1 Open fuel valve by moving lever to the right (a1).<br />
Note: If engine is cold, move choke lever to close position (b1). If<br />
engine is hot, set choke to open position (b2 ).<br />
4.3.2 Turn engine switch to “ON” (e1).<br />
4.3.3 Open throttle by moving it slightly to left (d1).<br />
4.3.4 Pull starter rope (c).<br />
Note: If the oil level in the engine is low, the engine will not start. If this<br />
happens, add oil to engine. Some engines are equipped with an oil<br />
alert light (f) that will come on while pulling the starter rope.<br />
4.3.5 Open choke as engine warms (b2).<br />
4.3.6 Open throttle fully to operate.<br />
wc_tx000100gb.fm 17
Operation<br />
<strong>VPA</strong><br />
4.4 To Stop<br />
See Graphic: wc_gr000014<br />
4.4.1 Reduce engine RPM to idle by moving throttle completely to right (d2).<br />
4.4.2 Turn engine switch to “OFF” (e2).<br />
4.4.3 Close fuel valve by moving lever to the left (a2).<br />
4.5 Application<br />
This plate is designed for compacting loose, granular soils, gravel, and<br />
paving stones. It is intended to be used in confined areas and areas<br />
next to structures such as walls, curbs, and foundations. Plates<br />
equipped with water tanks can be used for compacting asphalt.<br />
This plate is not recommended for compacting cohesive soils with a<br />
heavy clay content. For cohesive soil, use a vibratory rammer or<br />
sheepsfoot roller.<br />
wc_tx000100gb.fm 18
<strong>VPA</strong><br />
4.6 Operation<br />
Operation<br />
Run the engine at full throttle and allow the plate to pull itself along at<br />
its normal speed. When operating on an incline it may be necessary to<br />
assist the plate by pushing it forward slightly. When operating downhill<br />
hold the plate back slightly, if it begins to pick up speed. Depending on<br />
the material being compacted, three or four passes are recommended<br />
to achieve the best compaction.<br />
While a certain amount of moisture in the soil is necessary, excessive<br />
moisture may cause soil particles to stick together and prevent good<br />
compaction. If soil is extremely wet, allow it to dry somewhat before<br />
compacting.<br />
If soil is so dry as to create dust clouds while operating plate, some<br />
moisture should be added to the ground material to improve<br />
compaction. This will also reduce service to the air filter.<br />
For compacting asphalt, use a water tank to wet the asphalt and the<br />
underside of plate. This will prevent asphalt material from sticking.<br />
Two passes are usually sufficent to ensure good compaction.<br />
When using the plate on paving stones, attach a pad to the bottom of<br />
the plate to prevent chipping or grinding surface of stones. A special<br />
polyurethane pad designed for this purpose is available as an optional<br />
accessory.<br />
CAUTION: DO NOT operate the plate on concrete or on extremely<br />
hard, dry, compacted surfaces. The plate will jump rather than vibrate<br />
and could damage both the plate and the engine.<br />
wc_tx000100gb.fm 19
Maintenance<br />
5. Maintenance<br />
<strong>VPA</strong><br />
5.1 Periodic Maintenance Schedule<br />
The chart below lists basic engine maintenance. Refer to engine<br />
manufacturer’s Operation Manual for additional information on engine<br />
maintenance.<br />
Check fuel level.<br />
Check engine oil level.<br />
Inspect fuel lines.<br />
Inspect air filter. Replace as needed.<br />
Check and tighten external hardware.<br />
Daily<br />
before<br />
starting<br />
•<br />
•<br />
•<br />
•<br />
•<br />
After<br />
first<br />
20 hrs.<br />
Every<br />
2 weeks<br />
or<br />
50 hrs.<br />
Check and adjust drive belt. • •<br />
Clean air cleaner elements.<br />
Inspect shockmounts for damage.<br />
Every<br />
month<br />
or<br />
100 hrs.<br />
Change engine oil. • •<br />
Clean cooling system.<br />
Clean sediment cup / fuel filter.<br />
Check and clean spark plug.<br />
Check and adjust valve clearance.<br />
Change exciter oil.<br />
•<br />
•<br />
•<br />
•<br />
•<br />
Every<br />
year<br />
or<br />
300 hrs.<br />
•<br />
•<br />
5.2 Cleaning Plate<br />
Clean plate after use to remove dirt, stones, and mud caught under the<br />
engine console. If plate is being used in a dusty area, check engine<br />
cylinder cooling fins for heavy dirt accumulation. Keep engine cylinder<br />
fins clean to prevent engine from overheating.<br />
wc_tx000101gb.fm 20
<strong>VPA</strong><br />
5.3 Engine Oil<br />
Maintenance<br />
See Graphic: wc_gr000022<br />
5.3.1 Drain oil while the engine is still warm.<br />
5.3.2 Remove the oil fill plug (a) and drain plug (b) to drain oil.<br />
Note: In the interests of environmental protection, place a plastic sheet<br />
and a container under the machine to collect any liquid which drains<br />
off. Dispose of this liquid in accordance with environmental protection<br />
legislation.<br />
5.3.3 Install drain plug.<br />
5.3.4 Fill the engine crankcase with recommended oil up to the level of the<br />
plug opening (c). See Technical Data for oil quantity and type.<br />
5.3.5 Install the oil filler plug.<br />
wc_tx000101gb.fm 21
Maintenance<br />
5.4 Air Cleaner<br />
<strong>VPA</strong><br />
See Graphic: wc_gr000025<br />
The engine is equipped with a dual element air cleaner. Service air<br />
cleaner frequently to prevent carburetor malfunction.<br />
CAUTION: NEVER run engine without air cleaner. Severe engine<br />
damage will occur.<br />
NEVER use gasoline or other types of low flash point solvents for<br />
cleaning the air cleaner. A fire or explosion could result.<br />
WARNING<br />
To service:<br />
5.4.1 Remove air cleaner cover (a). Remove both elements and inspect<br />
them for holes or tears. Replace damaged elements.<br />
5.4.2 Wash foam element (b) in solution of mild detergent and warm water.<br />
Rinse thoroughly in clean water. Allow element to dry thoroughly. Soak<br />
element in clean engine oil and squeeze out excess oil.<br />
5.4.3 Tap paper element (c) lightly to remove excess dirt. Replace paper<br />
element if it appears heavily soiled.<br />
wc_tx000101gb.fm 22
<strong>VPA</strong><br />
5.5 Spark Plug<br />
Maintenance<br />
See Graphic: wc_gr000028<br />
Clean or replace spark plug as needed to ensure proper operation.<br />
Refer to the engine Owner’s Manual.<br />
The muffler becomes very hot during operation and remains hot for a<br />
while after stopping the engine. Do not touch the muffler while it is hot.<br />
WARNING<br />
Note: Refer to the Technical Data for the recommended spark plug<br />
type and the electrode gap setting.<br />
5.5.1 Remove spark plug and inspect it.<br />
5.5.2 Replace plug if the insulator is cracked or chipped.<br />
5.5.3 Clean spark plug electrodes with a wire brush.<br />
5.5.4 Set the electrode gap (a).<br />
5.5.5 Tighten spark plug securely.<br />
CAUTION: A loose spark plug can become very hot and may cause<br />
engine damage.<br />
wc_tx000101gb.fm 23
Maintenance<br />
5.6 Exciter Lubrication<br />
<strong>VPA</strong><br />
See Graphic: wc_gr000023<br />
The bearings in the exciter assembly are splash lubricated and rotate<br />
at very high speed. It is important to maintain the exciter oil at the<br />
correct level and change it regularly.<br />
Check oil level in exciter each day, before running plate.<br />
5.6.1 To check the oil level, place the plate on a flat, level surface.<br />
5.6.2 Oil level should appear near center of sight glass (a).<br />
5.6.3 Add oil as required.<br />
Change exciter oil every 300 hours of operation.<br />
5.6.1 To drain oil, remove plug (b) from end of exciter and tilt plate up.<br />
Note: In the interests of environmental protection, place a plastic sheet<br />
and a container under the machine to collect any liquid which drains<br />
off. Dispose of this liquid in accordance with environmental protection<br />
legislation.<br />
5.6.2 Place the plate on a level surface and add approximately 800 ml (27<br />
oz.) of oil through plug opening until oil appears near the center of the<br />
sight glass (a).<br />
CAUTION: DO NOT overfill. Too much oil in exciter can reduce<br />
performance and damage drive belt.<br />
><br />
=<br />
M ? C H & "<br />
wc_tx000101gb.fm 24
<strong>VPA</strong><br />
5.7 Drive Belt<br />
Maintenance<br />
See Graphic: wc_gr000185<br />
On new machines or after installing a new belt, check belt tension after<br />
first 20 hours of operation. Check and adjust belt every 50 hours<br />
thereafter.<br />
To adjust belt:<br />
5.7.1 Remove the two screws (b) at the bottom of the guard and the two nuts<br />
(a) located behind the guard.<br />
5.7.2 Remove belt guard.<br />
5.7.3 Loosen the four bolts (c) which hold the engine to the plate.<br />
5.7.4 Slide engine back toward the handle to tighten belt, forward to loosen<br />
belt.<br />
5.7.5 Adjust belt so that it deflects 10-13 mm (3/8"-1/2") (d) when pressed<br />
midway between belt pulleys.<br />
=<br />
><br />
<br />
?<br />
@<br />
M ? C H & #<br />
wc_tx000101gb.fm 25
Maintenance<br />
5.8 Adjusting Engine Speed<br />
<strong>VPA</strong><br />
See Graphic: wc_gr000280<br />
Adjust engine to the full load speed. See Technical Data.<br />
To adjust idle speed:<br />
5.8.1 Place machine on a rubber test mat to prevent it from moving.<br />
5.8.2 Start the engine and allow it to warm up to normal operating<br />
temperature.<br />
5.8.3 Turn the throttle stop screw (a) in to increase speed, out to decrease<br />
speed. Make sure the throttle lever is touching the stop screw before<br />
measuring rpm.<br />
CAUTION: Running the plate at a speed higher than that listed in<br />
Technical Data can damage both the plate and the engine.<br />
a<br />
wc_gr000280<br />
5.9 Cleaning Sediment Cup<br />
See Graphic: wc_gr000029<br />
5.9.1 Turn fuel valve off.<br />
5.9.2 Remove sediment cup (a) and O-ring (b).<br />
5.9.3 Wash both thoroughly in a nonflammable solvent. Dry and reinstall<br />
them.<br />
5.9.4 Turn fuel valve on and check for leaks.<br />
5.9.5<br />
wc_tx000101gb.fm 26
<strong>VPA</strong><br />
5.10 Carburetor Adjustment<br />
Maintenance<br />
See Graphic: wc_gr000032<br />
5.10.1 Start the engine and allow it to warm up to operating temperature.<br />
5.10.2 Set the pilot screw (a) 2 turns out. See Note.<br />
5.10.3 With the engine idling, turn the pilot screw (a) in or out to the setting<br />
that produces the highest rpm.<br />
5.10.4 After the pilot screw is adjusted, turn the throttle stop screw (b) to<br />
obtain the standard idle speed. See Technical Data.<br />
Note: On some engines the pilot screw is fitted with a limiter cap (c)<br />
to prevent excessive enrichment of the air-fuel mixture in order to<br />
comply with emission regulations. The mixture is set at the factory and<br />
no adjustment should be necessary. Do not attempt to remove the<br />
limiter cap. The limiter cap cannot be removed without breaking the<br />
pilot screw.<br />
5.11 Storage<br />
If plate is being stored for more than 30 days:<br />
5.11.1 Remove loose stones and dirt from plate.<br />
5.11.2 Clean engine cylinder cooling fins.<br />
5.11.3 Clean or replace air filter.<br />
5.11.4 Change engine oil and follow procedures described in engine manual<br />
for engine storage.<br />
5.11.5 Cover plate and engine and store in a clean, dry area.<br />
wc_tx000101gb.fm 27
Maintenance<br />
5.12 Lifting Machine<br />
<strong>VPA</strong><br />
See Graphic: wc_gr000352<br />
See Technical Data for the weight of the machine.<br />
To lift machine manually:<br />
5.12.1 Stop the engine.<br />
5.12.2 Obtain help from a partner and plan the lift.<br />
5.12.3 Grasp the machine by its cage (a) and lifting handle (b).<br />
5.12.4 Lift the machine as shown.<br />
To reduce risk of back injury while lifting, keep your feet flat on ground<br />
and shoulder width apart. Keep your head up and back straight.<br />
To lift machine mechanically:<br />
CAUTION: Before attempting to lift, be sure that all lifting devices can<br />
safely handle the weight of the machine. See Technical Data for the<br />
weight of the machine.<br />
5.12.5 Attach hook, harness, or cable to the machine as shown and lift as<br />
desired.<br />
CAUTION: DO NOT lift the vibroplate by its guide handle. The<br />
vibroplate can shift, causing it to fall.<br />
WARNING<br />
b<br />
a<br />
wc_gr000352<br />
wc_tx000101gb.fm 28
<strong>VPA</strong><br />
5.13 Transporting Machine<br />
Maintenance<br />
See Graphic: wc_gr000354<br />
To avoid burns or fire hazards, let engine cool before transporting<br />
machine or storing indoors.<br />
WARNING<br />
5.13.1 Turn fuel valve to the off position and keep the engine level to prevent<br />
fuel from spilling.<br />
5.13.2 Tie down machine on vehicle to prevent machine from sliding or tipping<br />
over. Tie machine to vehicle at points shown on graphic.<br />
wc_gr000354<br />
wc_tx000101gb.fm 29
Maintenance<br />
5.14 Troubleshooting<br />
<strong>VPA</strong><br />
Problem / Symptom<br />
Plate does not develop full<br />
speed. Poor compaction.<br />
Reason / Remedy<br />
• Engine throttle control not completely open.<br />
• Throttle control not adjusted correctly.<br />
• Ground too wet, plate sticking. Allow soil to dry<br />
before compacting.<br />
• Drive belt loose or worn, slipping on pulleys. Adjust<br />
or replace belt. Check that engine mounting bolts<br />
are tight.<br />
• Exciter bearings binding. Check condition and level<br />
of oil in exciter. Add or change oil.<br />
• Air filter clogged with dust, reducing engine performance.<br />
Clean or replace air filter.<br />
• Engine speed too low. Check engine speed with<br />
tachometer. Adjust or repair engine to run at correct<br />
speed. Refer to engine manual.<br />
Engine running, no vibration • Engine throttle not open.<br />
• Drive belt loose or broken. Adjust or replace.<br />
• Clutch damaged. Inspect and replace clutch.<br />
• Engine speed too low. Check engine speed.<br />
• Too much oil in exciter. Adjust oil to correct level.<br />
Plate jumps or compacts<br />
unevenly.<br />
• Ground surface too hard.<br />
• Shockmounts loose or damaged.<br />
wc_tx000101gb.fm 30