Makita - HM1303 - Rotary Hammer Drill - GGH Hire Ltd
Makita - HM1303 - Rotary Hammer Drill - GGH Hire Ltd
Makita - HM1303 - Rotary Hammer Drill - GGH Hire Ltd

Create successful ePaper yourself
Turn your PDF publications into a flip-book with our unique Google optimized e-Paper software.
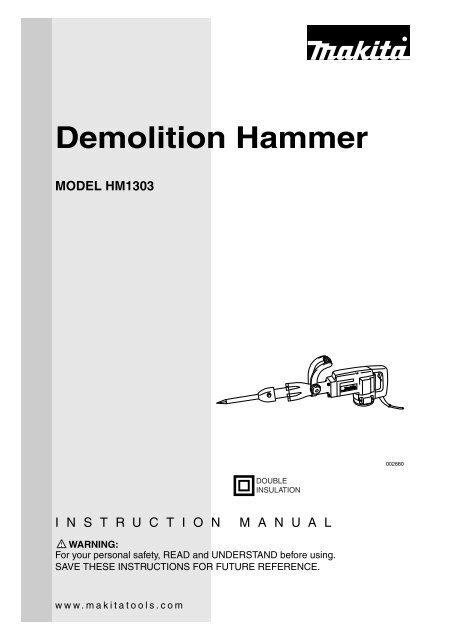
Demolition <strong>Hammer</strong><br />
MODEL <strong>HM1303</strong><br />
002880<br />
DOUBLE<br />
INSULATION<br />
I N S T R U C T I O N M A N U A L<br />
WARNING:<br />
For your personal safety, READ and UNDERSTAND before using.<br />
SAVE THESE INSTRUCTIONS FOR FUTURE REFERENCE.<br />
www.makitatools.com
SPECIFICATIONS<br />
Model<br />
<strong>HM1303</strong><br />
Blows per minute 1,450<br />
Overall length 747 mm (29-1/2”)<br />
Net weight<br />
14 kg (30.9 lbs)<br />
• Manufacturer reserves the right to change specifications without notice.<br />
• Specifications may differ from country to country.<br />
GENERAL SAFETY RULES<br />
USA002-2<br />
(For All Tools)<br />
WARNING:<br />
Read and understand all instructions. Failure to follow all<br />
instructions listed below, may result in electric shock, fire and/or<br />
serious personal injury.<br />
SAVE THESE INSTRUCTIONS<br />
Work Area<br />
1. Keep your work area clean and well lit.<br />
Cluttered benches and dark areas invite accidents.<br />
2. Do not operate power tools in explosive<br />
atmospheres, such as in the presence of<br />
flammable liquids, gases, or dust. Power<br />
tools create sparks which may ignite the dust<br />
or fumes.<br />
3. Keep bystanders, children, and visitors<br />
away while operating a power tool. Distractions<br />
can cause you to lose control.<br />
Electrical Safety<br />
4. Double insulated tools are equipped with<br />
a polarized plug (one blade is wider than<br />
the other.) This plug will fit in a polarized<br />
outlet only one way. If the plug does not fit<br />
fully in the outlet, reverse the plug. If it<br />
still does not fit, contact a qualified electrician<br />
to install a polarized outlet. Do not<br />
change the plug in any way. Double insulation<br />
eliminates the need for the three wire<br />
grounded power cord and grounded power<br />
supply system.<br />
5. Avoid body contact with grounded surfaces<br />
such as pipes, radiators, ranges and<br />
refrigerators. There is an increased risk of<br />
electric shock if your body is grounded.<br />
2
6. Do not expose power tools to rain or wet<br />
conditions. Water entering a power tool will<br />
increase the risk of electric shock.<br />
7. Do not abuse the cord. Never use the cord<br />
to carry the tools or pull the plug from an<br />
outlet. Keep cord away from heat, oil,<br />
sharp edges or moving parts. Replace<br />
damaged cords immediately. Damaged<br />
cords increase the risk of electric shock.<br />
8. When operating a power tool outside, use<br />
an outdoor extension cord marked “W-A”<br />
or “W”. These cords are rated for outdoor<br />
use and reduce the risk of electric shock.<br />
Personal Safety<br />
9. Stay alert, watch what you are doing and<br />
use common sense when operating a<br />
power tool. Do not use tool while tired or<br />
under the influence of drugs, alcohol, or<br />
medication. A moment of inattention while<br />
operating power tools may result in serious<br />
personal injury.<br />
10. Dress properly. Do not wear loose clothing<br />
or jewelry. Contain long hair. Keep<br />
your hair, clothing, and gloves away from<br />
moving parts. Loose clothes, jewelry, or long<br />
hair can be caught in moving parts.<br />
11. Avoid accidental starting. Be sure switch<br />
is off before plugging in. Carrying tools with<br />
your finger on the switch or plugging in tools<br />
that have the switch on invites accidents.<br />
12. Remove adjusting keys or wrenches<br />
before turning the tool on. A wrench or a<br />
key that is left attached to a rotating part of<br />
the tool may result in personal injury.<br />
13. Do not overreach. Keep proper footing<br />
and balance at all times. Proper footing and<br />
balance enables better control of the tool in<br />
unexpected situations.<br />
14. Use safety equipment. Always wear eye<br />
protection. Dust mask, non-skid safety<br />
shoes, hard hat, or hearing protection must<br />
be used for appropriate conditions. Ordinary<br />
eye or sun glasses are NOT eye protection.<br />
Tool Use and Care<br />
15. Use clamps or other practical way to<br />
secure and support the workpiece to a<br />
stable platform. Holding the work by hand or<br />
against your body is unstable and may lead<br />
to loss of control.<br />
16. Do not force tool. Use the correct tool for<br />
your application. The correct tool will do the<br />
job better and safer at the rate for which it is<br />
designed.<br />
17. Do not use tool if switch does not turn it<br />
on or off. Any tool that cannot be controlled<br />
with the switch is dangerous and must be<br />
repaired.<br />
18. Disconnect the plug from the power<br />
source before making any adjustments,<br />
changing accessories, or storing the tool.<br />
Such preventive safety measures reduce the<br />
risk of starting the tool accidentally.<br />
19. Store idle tools out of reach of children<br />
and other untrained persons. Tools are<br />
dangerous in the hands of untrained users.<br />
20. Maintain tools with care. Keep cutting<br />
tools sharp and clean. Properly maintained<br />
tools with sharp cutting edges are less likely<br />
to bind and are easier to control.<br />
21. Check for misalignment or binding of<br />
moving parts, breakage of parts, and any<br />
other condition that may affect the tools<br />
operation. If damaged, have the tool serviced<br />
before using. Many accidents are<br />
caused by poorly maintained tools.<br />
22. Use only accessories that are recommended<br />
by the manufacturer for your<br />
model. Accessories that may be suitable for<br />
one tool, may become hazardous when used<br />
on another tool.<br />
SERVICE<br />
23. Tool service must be performed only by<br />
qualified repair personnel. Service or maintenance<br />
performed by unqualified personnel<br />
could result in a risk of injury.<br />
3
24. When servicing a tool, use only identical<br />
replacement parts. Follow instructions in<br />
the Maintenance section of this manual.<br />
Use of unauthorized parts or failure to follow<br />
Maintenance instructions may create a risk of<br />
electric shock or injury.<br />
USE PROPER EXTENSION CORD: Make sure your extension cord is in good condition.<br />
When using an extension cord, be sure to use one heavy enough to carry the current your<br />
product will draw. An undersized cord will cause a drop in line voltage resulting in loss of<br />
power and overheating. Table 1 shows the correct size to use depending on cord length and<br />
nameplate ampere rating. If in doubt, use the next heavier gage. The smaller the gage number,<br />
the heavier the cord.<br />
Table 1: Minimum gage for cord<br />
Ampere Rating<br />
Volts<br />
Total length of cord in feet<br />
120 V 25 ft. 50 ft. 100 ft. 150 ft.<br />
More Than Not More Than AWG<br />
0 6 18 16 16 14<br />
6 10 18 16 14 12<br />
10 12 16 16 14 12<br />
12 16 14 12 Not Recommended<br />
SPECIFIC SAFETY RULES<br />
USB009-2<br />
DO NOT let comfort or familiarity with product (gained from<br />
repeated use) replace strict adherence to hammer safety rules.<br />
If you use this tool unsafely or incorrectly, you can suffer serious<br />
personal injury.<br />
1. Hold tools by insulated gripping surfaces<br />
when performing an operation where the<br />
cutting tool may contact hidden wiring or<br />
its own cord. Contact with a “live” wire will<br />
make exposed metal parts of the tool “live”<br />
and shock the operator.<br />
2. Wear ear protectors when using the tool<br />
for extended periods. Prolonged exposure<br />
to high intensity noise can cause hearing<br />
loss.<br />
3. Wear a hard hat (safety helmet), safety<br />
glasses and/or face shield. Ordinary eye<br />
or sun glasses are NOT safety glasses. It<br />
is also highly recommended that you wear<br />
a dust mask and thickly padded gloves.<br />
4. Be sure the bit is secured in place before<br />
operation.<br />
5. Under normal operation, the tool is<br />
designed to produce vibration. The<br />
screws can come loose easily, causing a<br />
breakdown or accident. Check tightness<br />
of screws carefully before operation.<br />
6. In cold weather or when the tool has not<br />
been used for a long time, let the tool<br />
warm up for a while by operating it under<br />
no load. This will loosen up the lubrica-<br />
4
tion. Without proper warm-up, hammering<br />
operation is difficult.<br />
7. Always be sure you have a firm footing.<br />
Be sure no one is below when using the<br />
tool in high locations.<br />
8. Hold the tool firmly with both hands.<br />
9. Keep hands away from moving parts.<br />
10. Do not leave the tool running. Operate the<br />
tool only when hand-held.<br />
11. Do not point the tool at any one in the area<br />
when operating. The bit could fly out and<br />
injure someone seriously.<br />
12. Do not touch the bit or parts close to the<br />
bit immediately after operation; they may<br />
be extremely hot and could burn your<br />
skin.<br />
13. Some material contains chemicals which<br />
may be toxic. Take caution to prevent dust<br />
inhalation and skin contact. Follow material<br />
supplier safety data.<br />
SAVE THESE INSTRUCTIONS<br />
WARNING:<br />
MISUSE or failure to follow the safety rules stated in this<br />
instruction manual may cause serious personal injury.<br />
SYMBOLS<br />
USD203-2<br />
The followings show the symbols used for tool.<br />
V ....................... volts<br />
A ....................... amperes<br />
Hz ..................... hertz<br />
................ alternating current<br />
....................Class II Construction<br />
.../min................revolutions or reciprocation per<br />
minute<br />
................number of blow<br />
5
FUNCTIONAL<br />
DESCRIPTION<br />
CAUTION:<br />
• Always be sure that the tool is switched off and<br />
unplugged before adjusting or checking function on the<br />
tool.<br />
1<br />
2<br />
002890<br />
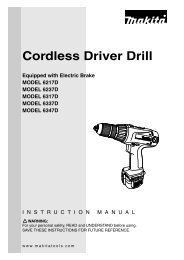
Switch action<br />
CAUTION:<br />
• Before plugging in the tool, always check to see that the<br />
switch trigger actuates properly and returns to the “OFF”<br />
position when released.<br />
• Switch can be locked in “ON” position for ease of<br />
operator comfort during extended use. Apply caution<br />
when locking tool in “ON” position and maintain firm<br />
grasp on tool.<br />
To start the tool, simply pull the switch trigger. Release the<br />
switch trigger to stop.<br />
For continuous operation, pull the switch trigger and then<br />
slide down the lock button.<br />
To stop the tool from the locked position, pull the switch trigger<br />
fully, then release it.<br />
1. Lock button<br />
2. Switch trigger<br />
ASSEMBLY<br />
CAUTION:<br />
• Always be sure that the tool is switched off and<br />
unplugged before carrying out any work on the tool.<br />
5<br />
1<br />
2<br />
002908<br />
3<br />
4<br />
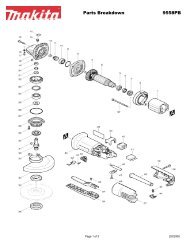
1. Nut<br />
2. Set bolt<br />
3. Projecting portion of side handle<br />
4. Notch in set bolt<br />
5. Side handle<br />
Side handle (auxiliary handle)<br />
The side handle can be either freely swiveled or secured at<br />
one position for use during tool operation. Just loosen the nut<br />
to swivel the handle freely.<br />
To secure the handle at a fixed position, first loosen the nut<br />
and swing the handle to the desired position for use. Then<br />
tighten the nut firmly. If the set bolt turns together with the nut<br />
when you secure the nut, see that the projecting portion of<br />
the side handle fits into the notch on the head of the set bolt.<br />
6
1<br />
2<br />
3<br />
4<br />
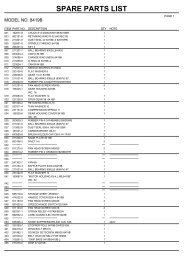
1. Bull point<br />
2. Notched portion<br />
3. Dust cover<br />
4. Tool retainer<br />
OPERATION<br />
002927<br />
Installing or removing the bit<br />
With the notched portion on the shank of the bit facing<br />
toward the tool retainer, insert the bit into the tool holder as<br />
far as it will go. Then pull out and turn the tool retainer 180°<br />
to secure the bit. After installing, always make sure that the<br />
bit is securely held in place by trying to pull it out.<br />
When installing the scaling chisel, clay spade or rammer,<br />
remove the dust cover from the tool.<br />
Chipping/Scaling/Demolition<br />
Hold the tool firmly with both hands. Turn the tool on and<br />
apply slight pressure on the tool so that the tool will not<br />
bounce around, uncontrolled. Pressing very hard on the tool<br />
will not increase the efficiency.<br />
MAINTENANCE<br />
CAUTION:<br />
• Always be sure that the tool is switched off and<br />
unplugged before attempting to perform inspection or<br />
maintenance.<br />
1<br />
1. Commutator<br />
2. Insulating tip<br />
3. Carbon brush<br />
2<br />
3<br />
001146<br />
Replacing carbon brushes<br />
When the resin insulating tip inside the carbon brush is<br />
exposed to contact the commutator, it will automatically shut<br />
off the motor. When this occurs, both carbon brushes should<br />
be replaced. Keep the carbon brushes clean and free to slip<br />
in the holders. Both carbon brushes should be replaced at<br />
the same time. Use only identical carbon brushes.<br />
7
1<br />
002955<br />
Use a screwdriver to remove the holder cap plates.<br />
2<br />
1. Screwdriver<br />
2. Holder cap plate<br />
1<br />
2<br />
002956<br />
Use a screwdriver to remove the brush holder caps. Take out<br />
the worn carbon brushes, insert the new ones and secure<br />
the brush holder caps.<br />
1. Screwdriver<br />
2. Brush holder cap<br />
002970<br />
Lubrication<br />
1. Screwdriver<br />
2. Plate 50<br />
2<br />
1<br />
This tool requires no hourly or daily lubrication because it<br />
has a grease-packed lubrication system. It should be relubricated<br />
after every 6 months of operation. Send the complete<br />
tool to <strong>Makita</strong> Authorized or Factory Service Center for this<br />
lubrication service. However, if circumstances require that<br />
you should lubricate it by yourself, proceed as follows.<br />
First, switch off and unplug the tool.<br />
1. <strong>Hammer</strong> grease<br />
1<br />
002971<br />
Remove the plate 50 using a screwdriver, then replenish with<br />
fresh grease (30 g; 1 oz). Use only <strong>Makita</strong> genuine hammer<br />
grease (optional accessory). Filling with more than the specified<br />
amount of grease (approx. 30 g; 1 oz) can cause faulty<br />
hammering action or tool failure. Fill only with the specified<br />
amount of grease.<br />
Reinstall the plate 50 and secure with the screws.<br />
To maintain product SAFETY and RELIABILITY, repairs, any<br />
other maintenance or adjustment should be performed by<br />
<strong>Makita</strong> Authorized or Factory Service Centers, always using<br />
<strong>Makita</strong> replacement parts.<br />
8
ACCESSORIES<br />
CAUTION:<br />
• These accessories or attachments are recommended for<br />
use with your <strong>Makita</strong> tool specified in this manual. The<br />
use of any other accessories or attachments might<br />
present a risk of injury to persons. Only use accessory<br />
or attachment for its stated purpose.<br />
If you need any assistance for more details regarding these<br />
accessories, ask your local <strong>Makita</strong> service center.<br />
• Bull point<br />
• Cold chisel<br />
• Scaling chisel<br />
• Clay spade<br />
• Rammer<br />
• <strong>Hammer</strong> grease<br />
• Steel carrying case<br />
9
Memo<br />
10
Memo<br />
11
Memo<br />
12
Cut<br />
First-Class<br />
Postage<br />
Required<br />
Post Office will<br />
not deliver<br />
without proper<br />
postage.<br />
<strong>Makita</strong> U.S.A., Inc.<br />
14930 Northam Street<br />
La Mirada, CA 90638-5753<br />
Fold<br />
13
MAIL THIS PORTION<br />
Your answers to the following questions are appreciated.<br />
1. This product was purchased from:<br />
3. How did you learn about this product:<br />
Home Center<br />
Other ( )<br />
Magazine<br />
Radio<br />
Hardware/Lumber Store<br />
From Dealer<br />
Exhibition<br />
Tool Distributor<br />
Newspaper<br />
From Friend<br />
Industrial Supply<br />
Store Display<br />
Previous Usage<br />
Construction Supply<br />
Catalog<br />
Other ( )<br />
2. Use of the product is intended for:<br />
Construction Trade<br />
Industrial Maintenance<br />
Home Maintenance<br />
Hobby<br />
Other ( )<br />
4. Most favored points are:<br />
Design<br />
Features<br />
Size<br />
Price<br />
<strong>Makita</strong> Brand<br />
Repair Service<br />
Durability<br />
Power<br />
Other ( )<br />
5. Any comments:<br />
DATE PURCHASED<br />
MODEL NO.<br />
Paste Paste Paste Paste Paste Paste<br />
INTL.<br />
STREET ADRESS<br />
CITY<br />
BE SURE TO COMPLETE THE CUSTOMER’S PORTION OF THIS FORM AND RETAIN FOR YOUR RECORDS.<br />
14<br />
MONTH DAY YEAR<br />
STATE<br />
AGE:<br />
LAST NAME / COMPANY NAME<br />
ZIP CODE<br />
SERIAL NO.<br />
PHONE<br />
STATUS<br />
Married Single<br />
AREA<br />
CODE<br />
SEX<br />
M F<br />
Under 19 20-29 30-39 40-49 50-60 Over 60<br />
Please return this portion by facsimile or mail.<br />
Facsimile No: (714) 522-8133<br />
Paste Paste Paste Paste Paste Paste<br />
Paste Paste Paste Paste Paste Paste Paste Paste
FACTORY SERVICE CENTERS<br />
1-800-4-MAKITA<br />
RETAIN THIS PORTION FOR YOUR RECORDS<br />
ALABAMA<br />
2365 Pelham Parkway<br />
Pelham, AL 35124<br />
(205) 620-1791<br />
COLORADO<br />
11839 E. 51st Ave.<br />
Denver, CO 80239-2709<br />
(303) 371-2850<br />
KENTUCKY<br />
1215 S. Hurstbourne Parkway<br />
Louisville, KY 40222<br />
(502) 326-3740<br />
NEW MEXICO<br />
5805 Menaul Blvd. NE<br />
Albuquerque, NM 87110<br />
(505) 881-4619<br />
PUERTO RICO<br />
200 Guayama St.<br />
Hato Rey, PR 00917<br />
(787) 250-8776<br />
ARIZONA<br />
3707 E. Broadway Rd., Ste. 6<br />
Phoenix, AZ 85040<br />
(602) 437-2850<br />
CONNECTICUT<br />
508 Spring St.<br />
Windsor Locks, CT 06096<br />
(860) 292-6405<br />
LOUSIANA<br />
5626 Jefferson Hwy.<br />
Harahan, LA 70123<br />
(504) 733-4138<br />
NEW YORK<br />
4917 Genessee Street<br />
Cheektowaga, NY 14225<br />
(716) 685-9503<br />
TENNESSEE<br />
4655 Nolensville Rd.<br />
Nashville, TN 37211<br />
(615) 331-9922<br />
ARKANSAS<br />
Shackleford Shopping Center<br />
240 South Shackleford Rd.,<br />
Ste. C<br />
Little Rock, AR 72211<br />
(501) 224-5733<br />
CALIFORNIA<br />
41850 Christy St.<br />
Fremont, CA 94538-5107<br />
(510) 657-9881<br />
1421 N. Clovis Ave., Ste. 112<br />
Fresno, CA 93727<br />
(559) 252-5166<br />
14930 Northam St.<br />
La Mirada, CA 90638-5753<br />
(714) 522-8088<br />
1970 Fulton Avenue<br />
Sacramento, CA 95825<br />
(916) 482-5197<br />
1440 South “E” Street<br />
San Bernardino, CA 92408<br />
(909) 885-1289<br />
7674 Clairemont Mesa Blvd.<br />
San Diego, CA 92111<br />
(858) 278-4471<br />
1714 E.McFadden Ave., Unit M<br />
Santa Ana, CA 92705<br />
(714) 667-5066<br />
1565 Winchester B.<br />
Campbell, CA 95008-0501<br />
(408) 379-0377<br />
16735 Saticoy St., Ste. 105<br />
Van Nuys, CA 91406<br />
(818) 782-2440<br />
FLORIDA<br />
620 Douglas Ave. Suite 1302<br />
Altamonte Springs, FL 32714<br />
(407) 774-6000<br />
750 East Sample Road<br />
Pompano Beach, FL 33064<br />
(954) 781-6333<br />
Thompson Center Waters<br />
5501 W. Waters Ave., Ste. 406<br />
Tampa, FL 33634<br />
(813) 886-8292<br />
GEORGIA<br />
4680 River Green Parkway<br />
Duluth, GA 30096-2566<br />
(770) 476-8911<br />
HAWAII<br />
4510 Salt Lake Blvd., Suite A7<br />
Honolulu, HI 96818<br />
(808) 847-0038<br />
ILLINOIS<br />
1450 Feehanville Dr.<br />
Mt. Prospect, IL 60056-6011<br />
(847) 297-3100<br />
INDIANA<br />
8403 Michigan Road, Unit 1<br />
Indianapolis, IN 46268<br />
(317) 334-9980<br />
KANSAS<br />
8819 W. 95th St.<br />
Overland Park, KS 66212<br />
(913) 642-1111<br />
MARYLAND<br />
7541 - 45 Ritchie Highway<br />
Glen Burnie, MD 21061<br />
(410) 590-0160<br />
MASSACHUSETTS<br />
232 Providence Hwy.<br />
Westwood, MA 02090<br />
(617) 461-9754<br />
MICHIGAN<br />
37454 Ann Arbor Trail<br />
Livonia, MI 48150<br />
(313) 432-1012<br />
MINNESOTA<br />
6427 Penn Ave. South<br />
Richfield, MN 55423<br />
(612) 869-5199<br />
MISSOURI<br />
9876 Watson Road<br />
St. Louis, MO 63126-2221<br />
(314) 909-9889<br />
NEBRASKA<br />
4129 S. 84th St.<br />
Omaha, NE 68127<br />
(402) 597-2925<br />
NEVADA<br />
3375 S. Decatur Blvd.<br />
Suites. 22 - 24<br />
Las Vegas, NV 89102<br />
(702) 368-4277<br />
NEW JERSEY<br />
251 Herrod Blvd.<br />
Dayton, NJ 08810-1539<br />
(609) 655-1212<br />
131-35 31st Ave.<br />
Flushing, NY 11354<br />
(718) 886-0971<br />
NORTH CAROLINA<br />
3501-G S. Tryon St.<br />
Charlotte, NC 28217<br />
(704) 527-0611<br />
OHIO<br />
6253 E. Main St.<br />
Columbus, OH 43213<br />
(614) 860-0222<br />
6379 Pearl Road<br />
Parma Heights, OH 44130<br />
(440) 843-7555<br />
1617 E. Kemper Rd.<br />
Sharonville, OH 45246<br />
(513) 771-0788<br />
OKLAHOMA<br />
552 E. Memorial Road<br />
Oklahoma City, OK 73114<br />
(405) 752-2655<br />
OREGON<br />
828 19th Avenue., N.W.<br />
Portland, OR 97209<br />
(503) 222-1823<br />
PENNSYLVANIA<br />
Springwater Plaza<br />
364 Wilmington W. Chester<br />
Pike<br />
Glen Mills, PA 19342<br />
(610) 459-4122<br />
6200 Babcock Blvd<br />
Pittsburgh, PA 15237<br />
(412) 366-6363<br />
TEXAS<br />
12801 Stemmons Fwy Ste. 809<br />
Farmers Branch, TX 75234<br />
(972) 243-1150<br />
12701 Directors Dr.<br />
Stafford, TX 77477-3701<br />
(281) 565-8665<br />
3453 IH-35 North, Ste. 101<br />
San Antonio, TX 78219<br />
(210) 228-0676<br />
UTAH<br />
145 E. 1300 S., Ste. 101<br />
Salt Lake City, UT 84115<br />
(801) 359-3410<br />
VIRGINIA<br />
5760 Northampton Blvd,. Ste.<br />
102<br />
Virginia Beach, VA 23455<br />
(757) 460-0280<br />
WASHINGTON<br />
22220 84th Ave. So., Bldg. A<br />
Kent, WA 98032<br />
(253) 395-8055<br />
WISCONSIN<br />
Lincoln Plaza Shopping Ctr.<br />
2245 S. 108th St. West Allis, WI<br />
53227<br />
(414) 541-4776<br />
CUSTOMER’S RECORD<br />
When you need service: Send<br />
complete tool (prepaid) to one<br />
of the <strong>Makita</strong> Factory Service<br />
Centers listed, or to an Authorized<br />
<strong>Makita</strong> Service Center. Be sure<br />
to attach a letter to the outside of<br />
the carton detailing the problem<br />
with your tool.<br />
Date Purchased<br />
Dealer’s Name & Address<br />
Model No.<br />
Serial No.<br />
15
WARNING<br />
Some dust created by power sanding, sawing, grinding, drilling, and other<br />
construction activities contains chemicals known to the State of California<br />
to cause cancer, birth defects or other reproductive harm. Some examples<br />
of these chemicals are:<br />
• lead from lead-based paints,<br />
• crystalline silica from bricks and cement and other masonry products, and<br />
• arsenic and chromium from chemically-treated lumber.<br />
Your risk from these exposures varies, depending on how often you do this<br />
type of work. To reduce your exposure to these chemicals: work in a well<br />
ventilated area, and work with approved safety equipment, such as those<br />
dust masks that are specially designed to filter out microscopic particles.<br />
MAKITA LIMITED ONE YEAR WARRANTY<br />
Warranty Policy<br />
Every <strong>Makita</strong> tool is thoroughly inspected and tested before leaving the factory. It is warranted to be free of<br />
defects from workmanship and materials for the period of ONE YEAR from the date of original purchase.<br />
Should any trouble develop during this one-year period, return the COMPLETE tool, freight prepaid, to one of<br />
<strong>Makita</strong>'s Factory or Authorized Service Centers. If inspection shows the trouble is caused by defective<br />
workmanship or material, <strong>Makita</strong> will repair (or at our option, replace) without charge.<br />
This Warranty does not apply where:<br />
• repairs have been made or attempted by others:<br />
• repairs are required because of normal wear and tear:<br />
• the tool has been abused, misused or improperly maintained:<br />
• alterations have been made to the tool.<br />
IN NO EVENT SHALL MAKITA BE LIABLE FOR ANY INDIRECT, INCIDENTAL OR CONSEQUENTIAL<br />
DAMAGES FROM THE SALE OR USE OF THE PRODUCT. THIS DISCLAIMER APPLIES BOTH DURING<br />
AND AFTER THE TERM OF THIS WARRANTY.<br />
MAKITA DISCLAIMS LIABILITY FOR ANY IMPLIED WARRANTIES, INCLUDING IMPLIED WARRANTIES OF<br />
"MERCHANTABILITY" AND "FITNESS FOR A SPECIFIC PURPOSE," AFTER THE ONE-YEAR TERM OF<br />
THIS WARRANTY.<br />
This Warranty gives you specific legal rights, and you may also have other rights which vary form state to state.<br />
Some states do not allow the exclusion or limitation of incidental or consequential damages, so the above<br />
limitation or exclusion may not apply to you. Some states do not allow limitation on how long an implied<br />
warranty lasts, so the above limitation may not apply to you.<br />
884058B067<br />
<strong>Makita</strong> Corporation<br />
3-11-8, Sumiyoshi-cho,<br />
Anjo, Aichi 446-8502 Japan