Manual NHTV-WPA for Windows 7
Manual NHTV-WPA for Windows 7
Manual NHTV-WPA for Windows 7

Create successful ePaper yourself
Turn your PDF publications into a flip-book with our unique Google optimized e-Paper software.
<strong>Manual</strong> <strong>NHTV</strong>‐<strong>WPA</strong> <strong>for</strong> <strong>Windows</strong> 7<br />
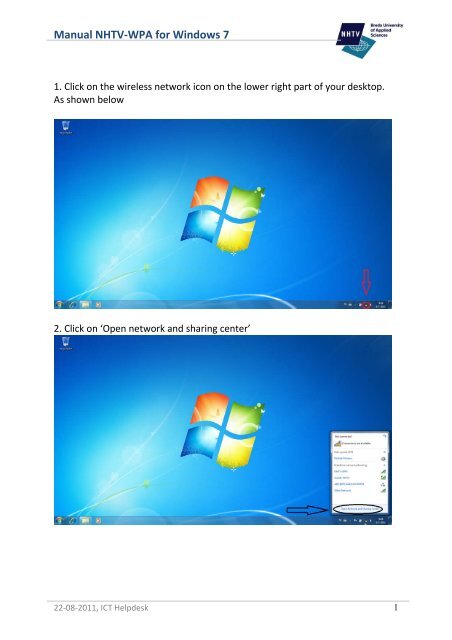
1. Click on the wireless network icon on the lower right part of your desktop.<br />
As shown below<br />
2. Click on ‘Open network and sharing center’<br />
22‐08‐2011, ICT Helpdesk 1
<strong>Manual</strong> <strong>NHTV</strong>‐<strong>WPA</strong> <strong>for</strong> <strong>Windows</strong> 7<br />
3. Click on ‘Manage wireless networks’ on the following screen.<br />
4. On the following screen click on ‘Add’.<br />
22‐08‐2011, ICT Helpdesk 2
<strong>Manual</strong> <strong>NHTV</strong>‐<strong>WPA</strong> <strong>for</strong> <strong>Windows</strong> 7<br />
5. A screen will popup asking <strong>for</strong> the network in<strong>for</strong>mation.<br />
Use the following in<strong>for</strong>mation:<br />
Network Name: <strong>NHTV</strong>‐<strong>WPA</strong><br />
Security Type: <strong>WPA</strong>2‐ Enterprise<br />
Encryption Type: AES<br />
6. After that click on ‘Next’<br />
Click on Change Connection Settings<br />
22‐08‐2011, ICT Helpdesk 3
<strong>Manual</strong> <strong>NHTV</strong>‐<strong>WPA</strong> <strong>for</strong> <strong>Windows</strong> 7<br />
7. After this open the Security tab.<br />
Make sure the Authentication method is set to ‘Microsoft: Protected EAP<br />
(PEAP).<br />
Click on ‘Settings’<br />
8. On the next screen make sure the ‘validate server certificate’ checkbox is<br />
NOT checked<br />
After this click on ‘Configure’<br />
22‐08‐2011, ICT Helpdesk 4
<strong>Manual</strong> <strong>NHTV</strong>‐<strong>WPA</strong> <strong>for</strong> <strong>Windows</strong> 7<br />
9. Make sure the Checkbox <strong>for</strong> ‘Automaticly use my <strong>Windows</strong> logon name and<br />
password’ is NOT checked<br />
10. Click on ‘ok’ twice until you are back on the following screen, and click on<br />
advanced settings.<br />
.<br />
22‐08‐2011, ICT Helpdesk 5
<strong>Manual</strong> <strong>NHTV</strong>‐<strong>WPA</strong> <strong>for</strong> <strong>Windows</strong> 7<br />
11. On the following screen make sure the checkbox with ‘Specify<br />
Authentication mode’<br />
Is checked and choose <strong>for</strong> ‘User authentication’<br />
12. Click on ‘Ok’ on all screen and close all other screen. A popup should come<br />
up in the lower right corner. Click on this popup and fill in your studentnumber<br />
as username and your password.<br />
Your laptop is now successfully connected.<br />
22‐08‐2011, ICT Helpdesk 6