Colorado - bei Karmann Mobil
Colorado - bei Karmann Mobil
Colorado - bei Karmann Mobil

You also want an ePaper? Increase the reach of your titles
YUMPU automatically turns print PDFs into web optimized ePapers that Google loves.
ELECTRICAL INSTALLATION 6-1<br />
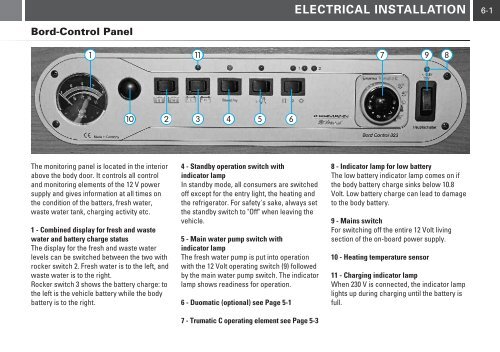
Bord-Control Panel<br />
1<br />
11 7 9<br />
8<br />
10<br />
2<br />
3<br />
4<br />
5<br />
6<br />
The monitoring panel is located in the interior<br />
above the body door. It controls all control<br />
and monitoring elements of the 12 V power<br />
supply and gives information at all times on<br />
the condition of the batters, fresh water,<br />
waste water tank, charging activity etc.<br />
1 - Combined display for fresh and waste<br />
water and battery charge status<br />
The display for the fresh and waste water<br />
levels can be switched between the two with<br />
rocker switch 2. Fresh water is to the left, and<br />
waste water is to the right.<br />
Rocker switch 3 shows the battery charge: to<br />
the left is the vehicle battery while the body<br />
battery is to the right.<br />
4 - Standby operation switch with<br />
indicator lamp<br />
In standby mode, all consumers are switched<br />
off except for the entry light, the heating and<br />
the refrigerator. For safety's sake, always set<br />
the standby switch to "Off" when leaving the<br />
vehicle.<br />
5 - Main water pump switch with<br />
indicator lamp<br />
The fresh water pump is put into operation<br />
with the 12 Volt operating switch (9) followed<br />
by the main water pump switch. The indicator<br />
lamp shows readiness for operation.<br />
6 - Duomatic (optional) see Page 5-1<br />
7 - Trumatic C operating element see Page 5-3<br />
8 - Indicator lamp for low battery<br />
The low battery indicator lamp comes on if<br />
the body battery charge sinks below 10.8<br />
Volt. Low battery charge can lead to damage<br />
to the body battery.<br />
9 - Mains switch<br />
For switching off the entire 12 Volt living<br />
section of the on-board power supply.<br />
10 - Heating temperature sensor<br />
11 - Charging indicator lamp<br />
When 230 V is connected, the indicator lamp<br />
lights up during charging until the battery is<br />
full.