View installation guide - CruiserCustomizing
View installation guide - CruiserCustomizing
View installation guide - CruiserCustomizing

Create successful ePaper yourself
Turn your PDF publications into a flip-book with our unique Google optimized e-Paper software.
BA-757x-xx<br />
Page: 4<br />
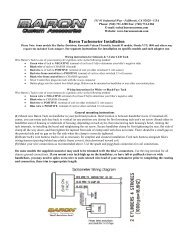
BULLET & MINI-BULLET TACHOMETERS INSTALLATION<br />
GUIDE - Please see appropriate section for your specific<br />
application<br />
REPLACEMENT BULB - .10A 14V T-1 3/4 WEDGE, #18 MINIATURE BULB GLASS WEDGE BASE like a Sylvania 74 or equivalent<br />
GE74.BP221029 style which are available at most auto parts stores or online light bulb suppliers.<br />
LED ILLUMINATION<br />
7-color LED or Single Color LED Tachometers do not have replaceable light sources. However, LEDs typically last a very long time so<br />
it is unlikely you will have an issue.<br />
NEEDLE BOUNCING<br />
Q: My Tach is bouncing at idle, what does this mean?<br />
A1: Typically, needle bounce is caused by low idle when idle is set under 1000 RPM's. Adjusting the idle upwards between 1000 to 1200<br />
RPM usually smooths out the needle. If you choose to keep it lower, you may experience some bouncing at idle. This does not negatively<br />
affect Tach operation.<br />
A2: It is also possible you have a poor connections on the RED, GREEN or BLACK wires. We recommend you check and possible solder<br />
all connections to assure solid connections.<br />
FOGGING<br />
Q: My Tach face has fogged up, what do I do?<br />
A: Tach fogging can occur when the outside air temp is warmer than the inside of the Tach, and humidity is high. Baron Tachs feature<br />
hidden vent holes in the Tach body, these are located next to the wire exit point on the pointed end of the bar-clamp. It is important the<br />
clamp be tightened so the holes are not closed off at the pointed/rear side of the clamp and so an open air exchange can occur. This means<br />
the flat edge of the clamp that faces the rider should be tightened down until it lightly touches and the forward facing pointed end of the<br />
clamp has a gap for the vents to work properly.<br />
UNDER THE HANDLEBAR MOUNTING<br />
A: Can the Tach be mounted inverted under the handlebars?<br />
A: Yes, if you have enough room to mount under the handlebars for the tach to mount and still be able to turn from lock to lock without<br />
hitting the tank or dash. See note in next paragraph for details on how to rotate the face of the Tach for appropriate positioning. BE<br />
AWARE: Chances of water intrusion are increased in this position!<br />
FACE ROTATION<br />
Q: How do I rotate the face of the Tach?<br />
A: With the Tach housing removed from the handlebar, unscrew the bezel (counterclockwise) and remove it from the housing, using a<br />
5/32 Allen wrench loosen the the set-screw located inside the clamp area or at the rear of the clamp area. Rotate the face of the Tach to<br />
your preferred position, tighten the set screw and replace the bezel.<br />
COIL IDENTIFICATION<br />
Q: How can I tell positive from negative on my coil?<br />
A: Most motorcycles will have two wires going to each of the coils, and each coil will share one common-color wire and have one unique<br />
color wire. The common-color is the positive and the unique color is the negative. For example, a Yamaha set-up has a red/black on both<br />
coils - that is positive. The other coil wire would be orange or gray - that is the negative side. Hondas set-up is blue/yellow and<br />
yellow/blue for the negative, and black/white for the positive. Suzuki has orange/white on both coils as positive and has white or<br />
black/yellow as the negative side.<br />
COIL SELECION<br />
Q: My bike has two (or four) coils - Which one/ones do I use?<br />
A: Most multi-cylinder bikes have one coil per cylinder. You only need to connect to one of the coils - choose the one most convenient for<br />
wire routing. (Single-fire motorcycles require the Tach adapter we include with each assemble.<br />
Our install <strong>guide</strong>s provide a basic outline on the proper <strong>installation</strong> of our products. Further tuning and/or<br />
fitment may be required. Barons bears no responsibility on <strong>installation</strong> costs associated with this product.<br />
© 2012 Barons Custom Accessories<br />
5221 Oceanus Drive Huntington Beach, CA 92649 (714)274-4065 - Ph. (714)901-0520 - Fax www.baronscustom.com tech@baronscustom.com