Ride On! - CruiserCustomizing
Ride On! - CruiserCustomizing
Ride On! - CruiserCustomizing

Create successful ePaper yourself
Turn your PDF publications into a flip-book with our unique Google optimized e-Paper software.
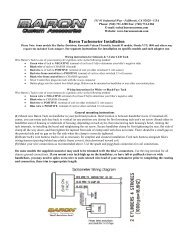
steP 2 Separate the two halves of the connector plugs. Install the Run-Turn-Brake control module<br />
inline; be sure to apply dielectric grease to the electrical connections before mating.<br />
steP 3 Remove the two screws in the the rear turn signal<br />
lenses; set the lenses aside, they will not be re-used.<br />
steP 4 Push the bulb into the socket and turn<br />
counterclockwise to remove; lift bulb out of the socket.<br />
Insert the new bulb into the socket.<br />
steP 5 Push the new red bulb straight into the socket and<br />
turn clockwise to secure. .<br />
steP 6 Install the clear turn signal lenses.<br />
note The Run-Turn-Brake control module is supplied<br />
with a flash tab. With flash tab installed, the brake light and<br />
turn signals will flash multiple times, then illuminate steady<br />
when the brake is applied. With the flash tab removed, the<br />
brake light and turn signals will illuminate steady when the<br />
brake is applied. Be sure the motorcycle ignition is in the “off”<br />
position before installing or removing the flash tab.<br />
steP 7 Start the motorcycle and test the function of the Run-Turn-Brake control module:<br />
a) Verify the tail lamp and turn signals illuminate.<br />
B) Apply the brake; if the flash tab is installed, verify the brake light and turn signals flash multiple times<br />
before illuminating steady. If the flash tab is not installed, verify the brake light and turn signals<br />
illuminate steady while the brake is activated.<br />
c) Verify that when either of the turn signals are applied that they do not flash too rapidly or operate<br />
erratically. If this occurs, you will need to install a load equalizer. See the end of this document for the<br />
load equalizer installation procedure.<br />
steP 8 Stow the Run-Turn-Brake control module under the seat. If you will not be installing the load<br />
equalizer, replace the seat. If you will be installing the load equalizer, leave the seat off and proceed to<br />
the next section.<br />
InstallIng the load equalIzer<br />
ATTENTION! Any load equalizers must be installed upstream of the Run-Turn-Brake control module.<br />
NEVER install a load equalizer between the Run-Turn-Brake control module and the rear lights.<br />
steP 9 The motorcycle must be “off” before installing the load equalizer. Locate the Run-<br />
Turn-Brake control module and plug the load equalizer into one of the empty 3-pin socket on<br />
the control module.<br />
steP 10 Start the motorcycle and retest the light functions, refer to STEP 4. If the lights<br />
still flash too rapidly or operate erratically, you will need to install a second load equalizer<br />
(Küryakyn P/N 4810, sold separately).<br />
steP 11 The load equalizers become warm during normal operation of the turn signals.<br />
Secure the load equalizer to the motorcycle frame; this will act as a heat sink and help cool the<br />
load equalizer. Keep the load equalizer away from any heat-sensitive components.<br />
-cont.-<br />
load<br />
equalIzer<br />
connectIons<br />
PIc.2<br />
In-lIne<br />
connectIon<br />
Page<br />
2<br />
t r I P l e W h a m m y<br />
PIc.3<br />
In-lIne<br />
connectIon<br />
fl ash taB<br />
InstallatIon