Acumed Ulna Shortening System.pdf - Osteosyntese
Acumed Ulna Shortening System.pdf - Osteosyntese
Acumed Ulna Shortening System.pdf - Osteosyntese

You also want an ePaper? Increase the reach of your titles
YUMPU automatically turns print PDFs into web optimized ePapers that Google loves.
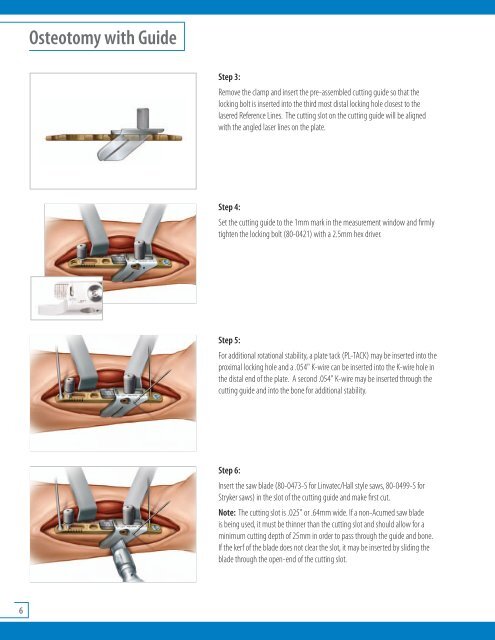
Osteotomy with Guide<br />
Step 3:<br />
Remove the clamp and insert the pre-assembled cutting guide so that the<br />
locking bolt is inserted into the third most distal locking hole closest to the<br />
lasered Reference Lines. The cutting slot on the cutting guide will be aligned<br />
with the angled laser lines on the plate.<br />
Step 4:<br />
Set the cutting guide to the 1mm mark in the measurement window and firmly<br />
tighten the locking bolt (80-0421) with a 2.5mm hex driver.<br />
Step 5:<br />
For additional rotational stability, a plate tack (PL-TACK) may be inserted into the<br />
proximal locking hole and a .054" K-wire can be inserted into the K-wire hole in<br />
the distal end of the plate. A second .054" K-wire may be inserted through the<br />
cutting guide and into the bone for additional stability.<br />
Step 6:<br />
Insert the saw blade (80-0473-S for Linvatec/Hall style saws, 80-0499-S for<br />
Stryker saws) in the slot of the cutting guide and make first cut.<br />
Note: The cutting slot is .025" or .64mm wide. If a non-<strong>Acumed</strong> saw blade<br />
is being used, it must be thinner than the cutting slot and should allow for a<br />
minimum cutting depth of 25mm in order to pass through the guide and bone.<br />
If the kerf of the blade does not clear the slot, it may be inserted by sliding the<br />
blade through the open-end of the cutting slot.<br />
6