Acumed Ulna Shortening System.pdf - Osteosyntese
Acumed Ulna Shortening System.pdf - Osteosyntese
Acumed Ulna Shortening System.pdf - Osteosyntese

You also want an ePaper? Increase the reach of your titles
YUMPU automatically turns print PDFs into web optimized ePapers that Google loves.
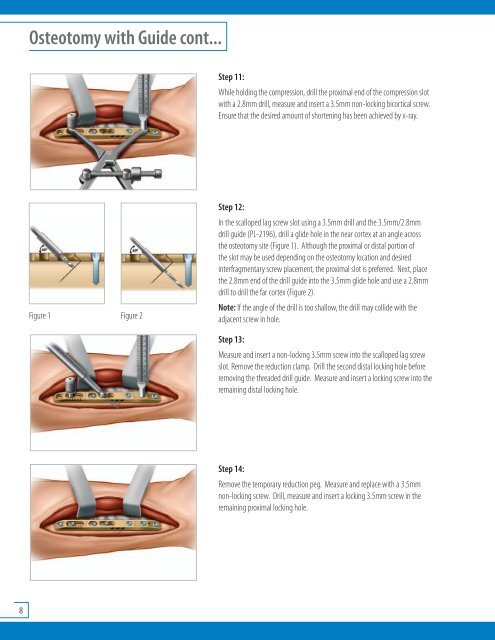
Osteotomy with Guide cont...<br />
Step 11:<br />
While holding the compression, drill the proximal end of the compression slot<br />
with a 2.8mm drill, measure and insert a 3.5mm non-locking bicortical screw.<br />
Ensure that the desired amount of shortening has been achieved by x-ray.<br />
Figure 1 Figure 2<br />
Step 12:<br />
In the scalloped lag screw slot using a 3.5mm drill and the 3.5mm/2.8mm<br />
drill guide (PL-2196), drill a glide hole in the near cortex at an angle across<br />
the osteotomy site (Figure 1). Although the proximal or distal portion of<br />
the slot may be used depending on the osteotomy location and desired<br />
interfragmentary screw placement, the proximal slot is preferred. Next, place<br />
the 2.8mm end of the drill guide into the 3.5mm glide hole and use a 2.8mm<br />
drill to drill the far cortex (Figure 2).<br />
Note: If the angle of the drill is too shallow, the drill may collide with the<br />
adjacent screw in hole.<br />
Step 13:<br />
Measure and insert a non-locking 3.5mm screw into the scalloped lag screw<br />
slot. Remove the reduction clamp. Drill the second distal locking hole before<br />
removing the threaded drill guide. Measure and insert a locking screw into the<br />
remaining distal locking hole.<br />
Step 14:<br />
Remove the temporary reduction peg. Measure and replace with a 3.5mm<br />
non-locking screw. Drill, measure and insert a locking 3.5mm screw in the<br />
remaining proximal locking hole.<br />
8