Ducted analog/electronic installation manual (783 kb) - Bryant RV ...
Ducted analog/electronic installation manual (783 kb) - Bryant RV ...
Ducted analog/electronic installation manual (783 kb) - Bryant RV ...

You also want an ePaper? Increase the reach of your titles
YUMPU automatically turns print PDFs into web optimized ePapers that Google loves.
ANALOG DUCTED INSTALLATION INSTRUCTIONS<br />
6. THERMOSTAT & CABLE INSTALLATION<br />
A. LOCATION<br />
The proper location of the thermostat is very important to ensure that it will provide a comfortable <strong>RV</strong> temperature. Observe<br />
the following general rules when selecting a location.<br />
1. Locate the thermostat 54" above the floor.<br />
2. Install thermostat on a partition, NEVER on an outside wall.<br />
3. NEVER expose it to direct heat from lamps, sun or other heat producing items.<br />
4. Avoid locations close to doors that lead outside, windows or adjoining outside walls or directly under cabinets or overhangs<br />
which limit air movement.<br />
5. Avoid locations close to supply registers and the air from them.<br />
6. NEVER locate thermostat in a room that is warmer or cooler than the rest of the coach - such as the kitchen.<br />
7. The major living area is normally a good location.<br />
B. CABLE INSTALLATION<br />
1. A seven-conductor cable, 18 to 22 AWG is to be used for low voltage connections.<br />
2. Choose the shortest, direct route from the 14-1/4" x 14-1/4" (±1/8") opening to the thermostat location selected.<br />
3. Consider where screws, nails or staples might contact the cable.<br />
4. Leave approximately 6" of cable extending through the wall for connection to the thermostat.<br />
5. Leave approximately 15" of cable extending into the 14-1/4" x 14-1/4" (±1/8") opening for connection at unit.<br />
6. If system is to control a gas furnace: Route two 18 gauge wires from the furnace to 14-1/4" x 14-1/4" (±1/8") opening at<br />
this time. See Section 4. Air Distribution System Installation; A Roof and Ceiling Opening Preparation.<br />
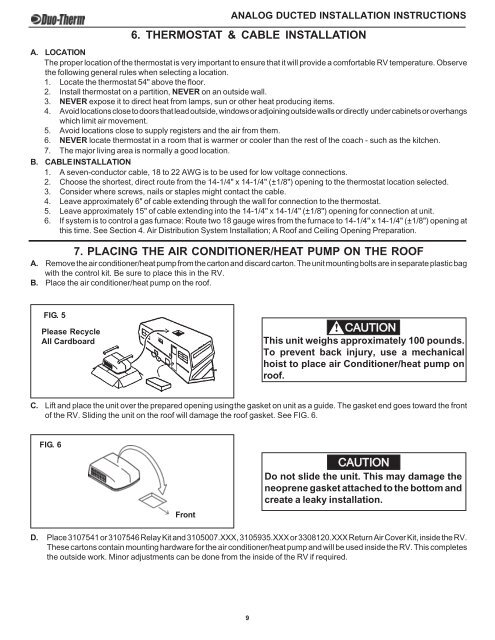
7. PLACING THE AIR CONDITIONER/HEAT PUMP ON THE ROOF<br />
A. Remove the air conditioner/heat pump from the carton and discard carton. The unit mounting bolts are in separate plastic bag<br />
with the control kit. Be sure to place this in the <strong>RV</strong>.<br />
B. Place the air conditioner/heat pump on the roof.<br />
FIG. 5<br />
Please Recycle<br />
All Cardboard<br />
! CAUTION<br />
This unit weighs approximately 100 pounds.<br />
To prevent back injury, use a mechanical<br />
hoist to place air Conditioner/heat pump on<br />
roof.<br />
C. Lift and place the unit over the prepared opening usingthe gasket on unit as a guide. The gasket end goes toward the front<br />
of the <strong>RV</strong>. Sliding the unit on the roof will damage the roof gasket. See FIG. 6.<br />
FIG. 6<br />
Front<br />
CAUTION<br />
Do not slide the unit. This may damage the<br />
neoprene gasket attached to the bottom and<br />
create a leaky <strong>installation</strong>.<br />
D. Place 3107541 or 3107546 Relay Kit and 3105007.XXX, 3105935.XXX or 3308120.XXX Return Air Cover Kit, inside the <strong>RV</strong>.<br />
These cartons contain mounting hardware for the air conditioner/heat pump and will be used inside the <strong>RV</strong>. This completes<br />
the outside work. Minor adjustments can be done from the inside of the <strong>RV</strong> if required.<br />
9