bruel & kjaer 2240 sound level meter
bruel & kjaer 2240 sound level meter
bruel & kjaer 2240 sound level meter
Create successful ePaper yourself
Turn your PDF publications into a flip-book with our unique Google optimized e-Paper software.
22<br />
Integrating-averaging Sound Level Meter Type <strong>2240</strong> – User Guide<br />
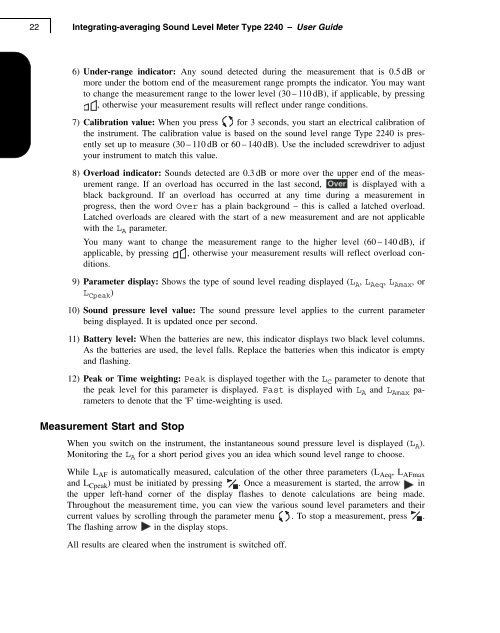
6) Under-range indicator: Any <strong>sound</strong> detected during the measurement that is 0.5 dB or<br />
more under the bottom end of the measurement range prompts the indicator. You may want<br />
to change the measurement range to the lower <strong>level</strong> (30 – 110 dB), if applicable, by pressing<br />
, otherwise your measurement results will reflect under range conditions.<br />
7) Calibration value: When you press for 3 seconds, you start an electrical calibration of<br />
the instrument. The calibration value is based on the <strong>sound</strong> <strong>level</strong> range Type <strong>2240</strong> is presently<br />
set up to measure (30 – 110 dB or 60 – 140 dB). Use the included screwdriver to adjust<br />
your instrument to match this value.<br />
8) Overload indicator: Sounds detected are 0.3 dB or more over the upper end of the measurement<br />
range. If an overload has occurred in the last second, is displayed with a<br />
black background. If an overload has occurred at any time during a measurement in<br />
progress, then the word Over has a plain background – this is called a latched overload.<br />
Latched overloads are cleared with the start of a new measurement and are not applicable<br />
with the L A para<strong>meter</strong>.<br />
You many want to change the measurement range to the higher <strong>level</strong> (60 – 140 dB), if<br />
applicable, by pressing , otherwise your measurement results will reflect overload conditions.<br />
9) Para<strong>meter</strong> display: Shows the type of <strong>sound</strong> <strong>level</strong> reading displayed (L A , L Aeq , L Amax , or<br />
L Cpeak )<br />
10) Sound pressure <strong>level</strong> value: The <strong>sound</strong> pressure <strong>level</strong> applies to the current para<strong>meter</strong><br />
being displayed. It is updated once per second.<br />
11) Battery <strong>level</strong>: When the batteries are new, this indicator displays two black <strong>level</strong> columns.<br />
As the batteries are used, the <strong>level</strong> falls. Replace the batteries when this indicator is empty<br />
and flashing.<br />
12) Peak or Time weighting: Peak is displayed together with the L C para<strong>meter</strong> to denote that<br />
the peak <strong>level</strong> for this para<strong>meter</strong> is displayed. Fast is displayed with L A and L Amax para<strong>meter</strong>s<br />
to denote that the 'F' time-weighting is used.<br />
Measurement Start and Stop<br />
When you switch on the instrument, the instantaneous <strong>sound</strong> pressure <strong>level</strong> is displayed (L A ).<br />
Monitoring the L A for a short period gives you an idea which <strong>sound</strong> <strong>level</strong> range to choose.<br />
While L AF is automatically measured, calculation of the other three para<strong>meter</strong>s (L Aeq , L AFmax<br />
and L Cpeak ) must be initiated by pressing . Once a measurement is started, the arrow in<br />
the upper left-hand corner of the display flashes to denote calculations are being made.<br />
Throughout the measurement time, you can view the various <strong>sound</strong> <strong>level</strong> para<strong>meter</strong>s and their<br />
current values by scrolling through the para<strong>meter</strong> menu . To stop a measurement, press .<br />
The flashing arrow in the display stops.<br />
All results are cleared when the instrument is switched off.


