Rider's Manual K 1200 R - K100.biz
Rider's Manual K 1200 R - K100.biz
Rider's Manual K 1200 R - K100.biz

Create successful ePaper yourself
Turn your PDF publications into a flip-book with our unique Google optimized e-Paper software.
8<br />
110<br />
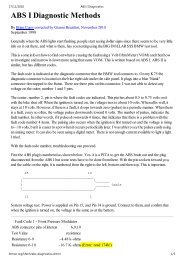
z Maintenance<br />
with OE BMW Motorrad Integral<br />
ABS:<br />
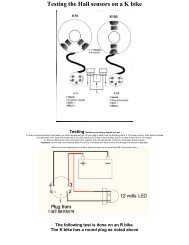
Take care not to damage<br />
the ABS sensor when<br />
rolling out the front wheel.<br />
Note the ABS sensor when<br />
rolling out the front wheel.<br />
Roll the front wheel forward to<br />
remove.<br />
Installing front wheel<br />
ABS malfunctions on account<br />
of incorrect speed<br />
signal.<br />
Segmentation differs between individual<br />
types of sensor ring; it is<br />
very important to ensure that the<br />
correct sensor ring is installed.<br />
Install only the sensor ring that<br />
matches the motorcycle's construction<br />
status.<br />
Threaded fasteners not<br />
tightened to the specified<br />
torque can work loose or their<br />
threads can suffer damage.<br />
Always have the security of the<br />
fasteners checked by a specialist<br />
workshop, preferably an authorised<br />
BMW Motorrad dealer.<br />
The front wheel must be<br />
installed right way round to<br />
rotate in the correct direction.<br />
Note the direction-of-rotation arrows<br />
on the tyre or the wheel<br />
rim.<br />
Roll the front wheel into position<br />
between the front forks.<br />
with OE BMW Motorrad Integral<br />
ABS:<br />
There is a risk of damaging<br />
parts of the front brake,<br />
particularly the BMW Motorrad<br />
Integral ABS, in the course of the<br />
procedure described below.<br />
Take care not to damage the<br />
brake system, in particular the<br />
ABS sensor with cable and the<br />
ABS sensor ring.<br />
Roll the front wheel into position<br />
between the front forks.<br />
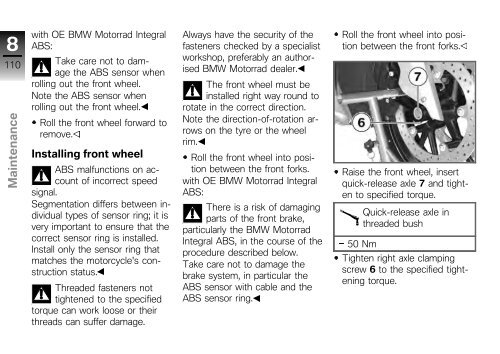
Raise the front wheel, insert<br />
quick-release axle 7 and tighten<br />
to specified torque.<br />
Quick-release axle in<br />
threaded bush<br />
50 Nm<br />
Tighten right axle clamping<br />
screw 6 to the specified tightening<br />
torque.