Phoenix 351, 401, 451, 551 Expert puls FDW - EWM Hightec ...
Phoenix 351, 401, 451, 551 Expert puls FDW - EWM Hightec ...
Phoenix 351, 401, 451, 551 Expert puls FDW - EWM Hightec ...

Create successful ePaper yourself
Turn your PDF publications into a flip-book with our unique Google optimized e-Paper software.
Design and function<br />
Notes on the installation of welding current leads<br />
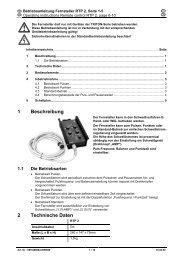
5.6 Notes on the installation of welding current leads<br />
NOTE<br />
Incorrectly installed welding current leads can cause faults in the arc (flickering).<br />
A<br />
B<br />
C<br />
D<br />
E<br />
Install welding lead and hose package in parallel and as close together as possible.<br />
Keep the welding lead and hose packages of each welding machine separate, with an<br />
installation distance of at least 15 cm!<br />
Fully unroll welding current leads, torch hose packages and intermediate hose<br />
packages. Avoid loops!<br />
Use an individual welding lead to the workpiece for each welding machine!<br />
Connect the work clamp close to the welding point.<br />
Always keep leads as short as possible! For optimum welding results max. 30 m<br />
(welding lead + intermediate hose package + torch lead).<br />
1 1 1<br />
D<br />
A<br />
E<br />
C<br />
B<br />
2 2 2<br />
3<br />
Figure 5-2<br />
Item Symbol Description 0<br />
1 Welding machine<br />
2 Wire feed unit<br />
3 Workpiece<br />
28<br />
099-004833-EW501<br />
10.07.2012