Keyed-in-Handle Secure ECR Lock Parts Breakdown - Wayne Dalton
Keyed-in-Handle Secure ECR Lock Parts Breakdown - Wayne Dalton
Keyed-in-Handle Secure ECR Lock Parts Breakdown - Wayne Dalton

Create successful ePaper yourself
Turn your PDF publications into a flip-book with our unique Google optimized e-Paper software.
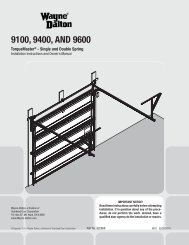
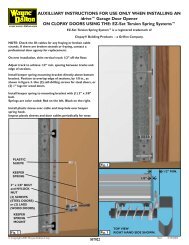
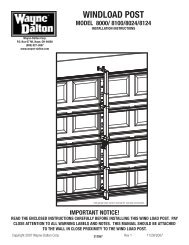
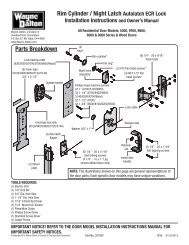
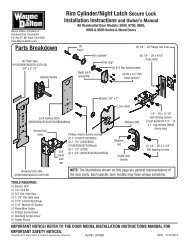
STEP 4: Install<strong>in</strong>g The <strong>Secure</strong> <strong>Lock</strong><br />
Locate the <strong>in</strong>side handle and uncoil the lock cable. Thread the lock<br />
cable through the <strong>in</strong>side handle, (SEE FIG. 8).<br />
Next, locate the secure lock striker plates over the pre-punched holes<br />
<strong>in</strong> the vertical track nearest the center of the lock section, (SEE FIG.<br />
9). Fasten the striker plates to the vertical track us<strong>in</strong>g (2) 1/4” - 20 x<br />
9/16” track bolts and flanged hex nuts. <strong>Lock</strong> bars are embossed “R”<br />
for right side and “L” for left side. Place the lock bars <strong>in</strong>to the slots <strong>in</strong><br />
the secure lock base. Attach the spr<strong>in</strong>gs to the tabs on the base and<br />
the lock bar. Position the end of the right lock bar <strong>in</strong>to the slot <strong>in</strong> the<br />
right striker plate. Move the base of the secure lock back 1/8” from<br />
the edge of the section. Attach the secure lock to the section with (4)<br />
1/4” - 20 x 11/16” self drill<strong>in</strong>g screws. Repeat for the left side. Feed<br />
one end of the lock cable through the slotted hole of a lock bar and<br />
secure with (1) 1/4” - 20 x 9/16” track bolt. Pull the cable taut, but not<br />
enough to pull the lock bar out of the striker plate. While hold<strong>in</strong>g taut,<br />
feed the lock cable through the slotted hole of the rema<strong>in</strong><strong>in</strong>g lock bar,<br />
secure with (1) 1/4” - 20 x 9/16” track bolt and flanged hex nut, (SEE<br />
FIG. 9-10).<br />
<strong>Lock</strong><br />
cable<br />
8a<br />
8b<br />
8d<br />
<strong>Lock</strong> cable<br />
Inside<br />
handle<br />
8c<br />
<strong>Lock</strong> cable<br />
Inside<br />
handle<br />
Inside<br />
handle<br />
Inside<br />
handle<br />
<strong>Lock</strong><br />
cable<br />
NOTE: Ensure that the bolt is through the front of the lock bar and the<br />
nut is on the back of the lock bar with cable go<strong>in</strong>g through the front of<br />
the lock bar.<br />
<strong>Lock</strong><br />
cable<br />
Operate the lock several times to make sure the lock bars clear the<br />
striker plates when the handle is turned and the lock bars engage<br />
the striker plates when the handle is released. Adjust the cables if<br />
necessary. Trim off the excess cable with wire cutters after the lock is<br />
operat<strong>in</strong>g satisfactorily.<br />
FIG. 8<br />
<strong>Secure</strong><br />
lock<br />
base<br />
Right<br />
hand<br />
lock<br />
bar<br />
1/8” Offset from<br />
edge of door<br />
<strong>Lock</strong><br />
cable<br />
1/4” - 20<br />
Flanged hex<br />
nuts<br />
Striker<br />
plate<br />
Vertical<br />
track<br />
1/4” - 20 x 11/16”<br />
Self drill screws<br />
1/4” - 20 x 9/16”<br />
Track bolts<br />
Left hand<br />
lock bar<br />
Inside<br />
handle<br />
Hook spr<strong>in</strong>g over tabs<br />
on lock bar and base<br />
9700 Series Doors<br />
use back slot<br />
Slide lock bar<br />
through the<br />
front slot<br />
FIG. 10<br />
Align lock bar<br />
<strong>in</strong>to front slot<br />
<strong>Lock</strong> bars are embossed for<br />
identification<br />
FIG. 9<br />
4