QBI HISTOLOGY AND MICROSCOPY GUIDE
QBI HISTOLOGY AND MICROSCOPY GUIDE
QBI HISTOLOGY AND MICROSCOPY GUIDE

You also want an ePaper? Increase the reach of your titles
YUMPU automatically turns print PDFs into web optimized ePapers that Google loves.
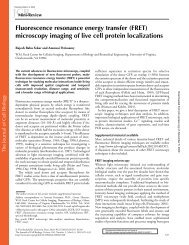
Histology and Microscopy<br />
A Guide to Fixation, Processing and<br />
Imaging in Neuroscience<br />
2011
Table of Contents<br />
Overview<br />
A Guide to Fixation, Processing and Imaging in Neuroscience1<br />
<strong>QBI</strong> Histology Facility1<br />
<strong>QBI</strong> Microscopy Facility2<br />
Plan Your Experiment<br />
Project Pathways: Brightfield Mouse Tissue Sections5<br />
Project Pathways: Fluorescence Mouse Tissue Sections6<br />
Project Pathways: Advanced Fluorescence Techniques7<br />
Preparing Your Sample<br />
Fixation - Using Paraformaldehyde8<br />
Sectioning Your Tissue9<br />
Paraffin Embedding (3-10µm)9<br />
Frozen Sections (5-20µm on cryostat / 30-100µm on sliding microtome)9<br />
Vibratome (40-100µm)9<br />
Ultrathin Sectioning (60nm for electron microscopy)9<br />
Staining Your Sample<br />
Immunohistochemistry10<br />
Fluorescence and Chromogenic Labeling10<br />
Imaging Your Sample<br />
Choosing the right technique11<br />
Exposure times11<br />
Fluorescent crosstalk / bleed-through12<br />
Autofluorescence12<br />
Keep things consistent13<br />
Appendix A: Protocols<br />
Fixation : Animal Trans-cardial Perfusion Technique14<br />
Sectioning : Tissue Preparation for Vibratome Sectioning15<br />
Fluorescence : Immunohistochemistry (cultured cells and monolayers)16<br />
Fluorescence : Immunohistochemistry (Cryostat Semi-thin sections)17<br />
Fluorescence : Immunohistochemistry (free floating tissue sections)17<br />
Fluorescence: Immunohistochemistry with Tyramide Signal Amplification (TSA)18<br />
Bright field: DAB protocol (40-50µm vibratome sections)19<br />
Bright field : Nickel DAB (N-DAB) Labeling21<br />
Bright field : Haemotoxylin and Eosin staining22<br />
Bright field : Cresyl Violet Staining (Nissl staining)23<br />
Bright field: Neuron Recovery of Neurobiotin/biocytin labeled cells24<br />
Bright field: Luxol Fast Blue26
Antigen retrieval: Citrate Buffer27<br />
Antigen retrieval: free floating sections27<br />
Dewaxing Paraffin Sections27<br />
Appendix B: Recipes<br />
Mowiol (aqueous mounting medium for fluorescence and Stereology)28<br />
8% Paraformaldehyde for Immunofluorescence28<br />
2 x PBS29<br />
Chrome Alum Gelatin Slide Coating29<br />
Sodium Citrate Buffer29<br />
Appendix C: Techniques
Overview<br />
A Guide to Fixation, Processing and Imaging in Neuroscience<br />
Often times experiments may be rushed with little planning ahead in order to get results quickly. Whilst<br />
the experiment may be completed, the tissue fixed, sectioned and imaged in record time the result<br />
doesn’t show what you need. Worse still you may need to go back and start from the beginning - wasting<br />
all the time you spent on the first experiment. This can also mean a loss of important tissue or animals.<br />
This happens a lot more than you think and can be easily avoided by spending some time thinking about<br />
what you are trying to observe or measure and then thinking about the best way to go about your<br />
experiment. You might not know the best way but other people can help you, this book, you lab<br />
members, facility managers and research papers are all resources that can all be used to develop and<br />
plan your experiments before you waste time doing things the wrong way.<br />
<strong>QBI</strong> Histology Facility<br />
The histochemistry laboratory is located on level 4 and provides training and technical support to <strong>QBI</strong><br />
Staff and <strong>QBI</strong> Affiliates. Jane Ellis (j.ellis@uq.edu.au) manages this facility and should be contacted for<br />
advice, training and access to histological instruments.<br />
Services Include:<br />
• Information and advice on appropriate experimental procedures.<br />
• Detailed tuition and supervision on the use of cryostats and microtomes within the facility.<br />
• Expert technical support for processing and sectioning tissue, including staining for rapid<br />
completion of projects (1.0 EFT available). Note: Charges apply.<br />
Technical capabilities:<br />
• Cryostat and freezing microtome (sledge) tissue processing and sectioning.<br />
• Paraffin embedding and sectioning.<br />
• Vibratome sectioning.<br />
• Ultrathin sectioning (for electron microscopy).<br />
• Histochemical staining.<br />
• Immunohistochemical staining.<br />
• Several staining methods available on request including silver stains, Luxol Fast Blue, Cresyl<br />
Violet (Nissl), and Haematoxylin and Eosin.<br />
1
<strong>QBI</strong> Microscopy Facility<br />
The microscopy facility has instruments spread through-out the institute that are managed by Luke<br />
Hammond (l.hammond@uq.edu.au) and Colin Macqueen (c.macqueen@uq.edu.au). Please log a job on<br />
the helpdesk (http://helpdesk.qbi.uq.edu.au/) for advice and training regarding microscopy.<br />
Services Include:<br />
• Information and advice on imaging techniques.<br />
• Basic and advanced training on microscopes and analysis software.<br />
• Guidance and advice for projects, including experimental design.<br />
Technical capabilities:<br />
• Brightfield and mullti-channel fluorescence microscopy.<br />
• Laser scanning confocal microscopy, including spectral imaging and multi-positional<br />
imaging.<br />
• Long-term (48hr+) live imaging in brightfield and fluorescence.<br />
• Rapid-acquisition live imaging for intracellular trafficking and calcium imaging.<br />
• TIRF imaging for observing proteins on the cell surface.<br />
• FRET imaging for detecting protein interactions.<br />
• Slide scanners for automated large scale tissue imaging in brightfield and fluorescence.<br />
• Imaging of micro-fluidic devices.<br />
• High-throughput screening of tissue and fluorescence in multi-well plates and dishes.<br />
• Stereology for quantifying cell numbers and analysing axon tracks.<br />
• Neurolucida and Imaris for neuron structure analysis and tracing.<br />
2
Plan Your Experiment<br />
1. Plan your experiment from start to finish<br />
The most important step. Getting this right will save you a lot of time!<br />
Think carefully about exactly what you are trying to observe / measure.<br />
Some examples:<br />
1. Is protein X and protein Y found in the same cell/organelle?<br />
2. Are there less X cells in the cortex when I treat with drug Y?<br />
3. Does the expression pattern/intensity of protein X change in condition Y?<br />
It can help to think about how you would display the final results of this experiment in a figure - what images<br />
would you need in each panel to show and convince a reviewer?<br />
What you need to observe / measure will determine what techniques you should use.<br />
If you are not sure what the best approach is at this point you should ask for help. Has someone previously<br />
carried out this experiment in your laboratory? How did they do it? Has a similar experiment been carried out in the<br />
literature? Check methods in publications where similar experiments have been carried out successfully.<br />
Before commencing a project it is recommended you contact histology and microscopy to clarify the suitability<br />
of the technique you intend to use - doing so could save you time, unnecessary stress, troubleshooting<br />
later, as well as wasted money and resources.<br />
Be aware of the time it will take to complete the imaging aspects of your project before you start so that<br />
you are not left desperate at the last minute - microscopy can be time consuming and instruments can be<br />
heavily booked.<br />
For more information see page 5-7<br />
2. Prepare your sample in the best way for the technique/s you intend to use<br />
After you have decided what you are observing/measuring and what technique you will use, find out how your<br />
cells/tissue should be prepared for best results.<br />
The right preparation will make your results easy to observe - the wrong preparation can mean lots of troubleshooting<br />
when it comes to imaging. Also, changing your method half-way through a study could make it difficult to<br />
compare your new results to older results - it is best to get this right the first time around.<br />
Fixation: Choose an appropriate fixation method and don’t over-fix - see page 8<br />
Sectioning: Choose an appropriate method and thickness for sectioning your tissue - see page 9<br />
40-50µm sections are often a good choice for most experiments. Any thicker and you can begin having trouble<br />
with staining and imaging. Confirm your choices with histology and microscopy.<br />
3
3. Select the right markers/labels and staining method<br />
Choose markers that will work well with your technique - there are many to choose from but you want to avoid<br />
marker combinations that may be difficult to tell apart (e.g. Heamatoxylin with nDAB or GFP with YFP).<br />
You also need to choose a staining protocol. These may vary on the tissue or cells you are looking at.<br />
for more information see page 10 and protocols<br />
4. Choose the correct mounting media<br />
DPX works well for brightfield sections to be imaged or scanned<br />
Use Mowiol for fluorescence (or for brightfield sections to be used for stereology)<br />
Use prolong gold if you are concerned about fluorescence fading or photobleaching<br />
5. Use the right coverslips<br />
Use 0.17mm thick / No.1.5 coverslips<br />
Seal the coverslips onto the slide using clear non-fluorescent nail-polish<br />
6. Choose the right objective and exposure time<br />
20x or 63x objectives are often the best choice for most experiments.<br />
When setting the exposure time avoid oversaturation which can prevent you from analysing changes in protein expression and<br />
localisation. Also, ensure your exposure time is not too long - excessive exposure times often mean you are imaging<br />
autofluorescence or bleed-through from another channel.<br />
If you intend to compare your images keep things consistent by using the same objective and exposure time. If you want to<br />
analyse intensity changes you should image using the same microscope with all the same settings.<br />
for more information see pages 11-13<br />
7. Run a pilot study<br />
In some cases running a small pilot study is recommended as this will assist in refining the methods without<br />
losing precious material. Positive and negative controls for the techniques should be included each time the<br />
procedure is done to validate the results. If you are not sure about controls ask for help.<br />
4
Project Pathways: Brightfield Mouse Tissue Sections<br />
What do you want to see?<br />
High resolution<br />
Example: localising a synaptic<br />
marker or looking at intracellular<br />
proteins<br />
Cell Numbers<br />
Example: counting neurons within<br />
the hippocampus<br />
Gross Morphology<br />
Example: looking for gross<br />
changes in anatomy or cell<br />
densities<br />
Fix tissue using trans-cardial perfusion<br />
Section on cryostat (2-20µm) or paraffin<br />
block (4-10µm)<br />
Fix tissue using trans-cardial perfusion<br />
Section on vibratome or sliding<br />
microtome (40 - 50µm)<br />
Fix tissue using trans-cardial perfusion<br />
Section on vibratome or sliding<br />
microtome (40 - 50µm)<br />
All cells + specific cells?<br />
Haemotoxylin + DAB (page 19)<br />
Specific cells?<br />
Nickel DAB (page 21)<br />
Count all cells?<br />
Haemotoxylin (page 22)<br />
All cells + specific cells?<br />
Haemotoxylin + DAB (page 19)<br />
Specific cells?<br />
Nickel DAB (page 21)<br />
Recommended:<br />
Haemotoxylin (page 22)<br />
Gross morphology + neuronal<br />
details?<br />
Nissl (page 23)<br />
Specific cells?<br />
Nickel DAB (page 21)<br />
To minimise shrinkage and structural<br />
changes to the cell structure<br />
mount in Mowiol<br />
Qualitative<br />
1. Mount in DPX<br />
2. Image using 20-63x objective<br />
3. Density analysis on images<br />
Quantitative<br />
1. Mount in Mowiol (p28)<br />
2. Seal slides with clear nailpolish<br />
3. Stereological Analysis<br />
Imaging some sections?<br />
1. Mount in DPX<br />
2. 10x/20x Mosaic on Green/Blue<br />
3. For multiple sections or subregions<br />
use Mark and Find<br />
High-throughput?<br />
1. Mount in DPX<br />
2. Scan using slide scanners<br />
Experiment time<br />
Qualitative - 15-45 minutes / animal<br />
Quantitative - 3-4 hours / animal<br />
5<br />
Experiment time<br />
Standard - 10min / section<br />
High-throughput - 25min / slide<br />
automated
Project Pathways: Fluorescence Mouse Tissue Sections<br />
What do you want to see?<br />
High resolution<br />
Example: localising a synaptic<br />
marker or looking at intracellular<br />
proteins<br />
Cell Numbers<br />
Example: counting neurons within<br />
the hippocampus<br />
Gross Morphology<br />
Example: looking for gross<br />
changes in anatomy or cell<br />
densities<br />
Fix tissue using trans-cardial perfusion<br />
Section on cryostat (2-20µm) or paraffin<br />
block (4-10µm)<br />
Fix tissue using trans-cardial perfusion<br />
Section on vibratome or sliding<br />
microtome (40 - 50µm)<br />
Fix tissue using trans-cardial perfusion<br />
Section on vibratome or sliding<br />
microtome (40 - 50µm)<br />
Recommended:<br />
DAPI + GFP/Alexa488 + Alexa594<br />
or Alexa647<br />
Try to avoid using markers prone<br />
to bleedthrough<br />
Count all cells?<br />
DAPI - BUT easier to use a<br />
brightfield technique<br />
All cells + specific cells?<br />
DAPI + Alexa488, Alexa555,<br />
Alexa647<br />
Recommended:<br />
DAPI + GFP/Alexa488 + Alexa594<br />
or Alexa647<br />
Try to avoid using markers prone<br />
to bleedthrough<br />
Imaging:<br />
Preferably image in 3D on an<br />
LSM confocal. - use Apotome as<br />
a minimum.<br />
Analysis:<br />
Use Imaris to analyses and<br />
visualise your data<br />
Qualitative<br />
1. Mount in prolong gold<br />
2. Image using 20-63x objective<br />
3. Density analysis on images<br />
Quantitative<br />
1. Mount in prolong gold<br />
2. Seal slides with clear nailpolish<br />
3. Stereological Analysis<br />
Imaging:<br />
Image on AxioImager Green or<br />
Blue using MosaiX at 10-20x<br />
or<br />
Image on Vslide at 20x (if imaging<br />
large quantities or for better<br />
stitching results)<br />
or<br />
Image on LSM Confocal<br />
6
Project Pathways: Advanced Fluorescence Techniques<br />
What do you want to see?<br />
Neuronal Structure<br />
Example: Imaging and tracing<br />
neurons to analyse branching or<br />
count number of spines<br />
Protein Interactions<br />
Example: do protein X and Y<br />
interact on the cell membrane<br />
Colocalisation<br />
Example: looking to see if protein<br />
X can be found in the same cell<br />
or organelle as protein Y<br />
Cell plated on 0.17mm coverslips or<br />
tissue sections no thicker than 100µm<br />
Live cell plated on 0.17mm<br />
MatTek dishes<br />
Cells plated on 0.17mm coverslips<br />
or thin tissue sections<br />
Neurons in Tissue:<br />
- Dye filled or biotin labelled cells<br />
- Cytosolic GFP or mCherry<br />
Cultured Neurons<br />
- Cytosolic makers e.g. GFP<br />
-Wheat Germ Agglutininm (WGAalexa647)<br />
Recommended:<br />
GFP + RFP FRET pair<br />
(Can also use CFP + YFP)<br />
Image on TIRF Marinas, also<br />
possible on LSM510 META inverted<br />
confocal<br />
Recommended:<br />
GFP/Alexa488 + Alexa594 or<br />
Alexa647<br />
Avoid using markers prone to<br />
bleedthrough<br />
Imaging:<br />
LSM Confocal (e.g. LSM510<br />
META)<br />
-ensure correct pinhole settings<br />
and Z-stack step size (avoid<br />
understampling the Z-axis)<br />
Analysis:<br />
Neurolucida or Imaris can trace<br />
neurons and identify spines<br />
FRET Imaging:<br />
TIRF Marinas for high speed or<br />
interactions on the plasma<br />
membrane or on an LSM Confocal<br />
(e.g. LSM510 META)<br />
Ensure the proper controls are<br />
used and results be careful not to<br />
misinterpret results<br />
Imaging:<br />
Preferably image in 3D on an<br />
LSM confocal. - use Apotome as<br />
a minimum. Standard fluorescence<br />
images should not be used<br />
for any colocalisation studies,<br />
Analysis:<br />
Use Imaris - avoid common<br />
whole image approaches to<br />
colocalisation - choose cell/<br />
organelle specific analysis<br />
7
Preparing Your Sample<br />
Fixation - Using Paraformaldehyde<br />
Fixation is also to be carefully selected for the techniques in use. Routine fixation in neuroscience with<br />
buffered 4% paraformaldehyde is typical but there are a variety of fixatives and fixation methods. Fresh<br />
tissue can be sectioned and post fixed but for good retention of labile protein molecules (such as<br />
neurotransmitters), transcardial perfusion with a paraformaldehyde-based fixatives is preferred.<br />
Post fixation is also a step, which needs careful control and standardization especially when<br />
immunohistochemical labeling is used. Cross-linking fixatives can render antigens unavailable for labeling.<br />
Immersion fixation can cause delays in fixing labile protein in situ and can be seen as blurred nuclear<br />
staining and poor chromatin preservation.<br />
Paraformaldehyde is toxic and can cause sensitisation reactions. All preparation of powders should be<br />
carried out in a fume hood wearing the appropriate PPE. The powder dissolves most effectively in water<br />
heated to 50 0 C and sodium hydroxide pellets added gradually to adjust the pH to 7.4.<br />
Important Notes on Paraformaldehyde:<br />
• Tissues should not be stored in PFA long term - remove your sample from PFA as soon as<br />
possible.<br />
• Over fixation by leaving tissue/cells in paraformaldehyde for too long renders some antigens<br />
irretrievable and increases autofluorescence.<br />
• Fixation time can vary depending on the antigen of interest and tissue type. It is very important to<br />
check you are using the right fixation protocol for your tissue and technique<br />
Other fixatives are used in histology and should be selected to optimise staining and morphological<br />
preservation. Antigen retrieval of paraformaldehyde paraffin embedded tissue is necessary and this can<br />
be achieved using enzyme digestion or heat retrieval (for standard solutions see page 25). All times for<br />
retrieval and antibody concentration titration must be carried out on a known positive slide to optimise<br />
staining prior to application to the test sample.<br />
Information about perfusion fixation vs drop fixing<br />
There are differences in the characteristics of tissues which have been perfused and those which are<br />
immersion or drop-fixed. If immunohistochemical labeling using the DAB chromagen, then be aware that<br />
drop fixed material will have erythrocytes present which will stain if not adequately blocked with hydrogen<br />
peroxide prior to staining. Also nuclear detail can be affected in immersion fixed tissues due to the<br />
diffusion of nuclear proteins out of the nucleus as the fixative diffuses into the tissue. Where possible<br />
perfusion fixation is highly recommended as this is instantaneous at labile proteins will be fixed in situ.<br />
8
Sectioning Your Tissue<br />
The thicker the section the more difficult it becomes to resolve small subcellular structures and<br />
immunohistochemical staining becomes limited due to antibody penetration into the sections. The final<br />
size and expression levels of the protein or structure of interest should be known and the labeling<br />
technique and sectioning thickness determined to ensure resolution using the microscopes available at<br />
<strong>QBI</strong> is optimized. Improved penetration using detergents and use of signal amplification may be<br />
necessary.<br />
5 - 20 µm : high resolution brightfield/fluorescent techniques or for use on the slide scanners<br />
40-50 µm : imaging gross morphology or for conducting stereology and slide scanning<br />
100 µm : imaging filled neurons or brightly stained tissue (tissue thicker than this can be difficult to image)<br />
Paraffin Embedding (3-10µm)<br />
Paraffin embedding provides a permanent archival block that can be cut at thicknesses ranging from 3 to<br />
10um. These thinner sections provide better microscopic resolution and are useful for various staining<br />
applications. Antigen retrieval techniques are usually needed for immunohistochemical stains.<br />
Frozen Sections (5-20µm on cryostat / 30-100µm on sliding microtome)<br />
Fresh frozen sections require snap freezing only before sectioning. Post fixation, once the sections are cut<br />
to prevent loss of morphological features during staining. Prefixed tissues should be sunk in 30% sucrose<br />
to prevent ice-crystal artifact during freezing. The cryostat and sliding microtome can be used for<br />
sectioning frozen tissue.<br />
*Frozen sections cannot be used for EM work but specialized freeze-drying techniques are carried out at<br />
The Centre for Microscopy and Microanalysis.<br />
Vibratome (40-100µm)<br />
Vibratome sectioning can be carried out on both fixed and fresh tissues. Fixed tissue sections can be cut<br />
from 40um up to 100um depending on the subsequent staining. The benefit of vibratome sections, is that<br />
free floating sections can be stained very effectively with immunohistochemical techniques and once<br />
mounted on slides are relatively wrinkle free. The added advantage of this technique is that sections can<br />
be used for electron microscoscopy processing and ultrathin sectioning and therefore achieve greater<br />
resolution.<br />
Ultrathin Sectioning (60nm for electron microscopy)<br />
This technique requires planning and the application of considerable amounts of time for processing and<br />
sectioning to achieve a good quality result. Fixation with a gluteraldehyde-based fixative is necessary.<br />
Other processing techniques are also available through The Centre for Microscopy and Microanalysis.<br />
*A license has to be purchased with CMM for access to processing facilities and the electron<br />
microscopes.<br />
9
Staining Your Sample<br />
Immunohistochemistry<br />
Immunohistochemistry is widely used in Neuroscience studies and requires careful work up and<br />
inclusion of positive and negative controls to ensure the final label is specific and sensitive. If this is<br />
not done the result is in question as merely an artifact of processing and staining. Work up requires<br />
titration of the antibody concentration and a sensitive positive control. Isotype antibodies should<br />
also be run with the experiment to exclude staining caused by inter species reactivity and other nonspecific<br />
binding reactions.<br />
Polyclonal and monoclonal antibodies are available for use and have the ability to label target proteins.<br />
The limitations of these types of antibodies should be considered where a small poorly expressed protein<br />
is the target and where cross reactivity with the species of the tissue may be an issue. Pre adsorbed<br />
antibodies are available at extra cost but these are useful for multiple labeling techniques.<br />
Antigen retrieval is required for most aldehyde fixed tissues and is essential to reveal antigens in the<br />
tissue. Fresh frozen sections can be post fixed in acetone to eliminate the need for cross linking fixatives<br />
and this can be useful when looking for fixation sensitive epitopes.<br />
In tissues that have very low expression of the antigen of interest amplification kits using Tyramide are<br />
commercially available and this provides better signal to background staining. (for Tyramide Signal<br />
Amplification (TMA) protocal see page 24)<br />
Fluorescence and Chromogenic Labeling<br />
The type of label used in immunohistochemistry will be dependent on levels of expression of the protein<br />
of interest. The lower the expression and smaller the tissue entity the more sensitive the labeling needs to<br />
be. Bright fluorescent labels in the orange to green wavelengths are best for small or low expression<br />
especially if multiple labels are being applied. For strongly expressed antigens a chromogen such as DAB<br />
+/- nickel enhancement will allow for long term archiving of slides. Make sure your final chromagen<br />
compliments any counterstain color.<br />
A recommended setup if you want to observe multiple proteins is:<br />
DAPI/Alexa350 + Alexa488/GFP + Alexa594 + Alexa647<br />
(Look out for crosstalk between Red and Far Red channels)<br />
Another 4 colour combination is:<br />
DAPI/Alexa350 + Alexa488/GFP + Alexa555 + Alexa647<br />
(Look out for crosstalk between Green and Red channels)<br />
10
Imaging Your Sample<br />
Choosing the right technique<br />
There are many microscopy techniques available, the one you choose will depend on your research<br />
question, and should be considered before preparing your sample - as discussed on page 3 of this guide.<br />
Some examples of research questions and suitable microscopy techniques available at <strong>QBI</strong> include:<br />
- Cellular structures and/or protein colocalisation - ApoTome or confocal microscopy<br />
- Accurate quantificaiton of cell numbers - Stereology<br />
- Tracing of neurons or axon tracts - Confocal microscopy and Imaris / Neurolucida<br />
- Measuring protein interaction - FRET or FLIM<br />
- Imaging protein delivery or cell surface dynamics - TIRF<br />
- Protein dynamics - FRAP<br />
- Long term cell changes or drug responses - high-throughput multiwell automated live microscopy<br />
If you are imaging a sample using brightfield techniques it is important to ensure you are using correct<br />
Kohler illumination (if you are unsure of how to do this please contact microscopy).<br />
If you are imaging a fluorescent sample you should be aware of how to choose the right exposure time<br />
(discussed below).<br />
Exposure times<br />
One of the most important things to consider when imaging your sample is the exposure time. The<br />
exposure time is essentially the length of time the camera spends capturing the image - a longer<br />
exposure time will mean a brighter image but also increases the chance of crosstalk and/or of imaging<br />
autofluorescence (page 12).<br />
When imaging your sample the first thing to do is to have a look through the eyepieces - does the<br />
fluorescence look faint by eye? If so, it may not be real staining, or if it is real it may be difficult to image<br />
using a confocal.<br />
If you are confident the fluorescence is the result of real staining choose an exposure time that avoids<br />
over saturation. Over saturation can often result in images that cannot be used for any advanced analysis<br />
such as comparing protein expression. The exposure time should also be kept to a minimum if you need<br />
to avoid photobleaching - this will be the case if you are imaging a live sample over time, or if you are<br />
capturing a large Z-stack through your sample. A short exposure time will also minimise crosstalk and<br />
autofluorescence.<br />
The settings below are a guide for the exposure times you should observing for your sample using the<br />
20x objective found on the microscopes within <strong>QBI</strong>. If your exposure times vary greatly from these it is<br />
possible you are imaging autofluorescence.<br />
DAPI 20-80msec<br />
Alexa488/GFP 200-800msec<br />
Alexa555/568/594 200-800msec<br />
Alexa647 400-1500msec<br />
11
Fluorescent crosstalk / bleed-through<br />
When imaging a sample that has more than one fluorescent marker it is important to avoid fluorescent<br />
crosstalk. Crosstalk occurs when two (or more) fluorescent markers are excited and imaged when trying<br />
to capture the signal from only one. This can often happen in samples containing GFP and Alexa568,<br />
especially when one is significantly brighter than the other. The resulting image will look as though there is<br />
perfect colocalisation between the green and red fluorophores (yellow).<br />
If you are trying to accurately measure protein colocalisation choose markers that are further apart (e.g.<br />
GFP and Alexa594 or Alexa647) or use a confocal microscope.<br />
Autofluorescence<br />
Many endogenous proteins and compounds within cells and tissue fluoresce naturally. It is important to<br />
keep this in mind when imaging your sample so that you don’t confuse this fluorescence with that of your<br />
protein or marker of interest. Different tissues fluoresce in different ways, in the case of mouse brain the<br />
tissue often fluoresces in the green to yellow spectrum and can easily be confused with Alexa488 labeling<br />
by a hopeful researcher using a new antibody. Insect tissue can fluoresce from green all the way up into<br />
the red spectrum.<br />
Over fixing will also contribute to the fluorescence of tissue, the longer the sample is left in PFA the more<br />
intense the autofluorescence will below. To avoid this find out the minimum time you need to leave your<br />
sample in PFA (15 minutes to overnight - as discussed in this guide).<br />
Fluorescence coming from fluorescent labels will almost always be much brighter than autofluorescence<br />
so a good way to check is to look at your sample through the oculars - real staining should be bright and<br />
in specific locations, autofluorescence will appear dim and relatively uniform.<br />
Commerically available reagents such as FocusClear can reduce autofluorescence in tissue samples.<br />
Simiarly, stains such as sudan black can block out certain forms of autofluorescence.<br />
Autofluorescence observed in a<br />
50µm mouse brain section<br />
12
Keep things consistent<br />
If you are imaging cells or tissue with the intention of comparing changes in protein expression or<br />
colocalisation it is important to keep everything consistent. This is because big variations in fluorescent<br />
intensity can occur between objectives as well as between microscopes. Even if you are not making<br />
sensitive measurements it is still a good idea to choose a microscope for your project and stick with it -<br />
this way if there any changes through your project you can be sure they are not related to the<br />
microscope.<br />
To keep things consistent remember to:<br />
1. Use the same microscope - different microscopes will have different bulbs and have usually<br />
been running for different amount of time - this means different light intensity and subsequently<br />
different exposure times.<br />
2. Use Colibri/LED illumination where possible - LEDs don’t change in intensity very much as<br />
they age. Colibri can cause increased crosstalk between channels so check for this.<br />
3. Use the same objective<br />
4. Use the same exposure time - use your brightest sample to set the exposure time, this will<br />
help you to avoid overexposure.<br />
5. Image your samples as close together as possible - if it is an important experiment try to<br />
do all your staining and imaging at the same time - as staining ages it can become less<br />
fluorescent so imagining some slides one week and other slides a few weeks later will give you<br />
confounding results. Similarly, as the bulb in the microscope ages it will become less intense or if<br />
it is replaced it may be much brighter than when you first set your exposure times.<br />
13
Appendix A: Protocols<br />
Fixation : Animal Trans-cardial Perfusion Technique<br />
Pre requisites:<br />
Animal ethics approval<br />
Training in the safe handling of laboratory animals<br />
Training in animal perfusion<br />
Reagents:<br />
- Pre-perfusion buffer (for washing to clear blood vessels and open up the capillaries)<br />
Sodium Nitrite 0.01% in PBS pH 7.4<br />
- Fixative<br />
4% Paraformaldehyde +/-0.25% Acrolein (other fixatives can be used here)<br />
- Anesthetic<br />
see “NHMRC Guidelines to promote the well-being of animals used for scientific purposes”<br />
Method:<br />
1. Set up the perfusion rig with fresh filtered solutions each time and ensure that all tubing is clean and<br />
free of blockages.<br />
2. Anesthetise the animal checking the foot pinch reflex to make sure it is fully anesthetised.<br />
3. Secure the animal on its back.<br />
4. Cut open the pericardium<br />
5. Pull the heart down to reveal the ascending aorta and insert the catheter into the ascending aorta.<br />
6. Clamp the heart at right angles to the catheter.<br />
7. Cut the right atrium.<br />
8. Make sure the pericardium does not occlude the venous outflow.<br />
**The principle of perfusion is to start at a rate equivalent to cardiac output.<br />
9. Begin the perfusion by running the wash solution through to open the capillaries and wash the<br />
erythrocytes out of the tissue.<br />
10.Once cleared switch to the fixative.<br />
11.The run through time for the fixative should be 20 to 30 mins.<br />
12.Dissect out the brain and post fix for 24 hr (this may vary depending on the sensitivity of the antigen).<br />
14
Sectioning : Tissue Preparation for Vibratome Sectioning<br />
1. Fix in 4% paraformaldehyde in 0.1 M PBS pH 7.2-7.4.<br />
2. remove excess fixative by washing tissues in PBS x 3.<br />
3. Embed in warm 40ºC 4% agarose in distilled water (dH20).<br />
4. Cool tissue blocks to 25ºC or until the agarose solidifies.<br />
5. Trim excess agarose away and attach blocks to metal chuck using cyanoacrylate adhesive.<br />
6. Cut sections to 30-50µm Vibratome sections.<br />
7. Collect sections in 0.1M PBS (add azide 0.05% for long term storage>1 week).<br />
15
Fluorescence : Immunohistochemistry (cultured cells and monolayers)<br />
Reagents:<br />
- Fixative<br />
Use 4% PFA (sometimes kept as frozen 8% stock - add 2xPBS buffer to make up to 4%)<br />
- Blocking Buffer<br />
0.5% BSA/PBS (e.g. 0.5g BSA in 100ml PBS) (% = g/100ml)<br />
- Permeabilisation Buffer<br />
0.1% TX-100 in PBS (e.g. 10% Tx-100 stock then 200µl in 20ml PBS)<br />
Method:<br />
1. Fix cells: 4% paraformaldehyde in PBS, pH7.4 for 30-90 mins RT<br />
2. Wash gently x3 PBS<br />
3. Permeabilise cells with 0.1% TX-100 in PBS for 5mins<br />
4. Wash 2x in PBS<br />
5. Block for 10min in 0.5% BSA/PBS (but can be as long as you like)<br />
6. While blocking should make up primary antibody, dilute antibody in BSA/PBS, need 25-40ul/coverslip<br />
*E.g. Antibody 1:50 = 2ul in 100ul BSA/PBS<br />
7. Aliquot onto parafilm with sufficient space between coverslips<br />
8. Pick up coverslip and dry edges gently (touch corner to kimwipe) and place coverslip cells down onto<br />
antibody drop. Incubate for 60-90min RT<br />
9. Flip coverslip so cells face up and wash gently with BSA/PBS x 3<br />
10.Prepare secondary antibody (25-45ul/coverslip) and incubate for 45-60min<br />
*many 2° Ab are used 1:400 (e.g. 1ul per 400ul) in BSA/PBS<br />
11.Wash x3 BSA/PBS<br />
12.Wash x3 PBS<br />
** This protocol outlines a general method for immunohistochemical staining and can be adjusted to suit<br />
the antibodies used.<br />
16
Fluorescence : Immunohistochemistry (Cryostat Semi-thin sections)<br />
Reagents:<br />
- 50 ml of 1xPBS pH 7.4<br />
Method<br />
- 50ml of 1% BSA/PBS<br />
- Primary antibody: As recommended by manufacturer<br />
- Secondary antibody: As recommended by manufacturer - Alexa dyes usually work best at 1:400<br />
1. Cryostat sections are picked up on subbed slides (chrome-alum gelatin coated) and air dried for at<br />
least 2 hours.<br />
2. Draw a circle around section with hydrophobic pen.<br />
3. Wash sections with PBS 3 times<br />
4. Block with BSA/PBS for 1-10 minutes.<br />
5. Add 1 o antibody for 1 hour.<br />
6. Wash with BSA/PBS 3 times.<br />
7. Add 2 o Ab for 1hr<br />
8. Wash with BSA/PBS 3 times<br />
9. Wash with PBS 3 times.<br />
10.A counterstain may be added for a few minutes, followed by PBS washing.<br />
11.Mount with fluorescent mounting medium (mowiol / prolong gold), dry edges, seal with nail polish.<br />
**Ensure nailpolish is non-fluorescent<br />
Fluorescence : Immunohistochemistry (free floating tissue sections)<br />
This method requires extended incubation times to account for the increase in section thickness and<br />
exchange of solutions into an out of the tissue. Permeabilising the tissue is also necessary and must be<br />
carefully calibrated to optimise staining without deterioration of the tissue integrity.<br />
17
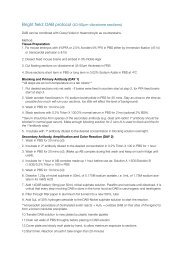
Fluorescence: Immunohistochemistry with Tyramide Signal Amplification (TSA)<br />
** Perkin Elmer kit // Protocol for Vibratome Sections<br />
** Perform all steps with slides arrayed horizontally in humidified chamber on a rotator at RT.<br />
Reagents:<br />
- Sodium citrate Buffer (10mM Sodium Citrate, 0.05% Tween 20 pH 6) (see appendix x)<br />
2.94g Tri-sodium citrate // 1000ml DI water // adjust pH to 6.0 with 1N CL // add tween<br />
20 // mix well // store at room temperature for 3months or at 4ºC for longer storage<br />
Method:<br />
- 50 ml of 1xPBS pH 7.4<br />
- 50ml of 1% BSA/PBS<br />
1. Mount sections on SuperFrost Plus slides – dry for ~1hr to fully adhere sections to slide<br />
2. Rinse slide with PBS to rehydrate<br />
3. Fix in 4% PFA for 10min<br />
4. Wash 3x 3min in PBS<br />
5. Perform antigen retrieval in Biocare Medical decloaking chamber – heat sections to 125 o C for 4min at<br />
15 psi in sodium citrate buffer<br />
6. Wash 3x 3min in PBS<br />
7. Block sections in 0.9% H2O2/10% Normal Serum/0.2% Triton-X 100 in PBS for 2hr on rotator (serum<br />
should be same as the species from which your secondary antibody was generated)<br />
8. Incubate overnight with 1 o antibody/ies at desired concentration in 2% Normal Serum/0.2% Triton-X<br />
100 in PBS<br />
9. Wash 3x20min in PBS<br />
10.Incubate with appropriate HRP labelled IgG 2 o antibody diluted 1:500 in 0.2% Triton-X 100 in PBS for<br />
1hr<br />
11.Wash 3x10min in PBS<br />
12.Dilute TSA Amplification reagent 1:50 in 1xPlus Amplification Diluent buffer. Apply 150-200µL per<br />
slide and incubate for 1 – 10mins (need to optimize for individual antibodies) in humidified chamber<br />
covered in foil. For all subsequent steps, keep chamber covered in foil<br />
13.Wash 3x10min in PBS<br />
14.If performing double labelling for multiple primary antibodies proceed to step 15. If only performing<br />
single labelling with TSA kit proceed to step 16<br />
15.Incubate with appropriate fluorescent 2 o antibody diluted in 0.2% Triton-X 100 in PBS for 3hr.<br />
16.Incubate in DAPI diluted 1:1000 in 0.2% Triton-X 100 in PBS for 20min at RT.<br />
17.Wash 3x20min PBS. NB: If using 2 o antibodies at high concentrations (i.e. greater than 1:500)<br />
replace first two washes with 0.2% Triton-X 100 in PBS.<br />
18.Coverslip using ProlongGold (Invitrogen). Let mounting media set for 1hr at RT in slide book, then<br />
store at 4 o C in dark. Take images within 2-3 weeks for optimum fluorescence.<br />
18
Bright field: DAB protocol (40-50µm vibratome sections)<br />
DAB can be combined with Cresyl Violet or Heamotoxylin as counterstains.<br />
Method:<br />
Tissue Preparation<br />
1. Fix mouse embryos with 4%PFA or 2.5% Acrolein/4% PFA in PBS either by immersion fixation (E15)<br />
2. Dissect fixed mouse brains and embed in 3% Noble Agar<br />
3. Cut floating sections on vibratome at 45-50µm thickness in PBS<br />
4. Store sections short term in PBS or long term in 0.02% Sodium Azide in PBS at 4ºC<br />
Blocking and Primary Antibody (DAY 1)<br />
**All steps are at room temperature on a lab rotator**<br />
1. Put desired sections into net wells - If brains were fixed in acrolein start at step 2, for PFA fixed brains<br />
start at step 3.<br />
2. Wash acrolein-fixed brains in 1% sodium borohydride in PBS for 20 mins. Stay as close to the time as<br />
possible (too much will ruin your sections, too little will effect the level of background)<br />
3. Wash in PBS for 10 mins (x3)<br />
4. Black sections with 0.2% Triton-X 100/2% normal serum in PBS for 2 hrs (optional 2% BSA).<br />
**Serum should be from species of the secondary antibody (e.g. Goat anti-rabbit 1º antibody should be<br />
blocked in normal goat serum). Make enough blocking solution for 2 runs (it is used to block and the for<br />
the 1ºantibody step)<br />
5. Incubate with 1º antibody diluted to the desired concentration in blocking solution overnight.<br />
Secondary Antibody, Amplification and Color Reaction (DAY 2)<br />
1. Wash in PBS for 20 mins (x3)<br />
2. Incubate in 2º antibody diluted to the desired concentration in 0.2% Triton-X 100 in PBS for 1 hour.<br />
3. Wash in PBS for 20 mins (x3). (Make up AB complex during first wash and keep on ice/in fridge until<br />
used).<br />
4. Incubate for 1 hour in AB complex made up 1 hour before use as: Solution A 1:500/Solution B<br />
(1:500)/0.2% Triton-x 100 in PBS<br />
5. Wash in PBS for 10 mins (x3)<br />
6. Dissolve 1.25g of nickel sulphate in 50mL of 0.175M sodium acetate, i.e. 5mL of 1.75M sodium acetate<br />
in 45 milliQ H2O<br />
7. Add 1xDAB tablet (10mg) per 50mL nickel sulphate solution. Parafilm and sonicate until dissolved. It is<br />
critical that every step involving DAB is done in the fume hood as DAB is carcinogenic and teratogenic<br />
8. Filter through filter paper in aluminium foil tunnel into a new 50mL tube<br />
9. Add 5µL of 30% hydrogen peroxide to the DAB-Nickel sulphate solution to start the reaction.<br />
**Horseradish peroxidase of biotinylated avidin reacts + H202 = oxidizes DAB on that sites of the ligand to<br />
form a brown insoluble precipitate.<br />
10.Transfer DAB solution to new plates by plastic transfer pipette<br />
11.Drain net wells of PBS throughly before placing in DAB solution<br />
12.Cover plate and slowly swirl plate by hand, to allow maximum exposure to sections<br />
13.Start timer. Reaction shouldn’t take longer than 20 minutes<br />
19
14.Drain thoroughly of DAB before replacing in PBS to stop reaction<br />
15.Wash in PBS for 5 minutes (x3)<br />
16.To clean up DAB reaction, immerse plates in bleach then soak plates in detergent overnight. Wash<br />
throughly and rinse the water the following day<br />
17.Mount sections onto slides by floating in PBS. Allow at least 1 hour to dry.<br />
18. Haematoxylin Counterstain if necessary here.<br />
19.Dehydrate in the fume hood using the following sequence:<br />
1x2min washes of the following:dH20,75% EtOH; 95% EtOH.<br />
Followed by 2x2min washes in 100% EtOH,<br />
Then 3x2min washes in 100% Histolene (Xylene may be substituted here)<br />
20.Use DPX (xylene-based mounting media) to coverslip, leave in fume hood to dry overnight.<br />
21.Store slides in slide boxes at room temperature<br />
DAB stained neurons with<br />
Haemotoxylin counterstain<br />
20
Bright field : Nickel DAB (N-DAB) Labeling<br />
Reagents:<br />
- Triton-X 100 Buffer 0.2% in 2%normal serum/1x PBS buffer<br />
- Primary antibody diluted as per manufacturers recommendation (titration may be necessary)<br />
- Appropriate secondary antibody diluted in Triton buffer<br />
- AB complex<br />
- Sodium acetate 0.175M.<br />
- Nickel sulphate 1.25g in 50ml Sodium acetate buffer 0.175M (Make up fresh)<br />
- DAB solution 10mg DAB in 50ml Nickel Sulphate solution. Dissolve and filter before use.<br />
- 1% bleach solution for DAB deactivation.<br />
Method:<br />
1. Wash section with 0.2% Triton-X 100 buffer<br />
2. Block section with Triton-X 100 0.2% normal serum -1hr<br />
3. Remove blocking solution and incubate the section in primary antibody overnight at 4 0 C<br />
4. Wash in 1x PBS (3x 10min)<br />
5. Incubate sections with secondary antibody 1hr<br />
6. Wash in PBS (3x 10min)<br />
7. Incubate in AB complex as per manufacturer’s instructions<br />
8. Wash in PBS (3x 10min)<br />
9. Incubate in DAB solution for 5mins<br />
10.Pour off the DAB solution and add 5ul of 30% Hydrogen Peroxide to this solution, mix and re<br />
incubate the sections. Check the sections microscopically and wash in PBS to stop the reaction once<br />
the desired staining intensity is reached.<br />
11.Counterstain if necessary using a contrasting histochemical stain such as Nuclear Fast Red(note:<br />
Haematoxylin counterstain is effective only with a brown DAB reaction product)<br />
12.Prepare sections for the microscope by dehydrating clearing and mounting in DPX<br />
13.Decontaminate any DAB affected surfaces and glassware with bleach and dispose of waste as per<br />
local regulations.<br />
21
Bright field : Haemotoxylin and Eosin staining<br />
Haematoxylin and eosin stain is used to stain cell nuclei blue and the cytoplasm pink/red to aid<br />
visualization of tissue structure and morphology.<br />
The staining method involves application of the basic dye haematoxylin, which stains basophilic<br />
structures, usually the ones containing nucleic acids, such as the ribosomes and the chromatin and<br />
alcohol-based acidic eosin Y, which colors eosinophilic structures, generally composed of intracellular or<br />
extracellular protein, bright pink to yellow.<br />
**Risk Assessment:10521 Histochemistry <strong>QBI</strong> Haematoxylin and Eosin Staining<br />
Reagents:<br />
- Absolute alcohol<br />
- Xylene<br />
- 0.3% Acid Alcohol (0.3% HCl in 70% ethanol)<br />
- Distilled water.<br />
- Mayer’s Haematoxylin (Fronine, # II007)<br />
- 1% alcoholic eosin (Fronine # 11016Q)<br />
- DePeX<br />
Method (for paraffin embedded sections):<br />
1. Dewax sections in xylene (2 or 3 changes of 3min each)<br />
2. Rehydrate in alcohol (100%, 95%, 70%) 3min each.<br />
3. Stain in Mayer’s haematoxylin 30sec. Watch how stain develops and check under microscope (nuclei<br />
should be blue with a pale blue tissue matrix)<br />
4. Wash and “blue” in running tap water.<br />
5. In the case of high background differentiate in acid alcohol 8-12 times briefly.<br />
6. Wash in tap water and re-blue and check under the microscope.<br />
7. Stain with the 1%eosin solution for 10sec.<br />
8. Rinse in tap water to remove the excess stain.<br />
9. Wash in 70% ethanol and check microscopically until the tissue matrix and cellular components are<br />
differentially stained.<br />
10.Rapidly dehydrate the sections through graded ethanol clear in xylene and mount in DePeX.<br />
**Thicker sections require exposure to each solution for longer to allow the diffusion of reagents.<br />
22
Bright field : Cresyl Violet Staining (Nissl staining)<br />
Cresyl Violet Acetate solution is used to stain Nissl substance in the cytoplasm of neurons in<br />
paraformaldehyde or formalin-fixed tissue. The neuropil will be stained a granular purple-blue. This stain is<br />
commonly used to identify the neuronal structure in brain and spinal cord tissue.<br />
The Cresyl Violet method uses basic aniline dye to stain RNA blue, and is used to highlight important<br />
structural features of neurons. The Nissl substance (rough endoplasmic reticulum) appears dark blue due<br />
to the staining of ribosomal RNA, giving the cytoplasm a mottled appearance. Individual granules of<br />
extra-nuclear RNA are named Nissl granules (ribosomes). DNA present in the nucleus stains a similar<br />
color.<br />
**Risk Assessment:12863 Cresyl Violet Staining<br />
Reagents:<br />
- 95% Ethanol<br />
- 70% Ethanol<br />
- Differentiation solution: 2 drops glacial acetic acid in 95% ethanol<br />
- Cresyl Violet Acetate 0.2% in Acetate Buffer (Fronine, Cat No:<br />
HH155)-Filtered<br />
Method (for paraffin embedded sections):<br />
1. De-wax sections in xylene (2 or 3 changes of 3min each)<br />
2. Rehydrate in alcohol (100% x2), 3min each.<br />
3. Stain in 0.1% Cresyl Violet 4-15min.<br />
4. Quick rinse in tap water to remove excess stain<br />
5. Wash in 70% ethanol (the stain will be removed by this method).<br />
6. If required immerse sections for 2min in Differentiation solution - check staining on microscope.<br />
7. Dehydrate through 2x3min changes of absolute ethanol.<br />
8. Clear in xylene x2 and mount in DePeX. Allow dry in the fume hood.<br />
Method (for free floating sections, mounted and air-dried)<br />
1. Wash slides briefly in tap water to remove any residual salts.<br />
2. Immerse slides through 2x3min changes of 100% ethanol<br />
3. Defat the tissue: 15min in 100% xylene(2-3 changes as directed), then 10min in 100% ethanol.<br />
4. Rehydrate through alcohol (100% x2) 3min each.<br />
5. Wash in tap water.<br />
6. Follow the protocol for paraffin sections above from step 3.<br />
**The thicker sections require exposure to each solution for longer to allow the diffusion of reagents.<br />
23
Bright field: Neuron Recovery of Neurobiotin/biocytin labeled cells<br />
This procedure details the method for neuron recovery of neurobiotin/biocytin filled neurons. The method<br />
may applied to free-floating or cryostat sectioned fixed tissue.<br />
This technique results in a black insoluble reaction product delineating the filled neuron. Developing the<br />
chromagen is slow and should be monitored microscopically. The reaction is stopped before the<br />
background staining occurs. The labeled sections can then be counter stained and mounted<br />
permanently.<br />
** Risk Assessment: 13382 <strong>QBI</strong> HISTOCHEMISTRY:Neuron Recovery of Neurobiocytin/Biocytin Labeled<br />
Cells.<br />
Hsu, S.-M., Raine, L. and Fanger, H., 1981. Use of avidin-biotin-peroxidase complex (ABC) in<br />
immunoperoxidase techniques. J. Histochem. Cytochem. 29, pp. 577–580.<br />
Hsu, S.M. and Soban, E., 1982. Color modification of diaminobenzidine (DAB) precipitation by metallic<br />
ions and its application for double immunohistochemistry. J. Histochem. Cytochem. 30, pp. 1079–1082.<br />
DW Smith, TA Day, Neurochemical identification of fos-positive neurons using two-colour<br />
immunoperoxidase staining. J Neurosci Methods. 1993 Apr;47(1-2):73-83<br />
Reagents:<br />
- 24 well plate<br />
- Sable brush<br />
- 1XPBS buffer<br />
- PBS Tween Buffer: 0.05% Tween in 1XPBS<br />
- Acetate buffer: 0.1M Sodium acetate trihydrate bring to pH to 6.0 with Glacial Acetic Acid<br />
- NiSO4 solution(0.13M) in Acetate buffer (40g Ni SO4 in 2L of acetate buffer adjust to pH 6.0 with<br />
HCl) - Note: NaOH will produce a precipitate.<br />
- D-glucose<br />
- Ammonium Chloride<br />
- Glucose Oxidase<br />
- 30% H2O2<br />
- Fetal calf serum<br />
- ABC vector elite kit PK6100<br />
- NiSO4/DAB solution (dissolve DAB in approximately 250μl of water before adding to NiSO4/acetate<br />
buffer)<br />
Vol (ml) D-glucose (mg) Ammonium<br />
DAB (mg)<br />
Glucose Oxidase<br />
Chloride (mg)<br />
(μl)<br />
25 50 10 6.25 5<br />
50 100 20 12.5 10<br />
100 200 40 25 20<br />
** DAB is a carcinogen and all powder must be weighed in a fume hood with appropriate PPE.<br />
Disposal and deactivation of excess powder and contaminated washings with dilute bleach<br />
solution prior to disposal into the sink is mandatory.<br />
**Nickel Sulfate must be disposed into the labeled container in the fume hood<br />
24
Method:<br />
1. Collect sections into multi well plate using sable-hair brush.<br />
2. Wash sections well in 3 x 5min of PBS-Tween<br />
3. Oxidise sections in PBS- H2O2 (750μl of 30% H2O2 in 25ml PBS) for 30min (this step quenches the<br />
endogenous peroxidase activity in the tissue.)<br />
4. Wash sections well in 5 x 5min of PBS.<br />
5. Incubate sections in blocking solution (25ml PBS + 0.5ml fetal calf serum) for 1 hour (this step blocks<br />
non-specific protein interactions.)<br />
6. During this time make ABC solution (6μl of part “A” and 6μl of part “B” per ml of solution required) or<br />
as stipulated by the manufacturer. Add total amount of A and B to 1/5 of the final volume of PBS and<br />
stir at room temp for at least 30min. Make up to the final volume with the remaining PBS just prior to<br />
use.<br />
7. Sections are incubated overnight in ABC solution at 4°C on a shaker.<br />
8. Wash sections well in 3 x 10min of PBS<br />
9. Wash sections 5min in acetate buffer<br />
10.Pre-incubate sections for 15min in NiSO4/DAB solution without glucose oxidase.<br />
11.Incubate sections in fresh NiSO4/DAB solution with glucose oxidase. Reaction can take up to 30min.<br />
12.To stop the reaction, wash quickly with acetate buffer.<br />
13.Wash again in acetate buffer for 5min to prevent background staining.<br />
14.Wash 3x5min PBS. An overnight wash can help reduce the background even further.<br />
15.Mount free floating sections onto chrome alum gelatin coated slides and dry.<br />
16.Counterstain, dehydrate, clear and mount in DPX.<br />
25
Bright field: Luxol Fast Blue<br />
This technique is a method requiring over-staining of tissues and differentiation to reveal the myelin. It is<br />
advisable to include a control showing de-myelination pathology to ensure the end point of staining is<br />
reached. Cresyl Fast Violet counter-stain is optional and results in neuronal piliform staining and a<br />
deepening of the myelin blue staining.<br />
Risk Assessment:12863 Cresyl Violet Staining<br />
Risk Assessment:13901 Luxol Fast Blue staining<br />
Materials / Reagents:<br />
- Mounted sections on glass slides<br />
- Slide staining rack, Staining jars, Coplin jar<br />
- Absolute alcohol<br />
- Xylene<br />
- Distilled water.<br />
- DePeX<br />
- Luxol Fast Blue (Fronine: FG080)<br />
- Cresyl Fast Violet 0.2% (Fronine: HH155)<br />
- Lithium Carbonate (Sigma Aldrich: 62470)<br />
- 0.05% Lithium Carbonate(aq)<br />
Method:<br />
1. Heat the staining solution to 60°C in the incubator (this will take 30mins approximately depending on<br />
the volume to be heated.<br />
2. Dewax or defat sections prior to rehydration as necessary. Rinse in tap water.<br />
3. Immerse the slides in the LFB solution and incubate at 60°C for four hours.<br />
4. Rinse off excess stain in distilled water<br />
5. Differentiate slides in Lithium Carbonate for 30 seconds<br />
6. Rinse in distilled water.<br />
7. Check staining microscopically and repeat steps 4 to 5 until myelinated and unmyelinated regions are<br />
defined.<br />
8. Counterstain with Cresyl Fast Violet for 8mins<br />
9. Dehydrate through 95% ethanol and check the Cresyl Fast Violet staining at that point. (70% ethanol<br />
will continue to remove the LFB).<br />
10.Dehydrate through absolute ethanol, clear in xylene and mount in DPX<br />
26
Antigen retrieval: Citrate Buffer<br />
This will be determined by the requirements of the primary antibody and the fixation times used. The processing<br />
method also dictates whether or not antigen retrieval is necessary. Most commonly Citrate buffer and heat are used<br />
too break chemical bonds formed during fixation. Enzyme digestion can also be used but care incubation and timing<br />
is required.<br />
Citrate buffer pH 6<br />
0.01M Citrate Buffer, pH 6.0<br />
Citric acid (anhydrous) ----------------- 1.92 g<br />
Distilled water ----------------------------1000 ml<br />
Adjust pH to 6.0 with 1N NaOH.<br />
Antigen retrieval: free floating sections<br />
1% sodium borohydride in PBS 20 min<br />
Microwaves or pressure cookers can be used for antigen retrieval. Ensure you have enough solution to<br />
keep your slides covered for the incubation period. Do not allow your sections to dry out at any stage<br />
once staining has commenced. Any heating times and temperatures must be tested for your tissue and<br />
antigen of choice<br />
*Microwave ovens vary considerably in their heating capacity and settings. This must be tested by the<br />
user to determine the optimal time and energy level to maintain buffer temperatures between 90 and 100<br />
ºC<br />
Most application need 30 mins gentle boiling so make sure the sections have enough buffer to cover<br />
them for the duration of the retrieval step.<br />
Pressure Cooker:<br />
Pressure and temperature settings need careful calibration for each antibody<br />
Dewaxing Paraffin Sections<br />
Xylene x2 (2-3mins)<br />
Absolute ethanol x2 (2-3mins)<br />
Water wash.<br />
Sections must be free of wax to allow aqueous solutions to penetrate.<br />
Cryostat and free floating sections may need defatting prior to immunhistochemical staining. This must be optimised<br />
by the user.<br />
27
Appendix B: Recipes<br />
Mowiol (aqueous mounting medium for fluorescence and Stereology)<br />
Recommended Anti-Fade for fluorescence microscopy - especially good for EGFP and other low expression<br />
reporting molecules.<br />
Mowiol goes into solution with difficulty. It’s best to make a large batch and freeze aliquots at -20ºC.<br />
Takes about 8 hours to prepare correctly<br />
Prepare in clean 250 ml flask or beaker<br />
1. 24g glycerol (analytical grade)<br />
2. Add 9.6g Mowiol 4-88 (Fluka, #81381 - through Sigma) and stir thoroughly to mix<br />
3. Add 24ml UHP distilled water and leave for 2hr at room temperature<br />
4. Add 48ml 0.2M Tris-HCl buffer, pH8.5<br />
**final volume will be 200 mls<br />
5. Stir with a clean stir bar on a hot plate on warm - heat gently to 50ºC stirring continually - at least 4-5 hours until<br />
the majority of the Mowiol powder goes into solution<br />
6. Aliquot into 50 ml centrifuge tubes, weigh and balance<br />
7. Centrifuge at 5000g for 15 min., there will be a pellet at the base, carefully remove supernatant<br />
8. Aliquot into 15 ml conical tubes - add only 10 mls for expansion<br />
9. Store at -20ºC for 12 months - store at room temperature no more than one month<br />
Note for stereology: if you have sections mounted in DPX - remove the DPX by soaking and washing in<br />
zylene, rehydrate in PBS and Azide as described above (but for 1-2 nights) then mount in Mowiol<br />
8% Paraformaldehyde for Immunofluorescence<br />
1. Add 16g paraformaldehyde to approximately 160ml water in fume hood<br />
2. Heating on setting 4.5 whilst stirring to 50ºC.<br />
3. Once temperature reaches 50ºC, 1M NaOH until the paraformaldehyde is just dissolved<br />
4. Make up to final volume of 200ml with water, pH to 7.2-7.4.<br />
5. Filter with 0.22µm filter.<br />
6. Aliquot in 5ml tubes, label and freeze.<br />
28
2 x PBS<br />
500mls<br />
100mls<br />
NaCl 8.0g 1.6g<br />
KCl 0.2g 0.04g<br />
KH2PO4 0.2g 0.04g<br />
Na2HPO4 1.14g 0.228<br />
add distilled water up to 500ml/100ml and adjust to pH 7.2-7.4<br />
Chrome Alum Gelatin Slide Coating<br />
Reagents:<br />
- 200ml Distilled water<br />
- 0.5g Gelatin<br />
- 0.05g Chromic potassium Sulphate<br />
Method:<br />
1. Microwave briefly to dissolve the gelatin<br />
2. Cool<br />
3. Dip clean slides and allow to drain vertically.<br />
4. Once completely dry pack into Slide boxes in a dust free environment.<br />
**Note: Clean grease-free slides are needed for the slide coating to be effective.<br />
Sodium Citrate Buffer<br />
Sodium Citrate Buffer (10mM Sodium Citrate, 0.05% Tween 20, pH 6.0)<br />
Tri-sodium citrate (dihydrate) 2.94 g<br />
Distilled water 1000 ml<br />
Mix to dissolve. Adjust pH to 6.0 with 1N HCl.<br />
Add 0.5 ml of Tween 20 and mix well. Store at room temperature for 3 months or at 4C for<br />
longer storage.<br />
29
Appendix C: Techniques<br />
<strong>QBI</strong> Stereology : Getting Started<br />
Stereology - Why use it and what can it be used for?<br />
Traditional approaches to counting, such as counting cell profiles, are biased. Furthermore, calculating cell density<br />
in sample regions may not reflect a change in cell number or be representative of the whole tissue.<br />
Stereology can be used to accurately estimate the total number of cells within a region of interest by only<br />
counting ~200-800 cells. This allows you to make statistically valid quantitative comparisons instead of<br />
observing qualitative differences.<br />
It can also be used to determine the size of cells/nuclei whilst counting, the volume of a region of interest, the<br />
length of fibres (e.g. vasculature or neuronal projections), or to analyse three-dimensional cytoarchitecture<br />
(e.g. cell-cell spatial relationships).<br />
It is important to understand stereology is time consuming and should NOT be used as a technique to fish for<br />
results.<br />
Things to remember:<br />
It takes time.<br />
For each sample group a Pilot Study should be conducted<br />
on one animal to determine the best sampling parameters.<br />
A pilot study generally takes 1 whole day / region of<br />
interest. Following on, additional animals should take ~1/2<br />
a day each.<br />
Identify the region you are counting in.<br />
You need to be able to identify the region you want to<br />
count in at all depths throughout the brain. You can use<br />
the mouse brain atlas, or sometimes the cells of that region<br />
will be clustered and drawing a border around them will be<br />
easy. If you can’t accurately identify where you are<br />
counting you may need to reconsider your project - varying<br />
region outlines can cause big variations in cell counts.<br />
Sample the whole region.<br />
You need to have set of sections that spans right from the<br />
beginning of your region of interest to the very end. You do<br />
not need every section - often people use serial sections<br />
e.g. every 6th section.<br />
Missing sections.<br />
It is OK if a section gets damaged and can’t be plated, or<br />
folds up and can’t be imaged - just make a note of it. The<br />
important thing is that you need to know that the section is<br />
missing so that it can be accounted for in the analysis.<br />
Proper stereology will be impossible if there is no record of<br />
missing sections.<br />
Sections need to stay thick.<br />
For stereology it is important to have thick sections, for<br />
this reason we often cut at 40µm or more. These sections<br />
also need to stay thick - if a section shrinks below 20µm<br />
thick then it becomes difficult or impossible to carry out<br />
stereological analysis.<br />
Discuss your project before you start.<br />
Tissue preparation:<br />
Tissue sections should be cut at 40-50µm.<br />
You can cut thicker but you need to make sure the whole<br />
section will be labelled during your staining protocol - often<br />
times if the tissue is too thick the stain or antibodies will<br />
not reach the middle of the section.<br />
Avoid drying the tissue.<br />
Drying the tissue will make it thinner. Ensure you keep your<br />
tissue sections hydrated, avoid processing steps that<br />
involve drying, ethanol or xylene, If a section needs to be<br />
dried you can rehydrate overnight in PBS+azide.<br />
Mount sections in an aqueous solution.<br />
This is usually done for fluorescent samples but DPX is<br />
often used for brightfield. DPX can make sections very thin,<br />
especially if xylene has been used in the protocol. For<br />
brightfield sections use Mowiol instead of DPX.<br />
For Best Results<br />
1. Use SuperFrost Plus slides<br />
2. Use 22 x 50mm coverslips<br />
seal onto slide with clear nailpolish<br />
3. Use mowiol mounting media<br />
if mounting brightfield sections<br />
4. Cut sections at 40-50µm<br />
avoid drying out and dehydration<br />
4. Keep tissue away from the<br />
end of the slide and the<br />
coverslip edges<br />
5. Keep tissue within the blue<br />
rectangle (brightfield only)<br />
Thursday, 21 July 2011<br />
30
<strong>QBI</strong> Slide Scanners<br />
What can they be used for?<br />
Digital archiving and high through-put imaging - the slide scanners can be used in an automated way to<br />
digitally archive slides at full resolution or scan large quantities of tissue sections for further analysis. Each system<br />
can handle 80 slides per run.<br />
High-resolution scanning - the slide scanners can be controlled manually to image one, or a few tissue sections<br />
at high resolution very quickly - this is an alternative to using MosaiX on the standard <strong>QBI</strong> microscopes and allows<br />
much higher magnification in a fraction of the time.<br />
Fluorescence imaging - fluorescence scanning from 10x to 63x magnification is also available. This can be used<br />
for imaging cells, neurospheres or tissue sections and can allow 3-dimensional reconstructions and advanced<br />
analysis using Imaris. <strong>QBI</strong>’s fluorescence scanning capabilities are state-of-the-art and capable of undertaking high<br />
through-put and high resolution analysis projects yet to be developed in other institutes around the world.<br />
Brightfield Scanning:<br />
Scanning individual sections usually takes under a<br />
minute. Details for two of the most common high<br />
through-put scanning options are below:<br />
20x Standard Colour Scan (full slide)<br />
10 - 25 minutes per slide<br />
~8-16GB full resolution image (1-4GB compressed)<br />
10x High-Resolution Colour Scan (full slide)<br />
3 - 10 minutes per slide<br />
~1-3GB full resolution image<br />
(high-resolution scanning uses a monochrome camera and<br />
takes 3 seperate images using red, green and blue lights)<br />
Slides are typically saved in *.IMS format and can be<br />
opened and cropped in Imaris or MetaViewer. However<br />
they can be saved in TIF or JPG format.<br />
Fluorescence Scanning:<br />
Scan times vary considerably depending on the type<br />
of project. Slides can be scanned as a single plane or<br />
complete Z-stacks can be captured:<br />
20x Single Channel Scan (full slide)<br />
10 - 25 minutes per slide<br />
~1-4GB full resolution image<br />
20 x Three Channel Scan (full slide)<br />
1 - 2 hours per slide<br />
~8-16GB full resolution image<br />
40 x Three Channel Scan / 60 slice z-stack<br />
1 - 2 hours per section<br />
~8-10GB full resolution image<br />
For Best Results<br />
Use SuperFrost Plus slides<br />
Use 24 x 60mm coverslips<br />
(keep the coverslip away from the end of the slide)<br />
Use DPX mounting for brightfield slides<br />
(avoid bubbles)<br />
When possible, use DAPI as a counter<br />
stain for fluorescence<br />
Ensure some tissue / cells are positioned<br />
in the lower left corner (black dot)<br />
SuperFrost<br />
Keep tissue away from the end of the<br />
slide and the coverslip edges<br />
(within the blue rectangle)<br />
Friday, 22 July 2011<br />
31