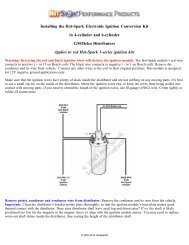
Installing The Hot-Spark SVDA034 Distributor With 3BOS4U1
Installing The Hot-Spark SVDA034 Distributor With 3BOS4U1
Installing The Hot-Spark SVDA034 Distributor With 3BOS4U1

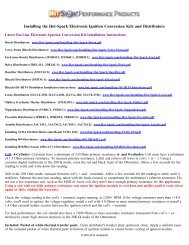
You also want an ePaper? Increase the reach of your titles
YUMPU automatically turns print PDFs into web optimized ePapers that Google loves.
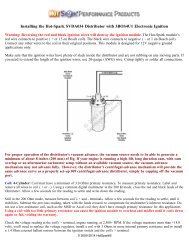
For best performance, the coil should also have 7,000 Ohms or more secondary resistance (measured from coil’s + or –<br />
terminal to center high tension terminal, in the 20K Ω mode of the Ohmmeter).<br />
Test the charging system's maximum voltage: If the charging system voltage, measured at the coil's positive<br />
terminal, is more than 14.2 volts at 2,500+ RPM, the voltage regulator likely needs replacing. Too much voltage can<br />
damage the ignition module and other electronic components.<br />
Test Battery Voltage to Coil: <strong>With</strong> ignition switch ON, engine not running, check voltage at coil’s + terminal. <strong>The</strong><br />
voltmeter should read somewhere around +11 to +13 volts. If voltage is too low or there’s no reading, the battery’s<br />
terminals or ground connection may be corroded and need cleaning or the battery may need charging. Some vehicles<br />
have a resistor wire running from the ignition switch to the coil’s + terminal. If this resistor wire drops the voltage<br />
below 9 volts or so, you may need to run a non-resistor wire from the ignition switch to the coil’s + terminal or run a<br />
+12V wire directly from the ignition switch to the red <strong>Hot</strong>-<strong>Spark</strong> ignition wire. Make sure that the ignition switch<br />
terminal to which you connect this wire has power only when the ignition switch is in the ON position. Or, you can,<br />
for temporary testing purposes only, run a wire directly from the battery's + terminal to the coil's + terminal, the <strong>Hot</strong><br />
<strong>Spark</strong> ignition's red wire to the coil's + terminal and the black <strong>Hot</strong>-<strong>Spark</strong> wire to the coil's - terminal. Do not leave the<br />
wire from the battery connected to the coil's + terminal for more than a minute or so without the engine running.<br />
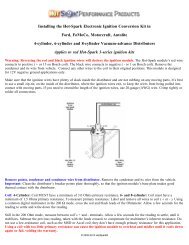
Can use these standard Bosch replacement parts:<br />
Rotor: 04 033<br />
<strong>Distributor</strong> Cap: 03 010<br />
Vacuum Can: 07 059<br />
Compatible Carburetors: <strong>The</strong> following carburetors should produce the proper amount of vacuum for use with the<br />
SVDA 034 distributor (if they are fitted with a vacuum port):<br />
Weber DFAV or DFEV<br />
Solex 30PICT-3<br />
Bocar 30/31<br />
Single or dual IDF<br />
DRLA<br />
ICT<br />
Solex 30/31<br />
1972-1974 VW bus with dual carburetors<br />
Kadron<br />
Solex 34PICT series<br />
If your car has Kadron or ICT carbs, connect the vacuum hose to at least one carburetor. If your car has dual IDF or<br />
DRLA carbs, run a vacuum hose to both carburetors, "T" them together and then run the vacuum hose to the SVDA<br />
034's vacuum port.<br />
If your '71 VW Bus or '71-'74 VW Beetle/Ghia/Thing has the original dual-vacuum distributor and you replace it with<br />
the SVDA 034, you'll need to plug (cap off) the carburetor's retard vacuum port, which is the port located closest to<br />
you as you're looking at the carburetor from the rear of the car. Use the advance vacuum port, located on the left side<br />
of the 34PICT carburetor.<br />
This distributor requires a 12-volt, negative ground electrical system.<br />
Make sure that engine oil level is on the full mark before revving engine!<br />
Finding Top Dead Center on a VW Type I engine: http://www.vw-resource.com/find_tdc.html#pulley<br />
© 2005-2014 <strong>Hot</strong><strong>Spark</strong>®