Seko Laundry Smart Instructi.. - UK
Seko Laundry Smart Instructi.. - UK
Seko Laundry Smart Instructi.. - UK

You also want an ePaper? Increase the reach of your titles
YUMPU automatically turns print PDFs into web optimized ePapers that Google loves.
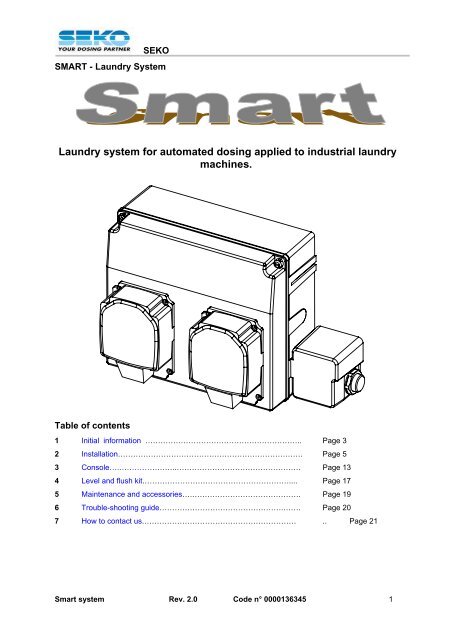
SEKO<br />
SMART - <strong>Laundry</strong> System<br />
<strong>Laundry</strong> system for automated dosing applied to industrial laundry<br />
machines.<br />
Table of contents<br />
1 Initial information …………………………………………………….. Page 3<br />
2 Installation………………………………………………………………. Page 5<br />
3 Console….…………………..…………………………………………. Page 13<br />
4 Level and flush kit.………………………………………………….... Page 17<br />
5 Maintenance and accessories….……………………………………. Page 19<br />
6 Trouble-shooting guide………………………………………….……. Page 20<br />
7 How to contact us.…………………………………………………… .. Page 21<br />
<strong>Smart</strong> system Rev. 2.0 Code n° 0000136345 1
SEKO<br />
SMART - <strong>Laundry</strong> System<br />
1<br />
Preliminary<br />
information<br />
• Welcome<br />
• Contents of<br />
the package<br />
• Technical<br />
specifications<br />
• Warnings<br />
• Material<br />
required for<br />
installation<br />
Assembly drawing of the <strong>Smart</strong> System<br />
9<br />
1<br />
2<br />
3<br />
4<br />
2<br />
Installation<br />
3<br />
Console<br />
8<br />
7<br />
6<br />
5<br />
4<br />
Level and flush kit<br />
10<br />
11<br />
12<br />
5<br />
Maintenance and<br />
accessories<br />
6<br />
Trouble-shooting<br />
guide<br />
7<br />
How to contact us<br />
1 <strong>Smart</strong> boxes<br />
2 Delivery tube 20 Bar (only for “PLUS” configuration)<br />
3 Water-faucet for water delivery (only for “PLUS” configuration)<br />
4 Delivery solenoid valve (24 VDC) (only for “PLUS” configuration)<br />
5 Solenoid valve filter<br />
6 Flush kit (only for “PLUS” configuration)<br />
7 Peristaltic pump<br />
8 Peristaltic tube<br />
9 Suction device (optional)<br />
10 Control console<br />
11 Programmer (optional)<br />
12 Level monitoring device (optional)<br />
<strong>Smart</strong> system Rev. 2.0 Code n° 0000136345 2
SEKO<br />
SMART - <strong>Laundry</strong> System<br />
1<br />
Preliminary<br />
information<br />
• Welcome<br />
• Contents of<br />
the package<br />
• Technical<br />
specifications<br />
• Warnings<br />
• Material<br />
required for<br />
installation<br />
1 Preliminary information…<br />
1.1 Welcome<br />
Thank you for purchasing a <strong>Seko</strong> product.<br />
With the <strong>Smart</strong> system for industrial laundry machines, our company supplies a high-quality<br />
product suitable for all applications. It is simple to use thanks to linear programming of the<br />
washing cycles and to the user-friendly way in which the programs are selected.<br />
Pay special attention to the warnings and to the precautions pointed out in the<br />
manual.<br />
2<br />
Installation<br />
3<br />
Console<br />
4<br />
Level and flush kit<br />
5<br />
Maintenance and<br />
accessories<br />
6<br />
Trouble-shooting<br />
guide<br />
7<br />
How to contact us<br />
1.2 Contents of the package<br />
Before starting, check the contents of the package:<br />
SMART BASIC<br />
SMART PLUS<br />
SMART System without flush kit (pump unit and control SMART System with flush kit (pump unit and control<br />
console with 5 m of cable)<br />
console with 5 m of cable)<br />
2 off anti-tampering seals 2 off anti-tampering seals<br />
<strong>Instructi</strong>on manual and adhesive sheet for programs<br />
4 off anchor bolts ∅=6 mm, 2 off brackets for securing<br />
<strong>Instructi</strong>on manual and adhesive sheet for programs<br />
the pump unit in place<br />
15 off plastic clamps for the hydraulic connections<br />
Adhesive Velcro strip for securing the control console in<br />
15 off plastic clamps for the hydraulic connections<br />
place<br />
Adhesive Velcro strip for securing the control console<br />
Tube fitting ∅16mm for output from flush kit<br />
in place<br />
5m of 14-wire cable (for connection of the power-supply<br />
5m of 14-wire cable (for connection of the powersupply<br />
and signals coming from the laundry machine).<br />
1 off <strong>Seko</strong>bril tube for Surfactants 2 off Memory Cards<br />
1 off Memory Cards<br />
and signals coming from the laundry machine).<br />
water-intake kit: water-faucet, delivery tube 2 m F3/4-<br />
F3/4 (optional 3-4-5 m).<br />
1 off <strong>Seko</strong>bril tube for Surfactants<br />
Technical specifications<br />
Power-supply requirements 85-230 Vac switching (mod. H) 115/208/230 Vac linear (mod. P)<br />
Maximum current absorption 100W (mod. H) 30W (mod. P)<br />
Flow rate of pumps 30/60/90/120 L/h (mod. H) 18 L/h (mod. P)<br />
Voltage on inputs<br />
20-230 Vac or 150-230Vac, selectable JP1 to JP6<br />
Number of inputs<br />
6, opto-insulated. Input n° 6 also counts the number of deliveries<br />
Class of protection IP 65 (<strong>Smart</strong> inox: IP 40<br />
Alarm output (optional) Relay-type contact NC in an alarm condition, 250V 8A max<br />
<strong>Smart</strong> system Rev. 2.0 Code n° 0000136345 3
SEKO<br />
SMART - <strong>Laundry</strong> System<br />
1<br />
Preliminary<br />
information<br />
• Welcome<br />
• Contents of<br />
the package<br />
• Technical<br />
specifications<br />
• Warnings<br />
• Material<br />
required for<br />
installation<br />
1.4 Warnings<br />
Read this manual carefully before proceeding with the installation and starting up<br />
the SMART System.<br />
The dosing unit should be connected to the power supply by means of a single-pole<br />
breaker having an opening distance equal to or greater than 3 mm.<br />
Check the model of the equipment purchased for the reference information<br />
contained in this manual for installing, setting and programming it.<br />
2<br />
Installation<br />
3<br />
Console<br />
4<br />
Level and flush kit<br />
For all connections, refer to the diagram of the control circuit contained in this<br />
manual.<br />
CAUTION: Always follow the appropriate safety procedures, including the use of<br />
suitable means for protecting the eyes, face, hands and clothing.<br />
CAUTION: Always disconnect the equipment from the power supply before carrying<br />
out the installation or any maintenance work on it.<br />
<strong>Seko</strong> is working constantly to improve all its products, and reserves the right to<br />
make changes at any time without prior notice.<br />
5<br />
Maintenance and<br />
accessories<br />
6<br />
Trouble-shooting<br />
guide<br />
7<br />
How to contact us<br />
Failure to comply with the instructions contained in this manual could cause<br />
damage to property or personal injury, prejudice proper functioning of the<br />
equipment or damage it.<br />
1.5 Material required for installation<br />
• SMART programmer<br />
• Plastic clamps of various sizes for securing the tubes and cables in place<br />
• Adhesive plates for securing the clamps<br />
• Graduated container, recommended size 250 ml (for calibrating the pumps)<br />
• PVC tube (for connecting the flush kit to the laundry machine)<br />
Other installation material is also available (see chapter 5, Maintenance and Accessories).<br />
<strong>Smart</strong> system Rev. 2.0 Code n° 0000136345 4
SEKO<br />
SMART - <strong>Laundry</strong> System<br />
1<br />
Preliminary<br />
information<br />
2<br />
Installation<br />
• Wall<br />
mounting<br />
• Diagrams:<br />
control and<br />
power-supply<br />
circuits<br />
• Wiring<br />
connections<br />
• Selection of<br />
flow rate of<br />
the pumps<br />
• Hydraulic<br />
connections<br />
• Antitampering<br />
seal<br />
3<br />
Console<br />
4<br />
Level and flush kit<br />
2 Installation<br />
CAUTION: Do not install the equipment where it would be directly exposed to<br />
chemical vapours or fumes. DO not place it close to the sources of heat.<br />
2.1 Wall mounting<br />
• Use the diagram shown below to define the distance between centres for drilling the<br />
holes, depending on the total length of the boxes.<br />
• It is advisable to install the system at a height of about 1.5 metres from the ground, and<br />
in any case in the vicinity of the tanks.<br />
• Fix the mounting brackets to the wall by means of the anchor bolts ∅=6 mm (Picture<br />
1).<br />
• After securing the brackets in place, hang the SMART System from them, as shown in<br />
the Picture (Picture 2).<br />
65 mm<br />
i<br />
Long box L=375mm Short box L=285mm<br />
Key to distance between centers for drilling the holes<br />
1 long box…………………………….. i= 190 mm<br />
1 long box + 1 short box…………… i= 425 mm<br />
2 long boxes………………………….. i= 564 mm<br />
2 short boxes ……...……………… i= 285 mm<br />
1 long box + 2 short boxes………… i= 659.5 mm<br />
Take care to secure the brackets to the wall correctly, since any errors in centring<br />
them would make it difficult to mount the SMART equipment.<br />
5<br />
Maintenance and<br />
accessories<br />
Picture 1 Picture 2<br />
6<br />
Trouble-shooting<br />
guide<br />
7<br />
How to contact us<br />
If the surface of the wall is not perfectly flat, making it difficult to mount the brackets,<br />
it is possible to secure the box directly to the wall, drill through the breaking lines inside<br />
each box and fix the box to the wall using anchor bolts ∅=6 mm. In order to not<br />
prejudice the IP protection degree, it is advisable to apply silicone to the screws inside<br />
the box.<br />
<strong>Smart</strong> system Rev. 2.0 Code n° 0000136345 5
SEKO<br />
SMART - <strong>Laundry</strong> System<br />
1<br />
Preliminary<br />
information<br />
2.2.1 Control circuit diagram<br />
3<br />
2<br />
Installation<br />
• Wall<br />
mounting<br />
• Diagrams:<br />
control and<br />
powersupply<br />
circuits<br />
• Wiring<br />
connections<br />
• Selection of<br />
flow rate of<br />
the pumps<br />
• Hydraulic<br />
connections<br />
• Antitampering<br />
seal<br />
2<br />
3<br />
Console<br />
WHITE<br />
GREEN<br />
BROWN<br />
1<br />
4<br />
Level and flush kit<br />
5<br />
Maintenance and<br />
accessories<br />
6<br />
Trouble-shooting<br />
guide<br />
7<br />
How to contact us<br />
Alarm Output for level alarm (optional)<br />
Level Input for 7-level monitoring device<br />
Flow<br />
Input for flushing control<br />
IN 1…..IN 6 Signal inputs: 20Vac - 230Vac or 160Vac - 230Vac<br />
JP1…..JP6 Selection of input voltage: (IN1-IN6) 20Vac - 230 Vac 160Vac - 230Vac<br />
1 Relay for level alarm output (optional)<br />
2 Buzzer<br />
3 Control console input<br />
Pumps 1…7 Voltage output for pumps<br />
J1 and J2 Connected to the power-supply unit<br />
In Vac ref. J12 Do not use<br />
<strong>Smart</strong> system Rev. 2.0 Code n° 0000136345 6
SEKO<br />
SMART - <strong>Laundry</strong> System<br />
1<br />
Preliminary<br />
information<br />
2.2.2 Power-supply unit circuit diagram<br />
Linear power-supply unit (mod. SMART P) Switching power-supply unit (mod. SMART H)<br />
2<br />
Installation<br />
• Wall<br />
mounting<br />
• Diagrams:<br />
control and<br />
powersupply<br />
circuits<br />
• Wiring<br />
connections<br />
• Selection of<br />
flow rate of<br />
the pumps<br />
• Hydraulic<br />
connections<br />
• Antitampering<br />
seal<br />
3<br />
Console<br />
4<br />
Level and flush kit<br />
5<br />
Maintenance and<br />
accessories<br />
IN POWER J2<br />
6<br />
Trouble-shooting<br />
guide<br />
IN POWER M5<br />
7<br />
How to contact us<br />
<strong>Smart</strong> system Rev. 2.0 Code n° 0000136345 7
SEKO<br />
SMART - <strong>Laundry</strong> System<br />
1<br />
Preliminary<br />
information<br />
2<br />
Installation<br />
• Wall<br />
mounting<br />
• Diagrams:<br />
control and<br />
power-supply<br />
circuits<br />
• Wiring<br />
connections<br />
• Selection of<br />
flow rate of<br />
the pumps<br />
• Hydraulic<br />
connections<br />
• Antitampering<br />
seal<br />
3<br />
Console<br />
4<br />
Level and flush kit<br />
5<br />
Maintenance and<br />
accessories<br />
6<br />
Trouble-shooting<br />
guide<br />
2.3 Wiring connections<br />
CAUTION: Always disconnect the SMART System and the laundry machine from the<br />
power supply before making any connections.<br />
All the wiring connections to the SMART System should be checked using a<br />
multimeter. Incorrect connections could seriously damage the unit and invalidate the<br />
warranty. Refer to the wiring diagram contained in this manual for all signalling and<br />
power-supply connections.<br />
2.3.1 Power-supply input<br />
Insert the 14-wire cable included in the supply (2x1.5 mm 2 +12x0.25 mm 2 ) through the cable<br />
gland PG11 on the left-hand side of the box and make the connections of the wires, ∅1.5 mm 2 ,<br />
on the Power-supply input of the power-supply unit circuit (see point 2.2.2, Diagram of<br />
power-supply unit circuit).<br />
• SMART P LINEAR POWER-SUPPLY UNIT (refer to the specific model purchased).<br />
Position the jumper on the required input voltage, 115/208/230 VAC, 50/60 Hz (Picture 3).<br />
The SMART System is factory set on 230 VAC.<br />
Picture 3<br />
• •<br />
• SMART S or H SWITCHING POWER-SUPPLY UNIT (refer to the specific model purchased).<br />
There is no need to make any selections, since the system will accept power-supply voltages<br />
from 85 to 230 VAC, 50/60 HZ.<br />
2.3.2 Input signals<br />
• •<br />
• •<br />
Default setting<br />
• Connect the wires, ∅0.25 mm 2 , of the 14-wire cable to the solenoid valves of the laundry<br />
machine.<br />
• Observing the colour coding used, connect the outputs from the solenoid valves to inputs IN1<br />
to IN6 of the control circuit. Use the jumper to select the voltage recognised by the inputs.<br />
If you wish to carry out operations controlled by the emptying solenoid valve of the<br />
laundry machine, use input IN6 on the control circuit.<br />
7<br />
How to contact us<br />
Jumpers<br />
(JP1 to JP6 on the circuit board) select the input range that is accepted on<br />
IN1 to IN6 (Picture 4)<br />
This selection can be useful when there is a parasitic current that the system could<br />
recognise as a signal, even with the solenoid valve not activated.<br />
Default setting<br />
Picture 4<br />
20÷230 V<br />
160÷230 V<br />
<strong>Smart</strong> system Rev. 2.0 Code n° 0000136345 8
SEKO<br />
SMART - <strong>Laundry</strong> System<br />
1<br />
Preliminary<br />
information<br />
2<br />
Installation<br />
• Wall<br />
mounting<br />
• Diagrams:<br />
control and<br />
power-supply<br />
circuits<br />
• Wiring<br />
connections<br />
• Selection of<br />
flow rate of<br />
the pumps<br />
• Hydraulic<br />
connections<br />
• Antitampering<br />
seal<br />
3<br />
Console<br />
4<br />
Level and flush kit<br />
5<br />
Maintenance and<br />
accessories<br />
2.3.3 Connection of level control (optional)<br />
• Run the cable ∅3x0,25mm (included) into the PG7 cable hold positioned on the left of<br />
the <strong>Smart</strong> box. Tighten the cable gland so as to ensure that the class of protection is<br />
maintained.<br />
• Connect the cable of the level control to input J14 LEVEL respecting the colours.<br />
• Refer to the section on the Level control for making the connection and for a<br />
description<br />
2.3.4 Connecting the Console<br />
• Remove the nut securing the cable gland (already fitted onto the cable), then pass the<br />
cable through the free hole on the left-hand side of the <strong>Smart</strong> box. Secure the cable<br />
gland to the box with the nut provided for this purpose. Tighten the cable gland in order<br />
to ensure proper sealing according to the class of protection.<br />
• Connect the cable with the telephone plug to the connector marked Console (see point<br />
2.2.1, ref. n° 3.<br />
• For description and operation, see the Console section in this manual.<br />
2.3.5 Alarm output (upon request)<br />
• Make a connection to output J13 ALARM.<br />
• In the event of an alarm, the relay-type contact will close to activate of an external<br />
acoustic signal and/or signalling lamp.<br />
CAUTION: The maximum rating of the relay is 250 VAC 8A.<br />
2.3.6 Flushing alarm (optional)<br />
• This is already connected to output J21 FLOW by means of the cable coming from the<br />
sensor positioned on the flush kit.<br />
• Refer to the section on the Flushing alarm for operation and for further description.<br />
• If the system has no sensor for detecting the flow, there will be a jumper on input J21.<br />
• If a flow-monitoring device is connected at a later time, follow the installation<br />
instructions provided with the flow-detection sensor kit.<br />
2.3.7 Existing connections<br />
6<br />
Trouble-shooting<br />
guide<br />
• P1 to P7<br />
• Sol<br />
voltage output for power-supply to pumps (control circuit).<br />
24 VDC voltage output for power-supply to solenoid valve (powersupply<br />
unit circuit).<br />
7<br />
How to contact us<br />
<strong>Smart</strong> system Rev. 2.0 Code n° 0000136345 9
SEKO<br />
SMART - <strong>Laundry</strong> System<br />
1<br />
Preliminary<br />
information<br />
2.4 Selection of the flow rate of the pumps (mod. <strong>Smart</strong> H only)<br />
In order to optimise the dosing function, on the SMART model H it is possible to select the<br />
speed of the motors and therefore the flow rate of the pumps. (Picture 5)<br />
2<br />
Installation<br />
• Wall<br />
mounting<br />
• Diagrams:<br />
control and<br />
power-supply<br />
circuits<br />
• Wiring<br />
connections<br />
• Selection of<br />
flow rate of<br />
the pumps<br />
• Hydraulic<br />
connections<br />
• Antitampering<br />
seal<br />
• SMART H (PLUS and BASIC) It is possible to select 30/60/90/120 l/hr<br />
3<br />
Console<br />
Select the flow rate (expressed<br />
in L/h) just moving the jumper on<br />
the motor circuit board<br />
4<br />
Level and flush kit<br />
5<br />
Maintenance and<br />
accessories<br />
<strong>Smart</strong> H systems are factory set with 60 L/h of flow rate.<br />
6<br />
Trouble-shooting<br />
guide<br />
Select the flow rate of the pumps taking the dosing times into consideration.<br />
Example: A typical dosing time of 20 seconds selecting a pumping rate of 60 l/hr<br />
would become 40 seconds if a pump in rate of 30 l/hr were selected.<br />
7<br />
How to contact us<br />
The P (PLUS and BASIC) version of the SMART System uses pumps with a fixed 18<br />
l/hr flow rate.<br />
<strong>Smart</strong> system Rev. 2.0 Code n° 0000136345 10
SEKO<br />
SMART - <strong>Laundry</strong> System<br />
1<br />
Preliminary<br />
information<br />
2<br />
Installation<br />
• Wall<br />
mounting<br />
• Diagrams:<br />
control and<br />
power-supply<br />
circuits<br />
• Wiring<br />
connections<br />
• Selection of<br />
flow rate of<br />
the pumps<br />
• Hydraulic<br />
connections<br />
• Antitampering<br />
seal<br />
2.5 Hydraulic connections<br />
2.5.1 Water-faucet (if there is one)<br />
• Make the connection to the water main (cold water) by means of the water-faucet included in<br />
the supply, as shown in the diagram (Picture 6).<br />
WATER MAIN<br />
Picture 6<br />
LAUNDRY<br />
MACHINE<br />
SMART SYSTEM<br />
CAUTION: Look over the connections shown in the Picture. If the connections are<br />
made correctly, the valve will only control the flow rate of the water to the SMART<br />
System. Delivery to the laundry machine will continue to be direct.<br />
3<br />
Console<br />
4<br />
Level and flush kit<br />
5<br />
Maintenance and<br />
accessories<br />
6<br />
Trouble-shooting<br />
guide<br />
It is recommended to install the water-faucet included in the supply close to the<br />
main water-faucet. This will enable a good flow rate of water to the SMART System<br />
even in the event of a low of pressure.<br />
• Connect the delivery tube included in the supply (on “Plus” version only) from the output of<br />
the water-faucet to the solenoid valve of the SMART System.<br />
• Delivery tubes of other lengths are also available (see the section on Maintenance and<br />
Accessories).<br />
2.5.2 Flush kit (if there is one)<br />
The flush kit factory-mounted under the SMART System. It is, however, possible to install it<br />
separately, even in a vertical position, by means of the appropriate kit (see the section on<br />
Maintenance and Accessories).<br />
The <strong>Seko</strong> flush kit is equipped with a valve for preventing return of the liquids, both towards the<br />
pumps and towards the solenoid valve.<br />
• Connect the output end of the flush kit to the laundry machine by means of a tube with<br />
∅=8mm (it is also possible to make the connection with a tube with ∅ 16 mm, replacing<br />
the hose fitting with another provided as a kit, included in the supply). (Picture7).<br />
Size of the output fitting from the flush kit, which can change depending on the models.<br />
7<br />
How to contact us<br />
To the laundry machine<br />
Max 1,5 bar<br />
Picture 7<br />
The tubes from the flush kit to the pumps are not factory connected to allow pumps<br />
calibration. Once terminated this operation (programmer manual par. 4.1.1) connect<br />
the tubes to the pumps.<br />
<strong>Smart</strong> system Rev. 2.0 Code n° 0000136345 11
SEKO<br />
SMART - <strong>Laundry</strong> System<br />
1<br />
Preliminary<br />
information<br />
2<br />
Installation<br />
• Wall<br />
mounting<br />
• Diagrams:<br />
control and<br />
power-supply<br />
circuits<br />
• Wiring<br />
connections<br />
• Selection of<br />
flow rate of<br />
the pumps<br />
• Hydraulic<br />
connections<br />
• Antitampering<br />
seal<br />
2.5.3 Suction Devices (if supplied)<br />
<strong>Seko</strong> suction devices are equipped with check valves and adapters for securing them to most<br />
types of tank available on the market.<br />
• Introduce the suction devices into the tanks (Picture 8) and connect them by means of<br />
tubes to their respective pumps. Tighten the tubes with the metal tube clamps included<br />
in the supply.<br />
• Connect the cables (if any) of the suction devices to the level control box (see section<br />
about Level Control).<br />
To the pump<br />
To the level control box<br />
Picture 8<br />
3<br />
Console<br />
Type<br />
Bottom<br />
filter<br />
Size (mm)<br />
length x diam.<br />
Leveldetector<br />
probe<br />
Suction<br />
device/can<br />
adapter<br />
Standard<br />
check<br />
valve<br />
Available check<br />
valve (optional)<br />
4<br />
Level and flush kit<br />
5<br />
Maintenance and<br />
accessories<br />
6<br />
Trouble-shooting<br />
guide<br />
7<br />
How to contact us<br />
<strong>Smart</strong> Plus Yes 450x34 Yes Yes FPM EPDM<br />
<strong>Smart</strong> Basic Yes 450x34 No Yes FPM EPDM<br />
Take care to not leave the suction tube bent.<br />
Introduce the suction device right to the bottom and fix it in place using the relevant<br />
tank adapter so as to prevent it from floating.<br />
Clean the bottom filter of the suction device whenever a tank containing the product<br />
is changed.<br />
2.6 Anti-tampering seal<br />
SMART System boxes are equipped with rings for inserting an anti-tampering seal.<br />
• <strong>Smart</strong> BOXES: close the boxes and insert the seal through the two rings provided for<br />
this purpose.<br />
• <strong>Smart</strong> CONSOLE: insert the memory card into the console and pass the seal through<br />
the hole provided in the card for this purpose and then through the ring on the console<br />
box.<br />
Once the seal has been closed it cannot be re-opened. It will have to be cut open and<br />
a new one will then have to be used. Seals are included in the supply as accessories<br />
(see the section about Maintenance and Accessories).<br />
<strong>Smart</strong> system Rev. 2.0 Code n° 0000136345 12
SEKO<br />
SMART - <strong>Laundry</strong> System<br />
1<br />
Preliminary<br />
information<br />
3 Console<br />
2<br />
Installation<br />
3<br />
Console<br />
• Technical<br />
specification<br />
s<br />
• Description<br />
of the<br />
operations<br />
• Main controls<br />
• Additional<br />
controls<br />
4<br />
Level and flush kit<br />
5<br />
Maintenance and<br />
accessories<br />
6<br />
Trouble-shooting<br />
guide<br />
7<br />
How to contact us<br />
3.1 Technical specifications<br />
Power-supply requirements Low voltage supplied from the central unit<br />
Signal interface<br />
Proprietary serial interface<br />
Length of connecting cables 5 metres<br />
Connector<br />
6-6 telephone type<br />
Weight<br />
0.18 Kg<br />
Class of protection IP 65<br />
Size 90x123x30 mm (HxLxD)<br />
3.2 Description of the operations<br />
3.2.1 SELECTION OF THE WASHING PROGRAMS IN THE MANUAL MODE<br />
(for selecting the washing program to be run)<br />
• Switching on the system, the console display shows --<br />
• Press [SEL] to select the number of the program to be run;<br />
• Press [START] to start washing (The “Programs” led is flashing)by entering the RUN<br />
PROGRAM mode. If the program that has been selected is empty, it cannot be started<br />
and the console display shows --.<br />
3.2.2 SELECTION OF THE WASHING PROGRAMS IN THE AUTOWASH MODE<br />
(to select the washing programs in the automatic mode)<br />
• Switching on the system, the console display shows AU;<br />
• The SMART System will wait for one or more input signals IN1 to 6 to be activated in<br />
order to start the program to be run;<br />
• When a program is activated, the number of that program will be displayed on the<br />
console and the PROGRAMS LED will flash.<br />
• If the program that has been selected is empty, the washingprogram will not start and<br />
the display on the console will show AU.<br />
<strong>Smart</strong> system Rev. 2.0 Code n° 0000136345 13
SEKO<br />
SMART - <strong>Laundry</strong> System<br />
1<br />
Preliminary<br />
information<br />
2<br />
Installation<br />
3<br />
Console<br />
• Technical<br />
specifications<br />
• Description<br />
of the<br />
operations<br />
• Main controls<br />
• Additional<br />
controls<br />
4<br />
Level and flush kit<br />
5<br />
Maintenance and<br />
accessories<br />
6<br />
Trouble-shooting<br />
guide<br />
7<br />
How to contact us<br />
3.2.3 PAUSE THE RUNNING PROGRAM<br />
(while in the RUN PROGRAM mode)<br />
• While the washing program is running, to introduce a pause into the system press<br />
[STOP]: the system will enter the PAUSE mode (“Programs” and “Pause” leds are<br />
steady light).<br />
• Press [START] to resume the washing program from the point where it was stopped<br />
and therefore to return to the RUN PROGRAM mode.<br />
3.2.4 TERMINATION OF THE PROGRAM BEING RUN<br />
(while in the RUN PROGRAM mode or during a PAUSE)<br />
• Press the [STOP] key and hold it down for more than three seconds to terminate the<br />
washing program and exit. The display will show:<br />
a) - - if the system was in the manual mode.<br />
b) AU if the system was in the autowash mode.<br />
The system will then return to the SELECT PROGRAM function.<br />
3.2.5 PRIMING THE PUMPS<br />
[In this mode, it is possible to activate a pump (the number of the pump will appear on<br />
the display) for periods of 30 seconds. The purpose of this is to prime the pump in<br />
question].<br />
During the priming, the solenoid valve will open, if it is set in the automatic mode (see<br />
Programmer manual par.4.1) and water will enter in the laundry machine through the flush kit.<br />
The solenoid valve will remains open for a few seconds even after priming has been completed,<br />
in order to clean the flush kit.<br />
• Press the [STOP] key and hold it down more than 3 seconds until the indication “P1”<br />
appears on the display.<br />
• Use the [SEL] key to select the pump to be primed.<br />
• Press [START] to start the priming (this lasts for 30 seconds). It is possible to stop the<br />
priming stage by pressing the [STOP] key;<br />
• If the pump is still not primed, repeat point 3;<br />
• To prime the other pumps, repeat the sequence as shown under points 2 to 5.<br />
3.2.6 DIAGNOSTIC MODE<br />
(while in the RUN PROGRAM mode)<br />
This procedure enables the instruction line of the program currently running to be displayed<br />
and, if required, changed.<br />
• Set the system in the Pause mode by pressing the [STOP] key (PAUSE LED lights on);<br />
• Press the [SEL] and [STOP] keys: the DIAGNOSTIC MODE is accessed (“Programs”<br />
and “Pause” leds are flashing) and the number of the program line currently running will<br />
be shown on the display;<br />
• The [SEL] key can be pressed to scroll cyclically through the program lines;<br />
• Press the [STOP] key to resume the program from the last line that has been selected.<br />
<strong>Smart</strong> system Rev. 2.0 Code n° 0000136345 14
SEKO<br />
SMART - <strong>Laundry</strong> System<br />
1<br />
Preliminary<br />
information<br />
3.3 Main controls<br />
MODE KEY ACTION FUNCTION<br />
2<br />
Installation<br />
3<br />
Console<br />
• Technical<br />
specifications<br />
• Description of<br />
the<br />
operations<br />
• Main<br />
controls<br />
• Additional<br />
controls<br />
4<br />
Level and flush kit<br />
5<br />
Maintenance and<br />
accessories<br />
SELECT PROGRAMS<br />
LED:<br />
− PROGRAMS: lights on<br />
− PAUSE : off<br />
Display: shows the number of<br />
the program that has been<br />
selected: 01 to 20 or “- -“<br />
RUN PROGRAM<br />
LED:<br />
− PROGRAMS: flashing<br />
− PAUSE : off<br />
Display: shows the number of<br />
the program being run<br />
PAUSE<br />
LED:<br />
− PROGRAMS: lights on<br />
− PAUSE : lights on<br />
Display: shows the number of<br />
the program in which there is a<br />
pause.<br />
[SEL]<br />
[START]<br />
[STOP]<br />
[STOP]<br />
[START]<br />
[STOP] +<br />
[SEL]<br />
Press briefly<br />
Keep pressed<br />
more than 3<br />
seconds<br />
Press briefly<br />
Keep pressed<br />
more than 3<br />
seconds<br />
Press briefly<br />
Press<br />
simultaneously<br />
To select the next washing<br />
program<br />
To start the washing program that<br />
has been selected and go into the<br />
RUN PROGRAM mode.<br />
To place the program in the<br />
PRIMING THE PUMPS mode.<br />
To enter a pause in the washing<br />
program being run and go into the<br />
PAUSE mode.<br />
To stop the washing program,<br />
returning the system to the<br />
SELECT PROGRAMS mode.<br />
To re-start the program by<br />
returning to the RUN PROGRAMS<br />
mode.<br />
This enables the DIAGNOSTICS<br />
mode to be accessed.<br />
6<br />
Trouble-shooting<br />
guide<br />
CAUTION: If the [STOP] key is held down more than 3 seconds, the system returns to<br />
the SELECT PROGRAMS mode and the following will be shown on the<br />
display:<br />
c) - - if the system was in the manual mode.<br />
d) AU if the system was in the autowash mode.<br />
7<br />
How to contact us<br />
<strong>Smart</strong> system Rev. 2.0 Code n° 0000136345 15
SEKO<br />
SMART - <strong>Laundry</strong> System<br />
1<br />
Preliminary<br />
information<br />
2<br />
Installation<br />
3<br />
Console<br />
• Technical<br />
specifications<br />
• Description of<br />
the<br />
operations<br />
• Main controls<br />
• Additional<br />
controls<br />
4<br />
Level and flush kit<br />
5<br />
Maintenance and<br />
accessories<br />
3.4 Additional controls<br />
MODE KEY ACTION FUNCTION<br />
PRIMING THE PUMPS<br />
LED:<br />
- PROGRAMS: off<br />
- PAUSE : off<br />
display : A letter P is displayed<br />
together with the number of the pump<br />
that has been selected, 1 to 8 (if the<br />
flush kit is used, pump P8 will select<br />
the water solenoid valve).<br />
DIAGNOSTICS<br />
LED:<br />
- PROGRAMS: flashing<br />
- PAUSE : flashing<br />
Display :shows the number of the<br />
programming line to be run, 00 to 24<br />
[SEL]<br />
[START]<br />
[STOP]<br />
[STOP]<br />
[SEL]<br />
[STOP]<br />
Press briefly<br />
Keep pressed<br />
more than 3<br />
seconds<br />
Press briefly<br />
DESTAINER AND SOFTNER<br />
(Only if enabled. See point 4.4.2 of the Programmer Manual)<br />
To select the next pump<br />
To activate the pump that has<br />
been selected for 30 seconds.<br />
To stop the pump (before of 30<br />
seconds).<br />
To go into the SELECT<br />
PROGRAMS mode.<br />
To scroll the program line<br />
number on the display.<br />
To return to the RUN PROGRAM<br />
mode, carrying out the line that is<br />
set on the display<br />
The DEST (destainer) and/or SOFT (softner) keys on the console can be pressed to enable<br />
operation of the pump selected solely for the washing cycle currently in progress. The<br />
associated LED will light up.<br />
6<br />
Trouble-shooting<br />
guide<br />
7<br />
How to contact us<br />
<strong>Smart</strong> system Rev. 2.0 Code n° 0000136345 16
SEKO<br />
SMART - <strong>Laundry</strong> System<br />
1<br />
Preliminary<br />
information<br />
4 Level monitoring device (optional)<br />
2<br />
Installation<br />
3<br />
Console<br />
4<br />
Level and flush kit<br />
• Technical<br />
specification<br />
s<br />
• Wall<br />
mounting<br />
• Description of<br />
the 7-level<br />
monitoring<br />
device<br />
• Flushing<br />
alarm<br />
4.1 Technical specifications<br />
Power-supply requirements Low voltage, supplied from the central unit<br />
Length of connecting cable 3 metres<br />
Connector<br />
3-pole, pitch 5 mm<br />
Weight<br />
0.120 (kg)<br />
Class of protection IP 65<br />
Size 75x130x22 mm (HxLxD)<br />
5<br />
Maintenance and<br />
accessories<br />
6<br />
Trouble-shooting<br />
guide<br />
Wall mounting<br />
• Fix the bracket included in the supply to the wall by means of anchor bolts, ∅6mm<br />
• Hang the 7-LEVEL MONITORING DEVICE box from the bracket.<br />
• Open the box and make the connections.<br />
CAUTION: In order to ensure good visibility of the alarm LEDS, it is recommended to<br />
install the level control box at eye level.<br />
7<br />
How to contact us<br />
<strong>Smart</strong> system Rev. 2.0 Code n° 0000136345 17
SEKO<br />
SMART - <strong>Laundry</strong> System<br />
1<br />
Preliminary<br />
information<br />
2<br />
Installation<br />
3<br />
Console<br />
4.3 Control level device<br />
If the 7-level alarm is connected, and the low of any products in the tanks is detected, the<br />
following events will occur:<br />
1) The LED associated with the empty tank will light up on the 7-level monitoring device;<br />
2) The alarm output, if any, on the <strong>Smart</strong> control circuit will be activated (contact closed);<br />
3) The buzzer on the <strong>Smart</strong> control circuit will be activated, buzzing intermittently at a rate<br />
of 1 second ON 1 second OFF.<br />
In the event of a level alarm, the SMART System will continue to function normally.<br />
4.3.1 Connection to the suction devices and level control unit<br />
Open the 7-level control unit box, connect the cable ∅3x0,25mm (included) coming from the<br />
SMART control circuit to the “OUT” connector of the <strong>Smart</strong> control circuit, taking care to<br />
observe the colour code, as shown in the Picture:<br />
4<br />
Level and flush kit<br />
• Technical<br />
specifications<br />
• Wall<br />
mounting<br />
• Description<br />
of the 7-level<br />
monitoring<br />
device<br />
• Flushing<br />
alarm<br />
BROWN GREEN WHITE<br />
Control<br />
circuit<br />
position<br />
J14 LEVEL<br />
5<br />
Maintenance and<br />
accessories<br />
6<br />
Trouble-shooting<br />
guide<br />
7<br />
How to contact us<br />
The level monitoring probes should be connected to terminals Lev 1 to 7.<br />
4.4 Flushing alarm (optional)<br />
If a flushing sensor is connected to the system, to the “FLU” connector on the CPU circuit, the<br />
SMART System will also monitor the presence of a water flow in the flush kit.<br />
If the system detects this alarm (no water is flowing through), the following events will take<br />
place:<br />
• The console display will show: FL;<br />
• The SMART System will stop dosing;<br />
• On the <strong>Smart</strong> CPU, the alarm output (if any) will be activated (contact closed);<br />
• On the <strong>Smart</strong> CPU, the buzzer will be activated, buzzing intermittently at a rate of 1<br />
second ON and 1 second OFF.<br />
• The program will automatically be paused;<br />
ACTION: Restore the flow of water then press [START] to resume the program from where it<br />
stopped.<br />
POSSIBLE CAUSES: closed faucet, disabled solenoid valve, no water from the main.<br />
<strong>Smart</strong> system Rev. 2.0 Code n° 0000136345 18
SEKO<br />
SMART - <strong>Laundry</strong> System<br />
1<br />
Preliminary<br />
information<br />
2<br />
Installation<br />
3<br />
Console<br />
5 Maintenance and Accessories<br />
5.1 Maintenance<br />
CAUTION: Before carrying out any maintenance, always disconnect the power supply<br />
and close the water delivery valve.<br />
Scheduled maintenance of the SMART unit includes the following:<br />
• Regular replacement of the peristaltic tube (every year at least) or whenever required in<br />
the event of chemical aggression.<br />
• Cleaning of the filter of the solenoid valve.<br />
• Cleaning of the bottom filters of the suction devices.<br />
4<br />
Level and flush kit<br />
5<br />
Maintenance and<br />
accessories<br />
• Maintenance<br />
• Accessories<br />
6<br />
Trouble-shooting<br />
guide<br />
7<br />
How to contact us<br />
In order to avoid serious scaling, it is recommended that a few washing cycles<br />
should be carried out periodically, metering water only. This will eliminate any<br />
residues of product.<br />
5.1.2 Replacement of the tubes of the pumps<br />
• Unscrew (if there are any screws) and remove the small cover from the pump;<br />
• Take out the peristaltic tube without disconnecting it from the connecting tubes in order to<br />
avoid any leak of product;<br />
• Introduce the new tube (supplied already greased) into the pump;<br />
• Put the front cover back into place;<br />
• Proceeding very cautiously, disconnect the connecting tubes from the old tube and connect<br />
them to the new tube in the same positions;<br />
• It will be advisable to prime the pump before starting the machine again.<br />
5.2 Accessories<br />
<strong>Seko</strong> can supply a complete range of accessories for making the installation operations easier.<br />
• Wall mounting kit for flush kit:………………. item n° 9900106331<br />
- This is used to secure the flush kit to a wall, in a vertical position if required, so<br />
as to facilitate drainage of the liquids. The kit includes 2 mounting brackets, 2<br />
anchor bolts - ∅ 6 mm - and 5 metres of PVC piping ∅8x12mm.<br />
• Programmer……………………item n° 9900700020<br />
• CD with the software for remote programming of the memory card and 1.8 m of serial<br />
cable. …………………………….item n° 9900106332<br />
• Delivery tube, 20 bars. 3/4F-3/4F, available in the following lengths:<br />
- 2 m…………….item n° 990090123<br />
- 3 m…………….item n° 990090124<br />
- 4 m…………….item n° 990090125<br />
- 5 m…………….item n° 990090126<br />
• 50 m of 14-wire cable (2x1.5mm 2 +12x0.25mm 2 )……….. item n° 0000602088<br />
• 100 m of PVC crystal piping ∅8x12mm…………………… item n° 9900090090<br />
• 50 anti-tampering seals……………………………………… item n° 9900106333<br />
<strong>Smart</strong> system Rev. 2.0 Code n° 0000136345 19
SEKO<br />
SMART - <strong>Laundry</strong> System<br />
1<br />
Preliminary<br />
information<br />
2<br />
Installation<br />
3<br />
Console<br />
4<br />
Level and flush kit<br />
5<br />
Maintenance and<br />
accessories<br />
6<br />
Troubleshooting<br />
guide<br />
6 Trouble-shooting guide<br />
6.1 Errors shown on the display<br />
• EE Check whether the memory card has been inserted correctly.<br />
• EE Check that the memory card being used is the Program Memory Card.<br />
6.2 One or more pumps are not working:<br />
If one or more pumps do not carry out the dosing according to the program during normal<br />
operation, check the following:<br />
• Make sure that the pumps are correctly connected to the inputs: PUMP 1 to 7.<br />
• Make sure that the pumps have not been enabled for delivery of destainer or softner (manual<br />
dosing).<br />
6.3 The pumps are running but the product is not being metered<br />
• Check the suction tube for any kinks.<br />
• Check the bottom valves of the suction devices to see if they are clogged.<br />
6.4 Solenoid valve<br />
If the solenoid valve does not work, check the following:<br />
• Make sure it is correctly connected to the circuit in the SOL position.<br />
• Make sure that there is a proper flow of incoming water (valve open).<br />
• Make sure that automatic opening has been enabled (FLU=AUT).<br />
6.5 After replacing an empty tank, the level alarm of the system persists:<br />
• This may happen with products that have a high viscosity. Wait for a few seconds in order to<br />
allow the float of the suction device to return to its normal position.<br />
7<br />
How to contact us<br />
<strong>Smart</strong> system Rev. 2.0 Code n° 0000136345 20
SEKO<br />
SMART - <strong>Laundry</strong> System<br />
1<br />
Preliminary<br />
information<br />
7 Contacting SEKO<br />
2<br />
Installation<br />
<strong>Seko</strong> group<br />
Via salaria Km 92.200 – 02010 S. Rufina (RI) –Italia<br />
Web site: www.seko.it Email: info@seko.it<br />
3<br />
Console<br />
4<br />
Level and flush kit<br />
5<br />
Maintenance and<br />
accessories<br />
6<br />
Trouble-shooting<br />
guide<br />
7<br />
How to contact<br />
us<br />
SEKO Italia<br />
SEKO Asia pacific<br />
SEKO Brasil<br />
SEKO Deutschland<br />
SEKO France<br />
SEKO Iberica<br />
SEKO Southern Africa<br />
SEKO <strong>UK</strong><br />
SEKO USA<br />
<strong>Smart</strong> system Rev. 2.0 Code n° 0000136345 21