RDO ® Optical Dissolved Oxygen Sensor - In-Situ Inc.
RDO ® Optical Dissolved Oxygen Sensor - In-Situ Inc.
RDO ® Optical Dissolved Oxygen Sensor - In-Situ Inc.

Create successful ePaper yourself
Turn your PDF publications into a flip-book with our unique Google optimized e-Paper software.
Page 2<br />
<strong>In</strong>stalling the <strong>RDO</strong> <strong>Sensor</strong><br />
1. <strong>In</strong>stall two D alkaline batteries in the TROLL 9500 instrument.<br />
2. Remove the standard restrictor or Cal Cup from the TROLL 9500<br />
instrument (if attached). This allows access to the sensor block.<br />
3. Determine the installation port(s) for the <strong>RDO</strong> sensor. For the cable<br />
connect, choose port 1 or 3. For the direct connect, you must use both<br />
ports 2 and 3. Ports 1 and 4 will be available for other sensors.<br />
7.<br />
8.<br />
The cap's lifetime is 1 year after the first reading has been taken<br />
with the TROLL 9500 instrument. <strong>In</strong>stall by the date printed on<br />
the packaging.<br />
Perform a 2-point calibration on the sensor, as described below.<br />
Attach the flow restrictor and nose cone.<br />
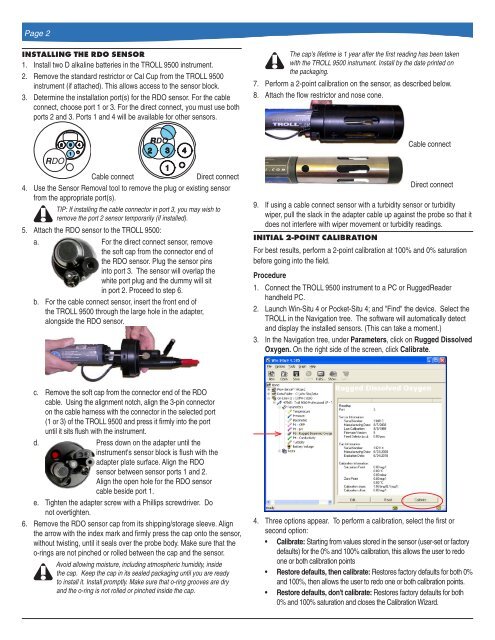
<strong>RDO</strong><br />
Cable connect<br />
4.<br />
5.<br />
Cable connect<br />
Direct connect<br />
Use the <strong>Sensor</strong> Removal tool to remove the plug or existing sensor<br />
from the appropriate port(s).<br />
TIP: If installing the cable connector in port 3, you may wish to<br />
remove the port 2 sensor temporarily (if installed).<br />
Attach the <strong>RDO</strong> sensor to the TROLL 9500:<br />
a. For the direct connect sensor, remove<br />
the soft cap from the connector end of<br />
the <strong>RDO</strong> sensor. Plug the sensor pins<br />
into port 3. The sensor will overlap the<br />
white port plug and the dummy will sit<br />
in port 2. Proceed to step 6.<br />
b. For the cable connect sensor, insert the front end of<br />
the TROLL 9500 through the large hole in the adapter,<br />
alongside the <strong>RDO</strong> sensor.<br />
Direct connect<br />
9. If using a cable connect sensor with a turbidity sensor or turbidity<br />
wiper, pull the slack in the adapter cable up against the probe so that it<br />
does not interfere with wiper movement or turbidity readings.<br />
<strong>In</strong>itial 2-Point CALIBRATION<br />
For best results, perform a 2-point calibration at 100% and 0% saturation<br />
before going into the field.<br />
Procedure<br />
1. Connect the TROLL 9500 instrument to a PC or RuggedReader<br />
handheld PC.<br />
2. Launch Win-<strong>Situ</strong> 4 or Pocket-<strong>Situ</strong> 4; and "Find" the device. Select the<br />
TROLL in the Navigation tree. The software will automatically detect<br />
and display the installed sensors. (This can take a moment.)<br />
3. <strong>In</strong> the Navigation tree, under Parameters, click on Rugged <strong>Dissolved</strong><br />
<strong>Oxygen</strong>. On the right side of the screen, click Calibrate.<br />
6.<br />
c. Remove the soft cap from the connector end of the <strong>RDO</strong><br />
cable. Using the alignment notch, align the 3-pin connector<br />
on the cable harness with the connector in the selected port<br />
(1 or 3) of the TROLL 9500 and press it firmly into the port<br />
until it sits flush with the instrument.<br />
d. Press down on the adapter until the<br />
instrument's sensor block is flush with the<br />
adapter plate surface. Align the <strong>RDO</strong><br />
sensor between sensor ports 1 and 2.<br />
Align the open hole for the <strong>RDO</strong> sensor<br />
cable beside port 1.<br />
e. Tighten the adapter screw with a Phillips screwdriver. Do<br />
not overtighten.<br />
Remove the <strong>RDO</strong> sensor cap from its shipping/storage sleeve. Align<br />
the arrow with the index mark and firmly press the cap onto the sensor,<br />
without twisting, until it seals over the probe body. Make sure that the<br />
o-rings are not pinched or rolled between the cap and the sensor.<br />
Avoid allowing moisture, including atmospheric humidity, inside<br />
the cap. Keep the cap in its sealed packaging until you are ready<br />
to install it. <strong>In</strong>stall promptly. Make sure that o-ring grooves are dry<br />
and the o-ring is not rolled or pinched inside the cap.<br />
4.<br />
Three options appear. To perform a calibration, select the first or<br />
second option:<br />
• Calibrate: Starting from values stored in the sensor (user-set or factory<br />
defaults) for the 0% and 100% calibration, this allows the user to redo<br />
one or both calibration points<br />
• Restore defaults, then calibrate: Restores factory defaults for both 0%<br />
and 100%, then allows the user to redo one or both calibration points.<br />
• Restore defaults, don't calibrate: Restores factory defaults for both<br />
0% and 100% saturation and closes the Calibration Wizard.