Download PDF - Bernina
Download PDF - Bernina
Download PDF - Bernina

Create successful ePaper yourself
Turn your PDF publications into a flip-book with our unique Google optimized e-Paper software.
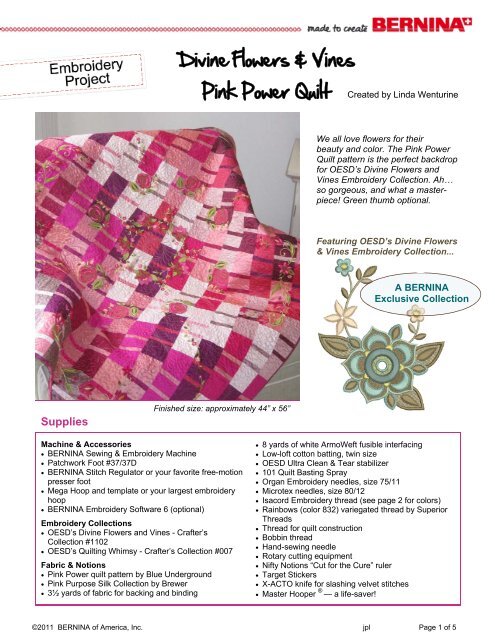
Divine Flowers & Vines<br />
Pink Power Quilt<br />
Created by Linda Wenturine<br />
We all love flowers for their<br />
beauty and color. The Pink Power<br />
Quilt pattern is the perfect backdrop<br />
for OESD’s Divine Flowers and<br />
Vines Embroidery Collection. Ah…<br />
so gorgeous, and what a masterpiece!<br />
Green thumb optional.<br />
Featuring OESD’s Divine Flowers<br />
& Vines Embroidery Collection...<br />
A BERNINA<br />
Exclusive Collection<br />
Supplies<br />
Finished size: approximately 44” x 56”<br />
Machine & Accessories<br />
BERNINA Sewing & Embroidery Machine<br />
Patchwork Foot #37/37D<br />
BERNINA Stitch Regulator or your favorite free-motion<br />
presser foot<br />
Mega Hoop and template or your largest embroidery<br />
hoop<br />
BERNINA Embroidery Software 6 (optional)<br />
Embroidery Collections<br />
OESD’s Divine Flowers and Vines - Crafter’s<br />
Collection #1102<br />
OESD’s Quilting Whimsy - Crafter’s Collection #007<br />
Fabric & Notions<br />
Pink Power quilt pattern by Blue Underground<br />
Pink Purpose Silk Collection by Brewer<br />
3½ yards of fabric for backing and binding<br />
8 yards of white ArmoWeft fusible interfacing<br />
Low-loft cotton batting, twin size<br />
OESD Ultra Clean & Tear stabilizer<br />
101 Quilt Basting Spray<br />
Organ Embroidery needles, size 75/11<br />
Microtex needles, size 80/12<br />
Isacord Embroidery thread (see page 2 for colors)<br />
Rainbows (color 832) variegated thread by Superior<br />
Threads<br />
Thread for quilt construction<br />
Bobbin thread<br />
Hand-sewing needle<br />
Rotary cutting equipment<br />
Nifty Notions “Cut for the Cure” ruler<br />
Target Stickers<br />
X-ACTO knife for slashing velvet stitches<br />
Master Hooper ® — a life-saver!<br />
©2011 BERNINA of America, Inc. jpl Page 1 of 5
Construct the Quilt<br />
Prepare the silk fabric by fusing ArmoWeft interfacing<br />
to the back of each fat quarter.<br />
Cut out silk following the pattern instructions.<br />
Construct the quilt top following the pattern instructions.<br />
You will not need all of the rectangle<br />
units for the 44” x 56” quilt shown, which is only<br />
16 rows across (it is the same length as the one<br />
in the instructions). You can use all of the rectangle<br />
units if you desire—your quilt will just be<br />
slightly wider than the one shown.<br />
Using a hand-sewing needle, sew a line of long<br />
basting stitches through the center of the quilt<br />
from top to bottom, then a line through the center<br />
from side to side. Next baste from each corner to<br />
the center of the quilt. These basting lines will be<br />
used as guides for positioning the designs.<br />
Embroider the Quilt<br />
Print templates for these designs:<br />
▫ BE110215—five copies<br />
▫ BE110210—twelve copies<br />
▫ BE110212—eight copies<br />
▫ BE110222—four copies<br />
Position the templates on the quilt and arrange<br />
according to the embroidery layout guide on<br />
page 3, or as desired.<br />
TIP: Layout the designs using BERNINA Embroidery<br />
Software, then print templates of the finished<br />
groupings.<br />
Start the embroidery process with the center<br />
wreath. Replace each template with a target<br />
sticker.<br />
Cut a piece of Ultra Clean & Tear stabilizer large<br />
enough to hoop. Spray it with 101 Quilt Basting<br />
Spray and affix it to the back of the fabric where<br />
the embroidery design will be stitched. Hoop the<br />
fabric/stabilizer together in the Mega Hoop.<br />
TIP: Use the Master Hooper ® as an aid for troublefree<br />
hooping!<br />
Isacord Thread Color Replacement Chart<br />
Color on Chart<br />
Color Used on Quilt<br />
0722 0352<br />
1565 6133<br />
4752 2520<br />
4332 2521<br />
1761 1352<br />
3654 1911<br />
0643 0651<br />
©2011 BERNINA of America, Inc. jpl Page 2 of 5
Pink Power Quilt Layout Guide<br />
Lay out the five rose design BE110215<br />
templates in the center of the quilt until you<br />
obtain a nice wreath arrangement.<br />
Place three trailing vine design BE110210<br />
templates from one corner toward the center,<br />
positioning them over the hand-basting lines.<br />
Repeat for the remaining three corners.<br />
Arrange the eight rose design BE110212<br />
template around the center wreath.<br />
Position two floral motif BE110222 templates<br />
at the center of each side of the quilt.<br />
©2011 BERNINA of America, Inc. jpl Page 3 of 5
If your embroidery machine has a built-in basting<br />
box, use it to baste around each embroidery<br />
design before stitching. You may also download<br />
basting box files at www.berninausa.com > See<br />
It, Share It > FREE <strong>Download</strong>s > Other Cool<br />
Stuff.<br />
Embroider the center top, bottom, and side designs.<br />
Remove the hand-basting stitching before<br />
embroidering, as it may be difficult to remove<br />
later.<br />
Embroider each design in the center wreath,<br />
removing the target sticker before stitching.<br />
TIP: If using a BERNINA 830, change the presser<br />
foot height (in the embroidery settings) to 7.5mm;<br />
this allows for the extra height of the “velvet”<br />
stitches. Alternatively, decrease the presser foot<br />
pressure on other machine models.<br />
Embroider the trailing vines (design BE110210)<br />
from the corners toward the center.<br />
When all embroidery is complete, remove the<br />
hand-basting stitches and basting boxes (if you<br />
used them), and clip the jump stitches.<br />
Construct the Quilt<br />
Cut six 2½”-wide strips for the binding. (Cut the<br />
binding along the crosswise grain, not the bias,<br />
of the fabric.)<br />
Use the remaining fabric for the quilt back. You<br />
will have to cut and join the fabric to make a<br />
large enough piece for the back. Make sure the<br />
back is 2” larger than the quilt top all the way<br />
around.<br />
Cut the batting the same size as the backing.<br />
Embroider the outer ring of eight roses (design<br />
BE110212).<br />
Layer the quilt back, batting, and top together,<br />
adhering the layers together with 101 Quilt Basting<br />
Spray.<br />
Pin baste the layers of the quilt, starting in the<br />
middle and working out to the sides.<br />
Open Quilting Whimsy design BC00704. Increase<br />
the size by 140% to fit inside the center<br />
wreath. Print a template of the enlarged design.<br />
Print templates for these designs:<br />
▫ BEC00704—four copies<br />
▫ BEC00720—one copy<br />
▫ BEC00731—sixteen copies<br />
©2011 BERNINA of America, Inc. jpl Page 4 of 5
Position the templates on the quilt and arrange<br />
according to the embroidery layout guide on<br />
page 3, or as desired. Pin templates in place.<br />
Attach the BERNINA Stitch Regulator or your<br />
favorite free-motion presser foot to the sewing<br />
machine. Using Isacord thread color 1352 in the<br />
needle and bobbin, stipple quilt the reminder of<br />
the quilt.<br />
Using Rainbows variegated thread color 832 in<br />
both the needle and the bobbin, embroider each<br />
design, replacing each template with a target<br />
sticker. Be sure to remove target stickers before<br />
stitching each design.<br />
Trim the edges of the quilt as needed, squaring<br />
the corners and sides.<br />
Sew the binding strips together and bind the quilt<br />
using your favorite binding method.<br />
Carefully slice the “velvet” stitching areas following<br />
the instructions included with the Divine<br />
Flowers<br />
and Vines<br />
embroidery<br />
collection.<br />
Visit www.berninausa.com<br />
Projects ● Webinars ● Promotions<br />
©2011 BERNINA of America, Inc. jpl Page 5 of 5